How I built my Workbench / Service Cart
Intro: Heavyduty Workbench / Shop Cart
Good Afternoon y'all, Mrs. Gnome has been requesting that I do something with the garage. I suppose tools and jugs of used motor oil lined up against the wall are not cool enough for her? Oh well, happy wife happy life.
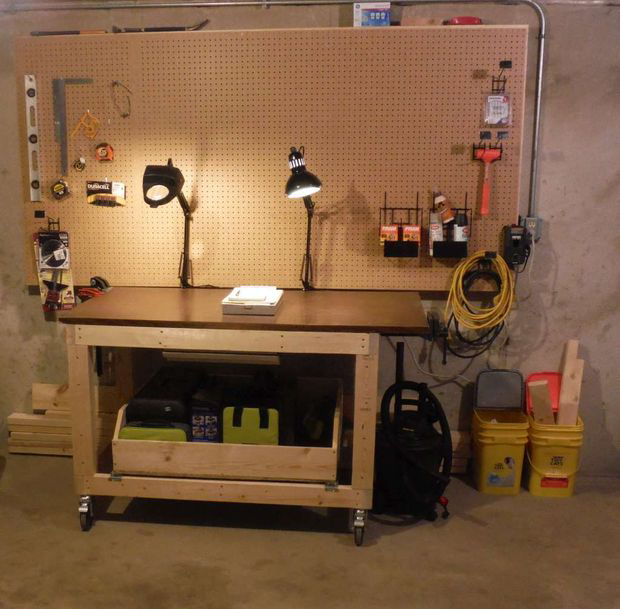
I have been tinkering on a salvaged wooden teacher’s desk the utility room, but I need an actual workbench. In addition to being a sturdy base for banging on stuff; I wanted 2 adjustable lights (one with a magnifier), a minimum of 4 x 110v outlets, a small vise, and storage for my larger tool boxes. I also wanted the ability to roll it around when I am working on something big, like a car, so that I can swing the lights over the engine bay.
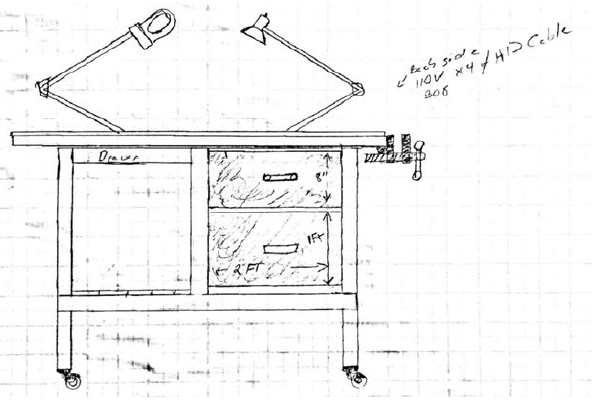
Like most of my projects, I tend to overthink them and write it in a little notebook. I keep doodling away until I get the time and money to work on them. I started with the sketch above, although I deviated as I went, the result wound up being both functional and good looking.
I should warn you I went pretty picture heavy if anything brings a question to mind feel free to ask in the comments.
SAFETY EQUIPMENT
ANSI rated safety glasses and a dust mask; you are only issued 2 eyes it is up to you to protect them. If you forget this stuff and hurt yourself then I can't help ya.
SALVAGE & Upcycle
The Top is a 2.5x5’ steel case desktop 1.5-inch-thick MDF with Formica. Or Use some 3/4 inch plywood.
1 pair Heavy duty ball bearing, server rails
Surge suppressor & 12-gauge heavy duty extension cord.
Center pen drawer from the desk the top came from
Things purchased from Amazon
ALVIN Magnifier Swing-arm Lamp Black $25
Alvin G2540-B Swing Arm Lamp, Black $18
Olympia Tools 38-736 6-1/2" Hobby Woodworker's Vise $20
Heavy-Duty 5 in. Swivel Casters with Double-Lock Brake 300LB per wheel $40
Things purchased locally & Consumables
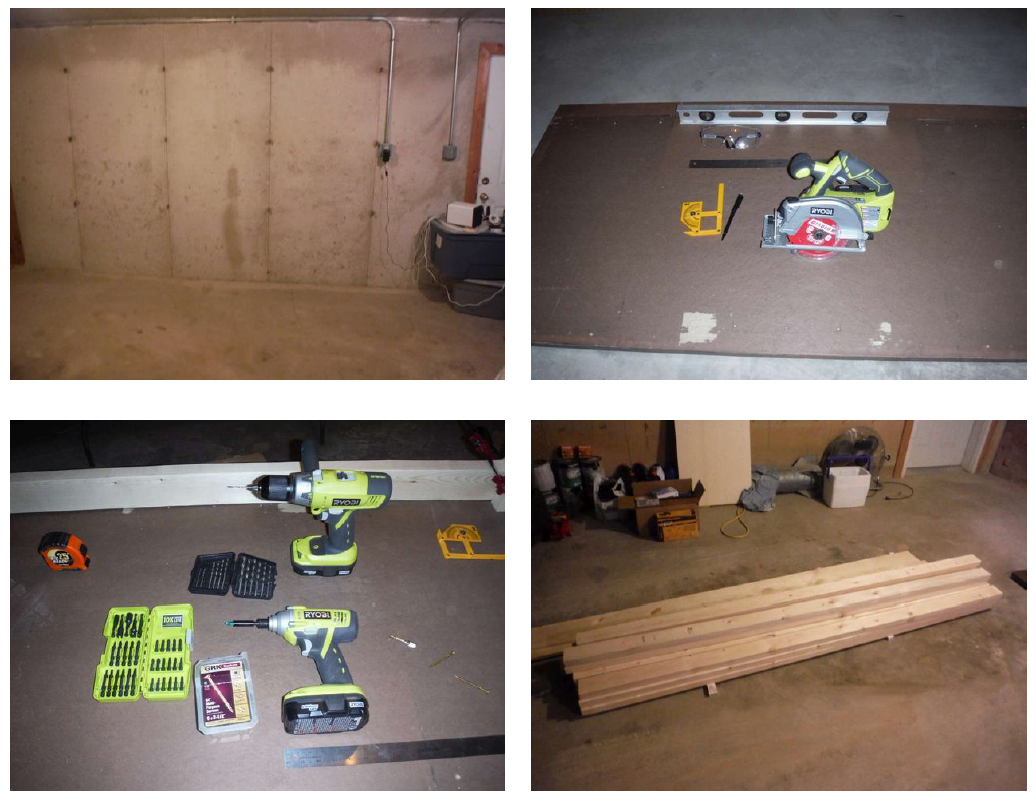
2”x4”x8’ – 16 Premium Grade (used 11) $3 each
8oz Gorilla Glue $3.49
#10 2¾ “GRK Uber-Grade construction screws 100ct $7.78
#8 1½” GRK Uber-Grade Construction screws 110ct $6.28
1”x10”x10’ pine board $9
1”x6x10” pine board $5.75
3 pack 14w CFL light bulbs $5
1 full sheet of pegboard $14
Things used from stock on hand
#10 washers (for the wheel screws)
Sandpaper
Tools Used
Drill
Circular saw
Impact screw gun
¼ Sheet palm sander
Carpenters protractor
Carpenters square
Dremel with cutoff wheel
4 Bar clamps
Bar level
Dead blow mallet
Hand saw
If I had my wish I would have used a miter saw and a reciprocating saw for squaring up the 2x4’s. I am more than happy with the result. All in all, I spent about $200 on this project but it holds up to me jumping on it, so I guess that classifies it as heavy duty. I am a big guy. and the lowest rated part is the wheels at 600lbs each.
Prep
Clean a space for the bench and gather your parts, tools and safety gear, you are going to need a bit of space to work with. I happen to have the rare occurrence of a perfectly flat and level garage floor of smooth concrete. I built up using the floor as my plane of reference. If you are not so lucky then use the tabletop as your reference point. Or any flat smooth surface.
Step 1: Framing the Top and Bottom Horizontal Supports
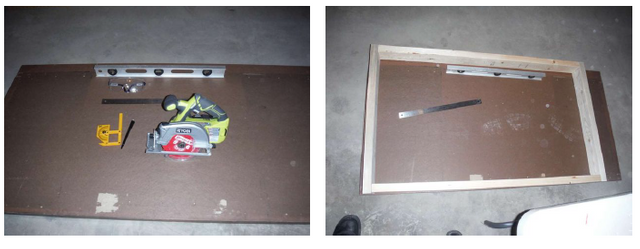
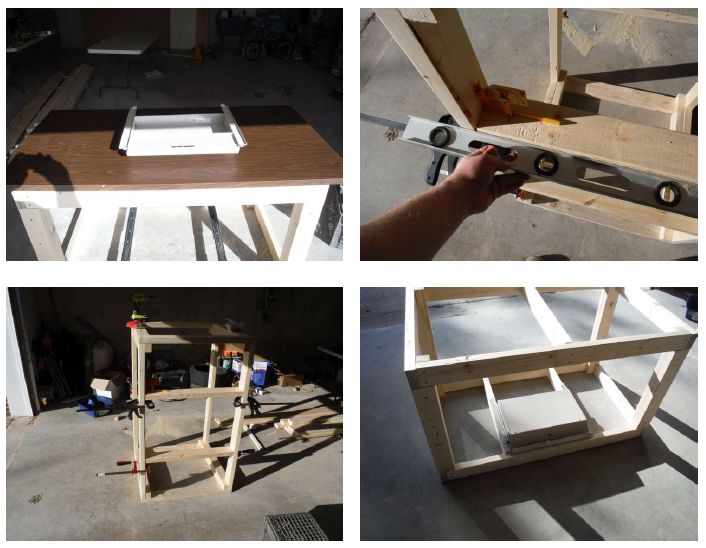
I am going to state early that every screw hole that I use, I drill a pilot hole to prevent the screw from splitting wood and ripping out. Also, this may seem like overkill but I sand all rough splinters from my cut wood and align every piece joined together with the squares. I like having a tight fitting joint and the extra time in fitting makes up for it with a nicer finished product. Unless I state differently in the directions assume that the wood has been sanded with 100 grit paper and drilled with pilot holes. All pieces of wood are clamped into place brought into square on all 3 axis then assembled. Unless specified I used the 2¾" screws. Measurements: The table top is the hard component that cannot be modified so I altered my design to it. The dimensions of the top are 30” deep by 60” wide. I needed an 8” overhang on the right side for my vise, so that gave 52 inches to work with. I left a 1-inch overhang on the left side to allow clamping space.
Cut four sections of 2”x4” into 4 - 48” lengths
Cut four sections of 2”x4” into 4 - 30” lengths
I used a butt joint, and 2 2¾ “screws per end, with the 48” lengths inside the 30” pieces, resulting in a box 51” by 30”. This Make the 2 frames needed for the top support and the bottom tray supports.
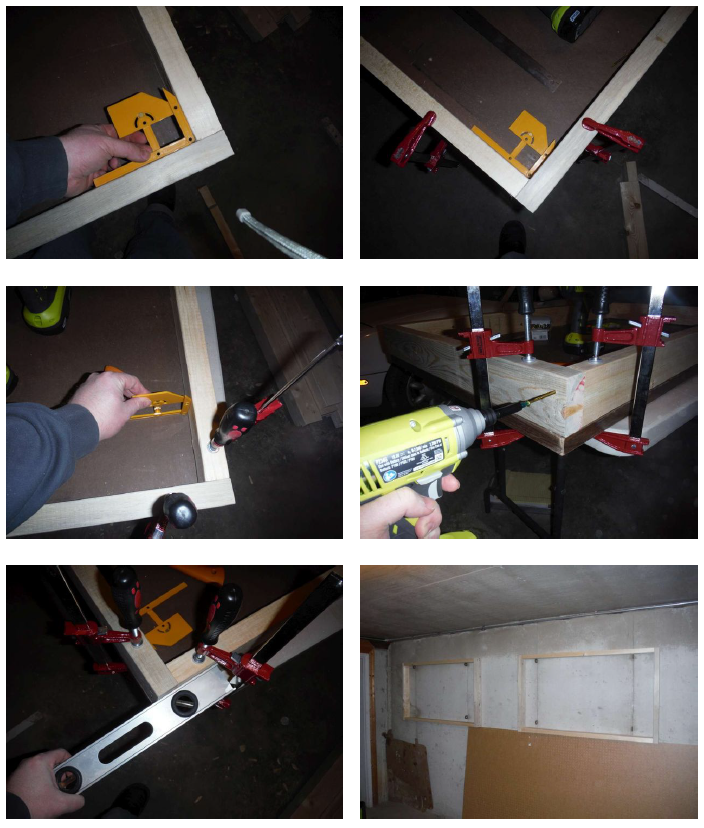
Step 2: Framing the legs
I wanted my bench to have 4x4” posts for legs, but I also wanted to be able to make it with the tools that I have on hand. I wound up notching the inner 2x4 with 2 "Top Post Tenons" and laminating a shorter 2x4 in place using glue and screws. This will result in a piece almost as strong as a single post but without the expense of a 4”x4”.
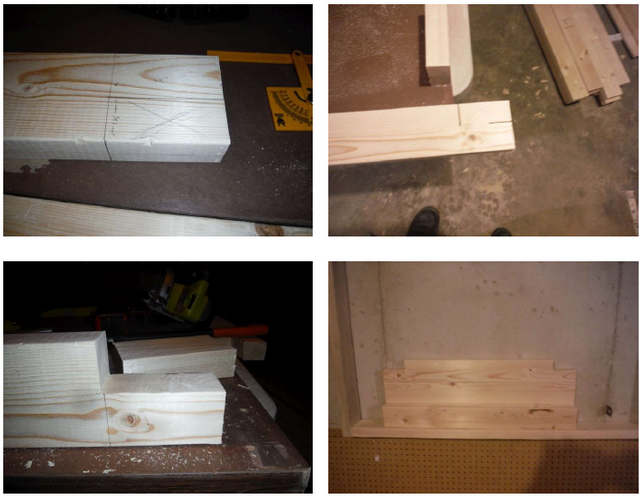
For this section, you will require 4 - 30” lengths of 2”x4” for the inner legs and 4 - 23” lengths for the outer legs. The inner legs will have a top tenon cut in them measuring 1½ “deep 3 ½ “long, to match the frame for the top and bottom.
I clamped all 4 legs together and marked them along the short edge 3 ½” then made a 1 ½” deep cross cut on all 4 boards then I upended the posts and made another cross cut to start the 3½ “that I then finished by hand. These cuts worked out rather well as you can see by the pictures. I touched them up with the sander then clamped and screwed them into place at each corner after leveling and squaring the legs. I used 2 screws on the front face and 1 screw on the side. After the inner portion of the legs was installed I double checked fitment of the 23” sections sanding them to ensure a tight fit. I applied a liberal amount of glue to the inner leg. Using a dead blow mallet, I seated the outer leg piece into place for clamping and screwing. After the 4 screws were inserted I removed my clamps and went onto the next leg.
http://en.wikipedia.org/wiki/Mortise_and_tenon
“The mortise and tenon joint has been used for thousands of years by woodworkers around the world to join pieces of wood, mainly when the adjoining pieces connect
at an angle of 90°. In its basic form, it is both simple and strong.”
Top tenon - “the tenon that occurs on top of a post.”
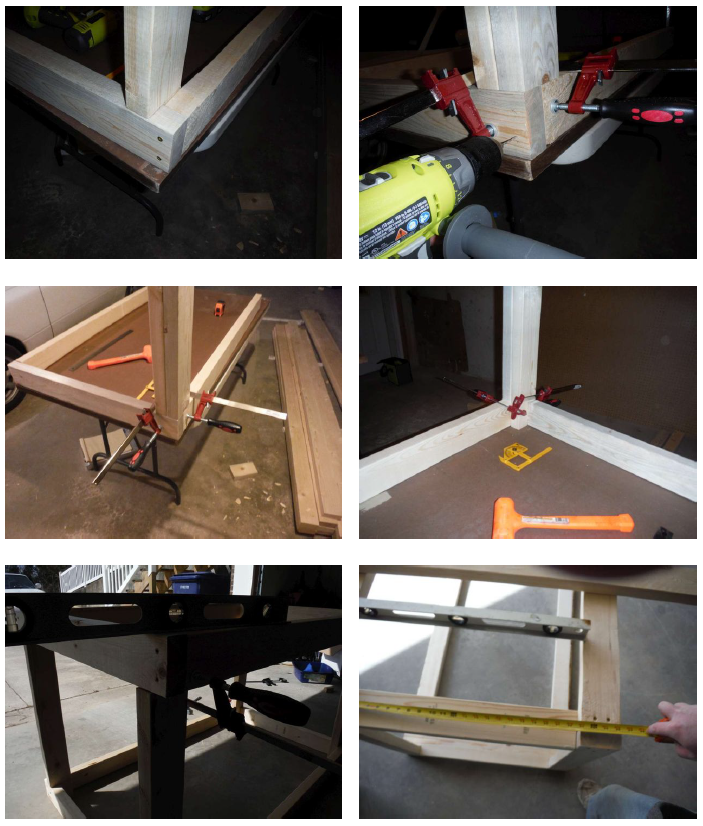
Step 3: Supporting structure, pencil drawer, and wheels.
I needed something to mount my steel drawer too and I wanted to provide at least 2 cross braces for the top. The bottom is not going to take so much stress so I decided that 1 cross brace would be sufficient to support the lower tool bin.
Supports
Cut 3 - 27" long sections of 2"x4" measure the width of your drawer mine turned out to be 20 inches between the screw centers. I then found the center line of my bench and measured 10 inches to either side before clamping my top supports into place. After clamping I ensured that the drawer mounting holes were lined up properly, and fastened each piece to the top frame using butt joints and screws. The bottom support was installed on the bottom centerline.
Drawer
For the drawer, I screwed it into place using 4 - 1½ “screws aligning the drawer front to the front of the bench top.
Now, I should have added the casters to the bottom frame corners as the bench is now top side down. But my wheels were delayed due to ice someplace between here and Kentucky. My pictures are shown with the top on. The bench is much lighter with the top off)
Wheels
The wheels I installed with 4 - 1½ “screws per caster I drove the screws in without pilot holes at a slight angle towards the center. Unfortunately, my casters did not arrive until after I purchased my screws. The screw head wound up being too small for the mounting holes. I dug around in my screw bin and found several #10 washers that I could use to secure the casters to the frame bottom.
After mounting and righting the table I locked each caster and gave it a good wobble. The locks held firm the table moved only a little and best of all my screws did not rip out.
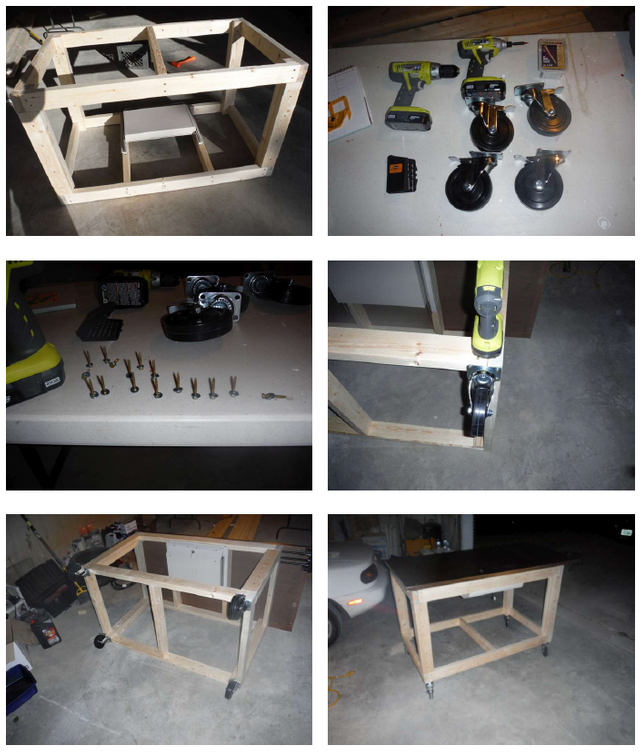
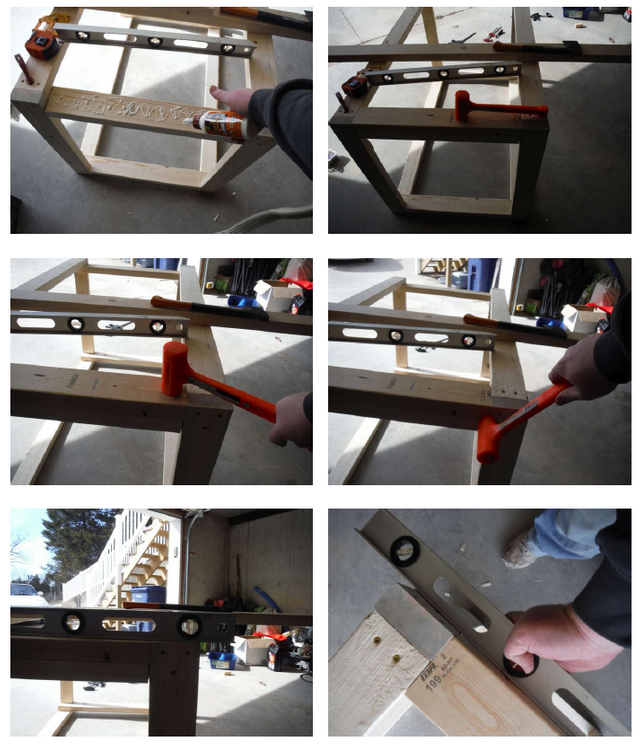
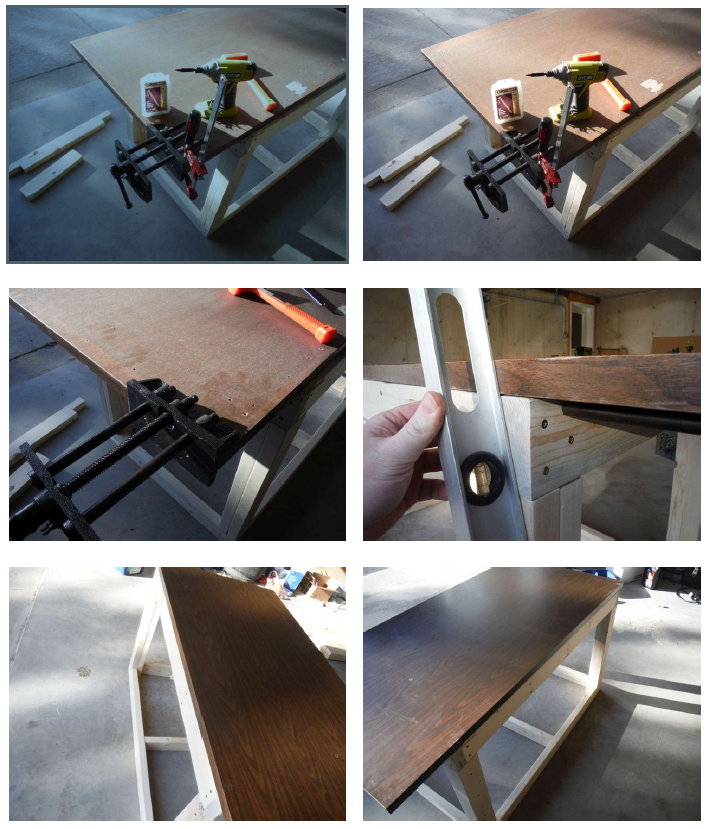
Step 4: Bench Top, and Vise
Before mounting my table top I attached the vise using the cast screw locations there are 4 holes on the bottom and 2 in the inner jaw, and 1½ “screws. The vise is aligned on the right end at the corner and should only be used for light work. I believe that with a pounding the cast iron would break and the screws would rip right out of the MDF/Formica top.
After the vise is secure I flipped the top right side up onto my frame and secured it with a single screw in each corner post location. I may or may not add a ½ “sheet of drywall as a sacrificial top. I don’t expect much lateral force to be applied. Well below the rating of the screws used.
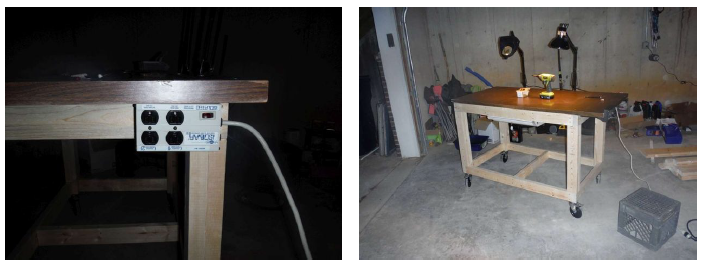
Step 5: Electrical and lighting
I was all set to wire up a 4-gang box and do a discussion about properly grounding your work. But one of my coworkers said what about these old 4 outlet Tripp-Lite Isobars. They have 4 regular 110v outlets, noise filtering, an illuminated switch, and a 15a breaker built in. Best of all in my mind it was ready to go and just needed to be bolted on using 2 1½ “screws and the cast keyways on the aluminum chassis. To protect against split soda’s, I mounted the outlet box under the overhang on the right side towards the back to facilitate ease of access for the lighting and I also saved $9 as the components went back to the hardware store.
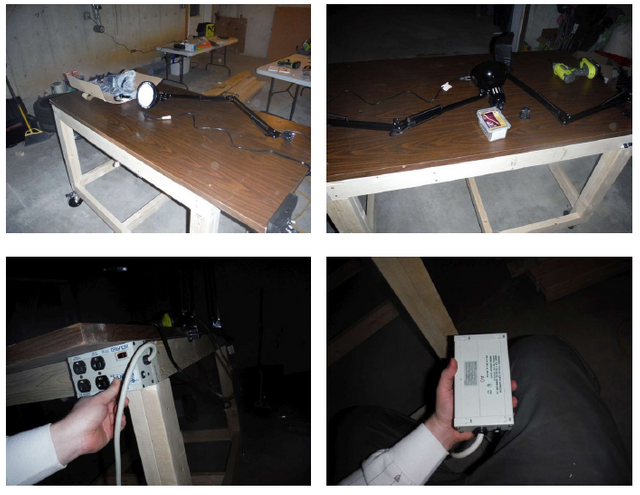
I assembled the lamps according to the directions included with them and mounted the swivels along the back edge of my table top using the 1½ “screws. Cable management is achieved by wrapping the extra cord around the power distribution box. I wanted the ability to easily move the lamps around, say to use the magnifier on the vise, or to even remove both lamps for oversized objects like a car hood. This mounting also provides the ability to reverse the lamps to shine while working under the hood of a car. The heavy-duty extension cord is for those times when it is away from the wall.
Step 6: Modifying server rails to function as a drawer slide.
Ok now that I have my bench top built, the vise installed, and it well lit. It is time to modify some server rails and build a sliding bin for my tool boxes. I had originally planned on making 2 sliding bins however with scope creep and determining that one would be better suited to the space available I made one big one. But first I needed to make the rails work with my bench.
Server rail kits are awesome, you get long easily adjustable ball bearing slides, that are designed to hold a great deal of weight. However, a workbench is not a server rack so I had to do some drilling and grinding to get rid of the unnecessary bits.
I began with removing the rear mounting pegs on each "ear" of the rail. Then I proceeded to drill out the rivets that held little spring loaded retaining clips. To prevent my drill from eating my bit I dipped the drill bit in a bit of used motor oil, then drilled for about 15 seconds, dipped again in oil and kept this up until the rivets were drilled out enough to pull them through their holes.
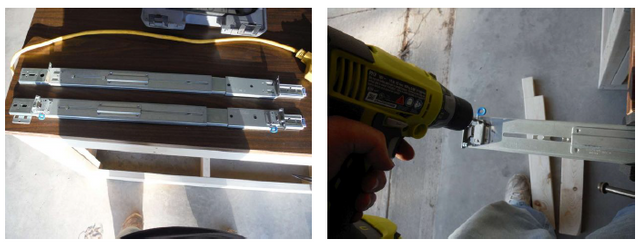
After the spring parts were gone I could grind the mounting tabs for the clips using a Dremel Multi tool with a cutoff wheel.
Once again, I stress safety glasses wear them love them keep your ocular balls safe and sound. Think of safety glasses as the cup of carpentry. You don't play baseball without a protective cup on don't play Norm Abrams without some spectacles for your head testicles.
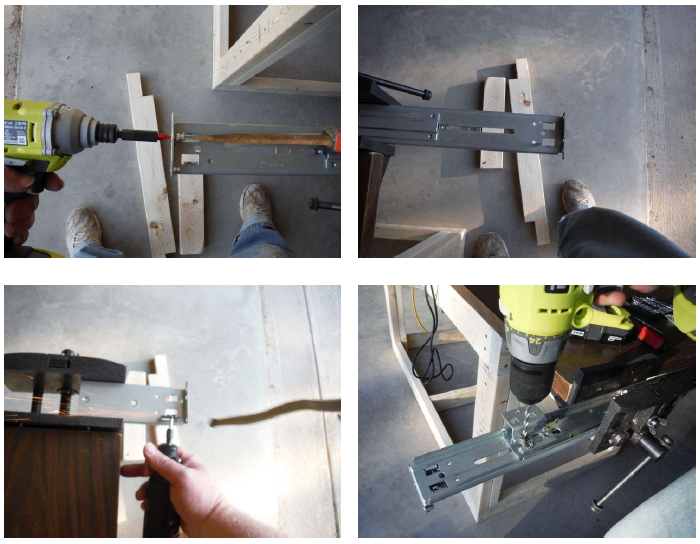
Step 7: Tool bin
The tool bin will use the rails that were prepped in the previous step. however, if you don't have a set or don’t need a set put a shelf down in place of this bin and call it a day. Everything else has been overkill why not this too.
The sides and back are 1" by 10" cut from a single 10' board but Unfortunately, I bought when I thought I was doing 2x2 bins and there was not nearly enough board length. In my contemplation I thought what about using a narrower board for the front and taper the sides at a 45-degree angle this will provide a bevel like the pencil drawer. So, I got to cutting.
The 10" board resulted in 2 28" pieces for the side with a 38" board for the back and I cut a 38" long piece of 1x6 for the front panel. After marking the sides for a 45-degree cut I then glued and secured the front to the sides using 1½ “screws. The back was attached in the same manner.
For the bottom I pulled a remnant piece of ¾" OSB board from my utility room where it once performed as a shelf. Then I tried it up to ensure that it was a maximum of 30" deep and 38 inches wide and square. This was easily achieved using a straight 1x6 as a rip fence clamped to the OSB. The resulting bottom was mounted using glue and 1½ “screws.

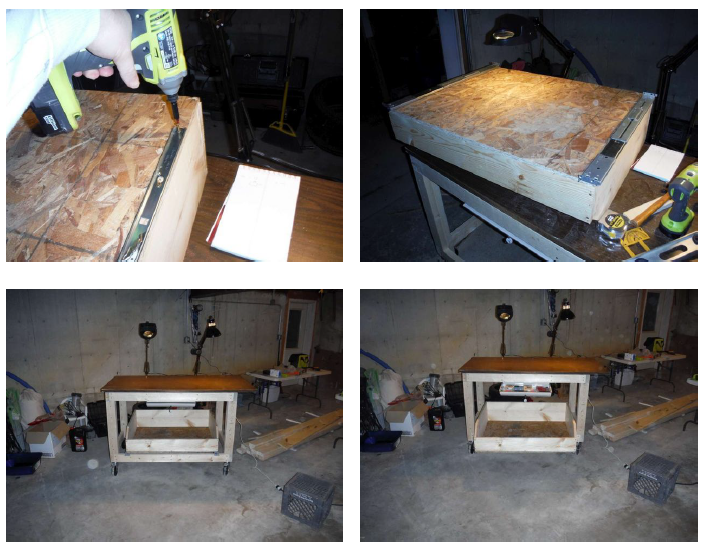
The drawer end of the rail kit is screwed to the bottom of the bin using the same 1½ “screws the rest of this step requires. The key with rail kits is that they must remain parallel to each other to prevent binding. This is achieved by fastening one side then measuring and mounting the other side insuring that the width is even along the entire length.
I then slid the rails into the closed position flipped the bin and centered it on the bottom frame of the bench / cart. 8 more 1½ “screws and that is it the rolling workbench /
service cart is done. Sit back enjoy your handy work and mount up some pegboard.... THE PEGBOARD!?!?!?!
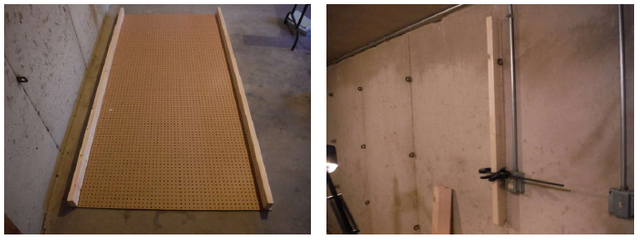
Step 8: Pegboard
I almost forgot. I need to hang the pegboard. If you remember from my first pictures my garage has these cement tabs from the pouring that were never cut off. This provided a great attachment point for the frame.
I wanted to use a whole sheet of pegboard without any seams. I decided that I would make a frame I cut 3 - 45" long sections of 2"x4" for the verticals and 2- 8' sections for the horizontals. Assembly is done with 2¾" screws and butt joints. The assembly is bolted to the wall, and the board is screwed to the frame with the same 2¾"

alright. a man cave for every man, that is a real MAN.
We need to bring back workshops and study's. A man can not subside on movies and TV alone.
Congratulations @motinkergnome! You have completed some achievement on Steemit and have been rewarded with new badge(s) :
Click on any badge to view your own Board of Honor on SteemitBoard.
To support your work, I also upvoted your post!
For more information about SteemitBoard, click here
If you no longer want to receive notifications, reply to this comment with the word
STOPGreat job..... I like the magnifier and lamp setup. I build guitars and the things I want to see are always in the shadow of my big head so your idea would work great. Pluscim 3/4 blind and the magnifier. Is a great idea...
Thank you. I agree as I get older my eyes seem to get worse and I need the magnification for fine soldering work.
Congratulations! This post has been upvoted by SteemMakers. We are a community based project that aims to support makers and DIYers on the blockchain in every way possible. Find out more about us on our website: www.steemmakers.com.
If you like our work, please consider upvoting this comment to support the growth of our community. Thank you.
Awesome job my friend! You obviously put a lot of work into this and deserve a ton of recognition! Ha! I'm seriously lax on using the safety equipment...bad habits are hard to break! This is great stuff! Enjoyed reading about it! CARRY ON!
Thanks Beekerst. I know the feeling about safety equipment. I used to just go ehhh what ever but then I started fighting fire and witnessing the issues with industrial accidents.
Yeah, I need to be more careful! CARRY ON!
You can read about us here