2018 Beginner's Guide to Setting up A Steem Witness and Seed Node
So You Wanna Be a Witness?
First off, I just want to say that becoming a Steem Witness is not for everybody. I know, I know. Brandon, how can you start off a witness setup tutorial with such a negative statement? Well.. after going through the process myself of setting up a steem witness, I've come to the conclusion that this is not something a complete beginner should necessarily be getting into. At least not before going through a little training first.
Many of the tutorials written before this one would have you believe that anyone can (and should) be a witness. But I don't feel that this is the case. For one, not everybody has the time to drop everything they're doing and tend to server issues. Also, if you have no hands-on experience then you're going to struggle with the setup and find it challenging to maintain. Therefore, I'd like to start this tutorial off with some prerequisites.
Prerequisites for Becoming a Witness
- At least a basic IT background
- Some experience with servers and CLI (command line interface)
- The ability to look for answers online
- A passion for the Steem Blockchain & Community
- And patience :)
If you still want to setup a steem witness but are missing some of the above, all hope is not lost. I'd recommend at least learning how to navigate Linux CLI by training on a site like http://linuxcommand.org/ or https://tutorials.ubuntu.com/. With some practice, it won't take you long to get comfortable with commands and navigating directories.
What Servers do I Need?
The Steem blockchain is growing larger and larger by the day, therefore it's important to plan for the future when it comes to choosing your server configuration. As of today (6/12/18), you can easily run your witness and seed on a 64GB Ram, 300GB SSD setup running Ubuntu Linux 16.04. But that should be the minimum. In a couple of months, that's likely not going to be the case. So if you're reading this in the future, then please contact me or another witness to find out what server requirements you'll need before getting started.
You really have two options: A) Choose a larger server now to prepare for the future. B) Start with the required minimum and have a plan in place to upgrade when the time comes... because it will come.
Current Minimum Requirements
- 4 CPU
- 64GB Ram
- 300GB SSD
- 1 Gbps Bandwidth
- Ubuntu Server 16.04 LTS (Recommded OS)
Also note that you will need two dedicated servers: one for your seed and one for your witness. Witnesses are pretty much expected to setup a seed server which is a node that broadcasts an updated version of the blockchain so that others can sync up quicker. If you want anybody to take you seriously as a witness, then setup a seed as well. It's slightly easier than the witness configuration, but we'll cover that in a bit. Keep in mind that you should use the same specs for both servers.
Here's the Server That I Chose
CPU: Intel Xeon E3-1270v6 - 4c/8t - 3.8GHz /4.2GHz
RAM: 64GB DDR4 ECC 2400 MHz
Storage: 2x450GB SSD NVMe
OS: Ubuntu Server 16.04 LTS
Network: 1gbit/s
I used a company called OVH to rent my servers, but there are other companies that witnesses swear by, such as Privex. Ask around to see what other witnesses recommend and choose what fits your budget and plans as a witness.
Let's Secure Our Servers
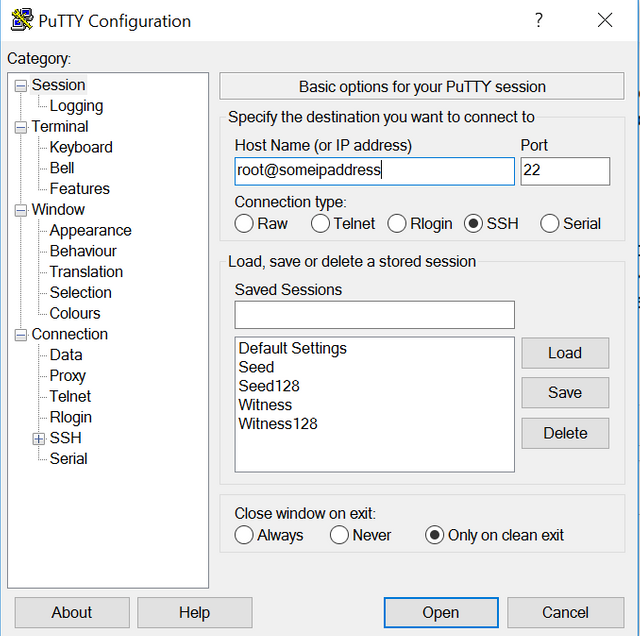
First off, we need to secure our servers. This is of utmost importance so DO NOT SKIP these steps. When you purchased your servers, you should have received an email with the URL, username (likely root), and the password to login. We'll use Putty to get connected but you can use any SSH client you feel comfortable with.
Open up Putty and insert root@serverIPaddress, then click Open.
Next we need to create a new user. Decide on a username and then run the following command. Be sure to replace username with the username you chose.
adduser username
It should ask you to set the new password for the user and confirm that password. Keep following the prompts to set the new user's information. If you'd like, you can leave all of this information blank.
Next, we want to give this new user sudo (root) privileges. (Again, replace username with the username you chose)
usermod -aG sudo username
By adding this user to the sudo group, it will automatically give them sudo privileges.
Now let's test to see that our new user does in fact have sudo privileges...
su - username
Let's attempt to list the contents of the root directory
sudo ls -la /root
It will ask for the user's password and then list the contents of the root directory if you were successful.
Install Updates and Applications
Be sure that you're in the root directory...
cd /
Then let's grab the updates and nano text editor
sudo apt-get update
sudo apt-get install nano
Now, let's change directories and copy the sshd_config file into a new file as a backup
cd /etc/ssh/
sudo cp sshd_config sshd_config_0
Open the sshd_config file & edit the port and disable root login
sudo nano /etc/ssh/sshd_config
Change PermitRootLogin to no so that this will disable anyone logging into the server as root.
PermitRootLogin no
Change the port number to a new number between 1000 and 65535 because this will make it a little harder for robots to find it.
Port #
Now we can save and exit the file. Press Ctrl + o to save and Enter to confirm changes, then Ctrl + x to exit
Then restart SSH
sudo service ssh restart
Create Secure Keys and Add to Server
Next we need to create SSH keys for logging into our server securely. I recommend downloading the Putty Keygen Tool to generate your secure key pair. This tutorial will guide you through the process of creating your keys and adding your private key to Putty.
But before you add the private key to Putty be sure to add the public key on your server.
Create the .ssh directory or if it already exists then continue to next step
mkdir ~/.ssh
Modify folder access
chmod 700 ~/.ssh
Change directory into the folder
cd ~/.ssh
Create or read the file for the key. If blank, paste the public key in. Save/overwrite the file and close.
nano authorized_keys
Load the new updates.
sudo service ssh restart
Set so only root can access.
chmod 600 authorized_keys
logout
Test login with the key to verify that it works. Go to SSH > Auth in Putty. Put the private key file in along with the server URL and port # you used, then click Save (for preset) and Open.

If you logged in successfully then you're good to go!
Disable Password Logins
Now that we know we have our SSH keys working properly, let's disable password logins.
Open the sshd_config
sudo nano /etc/ssh/sshd_config
Remove the "#" in front of the following line, overwrite, and exit
PasswordAuthentication no
Reload with new protocols
sudo service ssh restart
Remove IPv6 Listening
Add AddressFamily inet to the end of the sshd_config file
echo 'AddressFamily inet' | sudo tee -a /etc/ssh/sshd_config
sudo service ssh restart
Install and turn on UFW
Install UFW (firewall) and proceed with typing y to continue the installation
sudo apt-get install ufw
Now let's set some rules
sudo ufw default allow outgoing
sudo ufw default deny incoming
sudo ufw allow ssh
Now we want to allow connections via the port number we chose for ssh earlier.
ufw allow #
sudo ufw enable
Let's add NTP to Sync Time and Avoid Missed Blocks!
sudo apt-get install ntp
cd /etc
Copy the original file for a backup
sudo cp ntp.conf ntp0.conf
Open the conf file in nano
sudo nano /etc/ntp.conf
Add these at the end and overwrite the file
minpoll 5
maxpoll 7
Enable and restart.
sudo systemctl enable ntp
sudo systemctl restart ntp
That's it! Your servers are now secure, assuming you went through all of these steps with both machines. :)
Two Other Recommendations (optional)
Install Linux Process Monitoring, to monitor CPU and Memory current usage.
apt-get install htop
Set your timezone. The below example will set to EST
sudo timedatectl set-timezone America/New_York
Let's Setup Our Seed Server
Now we are ready to use our servers for either a witness or a seed node. I personally started with my seed node as it has fewer steps and allowed me to get comfortable with the process. But both setups are similar. I will cover the seed node setup first and then we'll move onto the witness setup. So let's get started!
First let's install Steem Docker by @someguy123
sudo apt install git curl wget
git clone https://github.com/Someguy123/steem-docker.git
Logout of your server, re-login, then change directory to steem-docker.
cd steem-docker
Now we need to install docker
./run.sh install_docker
Next we need to pre-compile Steem
./run.sh install
Then download a copy of the blocks.
NOTE: This step could take upwards of 1 1/2 hours depending on your server configuration.
./run.sh dlblocks
After the download has completed, set your shared memory. I set mine to 63G because I have 64G of actual RAM. Do not use more than you have though!
sudo ./run.sh shm_size 63G
Replay to get the blockchain up to date
./run.sh replay
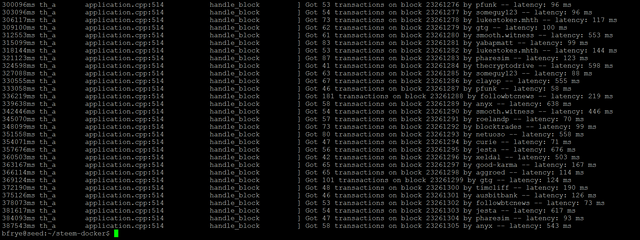
Every 10 minutes or so you can check your logs to see how it's coming along. You will know when it's finished because it will show a screen like below with witness usernames who are producing blocks. This process for me took approximately 2-3 hours... maybe longer. So be patient with it.
./run.sh logs
Congratulations!!! That's all you need to do for the seed node. Once you have it up and running for a while, you can submit your seed node URL in the seed-nodes steem.chat group where they'll monitor it for a while before adding it to the list of seed nodes.
Now you can move onto the Witness setup!
Witness Setup
As I mentioned before, the process for setting up a witness is identical to a seed except for a few more steps. So go ahead and follow the tutorial above, until you get to replay, and then we will continue setting up your witness server below. But do not replay the blockchain!
For the witness server we need to run the wallet
./run.sh remote_wallet
Next we will create a key pair for your witness to sign with
suggest_brain_key
The suggest_brain_key will provide you with your key pair. Be sure to copy your wif_priv_key and pub_key which you will use a little later
Press CTRL + D to exit the wallet.
If you haven't already, be sure to adjust your memory. And again, don't give it more memory than you actually have.
sudo ./run.sh shm_size 63G
Now we need to edit the config.ini file for your witness
nano data/witness_node_data_dir/config.ini
It should look something like below...
p2p-endpoint = 0.0.0.0:2001
shared-file-size = 63G <-- Be sure this is the correct memory
shared-file-dir = /shm
witness = “brandonfrye” <– Your Steem account goes hereWIF PRIVATE KEY to be used by one or more witnesses or miners
private-key = 5KfKJ…………. <-- private key created by suggest_brain_key earlier
Also, find p2p-endpoint = 0.0.0.0:2001 and delete it (or comment it out with #) because it's not needed for witness. Save and close the file, making sure you save changes.
Disable Port Forwarding
Next we need to disable port forwarding.
nano .env
Add these lines to the blank file
PORTS=
DOCKER_NAME=witness
Exit and save.
Now we are ready to run replay!
./run.sh replay
Again, this will take a while to catchup (approx 2-3 hours)
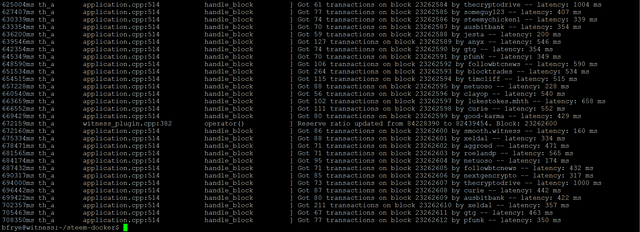
Keep monitoring the logs every 10-20 minutes or so
./run.sh logs
When it's fully synced to the blockchain you will see a screen like this
Congratulations, you're up and running! But we're not done yet...
Update Your Witness Information
There are really two options for this...
I prefer to use Conductor which is a Steem Witness Toolkit built on Python and developed by @furion. It will make your job so much easier when it comes to launching and updating your witness. It also has a killswitch feature which can shut down your node if you begin to miss blocks. See the github for straight-forward resources on how to use it and get your witness up and running fast.
We do it manually :)
So you chose to do it manually. Congratulations on diving deeper into being a witness and seeing how things work!
Go to Steemit.com and log into your account. Click on your wallet, and permissions, then show your private active hey. It will be 5andalongstringofcharacters. Copy your key to your clipboard.
Next we need to unlock the wallet
./run.sh wallet
You will need to setup a password, then unlock the wallet with the same password. After that, add your private key.
Like so...
set_password “MySuperStrongPassword”
unlock “MySuperStrongPassword”
import_key 5andalongstringofcharacters <-- this is your ACTIVE private key
Finally, we need to update our witness information on the network
update_witness “brandonfrye” “https://steemit.com/@brandonfrye” “Public_Key_from_Suggest_Brain_Key” {“account_creation_fee”:”0.100 STEEM”,”maximum_block_size”:65536,”sbd_interest_rate”:0} true
If it went through with no errors, then congratulations. Your witness is live!
But if you were like me, you received errors when trying to past into the wallet. When I attempted to paste in my witness declaration, all of the letter got jumbled up. If that happens, revert back to using Conductor as it will save you a LOT of frustration. :)
Setup Your Price Feed
Thought you were done? Almost.
All witnesses are expected to send out an updated price feed from your server.
Be sure that you're in the steem-docker folder
cd steem-docker
Let's grab steemfeed.js and update the config.json
git clone https://github.com/Someguy123/steemfeed-js.git
cd steemfeed-js
cp config.example.json config.json
nano config.json
Edit the config file with your steem username and Private Active Key. Keep the feed interval at 60 minutes.
{
“node”: “wss://steemd.privex.io/”, // Added Jan 8, 2018 to point to new server.
“name”: “brandonfrye”,
“wif”: “5KUKG…ACTIVE_PRIVATE_KEY”,
“interval”: 60
}
Let's start steemfeed-js
cd steemfeed-js
docker build -t steemfeed-js .
docker run -itd --rm --name feed steemfeed-js
Check the status with docker logs
docker logs feed
You can also check your price feed on https://steemian.info/witnesses which is a great resource for witnesses created by @drakos. If you do run into any errors while running “docker logs feed”, exit SSH and re-login again and it should correct itself.
You're a Witness!!
What's next? Go vote for yourself (and @brandonfrye) at https://steemit.com/~witnesses.

And begin asking for votes with a proper Witness Application post which should go in the witness-category. You can see mine as an example. Also check out the witness group on steem.chat. Lot's of great minds in there and people willing to help!
And again, if you have any questions about anything, feel free to reach out to me in steem.chat I'm glad to help as much as I can!
This tutorial is a culmination of many tutorials I read while setting up my servers. Special thanks to @jerrybanfield and @yehey whose tutorials helped me get up and running fast. If you have any feedback, comments, corrections, or questions, feel free to leave those in the comments below.

I GOT STUCK HERE:
./run.sh replay
if this happens to you try downloading the uncompressed version:
curl -o block_log https://gtg.steem.house/get/blockchain/block_log
curl -o block_log https://seed.steemian.info/get/blockchain/block_log
curl -o block_log https://rpc-upstream3.steem.house/get/block_log
curl -o block_log https://s3.amazonaws.com/steemit-dev-blockchainstate/block_log-latest
this is 4 different ways to download the uncompressed version of the blocks. it worked for me and took about 3 hours
Awesome, thanks for sharing that @happymoneyman. Should help anybody else who gets stuck there!
Wait a minute...
Where is Brandon and what have you done with him? lol
You lost me around here:
LOL Seriously though. Glad there are much smarter people than me on the planet because this is way over my head. But I applaud you for diving in man....This is extremely useful and I know a few people I'm sending it to right now.
Congratulation @jongolson, you won the bot upvote for this post! 😎🥂
(The vote will come after this next round of bidding)
Dude it's been my lucky week so far!!! LOL Thanks!
🤓 Huh?.. LOL
Yeah, when I was setting mine up I ended up using several tutorials so I thought it would be nice to consolidate them into one.. and add my personality to it. Most of the tutorials that show up in Google are from two years ago, so I purposely used good SEO in this article so maybe it'll show up for newer witnesses looking for instructions.
Anyways, I promise not to bore you guys too much with this kind of stuff. Just knew I had to put this out there for folks. Now back to your regularly scheduled program... 📺
Hi brandonfrye! I'm a CS student from Argentina. I'm just learning everything about steemit and steem... Dan Larimer its trully a genius mind! The three main currencies are a little confusing thou...
Thanks for this post!! I'm really looking forward to seting up a steem witness but I dont know if it is profitable... (not looking to become rich, but at least cover the costs) I want to be part of the network for philosophical reasons...
Hope you are doing good!
Thanks in advance!!
ha ha ha ha ha nah nah man, it's great stuff.
Much needed. And for the techies out there, I think it's very straight forward.
I tried to learn PHP back in the day....I got lost at <echo?> or whatever that code was lol
When I get back from Asia I'm going to start diving into Python and Javascript more. I've got some ideas for scripts that us content creators can use so I hope I can bring some cool tools to the platform. But that'll just be a side-hobby of mine. lol :)
This does not sound like a procedure I would like to go through. So thanks for taking the trouble. I'll head over and give you my vote.
LOL, it's definitely not for everybody. And thank you so much for the vote. I appreciate that!! 😊
@brandonfrye Can you please let me know what are current server requirements for steemit witness and seed nodes?
This is something I would totally do if I knew what the monetary ROI is. You speak of renting servers. If you were paying for a server, what do witnesses potentially earn from being one? I also would build my own hardware optionally as well and just host it from my house. But quite simply, what is in it for me? When is the approximate break even point? I am an IT professional of 25+ years. I run a cryptomining rig on Ubuntu.
I am not afraid the of the command line. I prefer it. I'm and old DOS guy and am no slouch with Unix derivatives.
Unlike BTC mining (POW) Steem's Delegated Proof of Stake (DPoS) requires that you receive votes from the community in order to begin producing blocks. So you could potentially make nothing from being a back up witness. But the top 19 witnesses are making roughly 1,800+ SP per week last time I checked. When you get outside of the top 19 you are rotated out, depending on your rank, as a backup witness.
So the goal of every witness should be to engage with the community, build their trust, and campaign hard. I'm very active in the community so I knew this would be a good fit for me. Btw, you can learn more about earnings here: https://steemit.com/@witnesswatch
But to answer your question...
You're supporting and securing the blockchain. It may not monetarily reward you at all.. but it's a good feeling just to know you're doing your part to ensure Steem is stable and running smoothly. I may make it up into the rankings where I'm making decent money, but I'm not counting on it. I'll continue to be a witness either way.
Ok, that helps. I see why there is incentive and why so many people are constantly asking to be voted for as witnesses. They want their investment to pay off in steempower and to see the blockchain work well. I might see what sort of hardware I may have access to in an effort to get something like this going. It looks like the hardware requirements aren't too aggressive or needy. There are lots of servers out there that have been decommissioned that might only need a decent hard drive to fit the bill. I would need to improve my internet service at home, but that is an easy thing to do. There is a constant promotion going on about switching to FiOS where they give you nearly a gig upstream/downstream as an average offering. I will keep following this idea and price it out in my hobby time. All of this steemit stuff is already occupying a good amount of my time already a minnow aspiring to be more while trying to survive the cryptomining woes of decreasing currency prices.
Yeah, exactly. We really have to push hard for those votes because probably 80% or more of the community doesn't even know what a witness does lol. So it's important to keep that conversation going.
And no, the requirements are still rather simple. I suspect that in the coming months our RAM requirement will jump to 128G but some people are still even running on 32G. Definitely start with 64G at a minimum, but 128 is even better and will last you longer. And definitely go with SSD (300GB minimum).
And lol, I know EXACTLY what you mean! I spend most of my days and nights here already, so I figured why not sync up to the blockchain. My brain already has LOL. But that's good man. Let me know if you need anything at all. Or if you decide to get setup I'd definitely recommend joining the witness channel on steem.chat in case you have any questions or need any help.
Thanks again for the support and tips. I will have to see what sort of servers I have at my disposal doing nothing. I am thinking that I might only need to get the SSD. I already use one in my laptop and my mining rig. It is definitely the way to go. I am going to start scraping together what I have and compare it to the price of a hosting solution. These are really great tips.
Wow! It is definitely a process but not at all impossible to do; particularly with the support available from the community. This is the reason why the STEEM blockchain seems to be on the right path to success!
Yeah, support is pretty easy to find here. An entire community helping one another. And I hope this tutorial will help future witnesses get through their setup in no time.
Seems like a lot to do... What are the additional incentives for running these servers? Is it only the influence on voting or are there rewards in terms of Steem?
For every block we create we earn roughly .80 Steem Power. But in order to produce a substantial amount of blocks, we need a substantial amount of votes. This is why witnesses campaign to get votes for their witness. And that's the difference between BTC mining and Steem witnessing. Instead of POW (proof of work) we use Delegated Proof of Stake (DPoS). Not only do we need the equipment to process blocks, but also the support from the community.
So there's a good chance I'll never make break even on my server expenditures, but then again, I could move up the ranks pretty fast if people feel they would like me to be witness. That's why I'm very thankful for your vote. :)
Wow! I'm actually glad I'm not thinking about doing this!!! But @ianaltosaar is, so I'm really happy to see such a well laid out guide to getting started! Thanks Brandon!
Great, I hope this will help guide him along. I ended up using about 3 tutorials myself before I got it figured out. I think this lays out everything nicely for somebody who might be somewhat new to server setup. Thanks for the comments!
Fortunately, my Brother Ian has been crypto-mining for some time and so has a good handle on most of the process, although this is his first attempt at a DPoS coin. I think what you covered in this post will give him a lot of insights on how to move forward, as he has already begun a couple of weeks ago. I wish you both great success!
Oh yeah, he'll be fine then. More than qualified. And yes, this will guide him through the whole process. He can reach out to me too if he has any questions.
Great article but way to difficult for me. ;-). Maybe in a few months.
Excellent write up @brandonfrye! I really appreciate you taking the time to put all of your information together in a well written article. For anyone that asks about becoming a witness this will be my go to guide for them.