The Complete Noob Guide to STEEM Witness Setup

 The Complete Noob Guide to STEEM Witness Setup
Table of Contents
- No Brain Required *
- What is a STEEM Witness? *
- Choosing Your Server Host
- Building & Installing STEEM
- Configuration of Client
- Broadcasting Witness Intent
- Updating Witness Price Feed
- Monitoring Your Witness Server
- What Does a Good Witness Do? *
- How Much Money Will You Make? *
Disclaimer: No Brain Required *
What is a STEEM Witness? *
The reason STEEM and other crypto blockchain networks are so perfectly decentralized and immutable is due to the fact that the underlying software used to power them is located on a collective of computers ran by all sorts of people in various countries around the world, rather than being located on one central server which would leave the network and it's data vulnerable to manipulation from whoever had physical access to the servers. By distributing the computing load needed as well as storing the block chain on many different computers ensures that no one can erase or modify record of the data in the STEEM blockchain.
STEEM features relatively unique approach to block creation originally pioneered by Dan Larimer ( @dantheman ) being first seen on his Bitshares (BTS) project. This relatively new, highly efficient system used for selecting which STEEM accounts are eligible to create new blocks for the network is known as "Delegated Proof of Stake" or DPOS for short. In the STEEM DPOS system any account with Steem Power is allowed to vote for whomever they would like to see elected onto the witness list, from this witness list the top 19 ranked are called on to successfully create a new valid blocks for each round which consists of 21 blocks. The remaining 2 slots in the 21 block round are filled by 1 user from the witness list below the top 19 (known as backup witnesses) and also 1 from the miner queue. With the recent development and deployment of private GPU mining applications for STEEM mining it's been made nearly impossible to get any sort of respectable return in Steem Power with CPU mining due. Currently 2 users mining accounts dominate the miners queue and you'd be very unlikely to compete with the hashes they are capable of.
Anyone who decides to run a dedicated steemd server and broadcast their intent can be a witness. STEEM's DPOS system solves the problem of excessive energy wasted in other crypto currency mining. Rather than having different groups of mining farms all hashing in competition with each other trying to solve the next block for the reward such as in BItcoin's "Proof of Work" (POW) which is extremely wasteful. With the STEEM DPOS system 19 of 21 witnesses each round expend next to no electricity over what is needed.
What this means in layman's terms is that unless you've got community votes your witness may take weeks or months to get the chance to solve a block. At rank 67 on the witness list I was hitting roughly 1 SP a day.
Choosing Your Server Host
 Don't cheap out on the server or VPS hosting your STEEM witness node.
Cheap / budget servers won't run it well if at all and you'll end up booted.
| CPU Cores / Speed | RAM | Hard Drive | Operating System |
|---|---|---|---|
| 2 cores @ +2.2ghz | 8GB | 40GB SSD | Ubuntu 16.04 server |
My personal suggestion would be to consider deploying a server with specs slightly higher than the ones listed above in order to "future proof" your server in case the minimum requirements to run the steemd executable grow in the future. Depending on what plugins are enabled to run when you launch your STEEM client it may easily utilize 8GB of RAM or more. A server capable of handling a decent load over time is a must.
Not Sure Where to Host the Witness and Want a Suggestion?
(In order to receive the free credit you must first make a small deposit of > $5 to unlock it)
If you do happen to use the hosting provider I linked above make sure to select the $40/month server with the Ubuntu 16.04 operating system installed to speed up the next step of our journey to becoming a witness.
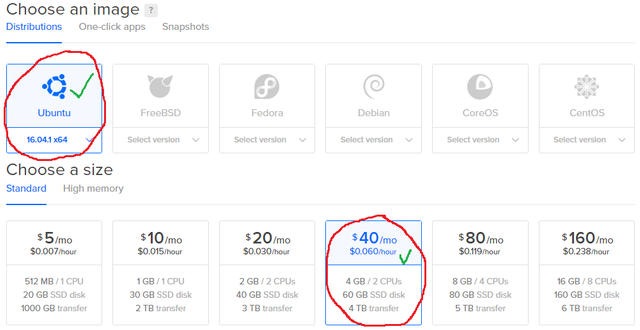
(Screencap taken from DigitalOcean.com)
Their ARE less expensive hosting options out there which offer specs on par or greater than the minimum specs needed to compile and operate your witness node. However I'll let you do your own research on that.
Whichever server hosting provider you end up settling on you MUST ensure they allow SSH access and optionally if you can find a VPS or server provider that gives access to "root" then it makes everything a bunch easier.
Building & Installing STEEM
Grab an SSH Client to Connect & Control our Witness Server
http://www.putty.org/
Its mandatory to continue on with the setup and configuration of your witness server.
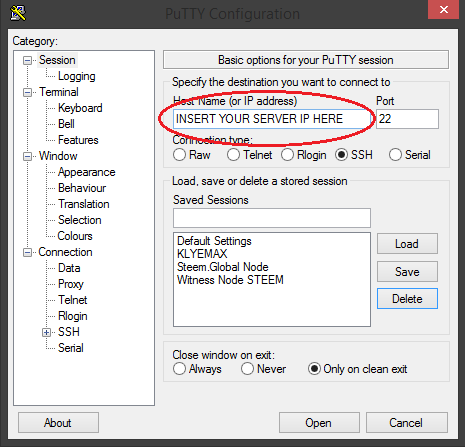
Once you've got putty (or equivalent) installed and running on your computer the next step is to connect to your web server and begin preparing a build environment with all the required dependencies and libraries needed to build steemd as well as the cli_wallet application as well. When you purchased or rented a server they would have sent you login credentials as well as the IP address of the server. Check your emails or the site you've bought hosting off of if you are unable to find your login /password.
Now with your SSH program open you're going to want to input the IP address of the server you are connecting to in the input field circled in red below and then hit the "Open" button below in order to start connecting:
Assuming that the correct IP address was entered you should end up with a login screen that looks something similar to the screenshot listed below. The login screen may vary slightly from this hosting company:
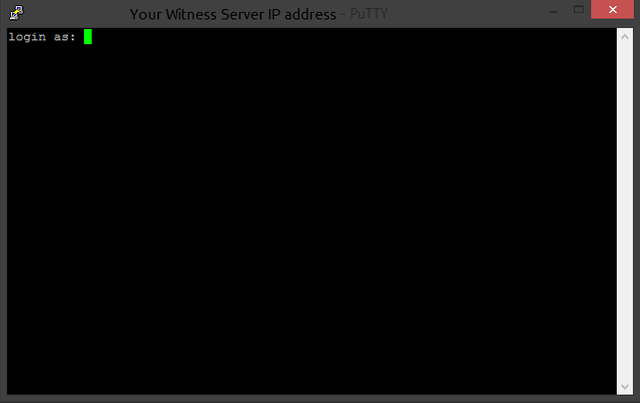
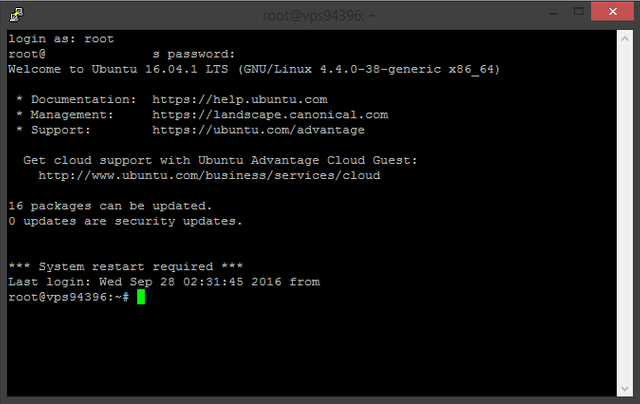
When prompted enter the credentials given to you by your hosting company do so and behold the wonders of the "modern" command line interface which is known as BASH. While it may seem a bit archaic and forbidding now once you've played around on the server a bit you'll likely get the hang of it. If you'd like to explore the bash shell commands more please feel free to take the initiative to learn, google is an amazing resource for those seeking information. Your SSH client should be displaying something similar to the picture below:
We're now ready to start updating current software on our server as well as begin downloading any missing dependencies that will be needed in order to properly compile and run our Steem Witness Node.
Let the STEEM Software Build Begin!
steemd on your server. in order to paste into the putty client you use right click on your mouse rather than the classic "ctrl+v" combo generally used on Windows OS.
Make sure you copy each command one at a time & entirely. Everything in the code tags:
First we start off by updating all current libraries and programs installed with the following command:
apt-get update
Once this is complete it's time to download and install all required dependencies to compile STEEM:
apt-get install -y git build-essential cmake libssl-dev libboost-all-dev autoconf autotools-dev doxygen libncurses5-dev libreadline-dev libtool screen libicu-dev libbz2-dev graphviz unzip
Next step is to go ahead and grab STEEM from github using the following command:
git clone https://github.com/steemit/steem.git
In order to update the STEEM source code and compile we move into the folder with:
cd steem
With this command we update the STEEM client code to the current 0.14.2 version:
git checkout v0.14.2 <-- This is important
For the final piece of the git update puzzle before we compile we must now apply the new update:
git submodule update --init --recursive
Now comes the building of the list needed to compile the steemd and cli_wallet programs:
cmake -DENABLE_CONTENT_PATCHING=OFF -DLOW_MEMORY_NODE=ON CMakeLists.txt
Go grab a coffee for this next bit if you've never compiled anything on ubuntu before.. This next command instructs the compiler installed on your server to begin compiling all of the source code you've just downloaded into something that the computer can easily execute. This may take anywhere from 5-30 minutes or more depending on how powerful the processors are on your rig.
When you've got your coffee (or beer) in hand it's time to begin compiling the STEEM client:
make or make -j x (x in this case is your processor count)
(If it fails to compile using the -j command with make, just use make again without it)
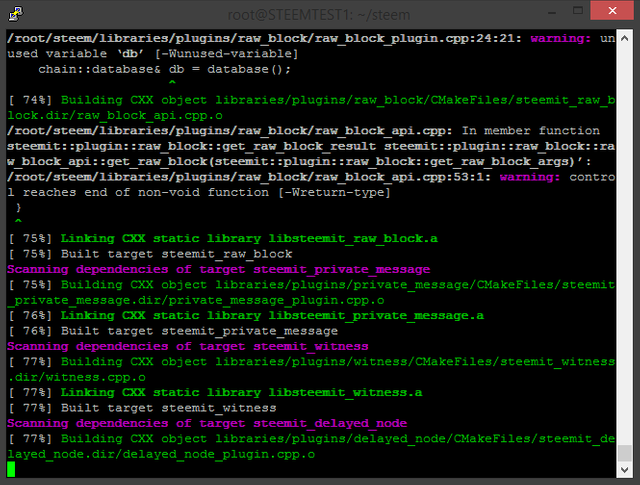
Now sit back, drink that coffee (or beer!) that you were supposed to grab in the previous instructions and watch the tiny robots inside of your server begin to build your very own steemd client which we'll configure shortly to act as a dedicated witness node. As mentioned above this process may take 5-30 minutes depending on your server specs. If you finish your coffee (or beer) while you're waiting on the compile job to finish you may as well grab a second.. We've still got a fair bit of tinkering to do before you're ready to start being a witness!
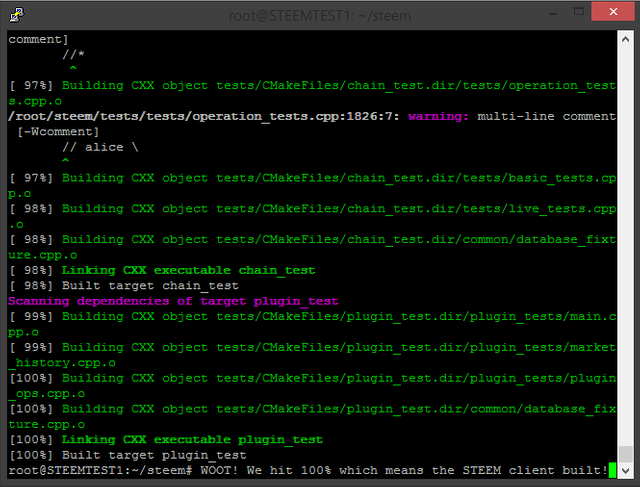
(Looks like another successful STEEM client build)
If the compile was successful you'll be shown a screen similar to the one that displayed above. When you're ready to start configuring your newly built STEEM client feel free to move on to the next section of this guide.
Configuration of Client
The first time the steemd client is started it creates some folders in which it stores the blockchain data as well as a configuration file and various other fancy bits of code we won't be using today.
To start the STEEM client & get it to create these files and folders we'll need to go to the folder it was built to:
cd /root/steem/programs/steemd
We've now navigated to the folder containing steemd and we start it up for around 5 seconds:
./steemd
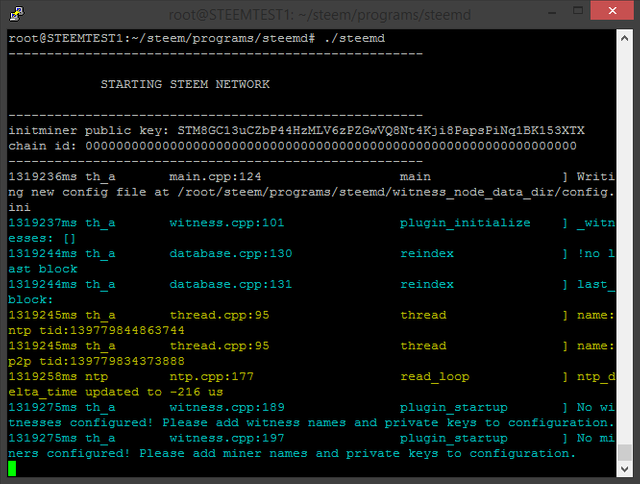
(This is what a new born STEEM client looks like)
Once the program has launched you must use ctrl+c which will tell STEEM to shut down so we can go in and modify the config.ini that steemd uses as a source to configure itself on start up.
Navigating to the folder that contains the config.ini file we must modify is accomplished with the following:
cd /root/steem/programs/steemd/witness_node_data_dir
Text editor nano is what we will be using to modify config.ini and is opened using:
nano config.ini
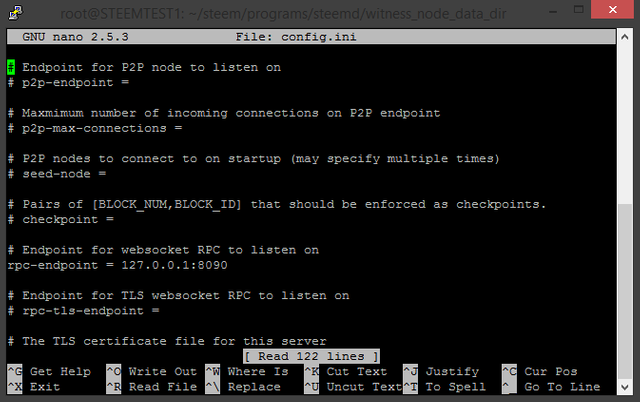
Assuming you followed the steps above properly you'll be met with the contents of the config file:
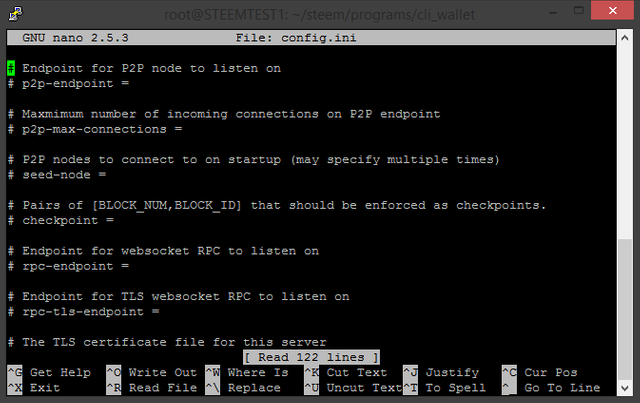
Now in order for our STEEM node to function properly we'll need to do some initial setup in order to tell it to open an RPC port to communicate with the cli_wallet program as well as tell it the location of existing STEEM nodes in order for it to have access to the new blocks minted on the chain. Below I've included a sample config.ini that should be enough to get your client started:
# p2p-endpoint =

# Maxmimum number of incoming connections on P2P endpoint
# p2p-max-connections =

# P2P nodes to connect to on startup (may specify multiple times)
# seed-node =

# Pairs of [BLOCK_NUM,BLOCK_ID] that should be enforced as checkpoints.
# checkpoint =

# Endpoint for websocket RPC to listen on
# rpc-endpoint =

# Endpoint for TLS websocket RPC to listen on
rpc-tls-endpoint = 127.0.0.1:8090

# The TLS certificate file for this server
# server-pem =

# Password for this certificate
# server-pem-password =

# API user specification, may be specified multiple times
# api-user =

# Set an API to be publicly available, may be specified multiple times
public-api = database_api login_api

# Plugin(s) to enable, may be specified multiple times
enable-plugin = witness

# Maximum age of head block when broadcasting tx via API
max-block-age = 200

# Defines a range of accounts to track as a json pair ["from","to"] [from,to]
# track-account-range =

# Ignore posting operations, only track transfers and account updates
# filter-posting-ops =

# Track account statistics by grouping orders into buckets of equal size measured in seconds specified as a JSON array of numbers
account-stats-bucket-size = [60,3600,21600,86400,604800,2592000]

# How far back in time to track history for each bucker size, measured in the number of buckets (default: 100)
account-stats-history-per-bucket = 100

# Which accounts to track the statistics of. Empty list tracks all accounts.
account-stats-tracked-accounts = []

# Track blockchain statistics by grouping orders into buckets of equal size measured in seconds specified as a JSON array of numbers
chain-stats-bucket-size = [60,3600,21600,86400,604800,2592000]

# How far back in time to track history for each bucket size, measured in the number of buckets (default: 100)
chain-stats-history-per-bucket = 100

# Database edits to apply on startup (may specify multiple times)
# edit-script =

# RPC endpoint of a trusted validating node (required)
# trusted-node =

# Set the maximum size of cached feed for an account
follow-max-feed-size = 500

# Track market history by grouping orders into buckets of equal size measured in seconds specified as a JSON array of numbers
market-history-bucket-size = [15,60,300,3600,86400]

# How far back in time to track history for each bucket size, measured in the number of buckets (default: 5760)
market-history-buckets-per-size = 5760

# Defines a range of accounts to private messages to/from as a json pair ["from","to"] [from,to)
# pm-account-range =

# Enable block production, even if the chain is stale.
enable-stale-production = false

# Percent of witnesses (0-99) that must be participating in order to produce blocks
required-participation = false

# name of witness controlled by this node (e.g. initwitness )
# witness =

# name of miner and its private key (e.g. ["account","WIF PRIVATE KEY"] )
# miner =

# Number of threads to use for proof of work mining
# mining-threads =

# WIF PRIVATE KEY to be used by one or more witnesses or miners
# private-key =

# Account creation fee to be voted on upon successful POW - Minimum fee is 100.000 STEEM (written as 100000)
# miner-account-creation-fee =

# Maximum block size (in bytes) to be voted on upon successful POW - Max block size must be between 128 KB and 750 MB
# miner-maximum-block-size =

# SBD interest rate to be vote on upon successful POW - Default interest rate is 10% (written as 1000)
# miner-sbd-interest-rate =

# declare an appender named "stderr" that writes messages to the console
[log.console_appender.stderr]
stream=std_error

# declare an appender named "p2p" that writes messages to p2p.log
[log.file_appender.p2p]
filename=logs/p2p/p2p.log
# filename can be absolute or relative to this config file

# route any messages logged to the default logger to the "stderr" logger we
# declared above, if they are info level are higher
[logger.default]
level=warn
appenders=stderr

# route messages sent to the "p2p" logger to the p2p appender declared above
[logger.p2p]
level=warn
appenders=p2p
To save the changes you've just made to the config.ini file simply use the keyboard shortcut ctrl + o and when prompted to confirm overwrite hit enter. After that you can exit nano by with ctrl + x
With the config.ini now containing seed node and RPC endpoint data we're going to go ahead and navigate to another folder in order to download the STEEM blockchain and transplant it into the folder where the client will be able to find it using this command:
cd /root/steem/programs/steemd/witness_node_data_dir/blockchain/database
Now inside of the folder which the client writes and reads the blockchain data to we'll download a copy of it here: wget http://einfachmalnettsein.de/steem-blocks-and-index.zip
(File is ~1.9GB - May take a few minutes)
After the blockchain downloads we can extract the contents with the following command:
unzip -o steem-blocks-and-index.zip
(may take a minute or two)
We'll go back to the directory housing the client executable now:
cd /root/steem/programs/steemd
Then open up another terminal window now with the following command:
screen
When greeted with the screen's splash screen all you have to do is hit enter. You're now in a separate terminal. What this does is allows us to in essence work on or run more than one thing at a time in the command line interface.
It's time to now sync up our steemd client again but this time with the recently transplanted blockchain:
./steemd --replay-blockchain
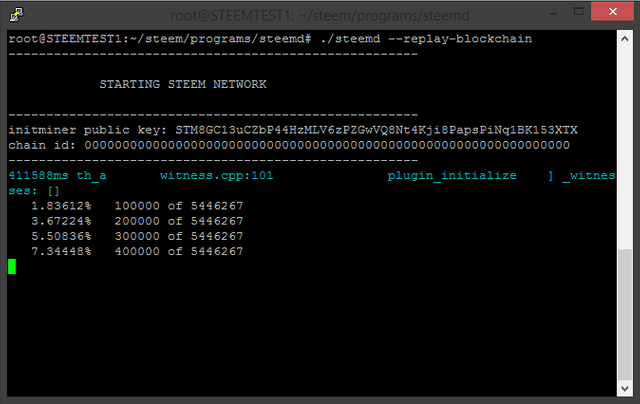
The client will now begin to go through all of the blocks you'd downloaded earlier and verify that the blockchain it has locally stored is valid. The client will fetch any blocks needed from the seed nodes we'd specified in the config.ini file to catch up to the current height of the network. Sometimes you may encounter some output like the picture below while replaying the blockchain:
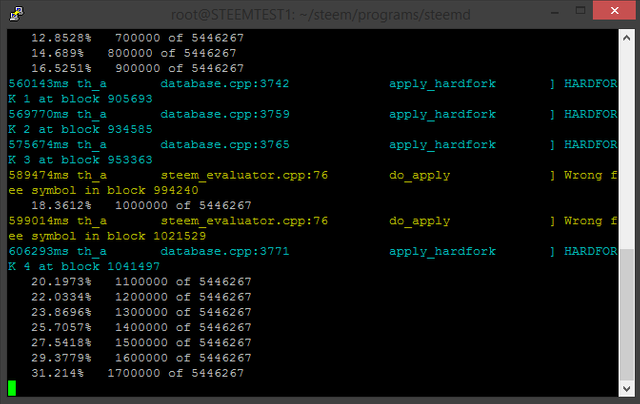
No need to panic over the hardfork or wrong STEEM symbol warnings. Be patient and let it run.
It may take a fair amount of time depending on the CPU processing power on your server.
When you're caught up and the client is fully synced the output should look something like this:
Now that we've got a fully up to date steemd client going our next step is to go check out the cli_wallet and import our account keys, but first we have to switch away from our current terminal screen by using the following keyboard shortcut:
ctrl + a + d
This directs us back the the terminal window we were using before we used screen to start the steemd client to sync it up to the current state of the network. We're likely going to want to have access to both steem and cli_wallet so what we'll do is open up another terminal screen so go ahead and do that now with the command:
screen
What we'll do now is navigate to the folder containing cli_wallet:
cd /root/steem/programs/cli_wallet
Once we've moved to the folder containing cli_wallet we'll go ahead start up the program up with this command:
./cli_wallet
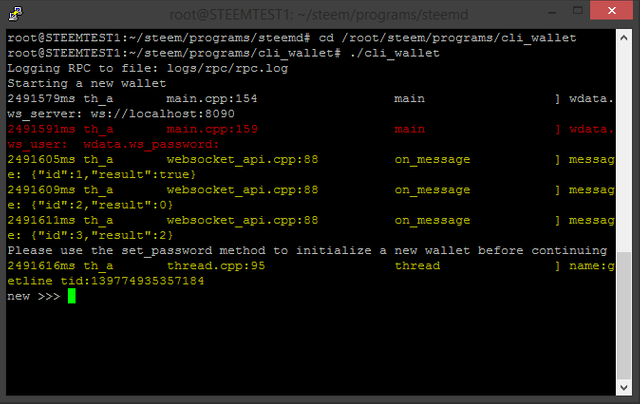
Hopefully a screen similar to the one pictured above springs to life in your console. Welcome to cli_wallet.
In order to securely use cli_wallet it is suggested that the first thing you do is set up a STRONG secure password for access to your wallet and the keys we're going to load into it using the following command:
set_password “Insert1YOUR2favourite10STRONG69pAsSwOrD420here9000"
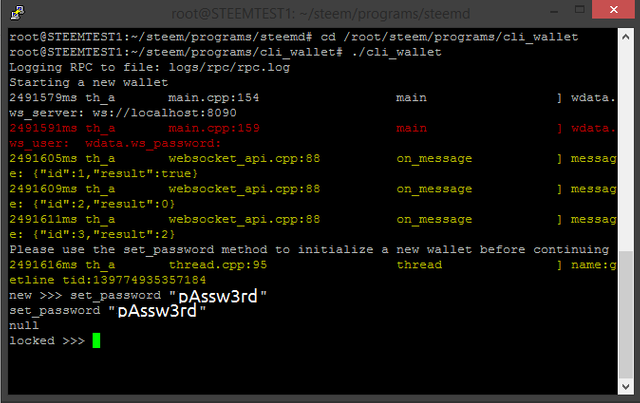
Immediately after setting a password for cli_wallet for the first time it should lock itself. In order to unlock the wallet you can use the folowing command coupled with the password you'd just specified like so:
unlock “Insert1YOUR2favourite10STRONG69pAsSwOrD420here9000"

With your cli_wallet now unlocked we can now import your active private key from the account you wish to act as witness. This key can be found on your Steemit.com wallet page under the permissions tab shown below:
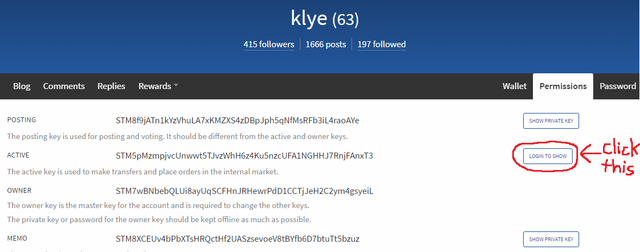
Click the button circled in red above and enter your password when prompted. This will display the corresponding private keys for the public keys that are initially shown and always start with"STM". Private keys start with a "5" and should be closely guarded as anyone who has access to your private keys can control your account and the funds it contains.

Copy your active private key in a secure location. We'll now importing it into the cli_wallet:
import_key 5YOURACTIVEPRIVATEKEY
The next step after importing our active private key is to generate our account some a pair of keys that will be used by our witness which function as signing keys. Use the following command below to generate a fresh key-pair:
suggest_brain_key
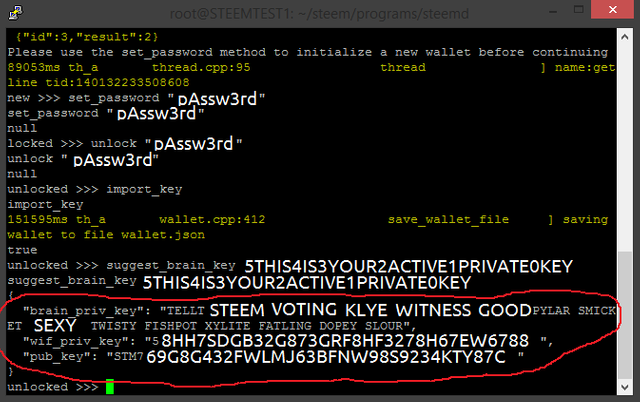
If you've followed closely and everything has been done properly so far the cli_wallet will spit out a new key-pair for you to use as witness signing keys. Copy the output that your given containing the keys and store it some place safe.
The format you're looking at in the output from suggest_brain_key is something similar to this:
suggest_brain_key
{
  "brain_priv_key": "UNBORED DISCOVER INTERNET LIVING MOONBOUND DREAM ELECT INDIVIDUALS UNBOUND POLITICAL INFLUENCE UNITE AMBASSADOR GLOBAL HORIZON TURTLES",
  "wif_priv_key": "5K8Qq69NbsLe37CY2KFfFvDukmM4fxHUe8DirS3Va9RsYu3fA8Y",
  "pub_key": "STM6fsCZaUkydV0xDsJiyYvdWx1sgH4XpmVAF8KwHC8NFAQ58NqPa"
}
One thing we'll need to do before going any further is go back to the folder containing the config.ini and input the witness name and the corresponding witness private key we just generated. However before we do this we must ensure that the STEEM client isn't still running. We can go and check if it's still running in the screen terminal window we started up earlier by using the ctrl + a + d keyboard shortcut to disconnect from the current terminal window.
We now have 2 different instances of screen running as well as the original terminal we connected with so in order to list what we've currently got open in regards to terminal windows we use the following command:
screen -r
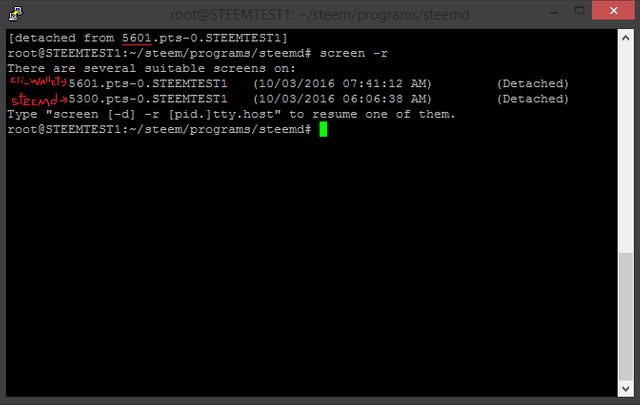
If you pay attention to the screen ID numbers and make note of which terminal you've just tabbed over from it will make it far easier to navigate back and fourth between the cli_wallet and steemd terminals as you see fit.
Figure out which screen instance is currently housing your synced and running steemd client and re-attach to it by adding the screen ID number after the -r like in the example given below:
screen -r XXXX (XXXX in this case is the screen ID number with steemd running in it)
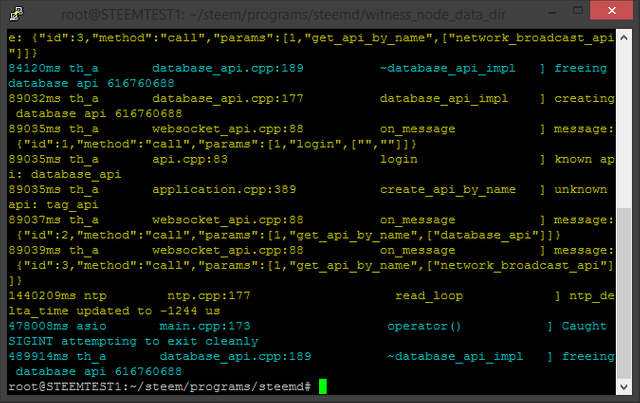
What we'll actually do now is tell steemd to stop by using the keyboard shortcut ctrl + c. This may take a few moments, so be patient as steemd disengages from the blockchain database and cleanly exits.
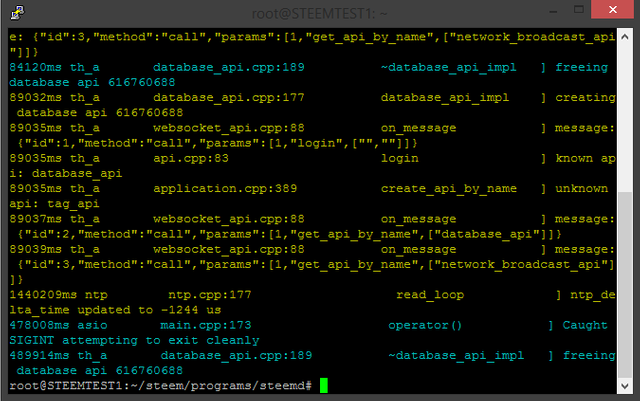
Now that steemd has halted we can go ahead and disconnect from the screen again using ctrl + a +d to get back to the terminal window that we'll be using to go back and add the finishing touches to the config.ini.
We'll now need to navigate back into the folder that contained the steemd config.ini file with this command:
cd /root/steem/programs/steemd/witness_node_data_dir
And again open up the steemd config.ini file using the nano text editor:
nano config.ini
This time however we're going in and adding in our witness account name as well as the witness signing key that we've generated above using cli_wallet. The 2 variables you're going to be editing are as follows:

# name of witness controlled by this node (e.g. initwitness )
# witness =
as well as
# WIF PRIVATE KEY to be used by one or more witnesses or miners
# private-key =
Enter your account name surrounded by quotation marks ("yourusername") beside the witness variable and then remove the # in front of it which acts to comment it out. It's imperative that you use the quotation marks else it may not work. Once you're done entering your account name surrounded by quotation marks you can use your arrow keys to navigate down to private key variable and paste the string following "wif_private_key" which you copied down after using the cli_wallet suggest_brain_key command. Same as before make sure to remove the # before the private-key variable or the key will be commented out.
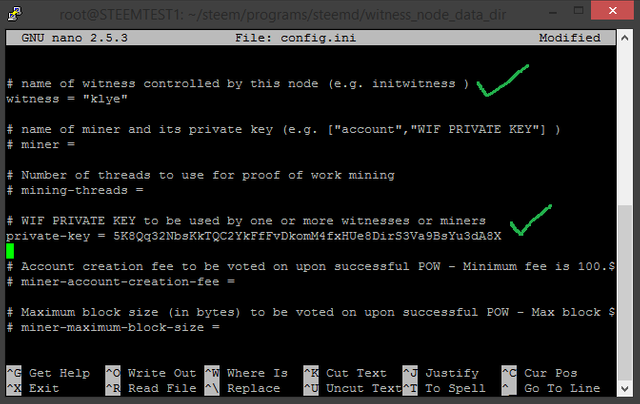
Once you've got your username and witness private key entered as shown above go ahead and save the changes by you've made by using keyboard shortcut ctrl + o and enter if it prompts an overwrite and then exit the nano editor with keyboard shortcut ctrl + x
This takes us back to our terminal. We need to go restart steemd so we'll once again switch to it's screen:
screen -r XXXX (XXXX in this case is the screen ID number with steemd running in it)
With our config.ini containing all the info needed to run our witness node we fire it up one more time:
./steemd --replay-blockchain
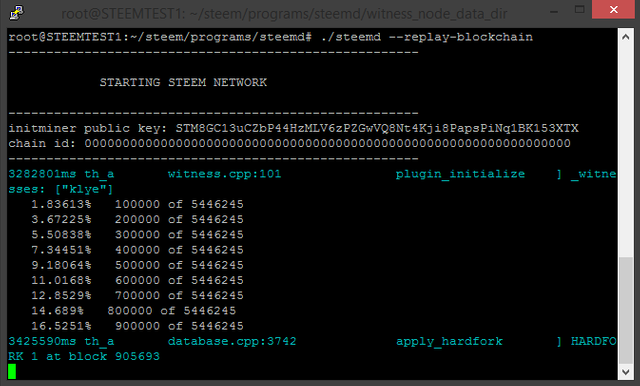
It will take a while to replay the whole blockchain and validate it. Be patient. If everything worked it will do this:
Guess What? YOU'RE ALMOST A WITNESS NOW
(But you still actually aren't YET.. Not party time yet you animal.. get back to work!)We're now ready to start working on a witness campaign announcement post if we haven't done so already. It's been decided that I won't go into a much of detail here as to what you should include in your witness campaign announcement as I believe that's something that you should already either have planned or completed before even starting to go through the motions I've explained above.
Broadcasting Witness Intent
Before you continue onward it's highly suggested you have a witness campaign post using the #witness-category tag completed and ready to submit before broadcasting your intent to be witness and making it official. While the link you're allowed to provide with your witness intention broadcast can be any URL you want it's considered proper etiquette to have it pointed towards a well written and detailed post here on steemit which outlines why we as a community should vote for you as a witness. An example of what my witness post looked like can be seen here:
KLYE's Witness Campaign
In order to broadcast your witness intent and become a full fledged backup witness we're going to have to go back into the cli_wallet terminal tab that should still be running on your witness server. In case you've forgotten how to navigate between the screen terminal tabs it's included below:
screen -r XXXX (XXXX in this case is the screen ID number with cli_wallet running in it)
If by some foul luck you can't find which screen instance has cli_wallet running you can easily navigate to it's folder and run it again by using the following set of commands in a fresh screen window:
cd /root/steem/programs/cli_wallet && ./cli_wallet
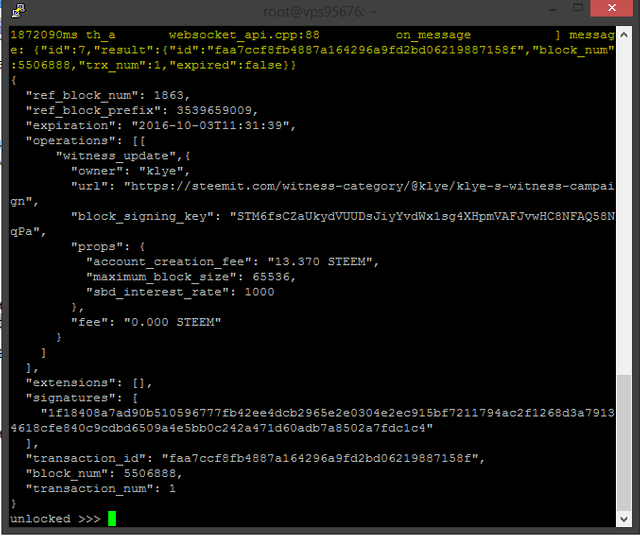
Once again at our unlocked cli_wallet it's time to broadcast our witness STEEM intent to the network so it knows that our server is ready to start producing blocks when it's called on to do so. An example of the command is below:
update_witness "witnessname" "https://steemit.com/witness-category/@you/link-to-your-witness-post" "STM69PUBLIC4SIGNING2KEY0GOES7HERE" {"account_creation_fee":"13.370 STEEM","maximum_block_size":65536,"sbd_interest_rate":1000} true
Before you broadcast your intent update_witness make sure the values are what you want them to be!
A brief breakdown of what's going on here is that you're using the update_witness command to inform the network that your account with the following link to their witness campaign post with the following public signing key wishes to declare their intent to be witness with them supporting a 13.37 STEEM fee for creating an account, a maximum size per block of 65536 kb and an interest rate of 10% APR. You can change these to anything you wish.
Whenever you're ready take the command I've given above, fill it with your own information and hit enter...
Did the terminal flash a bunch of yellow text briefly and leave your screen looking like the picture above?
If you answered YES.. I can finally say I've accomplished teaching someone something in my life!
You are NOW an actual Witness!
(wew, look at you following instructions and stuff!)To exit the SSH session and leav the server running properly just use ctrl + a + d</code until putty is closed.
Way to go fellow witness! It seems like only an hour ago you were a complete noob with basically zero idea what you were doing or how to even get a STEEM Witness going and now look at you.. It's beautiful!
You're now eligible to receive witness votes by anyone wishing to give them to you! Good luck to you.
If you wish to instruct users to vote for your witness it's as simple as directing them to the following link:
https://steemit.com/~witnesses
When you first start off you'll not be listed in the top 50 witness list displayed at the top of the page. Instead you'll have to instruct your voters to go all the way down to the bottom of the page and enter your witness name in the input field given and click the vote button on the right hand side:

While you are there upvoting yourself as witness feel free to type klye in that box and hit the vote button!
4 keystrokes and 2 clicks casts a witness vote for me. I greatly appreciate every witness vote I receive. <3
[Updating Witness Price Feed](#0
A manual price adjustment update is performed from the unlocked cli_wallet with the following command:
publish_feed witnessname {"quote":"1.000 STEEM", "base":"0.420 SBD"} true
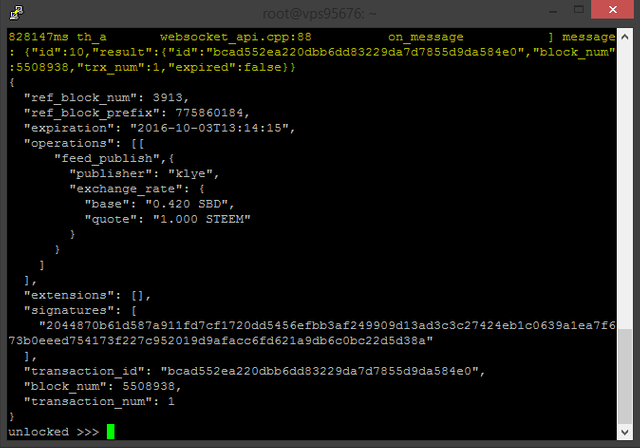
What this will do is update your price feed to reflect 0.420 SBD per STEEM. It's suggested you keep it current.
(Albeit the noob way.. but hey.. whatever works right?)
[Monitoring Your Witness Server](#0
Steemd.com/witnesses
SteemDB.com/witnesses
While these sites listed above are good nothing beats good old fashion attentiveness when it comes to monitoring your witness node. It should be noted that until you find a block your STEEM client version, Last block found and price feed may not be visible on the sites above.
What Does a Good Witness Do? *
When we allow inactive witnesses or those serving only their own agenda into prestigious, well compensated positions of power such as those offered by STEEM top 50 witness list we're essentially conveying the message to the world its acceptable to put in little effort and be rewarded handsomely.
Vote for those who you believe bring value and honest effort to our newly established STEEM society. Be the change in teh world you wish to see.
How Much Money Will I Make? *
| & | Money |
|---|
 Love
Love
Almost universally across all different regions and countries if you look into the driving factor behind most peoples actions it you'll quickly realize that unless they're doing something out of their love for the thing in question. Otherwise people will generally only perform tasks for some sort of expected monetary compensation.
The top witness position currently held by @charlieshrem earns around 1300 Steem Power per day.
At the current market rate that's worth around 1 Bitcoin or a little over $600 USD worth.. Every Day!
While the top 19 witnesses do receive an incredible amount of compensation daily for their efforts in securing and further developing the STEEM network truth be told if you're planning to get into the witness game with the intentions of making fast and easy profits I regret to inform you it's not going to be nearly as profitable or glamorous as your probably imagining.
At rank 67 on the witness list I was hitting 1 block every 24 hours or so.. Which will not break even given current STEEM prices when compared to the cost of running the server each month. When you start your witness campaign you'll very likely not be making any Steem Power nor will you actually be making any money at all. Also another thing to mention is that you can't just withdraw the Steem Power you're earning as a reward when your witness is selected to mint a block..
You'll have to power the SP down over the course of the next 2 years in order to realize the full profits. Unless you're honestly willing to run a STEEM Witness node out of your own pockets without expectation of compensation I'd say you're probably not the right type of person for this job... But if you are in fact here to support the STEEM network and help it's continued growth and security I personally welcome you to the ranks of STEEM witness.
Hope you've learned not only how to get your witness server up and running but also what is expected.
Enjoy this post? Vote @klye for Witness!
https://steemit.com/~witnesses
However you can still vote for me by scrolling to the bottom of the page and typing klye:

I can't understand, what much important in hardware?
Better processor, or lots of RAM?
Minimum 12 GB RAM for the witness server.
You have one?
Yes back up this morning, lol.
Erm... I was hopping for a simple GUI installer and easy interface for dummies. This is way too much work and commitment for me.
just because no brain is required doesn't mean that it's a good idea to do it if you meet the requirement!
Bahahahaha!!!!!
Good tutorial.
By the way, although it's possible that "No Brain Required" to run a witness node, it's not recommended that people doing it without a brain. Witnesses (especially the top 19) need to help provide useful info when something happens, to track down the issue and fix it, but not only upgrade to latest code when released or even after several hours.
//Edit: looks like you're running all things with the
rootaccount, it's not so good. @bitcalm's tutorial is better from a technical POV.I've yet to revise this to explain proper procedure in locking down the server properly to maintain the highest possible security levels. When I started writing this guide I had no idea it wold get so lengthy and I'll have to go back and add some things I've noticed when I get a chance to.
i keep getting no make file found
This is an awesome, in-depth guide. Between this and @bitcalm's guide, I hope we have enough information to bring in a diversity of witnesses.
Might I suggest using VNC Server for a remote GUI setup? (For those uncomfortable with CLIs)
I've never used VNC so I wouldn't know where to begin instructing anyone to use it. :(
Great guide @klye Wow man, I didn't realize Charlie was making so much being a witness. Jeez he is ballin' out of control!
Yeah. The top 19 witnesses are compensated handsomely for there running of the steemd client as a witness node.
Do you believe it makes sense for many more people to make an attempt at becoming a witness? I'm assuming it will get to a point where most people are buying server time and not being profitable trying to be a witness. Also I just voted for you @xeldal and @pfunk for witnesses. I have 25 more votes left for witnesses.
I believe that those running as witness for the right reasons won't mind running a server out of their own pockets.
With that being said I've hopefully painted an accurate description of what being a witness should entail. :)
Tons of other deserving witnesses exist. Whom you choose is entirely up to you.
Well from my perspective you are a good choice. You have the technical skills, you have been positively contributing to the community as a content creator and it appears like you are in for the long haul on this platform. I have the 25 more votes and as I learn more I will decide what to do with them. I'm not going to try to become a witness right now but possibly in the future after I gain more credibility on this platform.
I appreciate your support sir. truly do.
When I first showed up to the platform I admit it was money that I was seeking.. But once I started diving into the platform and realized exactly what I'd stumbled onto my mentality shifted from "this will be a great place to make money" to something along the line of "By investing my time and effort into STEEM I can help others achieve success". By helping with the growth and adoption of the STEEM platform I solidify the future stage for my own work.. It's beautiful actually.
We need more people here supporting the growth of the network rather than showing up strictly to collect reward payouts.
wow good post. very helpful. I am going to get on this immediately. Re-blogged and up-voted, definitely following, Good job.
Dear Klye,
I am new to steem and am having a continual issue, after my first replication I received an error saying it nescessary to set a server.pem in config.ini file, what is this, why is it necessary and where can I find this? In your config.ini file example nothing is mentioned about this, Thanks very much,
great work thanks.
You've done very well with this.
I'm not going to lie.. It took me waaaay to much time to write this and get all of screenshots and information down.
I can only imagine.
Thanks for the effort!
You're Welcome Papa-Pepper. :D
u did the right thing and wiill continue to be rewarded as more ppl become witnesses as steemit grows
hey what does this page mean?
https://steemit.com/~witnesses
it has a list of steemit witnesses (also i cat post an image in this comment? and when i upvote a comment like yours price didnt go up?
and lol did katey perry unconciously join steemit? her new thing is a "witness" thing