VPS Initial Setup for Masternode
Welcome
Hi all and welcome to my first post here on Steemit.
First off let me state that I am by no means a linux guru/expert/whizzkid/knowitall, I know what I know and that isn't much! it's generally enough to achieve some basic stuff but like anything; the best way to learn and become competent at things is to practise and play with it.
If you want to get to know linux and/or masternodes then using a VPS is the perfect playground to achieve this, if you mess something up you can click a few buttons and you are up and running again from scratch with no harm done.
Although this guide is aimed at setting up a VPS for a masternode, it will also serve anyone who wants to setup a VPS for any purpose.
VPS, What is it?
A VPS is a Virtual Private Server, and it's kind of like a program running on a computer. This program is allocated a certain amount of storage space from the HDD, a certain amount of RAM from the system memory and a number of the processing cores from the CPU. This in effect makes it look like an actual computer that you can install any operating system (OS) on to do what you like with. This program cannot however see any of the other programs that may be running on the server which is where the virtual part comes into play.
If a server has 32 processing cores, 32GB of RAM and 800GB of Hard drive space then via some special software you can create a number of VPS's using that hardware. You could for example create 32 VPS's with 1 CPU core, 1GB of ram and 25GB of HDD space or you could have 16 VPS's with 2 CPU cores, 2GB of RAM and 50GB of storage.
I'm sure there is a better way to explain that (and probably more correct lol) but that's how I see it, if you want to know more then check out the Wikipedia page here.
Where to begin?
To set up a VPS you need to find a company that has the ability to rent them out, there are plenty of them out there on the web but my personal preference at the moment is Vultr.com, they are as cheap as the other but also have better specifications than the other providers like Linode.com or DigitalOcean.com (If you sign up to Digitalocean with this link you will be credited with $10 to your account). Vultr also has a much nicer/cleaner interface I believe. OVH is another cheap one but it's quite confusing to use.
Getting started
This guide will show you how to setup a VPS at Vultr, if you are using a different hosting company then obviously you will have to do things differently but it should be a very similar process. The main meat and bones of this guide will all be done in Putty anyway so don't worry too much, it's only the initial creation of the VPS that will be different!
Requirements
- Obviously you will need to create an account at a hosting company.
- Putty, this will be your interface to the VPS. It can be downloaded from here.
- Puttygen, this will create a private and public key pair to secure your VPS. It can also be downloaded from the link above.
- A domain name. This is entirely optional but I find it easier to manage (from different locations) and it will also be a requirement for future Masternodes that will be encrypted like Zencash that will require an ssl certificate. I get mine from 123-Reg but there are a million and one providers out there, Google is your friend.
Step 1 - creating the VPS
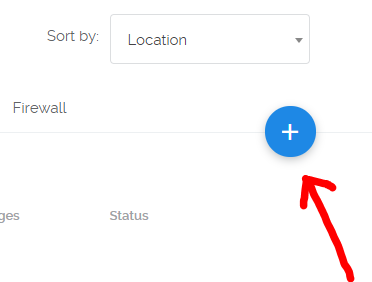
Once logged into Vultr, make sure you are on the Servers page (top icon on the left hand menu under the Vultr logo). Click on the blue round + as shown below to start the creation of a new VPS instance.
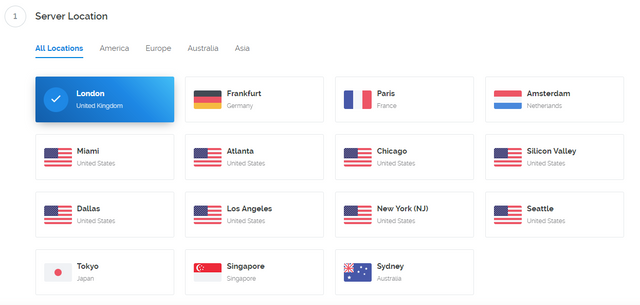
Section 1 is where you select the location of your VPS to be based, if you are going to have multiple Masternodes hosted with Vultr then you should probably put each one in a different location, this way if one of their data centers goes down for any reason only 1 of your Masternodes will be affected, this is also better for the Crypto coin network to have all their Masternodes spread out around the world rather than in a few locations where they can be easily targeted for attack.
Select the operating system you want to use in section 2, I suggest using Ubuntu 16.04 x64.
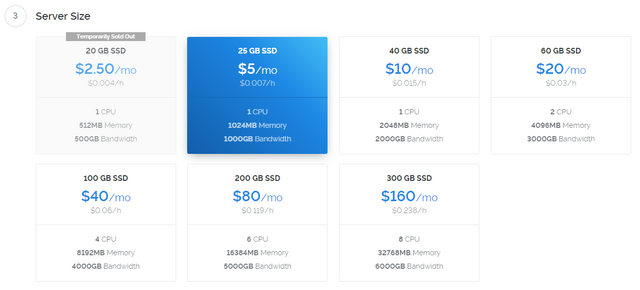
Choose the server size in section 3, I would say the $2.50/m is fine for hosting a Masternode (once sufficient swap has been configured) but as you can see they are not available at the moment. The next best option would be the $5/m VPS, you get double the RAM, Bandwidth and 5GB of extra storage space for your extra $2.50 which is nice (if you compare the Vultr $5 tier against Linode, DigitalOcean etc you will see that Vultr is a better deal).
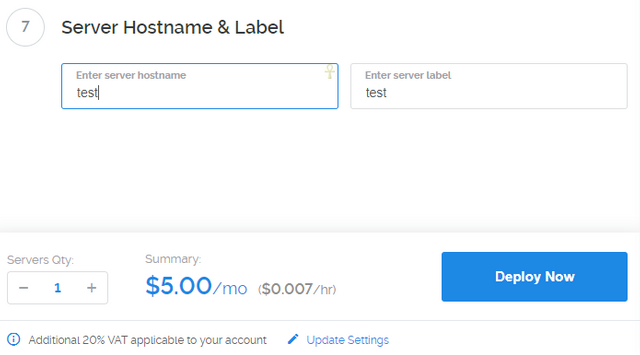
In section 7 we need to enter the hostname of our VPS, I am just going to call mine 'test' but you can call your what you like, for my Masternodes I use the currency ticker, i.e ENT, CRAVE, NTRN etc. Once done click on the big blue 'Deploy Now' button.
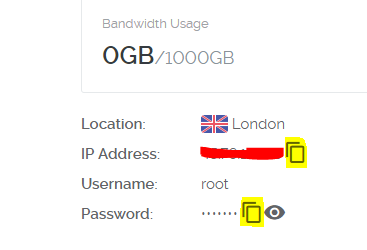
You will see your VPS show up and it will indicating it is being installed, once it has finished it will show you the basic details of your VPS like the picture below (the red squiggle is to hide the IP Address of the server). Click on the hostname, 'test' in my case.
Below you will see a picture of the 2 most important things you need to know right now, the IP address with a handy copy button (highlighted yellow) and also the root password with a copy and view button.
Step 1 b - Configure your domain name (Optional)
If you have a domain name then you can now go ahead and create a subdomain that points to the IP address of your VPS, I won't go into details here as each domain registrar will do things differently. I always give the subdomain the same name as I gave the VPS just to keep things easy. i.e. ent.MyFantasticWebsite.com.
If you know nothing about domain names etc then I suggest you skip this part.
Step 2 - Logging in
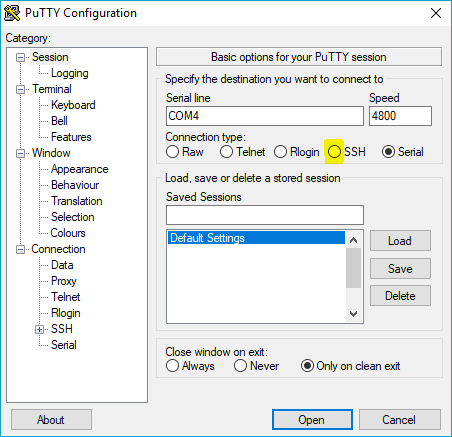
Now we will need to log into the VPS using Putty, open it up and you will be presented with the screen as shown below.
Select the round 'SSH' button, your putty should now look like this.
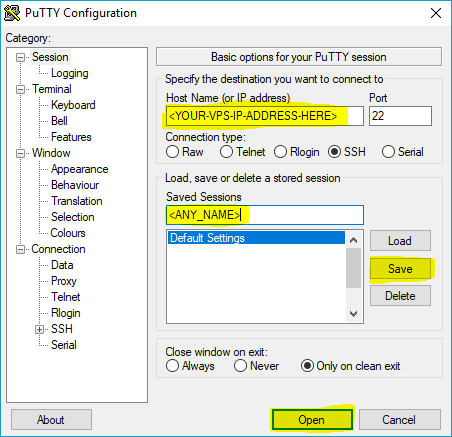
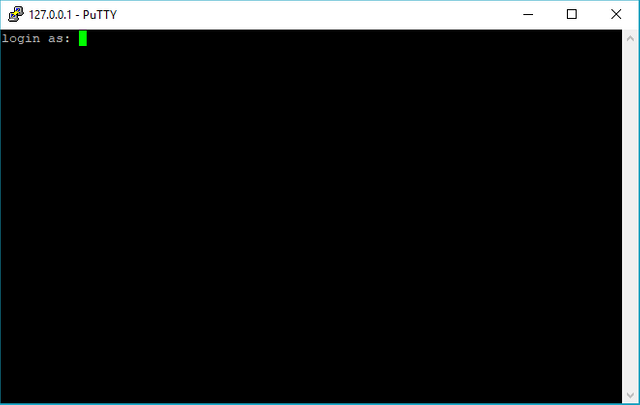
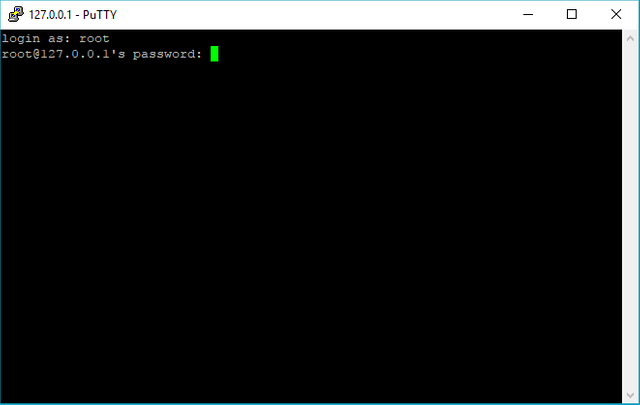
Copy the VPS IP address from Vultr and paste it into the box at the top. If you have set up a domain name then you can type this into this box also. Keep the port as 22. Write a descriptive name into the second box highlighted yellow and click 'Save', this is so you don't have to keep typing in IP addresses etc every time. Once done click 'Open' at the bottom and you'll see this hopefully.
Type root and hit 'Enter'.
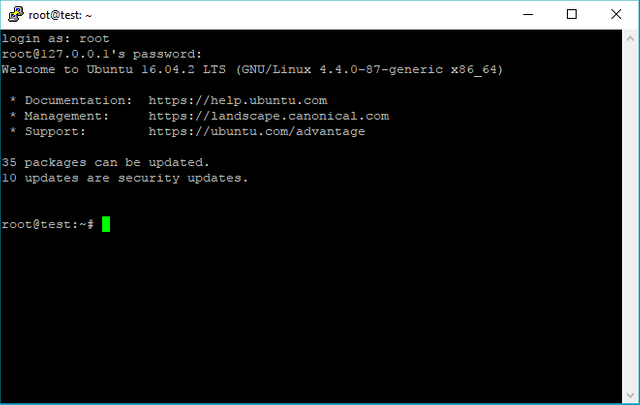
Back on the Vultr page copy the root password. If you have never used Putty before then you need to learn how to paste text into it, it's really easy, just hover the mouse pointer over Putty and click the Right mouse button, that's it. The other thing you should know is when you are typing/pasting passwords into a linux terminal like Putty, they won't show, literally they are invisible, so after Right clicking just hit 'Enter'. You should now see this.
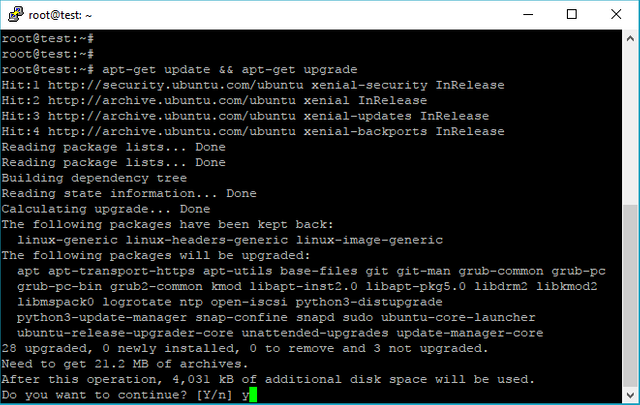
As you can see, there are 35 packages which need updating and 10 security updates available, we'll fix that first. Copy and paste the commands below 1 row at a time followed by 'Enter'.
apt-get update && apt-get upgradeWhen prompted click 'y' then 'Enter'. Now let's install them security updates.
apt-get -y dist-upgrade
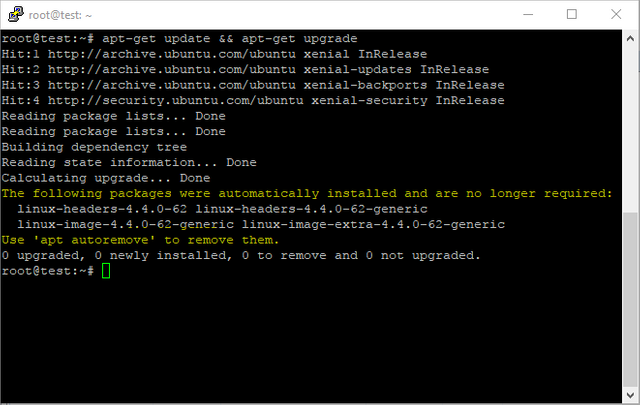
Notice the -y in this new command, this removes the prompt you saw above (click y) and just goes ahead and does it regardless. Now lets run that first command again.
apt-get update && apt-get upgradeNotice the lines highlighted in yellow, lets fix that real quick.
apt-get -y autoremoveOne thing you may also have noticed from the above picture was the command is different, I used apt-get -y autoremove and the terminal suggested just apt autoremove. They are both the same thing, I just learned it the apt-get way and have stuck with it ever since but either way is fine.
I'm going to add less screenshots now and just give the commands for you to enter. Lets start by checking the hostname of the VPS is set correctly.
hostnamectl
If it says 'Static hostname: ' with the name you chose in Vultr then that's all done. If not then use the following command to set it. Obviously you need to put your own hostname where it says <YOUR-HOSTNAME-HERE>.
hostnamectl set-hostname <YOUR-HOSTNAME-HERE>
If you have set up a domain name then you should do the following. Skip to Changing the root password if you didn't set up a domain name though there is some useful information on how to use the nano editor below.
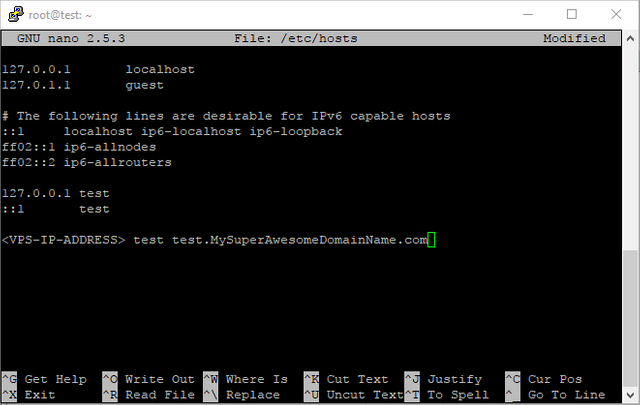
sudo nano /etc/hosts
This will bring up the nano editor, this is used for editing files in the terminal, it's quite easy to use once you get used to it. Scroll to the bottom using the down arrow key and add the following.
<THE-VPS-IP-ADDRESS> <YOUR-HOSTNAME> <YOUR-FULL-DOMAIN-NAME>
It should look like this
To save and exit use the key combination; 'Ctrl' + 'x' to exit, It will ask you if you want to save the file, hit the 'y' key followed by 'Enter' to confirm the name of the file (look at the menu at the bottom after each press to get an idea of what is happening, it also shows what commands can be used by clicking 'Ctrl' plus the letter followed by the ^).
Changing the root password
We're going to change the root password as it's quite short and we want to make sure the VPS is as secure as possible.
passwd root
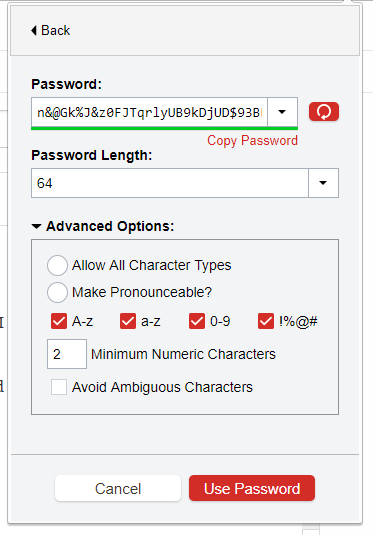
I use the excellent Lastpass to securely generate and store all my passwords, I highly recommend it, especially if you are going to be getting into Masternodes.
Create a long (32+ digit random password using all characters) password and save it somewhere. Paste it in using the Right mouse button followed by 'Enter' then again to confirm.
Setting the correct Timezone
We want to make sure the clock on the VPS is set correctly just incase we need to review any logs. You can get a list of locations by using this command. Use the spacebar to change page.
timedatectl list-timezones
Then once you know your closest location use the following but replacing 'Europe/London' with your equivalents.
timedatectl set-timezone 'Europe/London'
Adding a new non-root user
Now we want to increase security further by creating a new user. Create and save a new long secure password like before and paste it in with the right mouse button when prompted. Note: make sure you save all the passwords created for this VPS, we will be creating 3 passwords within this guide and they should all be long, random and different.
adduser adam && adduser adam sudo
Obviously you will want to replace 'adam' with your own name. Once that is done you will need to log out of the VPS and then back in but using this new user you have just created.
exit
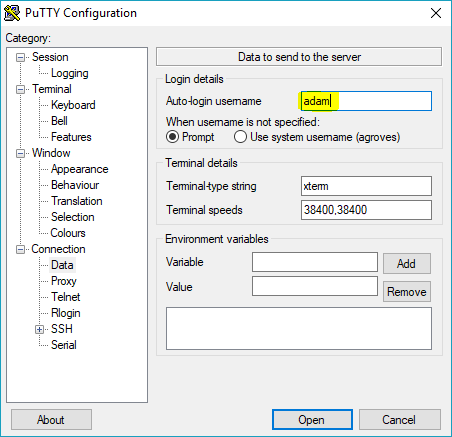
This will close putty so now open a new session and click on the name you saved last time then 'Load'. Now on the left hand side click on 'Data' under 'Connection' and type your new username you just created into the top box as shown below. This will make putty automatically log into your VPS using that name.
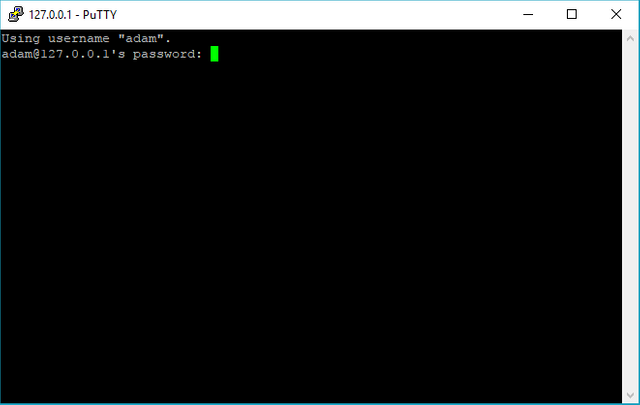
Click on 'Session' at the top and then 'Save' to save the change you just made, now click 'Open'. You should now see this, use your password for your new user not the root password.
If you see 'System restart required' once logged back in then do this.
sudo shutdown -h now
Notice the word sudo there, as we are now logged in as a non root user, if we want to do stuff that requires administrative privileges we have to use the word sudo in front of the command, generally if you see anything complaining about permissions in linux sticking sudo in front may well fix it.
Now go back to Vultr and click the Stop button followed by the Restart button. Wait a few minutes for the VPS to boot back up then log back in with putty the same as you just did.
Securing SSH
One thing you must do when setting up a VPS is configure SSH to make it more secure. First check if there is a .ssh folder. The '-a' option in the command below is to show hidden files and folders, these are the ones that start with the full stop.
ls -a
The ls command will show you all the files and folders within whatever folder you are currently looking at, you can determine which folder you are looking at by looking to the left of the cursor. It should show your username followed by @ followed by the hostname of the computer followed by a : followed by the current folder (~ = your home folder) followed by a $.
If the .ssh folder is not present then do the following one line at a time to create this folder.
mkdir ~/.ssh
chmod 0700 ~/.ssh
touch ~/.ssh/authorized_keys
chmod 0644 ~/.ssh/authorized_keys
Now we need to get ready to create a public Key file.
sudo nano ~/.ssh/authorized_keys
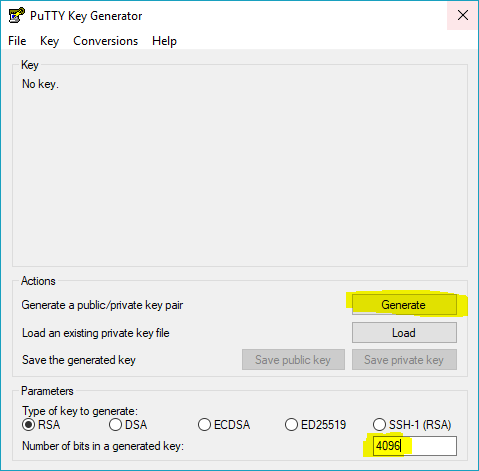
At this point we need to open puttygen, it'll look like this once opened.
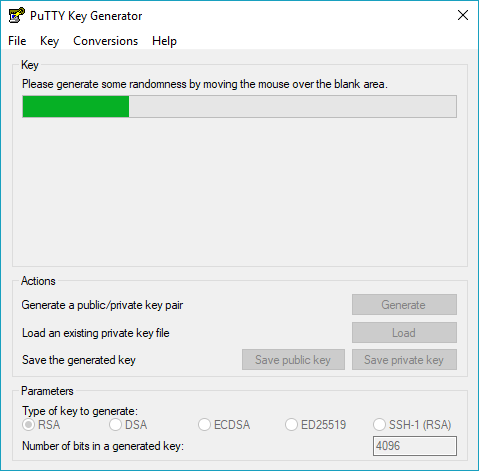
The first thing to do is to change the 2048 at the bottom to 4096 and then click 'Generate'. Follow the instructions and wave the mouse around over the blank section to create some randomness.
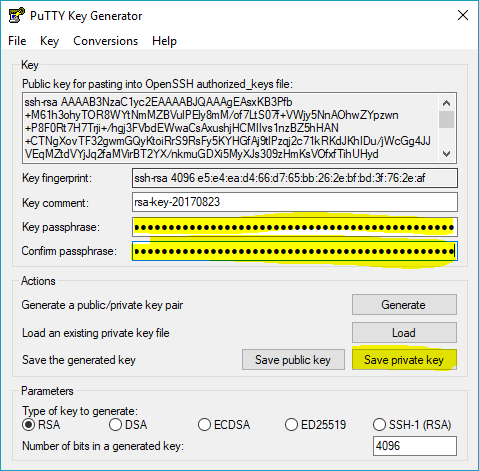
Once it has finished it should look like the picture below, create and save another very long random password, this one is for the SSH passphrase, and paste it into the the 2 highlighted boxes. Make sure you save this password, once we are finished you will not be able to access your VPS without it!!!
Click the 'Save private key' button and save it somewhere safe on your PC. Again don't lose this file. Right click on the box of text at the top (this is the Public Key) and click 'Select All', now right click again and click 'Copy'. Paste this into putty then save and exit with 'Ctrl' + 'x' then 'y' then 'Enter'. You can also save the Public key into a text file if you so wish.
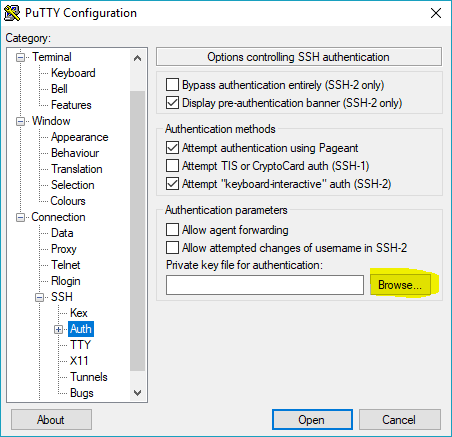
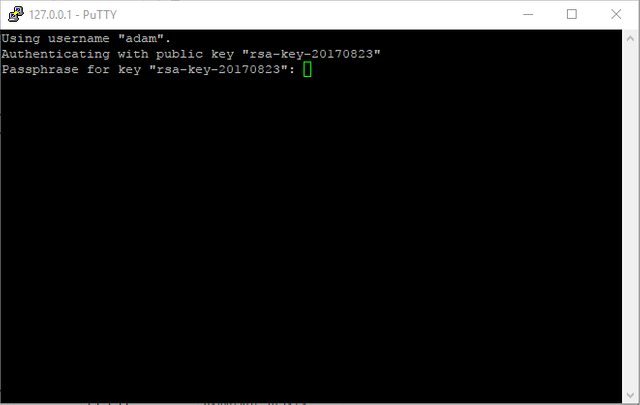
Log back out of the VPs with 'exit' and then open putty. Once putty is open we need to tell it to use the Private key we just saved, expand where it says 'SSH' on the left and then click on 'Auth' as shown below. Browse for the Private key file (.ppk) you just saved and select it. Now go back to 'Session' at the top and click 'Save' again to save your new changes. You can now click 'Open' but this time it will ask you for your SSH passphrase.
Once you are logged in we need to make some more changes, enter the following.
sudo nano /etc/ssh/sshd_config
You need to look for and change the following lines as shown then save and exit.
PermitRootLogin no --------change to-------> PermitRootLogin yes
#PasswordAuthentication yes --------change to-------> PasswordAuthentication no
UsePAM yes --------change to-------> UsePAM no
What you just did was tell the VPS that the root user is not allowed to log in (that's good) and basically you have to have the Private key that matches the Public key saved to the VPS. This makes it much more secure against attack.
Now we need to restart the SSH service for the changes to take effect.
sudo systemctl restart sshd.service
Enable and configure the inbuilt firewall
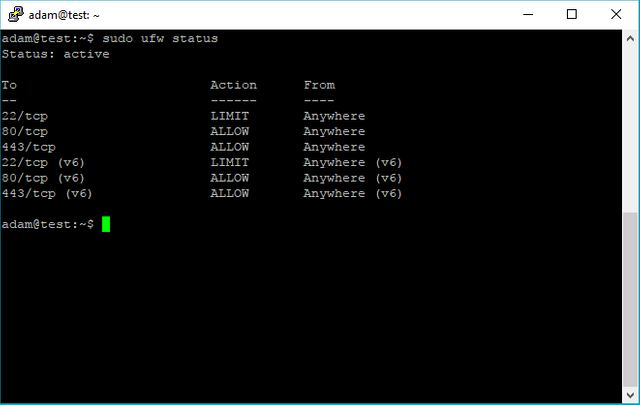
Ubuntu has a firewall called ufw all ready to go but is always disabled by default, just to make sure it isn't running run the following command.
sudo ufw status
If it's not running the run the following 1 at a time and in the correct order.
sudo ufw default allow outgoing
sudo ufw default deny incoming
sudo ufw allow ssh/tcp
sudo ufw limit ssh/tcp
sudo ufw allow http/tcp
sudo ufw allow https/tcp
sudo ufw allow 4854/tcp
sudo ufw allow 4855/tcp
sudo ufw logging on
sudo ufw enable
sudo ufw status
That's it you now have a firewall up and running.
More Safety!
Yep we're now going to add more safety to our setup. Install the excellent fail2ban using the following.
sudo apt-get install fail2ban
sudo systemctl enable fail2ban
sudo systemctl start fail2ban
What this app does is ban people that keep entering the wrong password when trying to log in via ssh, i.e brute force attacks.
Now lets also install a rootkit hunter.
sudo apt -y install rkhunter
To run rkhunter you have to use the command.
sudo rkhunter --propupd
Setting up Swap
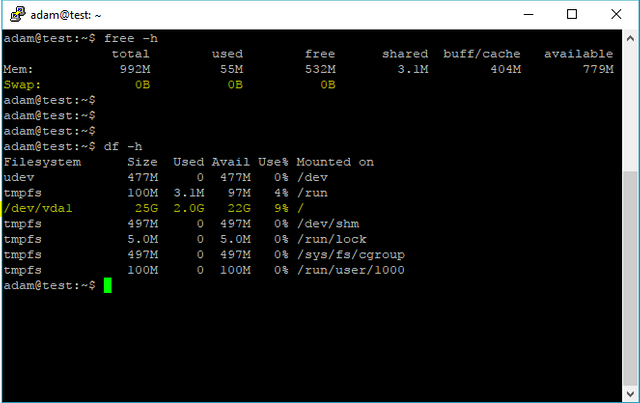
Let's add some swap memory to give us a bit of breathing room with regards to the small amount of RAM on our VPS. First lets look at how much free memory we have and how much free HDD space we have.
Enter the following 2 commands and you should see something like the picture below
free -h
df -h
The -h option makes the numbers human readable.
Now lets add 4GB of swap.
sudo fallocate -l 4G /swapfile
sudo chmod 600 /swapfile
sudo mkswap /swapfile
sudo swapon /swapfile
Open the sysctl.conf file.
sudo nano /etc/sysctl.conf
and add the following to the bottom then save and exit.
vm.swappiness=10
Now open fstab with the following.
sudo nano /etc/fstab
And paste the following line again at the bottom then save and exit.
/swapfile none swap sw 0 0
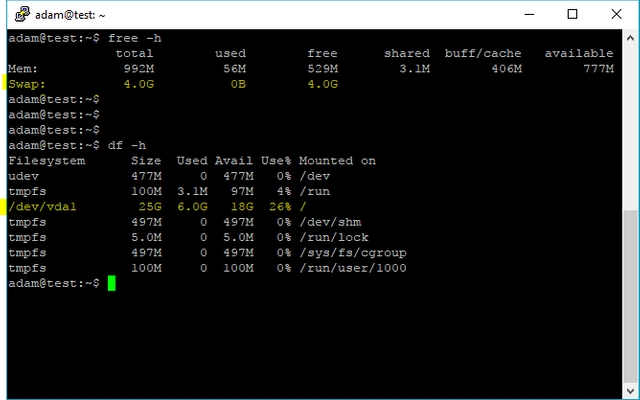
If you now run the free -h and df -h again (Tip: if you press the up arrow it will show you your previous commands, keep clicking up till you get to the one you want) you will now see you have some lovely swap memory to fall back on should you need to.
Extras
Now finally we are going to install some useful programs you may need in the future.
sudo apt-get -y install git screen htop nmap ncdu busybox inxi links unzip python
That's it we're all done, you now have a healthy and secure VPS ready to go, I suggest at this point you create a snapshot if on Vultr (they are free, for now!) which you can easily reinstall if something should go wrong in the future. Just remember to alway do the following every time you log in.
sudo apt update
sudo apt -y dist-upgrade
sudo apt -y autoremove
sudo rkhunter --propupd
You could easily write a script to do this and then just run this script whenever you need.
Now like I said at the beginning I'm not an expert in this stuff and I'm sure I have said to do something wrong or there's an easier way to do things, but the best way to get competent at these things is to read, learn and play. Therefore if you have any helpful tips/hints/better ways to do things then please leave a comment so we all can learn together :-)
Thanks for reading and I hope this has been of some help to you. I plan on writing some writeups soon showing how to install some crypto coin wallets to setup some masternodes and start earning a nice passive income with interest.
For transparency reasons I feel I should inform you that some of the links I have used in this post are affiliate links, if you feel this post has been helpful and sign up to one of the services mentioned here but dont mind if I get a little beer money for my time then thankyou very much, if not then I'm sure you know how to work the google :-)


Congratulations @grovesy! You have completed some achievement on Steemit and have been rewarded with new badge(s) :
Click on any badge to view your own Board of Honor on SteemitBoard.
For more information about SteemitBoard, click here
If you no longer want to receive notifications, reply to this comment with the word
STOPthis guide is awesome ... the only problem i have so far is
adduser adam && adduser adam sudo
what is the password for the new user? replaced my name with adam and when i try to login it asks for password that i didn't set
thanks
Hi @mrsray, sorry for not replying sooner, I wasn't notified by steemit about your comment.
Did you manage to fix your problem?
Ideally when you create the new user and password you should write them down in notepad and save it before you copy and paste them into the terminal. To fix your problem log into the VPS as root and try the following.
To list all the users on the system try the following:
Then once you found the UserName you can't log in as, type the following to delete that user and their Home Directory.
Then write down into Notepad and save the new user name and a new secure password and try again with the commands from the guide.
Obviously replacing UserName with your own name lol Also when it asks twice for a password, copy it from Notepad (make sure you don't copy any spaces at the begining or end) and right click in the terminal followed by Enter, that way you can avoid mistakes as you won't be typing the password just pasting something you have copied.
I hope this helps you.
For anyone else who has trouble with passwords, I really can't recommend enough a service like Lastpass enough.
Easy as that and well worth the $10 per year or whatever it is to keep your online presence safe and secure with all these hacks etc taking place.
IMPORTANT PLEASE READ
Since writing this guide I have run into a problem when using the command below with at least one of my Masternodes
It removed some stuff needed by the wallet (I can't remember but I think it was the Berkely DB) and the wallet promptly stopped working.
Therefore I suggest you not to run this command with the -y option and check if any stuff it says is not needed anymore, is something that was a dependency of the wallet and hence actually needed.
Or to be extra safe just don't use the autoremove command at all lol
I can't edit the post above (a bit silly if you ask me) so hopefully people see this comment.
Is this not supposed to be the other way around?
PermitRootLogin no --------change to-------> PermitRootLogin yes
@propagandalf yes you are absolutely right, we want to stop the root user from being able to login. It should be:
This highlights the reason why I don't want to do anymore tutorials/guides on steemit, once it's posted that's it, you can't edit it in any way and if it's wrong then it's wrong which is obviously a bit naf when you're trying to teach people how to be safe.
All,
Due to the limitations of Steemit with regards to being unable to edit your posts and correct (potentially very) important errors I have decided to recreate this post on my own blog. This can be found at https://groovycrypto.uk
There will be new guides and tips posted there soon including some useful scripts to automate all of the above.
Congratulations @grovesy! You received a personal award!
You can view your badges on your Steem Board and compare to others on the Steem Ranking
Vote for @Steemitboard as a witness to get one more award and increased upvotes!