Building a Weather Application with Dart's Flutter Framework (Part 3, RxCommand (RxDart) and Adding an Inherited Widget)
What Will I Learn?
- You will learn about Observers and Streams in Dart and Flutter
- You will learn how to use RxCommand inside of a Flutter application to build reactive handlers
- You will learn how to pass around your RxCommands using a Inherited Widget
- You will learn how to create conditional RxCommands using Boolean Observables
Requirements
System Requirements:
- IDEA intellij, Visual Studio Code with the Dart/Flutter Plugins, Android Studio or Xcode
- The Flutter SDK on the latest Master Build
- An Android or iOS Emulator or device for testing
OS Support for Flutter:
- Windows 7 SP1 or later (64-bit)
- macOS (64-bit)
- Linux (64-bit)
Required Knowledge
- A basic understanding of APIs
- A fair understanding of Mobile development and Imperative or Object Oriented Programming
- Basic knowledge Asynchronous Programming
Resources for Flutter and this Project:
- Website: https://flutter.io/
- Flutter Official Documentation: https://flutter.io/docs/
- Flutter Installation Information: https://flutter.io/get-started/install/
- Flutter GitHub repository: https://github.com/flutter/flutter
- Flutter Dart 2 Preview Information: https://github.com/flutter/flutter/wiki/Trying-the-preview-of-Dart-2-in-Flutter
- Flutter Technical Overview: https://flutter.io/technical-overview/
- Dart Website: https://www.dartlang.org/
- Open Weather Map Website: https://openweathermap.org/
- Flutter Awesome GitHub Repository: https://github.com/Solido/awesome-flutter
- Dart ReactiveX GitHub Repository: https://github.com/ReactiveX/rxdart
- RxCommand GitHub Repository: https://github.com/listenzz/RxCommand
Sources:
Flutter Logo (Google): https://flutter.io/
Difficulty
- Intermediate
Description
This video tutorial is a continuation of the Flutter Mobile Weather Application tutorial series detailed in these video articles: Part 1, Part 2
Outline and Overview
General Overview
The goal of this Video Tutorial Series is to showcase how you can build a Weather Application using Dart's Flutter Framework. This Weather Application uses a reactive interface and ReactiveX concepts via the RxCommands Plugin. This includes Observables and Commands which make use of conditionals. It also makes use of the Geolocation Plugin to fetch the GPS data from the user's device. Once we have this location data, we can make a request to Open Weather Map's API using an API Key. The resulting response is serialized by our Built Generated Json Serializer Code which was created with the JSON Annotation and JSON Serialization plugins. We then are able to select various fields from this JSON request and we can display those fields in our View. We can update our view by passing model from our view model to our view using Observables and Streams.
Outline of this Tutorial
In this Tutorial, we introduce ReactiveX commands and ReactiveX Observables. Using these concepts we are able to implement a skeleton for our view model and an Inherited Widget that works as our model provider. These RxCommands allow us to wrap the functions from our repository in an abstraction so that we can Emit Observables based on certain events.
Item 1: Dart Streams and Observables
Dart's async library provides us with two fundamental types, the Future Type and the Stream Type. Futures are the result of a single computation where in the result will resolve at some unspecified time in the future. Streams act more like iterators then single values because they are able to handle an infinite amount of events. Streams are Asynchronous by default; this means that the data events do not need to be emitted in a regular interval. In Dart there are two primary types of streams, Broadcast Streams and Single Subscription Streams.
As a result of Streams being a part of Dart's standard library, Observables are an extension of Dart's Stream type. This means that Observables may be passed around to any place that will accept a Dart Stream. It also means that Observables have all of the Methods that are native to Streams at their disposal. Streams can be transformed into Observables either by using the Observable constructor or by way of a factory constructor. Also, unlike Streams, Observables are Synchronous by default and they include a large amount of new transformation methods and properties.
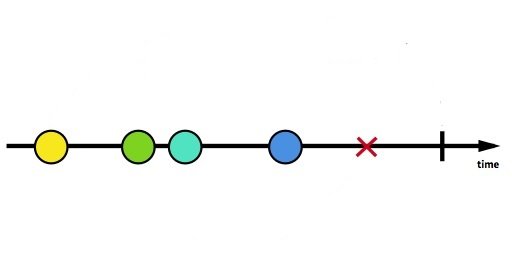
This image can represent a Stream or an Observable. The horizontal line indicates the flow of time from left to right. The circles are pieces of data, the Red X is an error and the vertical black line is an execution halt command.
Item 2: RxCommand
RxCommand uses the Observable abstraction as a way to convert event handlers into Commands. These Commands emit Observables. They also can implement Conditional Execution by taking in a Boolean Observable as their canExecute property. This lets us react to the various Execution States of each command; if some event happens, we can shut down the execution of the command.
Above we have the four commands that are implemented in this tutorial. Two of the four commands; _getGpsCommand and _radioCheckedCommand, are boolean conditional commands which can be used to modify the other two commands. The _updateLocationCommand is conditionally executed based on whether or not _getGpsCommand produces a true or false value in its Observable. _updateWeatherCommand is conditional based on the _radioCheckCommand which ties the condition of it's execution directly to a widget in the view.
Item 3: The Model Provider Inherited Widget
With the Model Command/View Model defined, we can now create a Model Provider Inherited Widget. This widget can sit at the top of our widget tree and dispense the Model Command and its commands directly to any widget that needs them. This means that a button in our view can directly call to one of our commands and any Display Widget can directly output the data from one of the Observables.
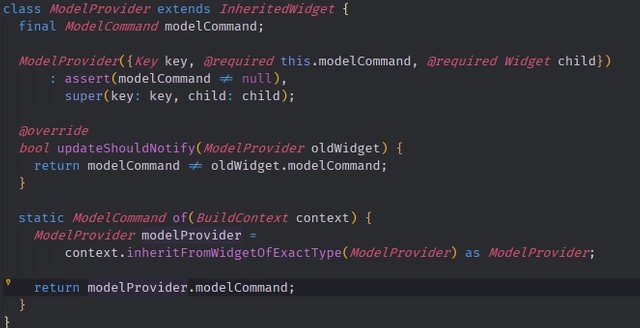
The image above shows off the entire Model Provider Inherited Widget class implementation. In the constructor, we pass in the Model Command and also a child widget. We are then able to implement the traditional Inherited Widget Pattern by overriding the updateShouldNotify method. This method's return value will tell the framework whether or not it should rebuild the widgets that are inheriting the state from this widget. We also are able to add in a Static method called of which returns an instance of the Model Command class if given the Build Context.
Project GitHub Repository:
The Source Code for this project can be found here
Video Tutorial
Projects and Series
Related Videos
- Building a Weather Application with Dart's Flutter Framework (Part 1, Handling Complex JSON with Built Code Generation)
- Building a Weather Application with Dart's Flutter Framework (Part 2, Creating a Repository and Model)
Stand Alone Projects:
- Dart Flutter Cross Platform Chat Application Tutorial
- Building a Temperature Conversion Application using Dart's Flutter Framework
- Managing State with Flutter Flux and Building a Crypto Tracker Application with Dart's Flutter Framework
Building a Calculator
- Building a Calculator Layout using Dart's Flutter Framework
- Finishing our Calculator Application with Dart's Flutter Framework
Movie Searcher Application
- Building a Movie Searcher with RxDart and SQLite in Dart's Flutter Framework (Part 1)
- Building a Movie Searcher with RxDart and SQLite in Dart's Flutter Framework (Part 2)
- Building a Movie Searcher with RxDart and SQLite in Dart's Flutter Framework (Part 3, Final)
Minesweeper Game
Curriculum
- Building a Multi-Page Application with Dart's Flutter Mobile Framework
- Making Http requests and Using Json in Dart's Flutter Framework
- Building Dynamic Lists with Streams in Dart's Flutter Framework
- Using GridView, Tabs, and Steppers in Dart's Flutter Framework
- Using Global Keys to get State and Validate Input in Dart's Flutter Framework
- The Basics of Animation with Dart's Flutter Framework
- Advanced Physics Based Animations in Dart's Flutter Framework
- Building a Drag and Drop Application with Dart's Flutter Framework
- Building a Hero Animation and an Application Drawer in Dart's Flutter Framework
- Using Inherited Widgets and Gesture Detectors in Dart's Flutter Framework
- Using Gradients, Fractional Offsets, Page Views and Other Widgets in Dart's Flutter Framework
- Making use of Shared Preferences, Flex Widgets and Dismissibles with Dart's Flutter framework
- Using the Different Style Widgets and Properties in Dart's Flutter Framework
- Composing Animations and Chaining Animations in Dart's Flutter Framework
- Building a Countdown Timer with a Custom Painter and Animations in Dart's Flutter Framework
- Reading and Writing Data and Files with Path Provider using Dart's Flutter Framework
- Exploring Webviews and the Url Launcher Plugin in Dart's Flutter Framework
- Adding a Real-time Database to a Flutter application with Firebase
- Building a List in Redux with Dart's Flutter Framework
- Managing State with the Scoped Model Pattern in Dart's Flutter Framework
- Authenticating Guest Users for Firebase using Dart's Flutter Framework
- How to Monetize Your Flutter Applications Using Admob
- Using Geolocator to Communicate with the GPS and Build a Map in Dart's Flutter Framework
- Managing the App Life Cycle and the Screen Orientation in Dart's Flutter Framework
- Making use of General Utility Libraries for Dart's Flutter Framework
- Interfacing with Websockets and Streams in Dart's Flutter Framework
Posted on Utopian.io - Rewarding Open Source Contributors


Excellent work @tensor. I do link your slides format. This provides a good context for the code leading into the work. As an extension, you could even quickly revisit some of the key points at the end to recap what was learned. Just a suggestion.
A small clerical point, be sure to cite the source for the Flutter logo.
You have received "Staff Pick" for this submission.
Thanks again for your excellent contribution.
Cheers,
buckydurddle
Need help? Write a ticket on https://support.utopian.io.
Chat with us on Discord.
[utopian-moderator]
Thank you for the compliments and the constructive criticism. It is all very helpful for my creative process. As always, thank you for moderating my contribution.
Hey @buckydurddle, I just gave you a tip for your hard work on moderation. Upvote this comment to support the utopian moderators and increase your future rewards!
Hey @tensor! Thank you for the great work you've done!
We're already looking forward to your next contribution!
Fully Decentralized Rewards
We hope you will take the time to share your expertise and knowledge by rating contributions made by others on Utopian.io to help us reward the best contributions together.
Utopian Witness!
Vote for Utopian Witness! We are made of developers, system administrators, entrepreneurs, artists, content creators, thinkers. We embrace every nationality, mindset and belief.
Want to chat? Join us on Discord https://discord.me/utopian-io
@tensor,
this is a great comprehensive workload. It surely will help a lot of meteorologist develop their digital skills.
Though am far from being one, but your mapped out curriculum has got me salivating.
I just have a little knowledge of what your doing. Well done and lots of luck and strength.
Thank you and good luck. I've got a few Meteo friends who have helped me in the past when it came to data science and working with Fortran and R. I am glad that I will be able to help one in return this time.