Pt:3 Creating API end points with Laravel.

Introduction
Hello, we are beginning a new series on building API endpoints with laravel (REStful api), REST, which stands for relational state transfer, which is used for interaction from a frontend by just send data to the backend or retriving data from the backend through different transfer protocol.
Requirements
The following are the requirements for this tutorial.
- Download php 7.2.1
- Download Composer.exe
- Download xampp or wamp for windows.
- Download postman.
Difficulty level
This tutorial is rated as intermediate.
Recap of the previous tutorial.
In the previous series, we learnt how to used a package called Faker to automatically fill our database
faker uses the Model Factory class to initiate the procedure.
Overview of today's task.
in This series, we are going to learn how to install a new service, this time we would be installing an Api service for laravel. Also we would be creating a resource route for our application.
Lets begin
We are going to start by creating an Api service or registering one
To create a service we need to hit lucid command prompt and enter the command below.
lucid make:service Api
Note: lucid command prompt is found in the vendor/bin folder

After creating a service, you will need to register the service to Lucid-laravel,
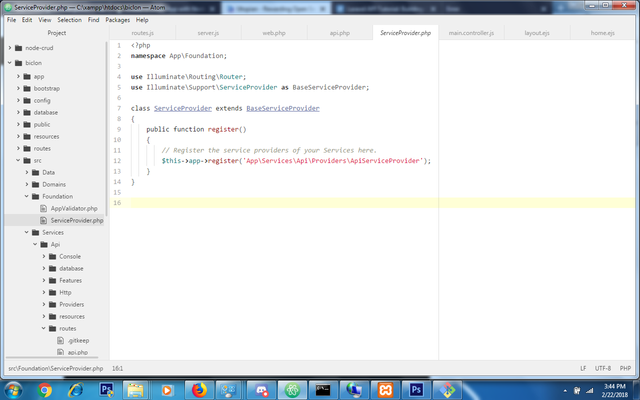
to register a service, all you need to do open app/Foundation/ServiceProvider and add the snippet of code below to the register method.
    public function register()
    {
        // Register the service providers of your Services here.
        $this->app->register('App\Services\Api\Providers\ApiServiceProvider');
    }

Yes, we have our service ready and activated. All we need to do is create a route for our end points.
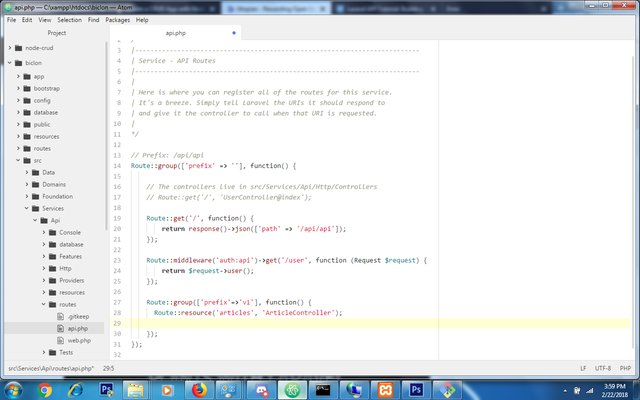
Find the file for the Route at Src/Services/Api/routes/api.web
Add the snippet of code below.
Route::group(['prefix'=>'v1'], function() {
        Route::resource('articles', 'ArticleController');
    });

A resource route, contains all the necessary protocol for creating, reading, updating and deleting.
In the above snippet, we are listening for the url localhost:8000/api/v1/articles
immediately the url above is clicked, we send the data for processing in the ArticleContoller.
Creating the ArticleController.
We hit the command prompt to create the ArticleController
lucid make:controller ArticleController Api
Api in the above is added to show the particular service we are creating a controller for.
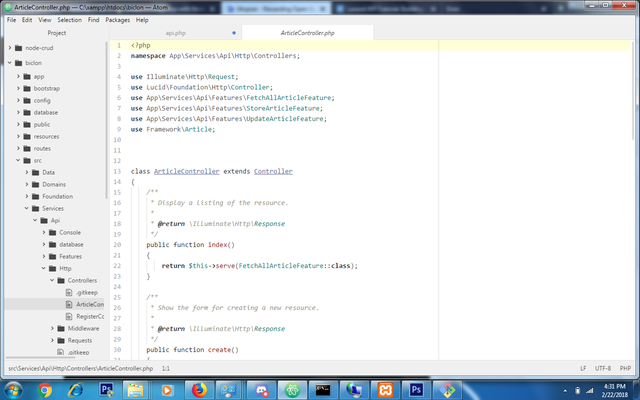
find the newly created Controller in src/Service/Api/Http/Controllers/ArticleController.php

In the controller all the methods for different protocol are available.
We are going to be using the following methods in the ArticleController
public function store(Request $request)
    {

    }
The code above stores a particular input from the user to the database. the store function uses the post protocol in which we can use the alternative route::post('article, 'ArticleController@store')`
next,
public function show($articleId)
    {

    }
This method return a single entry from the using its id, it uses the get protocol, where the alternative in the route is Route::get('article/{id}', ArticleController@show)
public function update(Request $request, $id)
    {

    }
The method input request from the user to update the database.
This method uses the the put or post protocol which is simply just semantics.
public function destroy($id)
    {
        //
    }
Lastly the destroy method does what its says, deletes a particular entry from the database.
Creating a feature
In lucid architecture, a feature is serve to a controller which house the buck of the logic of the application. a feature is registered using the lucid command prompt with the command below
lucid make:feature FeatureName ServiceName

Conclusion
Now we have the api service, ArticleController and route in the next part, we would be serving and creating a feature for our Application.
Curriculum
Posted on Utopian.io - Rewarding Open Source Contributors
Thank you for the contribution. It has been approved.
You can contact us on Discord.
[utopian-moderator]
Hey @sirfreeman I am @utopian-io. I have just upvoted you!
Achievements
Community-Driven Witness!
I am the first and only Steem Community-Driven Witness. Participate on Discord. Lets GROW TOGETHER!
Up-vote this comment to grow my power and help Open Source contributions like this one. Want to chat? Join me on Discord https://discord.gg/Pc8HG9x
Your post is very good