Pt 1: Creating Api end points with laravel
Introduction
Hello, we are beginning a new series on building API endpoints with laravel (REStful api), REST, which stands for relational state transfer, which is used for interaction from a frontend by just send data to the backend or retriving data from the backend through different transfer protocol.
Requirements
The following are the requirements for this tutorial.
- Download php 7.2.1
- Download Composer.exe
- Download xampp or wamp for windows.
- Download postman.
Difficulty level
This tutorial is rated as intermediate.
Explaining the concept of a restful api.
A restful Api can accept a request sent to it and returns a specific response of data which is used by an application. The Api needs not to know about the front end, which can be used on web and on mobile application and desktop appications.
We are going to be using different HTTP verb
GET this retrieves data from the api
POST Send data to the api and the api returns a response
PUT Edit the resource
DELETE Removes the resource or data from the database.
we are going to use the RESOURCE which contains all the specific HTTP verbs
Overview of the task.
In this series, we are going to talk a little about setting up laravel, but you can get more information on my previous tutorial, we are also going to talk about Http transfer protocols, and lastly database setup.
Setting up environment.
As you know, we are going to use lucid architecture, but this time we would be building on the laravel
Go to the htdocs in the xampp folder and open your command prompt there and use the command below to create an installation.
We are going to call this project biclon
composer create-project lucid-arch/laravel biclon
On the command line enter cd biclon to naviate to the biclon directory.
enter npm install to intall the vendor dependencies.
With the installation done, you can start the server by entering the command
php artisan serve
Database setup
We are going to be using MySql for our DB,
we are to setup the .env in the root directory of biclon folder.
APP_ENV=local
APP_KEY=base64:J1EEJcLtOpiGNXc0dZlQ7pYBpbi8a8feUDTcwpKrKqA=
APP_DEBUG=true
APP_LOG_LEVEL=debug
APP_URL=http://localhost

DB_CONNECTION=mysql
DB_HOST=127.0.0.1
DB_PORT=3306
DB_DATABASE=biclon
DB_USERNAME=root
DB_PASSWORD=

BROADCAST_DRIVER=log
CACHE_DRIVER=file
SESSION_DRIVER=file
QUEUE_DRIVER=sync

REDIS_HOST=127.0.0.1
REDIS_PASSWORD=null
REDIS_PORT=6379

MAIL_DRIVER=smtp
MAIL_HOST=mailtrap.io
MAIL_PORT=2525
MAIL_USERNAME=null
MAIL_PASSWORD=null
MAIL_ENCRYPTION=null

PUSHER_APP_ID=
PUSHER_APP_KEY=
PUSHER_APP_SECRET=
This section below, points to the database
DB_CONNECTION=mysql
DB_HOST=127.0.0.1
DB_PORT=3306
DB_DATABASE=biclon
DB_USERNAME=root
open open phpmyadmin and create the database biclon.
#Creating the migrations for bilon database
To strart, larave has created a generating tool for us using composer. we are going to open our command prompt to make both model and migration for a specific model.
php artisan make:model Article -m
The above generate the the Article model and the migration.
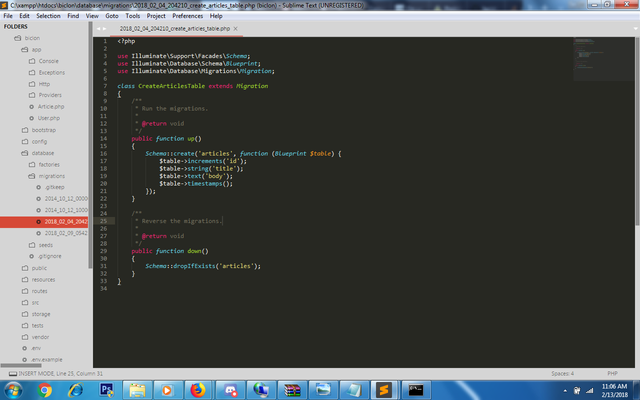
open the migration file and add the code in the up function
Schema::create('articles', function (Blueprint $table) {
            $table->increments('id');
            $table->string('title');
            $table->text('body');
            $table->timestamps();
        });
The up and down methods initiate a the migration and reverse the migration respectively
table->increments(''id") creates a table with automatic increment in the id when a new entry is added.
$table->text('body') sets the entry to the database to be a text
$table->string('title') sets the entry to the database to be a string
With laravel all you need to do is to run the command to create a web authentication system
which we are going to work on to support our api authentication mechanism.
php artisan make:auth
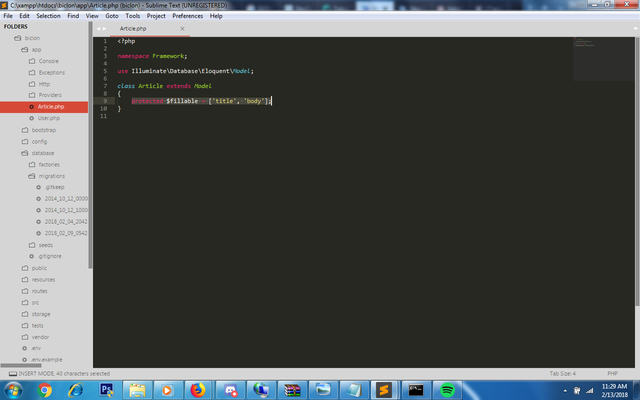
Next up open up the model, lets set up our fillables for the model Article
open up the article model and add the line below.
protected $fillable = ['title', 'body'];

We talk abut the user model in a later part of this tutorial series.
finally we can run the command below to migrate the structure to our mysql DB
php artisan migrate
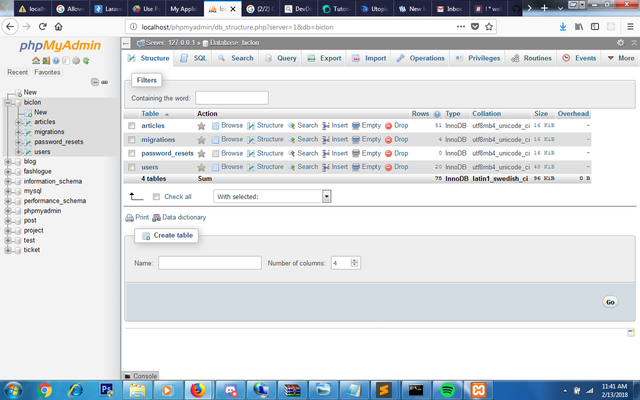
we should see this structure below in our database

Conclusion
In the next part, i will be teaching how you would automatically fill your database using Faker
cheers.
Posted on Utopian.io - Rewarding Open Source Contributors


This contribution should not have been approved since most of the content is shared in another website.
You can contact us on Discord.
[utopian-moderator]
Hey @espoem, I just gave you a tip for your hard work on moderation. Upvote this comment to support the utopian moderators and increase your future rewards!
Thank you for the contribution. It has been approved.
You can contact us on Discord.
[utopian-moderator]
Hey @sirfreeman I am @utopian-io. I have just upvoted you!
Achievements
Suggestions
Get Noticed!
Community-Driven Witness!
I am the first and only Steem Community-Driven Witness. Participate on Discord. Lets GROW TOGETHER!
Up-vote this comment to grow my power and help Open Source contributions like this one. Want to chat? Join me on Discord https://discord.gg/Pc8HG9x