🤖 TUTORIAL - Contest Bot - Building bots With steem-js #9
This tutorial is part of a series on ‘How To Build Bot’s Using Steem-JS’ it aims to demonstrate practical applications for bots and demystify the code used to create them.
- #1 Auto-liking bot
- #2 Curation bot
- #3 Auto follow bot
- #4 Paid upvote bot
- #5 @ Mention Notifier bot
- #6 Auto Reward Claimer bot
- #7 Bots In The Background
- #8 Stats Responder
The completed bot code is here - I know some people find it easier to see everything in one block and follow along that way. ⬅️
Outline 📝
This tutorial is a little different than previous projects in the series. We’re building a Bot & basic platform to help with running contests on a Steemit/Busy.org blog. This will be the first in a number of tutorials focussed on helping to run contests.
Imagine the Scenario of running a contest from your blog. Perhaps we are running a travel photography contest where entrants must post their best picture with the main hashtag #toptravelphoto and must also mention your page @toptravelphotos in their post. At the end of the time limit 1day/1week we will A) randomly choose a winner or B) choose the best photo.
There will be two parts to this project. First a Bot that checks for incoming posts with the correct hashtag and mention, saves them and responds to the user who entered. Second a “platform” (aka a single webpage) that reads in the saved information, displays it in a friendly format and allows for choosing a random entry.
My aim for this tutorial is to keep it simple enough to build in a reasonable amount of time without too much prior knowledge. There are of course many ways we could improve this project and alternate ways to get to the same result. This project is longer than the previous in the series, I hope you enjoy and find it useful. ✌️
Requirements
- A plain text editor (I use atom.io )
- Your private posting key - This is found in your wallet on the permissions tab on steemit.com, click ‘show private key’ (remember to keep this safe). This allows the bot to reply when users enter the competition.
Difficulty
intermediate
Please run through all other tutorials in the series to better understand what we’re working on.
(I appreciate feedback on the teaching level).
Learning Goals
- check steem posts for top level tag + mention
- save competition results to .json file
- load json file in a browser
- create random selection function
Step 1 - Bot Setup 💻
Our bot will run with Node.js in the background so we can leave it running as long as we want the competition to be active. We’ll setup with a familiar streaming function listening for transactions. Download and save the starter file - only 8lines of js initialise an npm project so we can use the package manager to install steem see the below code in the command-line to kick things off.
npm init
npm install
node bot.js (or whatever you called your file)
This will get the transactions streaming like we’re used to. Next narrow down the results for out competition entries.
Step 2 - Bot - Checking transactions
Rules for the competition
- must be a full post not just a comment
- must use competition tag for main/first tag
- must include @mention of competition account
Create an if statement to enforce these rules within our transactions stream. .parent_permlink is the top level tag when posting a new post on steem and a link to the main post when replying. Checking this data point will tell us both if this is a top level post and that it uses the correct tag.
if (txType == 'comment' && txData.parent_permlink == ‘travel’ )
While not strictly necessary I think it helps for clarity to reconstruct the data from each post into something more manageable. Displaying the data later we’ll want, post title, author, main tag and permlink.
    let data = {
      name: txData.author,
      title: txData.title,
      tag: TAG,
      permlink: txData.permlink
    }
Each time we have an entry we’ll want to save it, lets call that function now and we’ll go on to create it next. Pass the newly constructed data into the function.
saveData(data)
I am leave including @ mention from this tutorial as it is already covered in project #5 you can refer back to that if you’d like to add it here too.
Step 3 - Bot - Saving data
Next we’ll save the transactions that fit our requirements into a .json file. If we’re building a contest that would expect to have many entries very quickly we should use a database instead. For the sake of the tutorial and to save needing to introduce, download, install and setup a database we’ll use a single file for our entries.
While using a .json file within nodes is fairly straightforward it still involves a number of steps. JSON stands for Javascript Object Notation and while it’s fairly friendly we need to take the raw text and turn it into javascript that can be accessed and update dynamically within our code. We do this by parsing or in javascript it’s JSON.parse() this turns the text into a real javascript object that can be updated, looped over etc you can also do the reverse with JSON.stringify()
- Require the file system library for easily manipulating files on the computer system
let fs = require('fs’); - Create a new empty entries.json file that contains only square braces
[] - Save a reference to the file
let file = './entries.json’ - Select and open file
let data = fs.readFileSync(file, 'utf8’) - Parse the file into an array of objects
array = JSON.parse(data); - Add the new data passed from the transaction stream into the array we just created.
.push()is an Array function that adds the data as a new item at the end of the array.
array.push(postData); - Turn the full set of data we have just updated back into plain text so it can be stored again.
let json = JSON.stringify(array); - Save the newly updated and reformatted data back to the filesystem with the same name as before (overwriting it)
fs.writeFileSync(file, json, 'utf8’);
After working through all of those steps, make sure it’s wrapped in a function so it can be easily used from within streamTransactions(). The full function below.
function saveData(postData){
    let data = fs.readFileSync(file, 'utf8')
    let array = JSON.parse(data);
    array.push(postData);
    let json = JSON.stringify(array);
    fs.writeFileSync(file, json, 'utf8');
}
Step 4 - Bot - replying to entries
Next reply to the user who just entered, thank them and perhaps add when the competition finishes or what blog post to look out for. Add a send function right after saving the data.
To save repeating myself over multiple tutorials I’m going to instead link to the previous tutorial where we also replied with steem-js. See step 3 - replying with a comment or the full code here and feel free to ask a question if you get stuck.
Step 5 - Platform - setup
Run the bot using node.js and leave it running as it saves entries. Next we’ll look at what to do for the end of the competition
Create a new index.html file. Link to bootstrap CDN for so quick style improvements and jQuery CDN to easily work with the data.
<html>
  <head>
    <link rel="stylesheet" href="https://maxcdn.bootstrapcdn.com/bootstrap/4.0.0/css/bootstrap.min.css">
  </head>
  <body><h2>TRAVEL Comp Post Entries</h2>
      <script src="http://code.jquery.com/jquery-3.3.1.min.js"></script>
  <script>// Our Platform Code here :)</script>
    </body>
</html>
With a new index page setup our first task is reading the data from the .json file that has been storing the competition results.
Step 6 - Platform - read data
For security reasons your browser can not use AJAX to read files. This is good thing but means we’ll need to setup a simple web server for this project to work. I recommend install http-server using node.js, with one command you can launch a web server using an folder.
npm install http-server -g
now run http-server from within the working folder.
With the server online we can use jQuery to read the json file. the $.getJSON() is shorthand for a regular get AJAX request with the datatype set to Json.
$.getJSON('./comp.json', function(json) {
    console.log(json)
})
Step 7 - Platform - Display data
How you want to display results may vary depending on the type of competition you’re working on. In future we’ll look at ranking and or adding a gallery for viewing photo contests. today we’ll list all entries in a big table.
- create the table structure in html. Tables are made up on a
<table>tag<thead>for a table heading row and a<tbody>area (currently blank) that will be filled with the data form steem entries.
      <table class="table">
          <thead>
            <tr>
              <th scope="col">#</th>
              <th scope="col">Name</th>
              <th scope="col">Post</th>
              <th></th>
            </tr>
          </thead>
          <tbody>
          </tbody>
        </table>
After reading the .json file with jquery, loop over the data and add it into the table. we can use Javascript template string which use the backpack ` notation and allow string interpolation ${varibalename} to make friendly looking templates.
- Loop over the json data with a forEach statement
- For each item create a new table row from our template example
- Add the new table row into the table under all the others.
      json.forEach((item, i) => {
        let template =
        `<tr>
          <th>${i+1}</th>
          <td>${item.name}</td>
          <td><a href="https://steemit.com/@${item.name}/${item.permlink}">${item.title}</a></td>
        </tr>`
        $('tbody').append(template)
      })
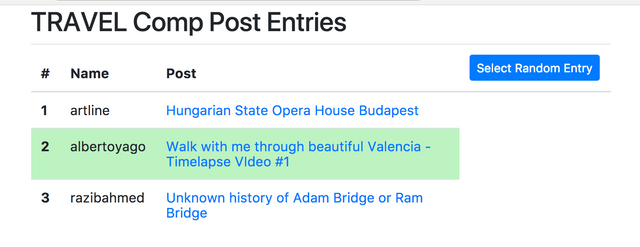
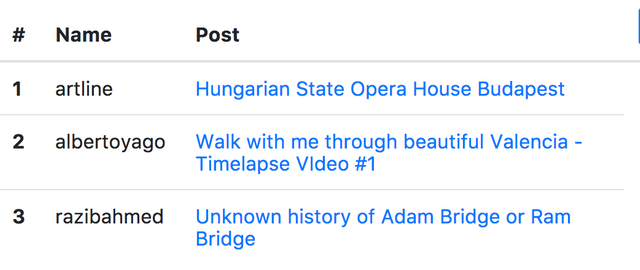
reload the index.html page to see the new list of entries as a html table. with the inclusion of bootstrap it should look pretty good.
step 8 - Platform - random generator
For this competition we’ll add a random selection function.
First we’ll want a simple button on the front end UI to allow a user to click to select a random winner. Add a button, anchor tag or span above the table or in in the final table heading column. Add a class we can use to select this button in javascript and some bootstrap css classes for styling.
<th><span class="random btn btn-sm btn-primary">Select Random Entry</span></th>
- create a click event handler for random button
- get total amount of entries
- get a random number from 1 to the number of entries
- select the random entry and colour it to easily see it in the UI
$('.random').on('click', function(){})
To get the total entries we’ll need to check the json data length from inside of the $.getJSON callback e.g entries = json.length; while saving the entries in a variable outside of the callback to be used in this new click event.
First get a random number using javascript math library, multiple that by the total entries and get a whole number using Floor.
let random = Math.floor(Math.random() * entries)
The final step is to select the corresponding item in the UI and highlight it. if you had a lot of entries it might be worth making a modal Window or cloning the result to the top of the table. Get the table row that is equal to the random number we just generated.
let winner = $('tbody tr').eq(random).css('background', ‘blue’)
Step 9 - Finish
The setup for using this project would be to run the first part continuously for a day or week in the background using forever, pm2 or similar then checking the front end table at the end of the contest time.
Let me know what you think of this robot tutorial.
Other Posts in This series
- Part 1 - Beginner friendly - Build your first Steem bot in Javascript - 30minutes
- Part 2 - Beginner friendly - Building bots With steem-js #2
- PArt 3 - Copy Follow Bot - Building Bots With steem-js #3
- Part 4 - Paid Voting Bot - Building Bots With steem-js #4
- Part 5 - Mention Notifier Bot - Building Bots With steem-js #5
- Part 6 - 🤖 TUTORIAL - Auto Reward Claimer - Building bots With steem-js #6
- 🤖 TUTORIAL - Bots In The Background - Building bots With steem-js #7
- 🤖 TUTORIAL - Statistics Responder - Building bots With steem-js #8
Posted on Utopian.io - Rewarding Open Source Contributors


Thank you for the contribution. It has been approved.
You can contact us on Discord.
[utopian-moderator]
Thanks for the review Amos 👊
should i really test like this?
Hey Sam,
Question... do you think it would be difficult to build a bot that could count votes in the comments of a post?
I'm thinking the post could have:
Votebot 1 : For decision X
Votebot 2 : For decision Y
Votebot 3 : For decision Z
And then commenters could use this bot which tracks the number of votes for each for that one post...
Hard / Easy / Medium?
Thanks Sam... if I'm off my rocker and/or super annoying, let me know.
Hey dude.
Not 100% what you mean either way it's probably not that difficult or time-consuming.
Is it -
Person A comments: vote for Fred
Person B comments: vote for Sarah
Person C comments: vote for Fred
Person D comments: vote for Harry
etc.
Bot replies/tracks total votes after X amount of time.
or
Main account posts multiple comments 1) Fred, 2) Sarah, 3) Harry and bot checks upvotes on each comment?
Totally happy to help if you have any idea where something like this might be helpful. The time consuming part is often making an interface that makes the bot easier to use, actually building the bot for the command-line isn't so bad.
Thanks Sam... it's the first one.
I'm working on a project where we want commenters to help drive a story/narrative by picking one of, say, 4 options.
I imagine lots of other Steemians would want to use this too, but we've got our specific project in mind.
I'm happy to learn the coding to try and make this work... just not super sure if it was possible or where to start.
You did it again :) 👊
haha thanks Jo! I think of ideas faster than I can build them.
Then watch out not to suffer from shiny-objects-syndrome like I do :)
yeah it's a real problem, working through a bunch of updates to my projects this week
test
just awesome
good to hear, thanks
Hi Sam, your tutorials are really helpful. I am following your posts regularly. I have a suggestion that would benefit absolute beginners. Would you please write a tutorial about how to use Steem JS library? It would be nice if you can create a very simple bot and also tell the beginners step-by-step how and from where they can get all the info.
Thanks a lot.
hey @monajam. Thanks for the comment. I'm unsure if you have been through all of my tutorials.
What you are asking is exactly what my first tutorial in this series does! See here If you have any more specific information about what you don't understand or cannot set up then please ask those questions.
Hey @sambillingham I am @utopian-io. I have just upvoted you!
Achievements
Suggestions
Get Noticed!
Community-Driven Witness!
I am the first and only Steem Community-Driven Witness. Participate on Discord. Lets GROW TOGETHER!
Up-vote this comment to grow my power and help Open Source contributions like this one. Want to chat? Join me on Discord https://discord.gg/Pc8HG9x
testing
Nice! I’m wondering, can a bot be built with PHP or Java? Btw, upvoted and followed you.
Hey, thanks. Yes you can use PHP or Java, there are already API wrappers written for them to make it easier - https://www.steem.center/index.php?title=API_Libraries
test
testing boom!
Really? Thanks! I’ll check them out :)
test
test2