Auxiliary Wireless TV Power Remote Control using NodeMCU devkit v1.0
What Will I Learn?
- You will learn to assemble the electronic circuits that are necessary to send and receive infrared signals using NodeMCU devkit v1.0 and other low-cost electronic components to make an auxiliary wireless TV power control.
- You will learn to program your NodeMCU devkit v1.0 to transmit and evaluate specific infrared codes by using Arduino IDE.
- You will learn the practical application of this tutorial in electronic projects, studies or in the industry.
Requirements
Materials Needed
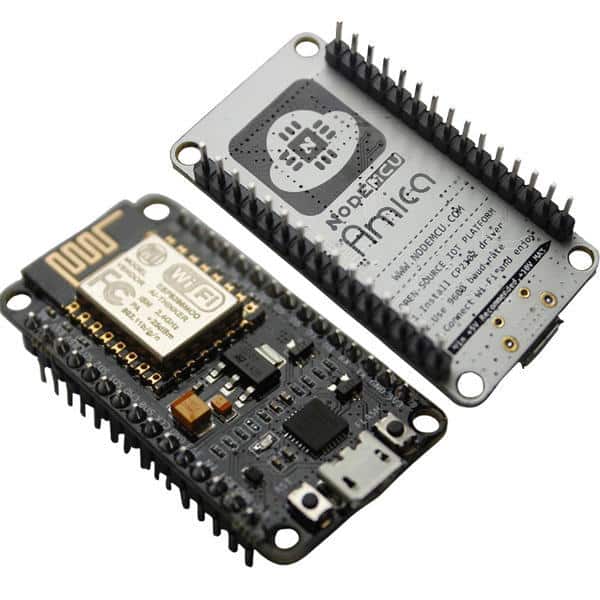
- NodeMCU devkit v1.0
- 940 nm Infrared Transmitter LED
- Infrared Receiver
- 2N222 NPN Transistor
- 220 ohms Resistor (1/4 W)
- USB Cable (Type A to Mini B)
- Junction Wires
- Computer
Software Applications
- Open-Source Arduino Software (IDE) / Arduino IDE
Difficulty
- Intermediate
Description:
The NodeMCU is an established open source IoT platform. The name NodeMCU actually refers to the firmware rather than the devkits. The NodeMCU devkit v1.0 is a single-board microcontroller and its developer is the ESP8266 Opensource Community. Its central processing unit is ESP8266. It has 128 kB of memory and 4 MB for its storage. It can be powered thru USB.
For a further research about NodeMCU devkit v1.0. Here is its official website
Infrared Signals belongs to the frequency spectrum closed to that of visible light. It does not penetrate thru walls. It is commonly used for close wireless communications.
When you toggle the power of your TV using its remote control, you are actually using infrared signals to send specific infrared codes to your TV so it would turn itself on from standby mode.
In this tutorial, we will use the microcontroller capabilities of the NodeMCU devkit v1.0 board to implement wireless infrared communication.
Tutorial Contents
Step 1: "Downloading the ESP8266 Boards and its Necessary Files"
Open Arduino IDE and click on the preferences under the FIle tab.

On the Additional Boards manager URLs on the Preferences window, type http://arduino.esp8266.com/stable/package_esp8266com_index.json. And press ok.

Then, click on the Tools tab and go to the Boards Manager. Search ESP8266 And, on the search bar, look for esp8266 by ESP8266 Community and click on the Install button.

After the installation of ESP8266, go to the Tools tab and change the board to NodeMCU 1.0 (ESP-12E Module)

Step 2: "Programming Your Board"
Now, we will download the library of infrared communication for ESP8266 boards like the NodeMCU devkit v1.0. Go to Sketch>Include Library>Manage Libraries... On the search tab, look for IRremoteESP8266 and install it.

In order to control the power toggle of your television, first, we must know the infrared code used by your remote control to turn ON/OFF your television. To do this, we need an IR receiver connected to to the NodeMCU board like this:
I used Fritzing Beta to make these circuits and models.

Take note of the pinouts of the discrete electronic components.

Then, open a new sketch in the Arduino IDE and input this code:
#ifndef UNIT_TEST

#include <Arduino.h>

#endif

#include <IRremoteESP8266.h>

#include <IRrecv.h>

#include <IRutils.h>

// An IR detector/demodulator is connected to GPIO pin 14(D5 on a NodeMCU

// board).

uint16_t RECV_PIN = 14;

IRrecv irrecv(RECV_PIN);

decode_results results; // Somewhere to store the results

irparams_t save;  //A place to copy the interrupt state while decoding.


void setup() {

//Status message will be sent tp the PC at 115200 baud

Serial.begin(115200, SERIAL_8N1, SERIAL_TX_ONLY);

irrecv.enableIRIn(); //Start the receiver

}


void loop() {

//Check if the IR code has been received.

if (irrecv.decode(&results)) {

long int decCode = results.value;

Serial.println(decCode);

irrecv.resume(); //receives the next ir codes

Serial.println(decCode);

}

}
The program simply evaluates the infrared code received thruConnect your NodeMCU devkit v1.0 to your computer using the USB cable (Type A to Mini B).IRrecv irrecv(RECV_PIN)using the IR receiver that is connected thru pin 14(D5) of the NodeMCU devkit v1.0. On the IF statement, I simply convert the results stored on thedecode_results resultsinto its decimal value. We will need to convert this decimal value into its equivalent hex value which is very easy. You can use a scientific calculator to do it.
Go to the device manager and identify its port number if it is your first time to use this board. Now, on the Arduino IDE, go to Tools > Port and look for the port of your NodeMCU dekit v1.0.
Upload the program above. Make sure to input it properly. (I have already compiled this program and it has no errors)

Step 3: "Test Your IR Receiver Circuit"
After uploading your program to your board, you can test the circuit I have above for receving IR codes using the board. Do not unplug the board from the USB port of your computer. Go to serial monitor on the Arduino IDE. Get your TV's remote control, point it at the IR receiver and press the power button of the remote control. In my case, this is the output decimal code on my serial monitor.
284158740

284158740
284158740 is equal to10EFEB14 in hex value. I used a scientific calculator to convert it. We will need this hex value to duplicate the power toggle of the remote control when we send infrared codes to turn ON/OFF the TV using our NodeMCU devkit v1.0.
Step 4: "Assembling your TV Remote Power Control Circuit"
Get your NodeMCU devkit v1.0 and disassemble the IR receiver circuit you have previously constructed. And construct the circuit below for sending infrared signals on the same breadboard.

Then, open a new sketch in the Arduino IDE and input this code:
#ifndef UNIT_TEST

#include <Arduino.h>

#endif

#include <IRremoteESP8266.h>

#include <IRsend.h>

// An IR detector/demodulator is connected to GPIO pin 14(D5 on a NodeMCU

// board).


IRsend irsend(4);  // An IR LED is controlled by GPIO pin 4 (D2)


void setup() {

irsend.begin();

Serial.begin(115200);

irsend.sendNEC(0x10EFEB14, 32);

}

void loop() {


}
The program simply set the NodeMCU board to send an infrared signal whenever the reset button on the board is pressed thru the code irsend.sendNEC(0x10EFEB14, 32). It uses the same library as receiving infrared signals on our prior program.Step 5: "Testing Your TV Remote Power Control"

Point your assembled circuit with the infrared LED in front on your TV. This will turn ON/OFF your television. You can replace the infrared code to be sent. Rather than turning ON/OFF the TV, you can also replace it with volume adjustment, switching channels or etc.
You just have to simply follow my tutorial and tweak the infrared codes on the program. The same circuit can also be used.
Curriculum
This is my first contribution to utopian-io tutorial.
This tutorial is very useful when you want to implement an infrared communication between two adjacent points. The medium of communication is air hence, it is wireless. It is ideal to minimize excessive wires for very complex systems. And most of all, both the NodeMCU devkit v1.0 and the Arduino IDE are open source.
I hope you enjoy my tutorial. Till next time!
Your contributor, @japh
Posted on Utopian.io - Rewarding Open Source Contributors
w0w interesting you have my vote!!
What programming language does Arduino IDE compile? I love this post, followed
The arduino language uses a set of C/C++ functions that can be called by the codes we used.
Thanks @hillstech.
This is a very good tutorial @japh . It's a complete wrap up of the do-it-yourself for the nodemcu. Looking forward for more tutorials on nodemcu and the like :D
Thanks @leryam12. I was inspired by your contributions. We both like this kind of tutorials. I am also looking forward for your tutorials.
An alternative way if i lost my tv remote 😂
Yeah. You can also use this as an alternative for your air conditioner remote control or any appliances that uses infrared remote control systems.
this makes me question my technical competence.
The difficulty of this tutorial is intermediate. You can do this too @sabo. I trust your skills.
This is a very well guide and example of an application of arduino for us lower years. Looking for more of this kind of post sir japh.
Thank you @jcpuzs1. I'm glad you liked my tutorial. I will try to improve more.
Thank you for the contribution. It has been approved.
You can contact us on Discord.
[utopian-moderator]
Thank you @manishmike10. I will put the codes in the code blocks next time and I will fix this one too.
Is this applicable to all brand of TV ?
Yes, it is applicable to all brands of TV @carpieeew. As long as the infrared receiver of the TV is functioning.
I personally don't think I will ever attempt to make this.. lol But I loved how you took your time and wrote detailed instructions how to build one from scratch.
So hats of to you my friend for taking the time to write it, and educating people interested in building something like this. :)
Have an amazing day. :)
Thank you @awakentolife. Still grinning whenever I remember your story about your dreams and those chick peas you overcooked.
I really love topics like this. I am on my final year in engineering and by writing about stuffs like this, I can share my knowledge and develop my skills as well.
Man, I was so lucky with the chickpeas incident. It could off ended up way different. :)
It is all about doing and writing about what you love to do and write about. We can see in your posts you truly do love what you are doing. :)
Hey @japh I am @utopian-io. I have just upvoted you!
Achievements
Suggestions
Get Noticed!
Community-Driven Witness!
I am the first and only Steem Community-Driven Witness. Participate on Discord. Lets GROW TOGETHER!
Up-vote this comment to grow my power and help Open Source contributions like this one. Want to chat? Join me on Discord https://discord.gg/Pc8HG9x