Simple Shopping Cart Using Vue.js and Materialize - 2
Repository
What Will I Learn
In this tutorial we will build a simple shopping cart using Vue.js and MaterializeCSS framework.
This is the second tutorial in this series, you can find the link to the first tutorial at the end of this post.
For an introduction to Vue.js and its' installation check out the first tutorial.
In the first post for this series we installed vue and vuex , we also built the navbar and productlist component.
In this tutorial we will cover the following
- Building Components (cont'd)
- State Management (cont'd)
We will add a new component shoppingcart.
Our cart component makes use of data from our store.js to modify its' behavior whenever any event is emitted.
Requirements
You need to have to have the latest version of NodeJS and NPM installed. Refer to the first tutorial of this series for a link to the official guide.
You need to have Vue installed, the Vue installation process was covered in the first tutorial
Code Editor
Difficulty
Intermediate
Tutorial Contents
Building Components(cont'd)
In the last tutorial we setup our navbar and productlist components.
We also created our store.js file to manage state and hold information about our products which we can export for use in other modules.
In this tutorial we will create a shoppingcart component, we will also work on our store.js file to include more features for our store
Shopping Cart
To create a our new component, go to the src directory in your project folder and create a new file shoppingcart.vue
Code for our Shopping Cart Component
<template>

<div  id="shopping-cart">


<div  class="card">

<div  class="card-action">

<a  class="waves-effect waves-light btn blue">Cart<span  class="badge red">{{ cartLength }}</span></a>

</div>

</div>


<table  v-for="(item, index) in  cart">

<tr>

<td  class="center-align center">{{ item.name }}</td>

<td  class="center-align center">{{ '$'  +  item.price }}</td>

<td  class="center-align center">

<a  class="waves-effect waves-light btn red"  @click="removeFromCart(index)"  style="padding-top: 5px;"><IosCloseIcon  w="20"  h="20"  /></a>

</td>

</tr>

</table>

<table>

<tr>

<th>Total</th>

<th>{{ '$'  +  total }}</th>

</tr>

</table>


<div  class="card">

<div  class="card-action">

<a  class="waves-effect waves-light btn blue darken-2">Checkout</a>

</div>

</div>


</div>

</template>


<script>

import  IosCloseIcon  from  '../node_modules/vue-ionicons/dist/ios-close.vue'


export  default {

name:  'shoppingcart',

computed: {

inCart() { return  this.$store.getters.inCart; },

cartLength(){ return  this.inCart.length; },

cart(){

return  this.$store.getters.inCart.map((cartproduct) => {

return  this.$store.getters.products.find((itemForSale) => {

return  cartproduct  ===  itemForSale.id;

});

});

},

total(){

return  this.cart.reduce((acc, cur) =>  acc  +  cur.price, 0);

}

},

components: {

IosCloseIcon

},

methods: {

removeFromCart(index) {

this.$store.dispatch('removeFromCart', index)

}

}

};


</script>


<style>

table {

width: 320px;

}

tr {

width: 300px;

}

td {

width: 90px;

margin: auto;

padding: 2px;

}


</style>
Analysis
For the
<template></template>tag, we create a new<div id="shopping-cart"></div>.To display the shopping cart header we add a new card using the tag
<div class="card"></div>Inside the card we have
<div  class="card-action">

<a  class="waves-effect waves-light btn blue">Cart<span  class="badge red">{{ cartLength }}</span></a>

</div>
The above code creates a card footer with the
<div class="card-action"></div>tagInside the card footer we have a button with a badge that will output the number of products presently in the shopping cart.
<a class="waves-effect waves-light btn blue">Cart<span class="badge red">{{ cartLength }}</span></a>
We bind
{{ cartLength }}to the badge,cartLengthis a computed property that will return the number of products in cart.To output the contents of our cart we create a new table
<table v-for="(item, index) in cart"></table>We use the
v-fordirective to bind data to this table.v-for="(item, index) in cart"implies that for everyitemin thecartobject some code should be executed.cart()is a computed property which returns data from ourstoreOur table contains one row
 <tr>

    <td  class="center-align center">{{ item.name }}</td>

    <td  class="center-align center">{{ '$'  +  item.price }}</td>

    <td  class="center-align center">

    <a  class="waves-effect waves-light btn red"  @click="removeFromCart(index)"  style="padding-top: 5px;"><IosCloseIcon  w="20"  h="20"  /></a>

    </td>

    </tr>
<tr></tr>creates a new table rowFor the contents of our row we have the first tag
<td class="center-align center">{{ item.name }}</td>We bind the data
{{ item.name }}to the first column.item.namewill be fetched from our computedcart()property and it will return the name of the product being added to the cart.The second column contains
<td class="center-align center">{{ '$' + item.price }}</td>In the second column we bind the data
{{ '$' + item.price }}.item.pricewill be fetched from our computedcart()property and it will return the price of the product being added to the cart.The following are the contents of the third column
<td  class="center-align center">

    <a  class="waves-effect waves-light btn red"  @click="removeFromCart(index)"  style="padding-top: 5px;"><IosCloseIcon  w="20"  h="20"  /></a>

</td>
In the third column we have a icon button with a
@clickevent listener , whenever the button it fires theremoveFromCart(index)method.To render our
shoppingcartin the root component, we need to do the following in ourApp.vuefileThe cart is displayed on a row alongside the
productlist, the code for displaying the cart inApp.vue
<div  class="row"  style="margin-top: 100px;">

<div  class="col l9">

<productlist  v-for="product  in  products"  :key="product.id"  :id="product.id"  :name="product.name"  :image="product.image"  :price="product.price"  />

</div>

<div  class="col l3">

<shoppingcart  />

</div>

</div>
The cart is outputted in the second column using
<shoppingcart />tag.We import the component using the following statement
import shoppingcart from './shoppingcart.vue';
- We also register the component using
components: {

// other code

shoppingcart

}
If we view our app now the component will be added as shown below
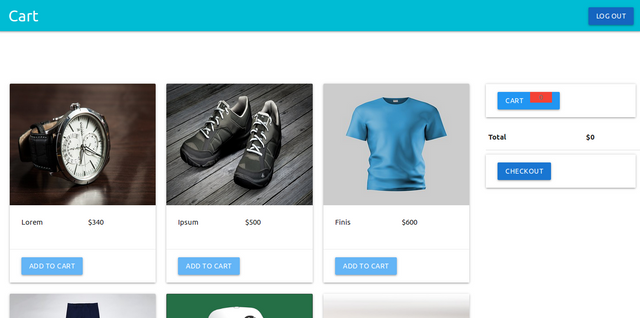
For the
<script></script>tag we get the component module ready for export by using theexport default {}statement.We register a name for our component using the
name:option.We then add a
computedproperty with the following options
computed: {

    inCart() { return  this.$store.getters.inCart; },

    cartLength(){ return  this.inCart.length; },

    cart(){

    return  this.$store.getters.inCart.map((cartproduct) => {

    return  this.$store.getters.products.find((itemForSale) => {

    return  cartproduct  ===  itemForSale.id;

    });

    });

    },

    total(){

    return  this.cart.reduce((acc, cur) =>  acc  +  cur.price, 0);

    }

    },
- The first computed data
inCart()will return data stored in theinCartarray in ourstore.jsfile.
return this.$store.getters.inCart;
The above statement will return data gotten from the
inCartarray by thegettersin ourstore.jsfile.The second computed data
cartLength()will return the length of theinCartarray which is also the number of products in the cart.In our
store.jsthe following code will handle the request to pass data from theinCartarray in ourstoreto theshoppingcartcomponent.
getters: {

// other code here
inCart:  state  =>  state.inCart

},
- The third computed data
cart()will return the products presently in the cart on their way to be checked out.
return  this.$store.getters.inCart.map((cartproduct) => {

    return  this.$store.getters.products.find((itemForSale) => {

    return  cartproduct  ===  itemForSale.id;

    });

    });
The above code will loop through the inCart array, compare it with the products array and return the product from inCartthat matches the id of a product in the products array
- We also add one function under the
methodsoption
methods: {

    removeFromCart(index) {

    this.$store.dispatch('removeFromCart', index)

    }

    }
Whenever the method removeFromCart(index) is fired the following code is executed
this.$store.dispatch('removeFromCart', index)
- The above code dispatches an action to our store. To define the action in our store, add the following code to
store.js
actions: {

// other code

removeFromCart(context, index) {

context.commit('REMOVE_FROM_CART', index);

}

}
Whenever the
removeFromCartaction dispatches, it will commit the action to the mutationREMOVE_FROM_CARTThe mutation for our
removeFromCartaction
mutations: {
// other code

REMOVE_FROM_CART(state, index) {state.inCart.splice(index, 1)}

},
- If we save the file now and click on the
ADD TO CARTbutton in the product liss component our products will be added to the cart as shown in the picture below
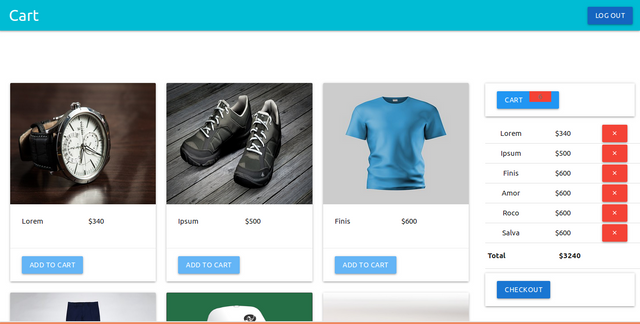
- If we click on the red button appearing alongside all products in the cart, the product inline with the button will be removed from the cart.
Thank you for your contribution.
Below are few suggestions for you to improve your future contributions:
Your contribution has been evaluated according to Utopian rules and guidelines, as well as a predefined set of questions pertaining to the category.
To view those questions and the relevant answers related to your post,Click here
Need help? Write a ticket on https://support.utopian.io/.
Chat with us on Discord.
[utopian-moderator]
Hey @gotgame
Thanks for contributing on Utopian.
We’re already looking forward to your next contribution!
Contributing on Utopian
Learn how to contribute on our website or by watching this tutorial on Youtube.
Want to chat? Join us on Discord https://discord.gg/h52nFrV.
Vote for Utopian Witness!