Building A Content Management System Using The MEAN Stack - 1 (Create Server, Config File and Helper Modules)
Repository
https://github.com/nodejs/node
What Will I Learn
In this new series of tutorials we are going to build a content management system for blogs and websites from scratch using the MEAN stack(MongoDB, ExpressJS, AngularJS and Node ).
The tutorial is written in a beginner friendly context which makes it easy for anyone to follow and learn regardless of their prior experience.
In this particular tutorial which is the first in the series we will learn how to build the following features as part of our CMS
Setting up dependencies and using them
Creating a nodejs application server for a content management system
Creating a config file for the application
Adding helper modules to perform specific functions
Requirements
- Latest versions of NodeJS and NPM,
- AngularJS
- Text Editor
- Basic to Intermediate knowledge of JavaScript and its syntax
- Basic knowledge on how to use a terminal/command line
Difficulty
- Intermediate
Tutorial Contents
Server
As with most web applications we will start by creating the server before moving on to the main application.
Before creating the server we first have to install all project dependencies that will be used in the course of the project.
All dependencies will be stored in our package.json file.
Step 1
Create a new folder for the project, name it whatever you prefer.
Inside the project folder create a new folder and name it server. This folder will contain all codes relating to the project backend server and all API controllers.
After creating the folder navigate to the folder through the terminal or command line.
Once we are in the folder run the command npm init to create a new package.json file.
After the complete run of the command you can check in the project folder to find a new package.json file.
Now we can install all dependencies for our project.
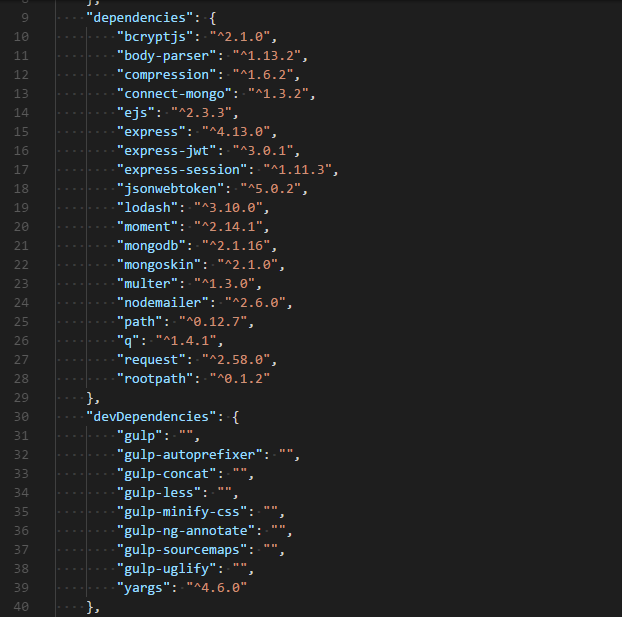
We want to install the following dependencies for use in this project
bcryptjs,
body-parser,
ejs,
connect-mongo,
compression,
express,
express-jwt,
express-session,
jsonwebtoken,
lodash,
moment,
mongodb,
mongoskin,
multer,
nodemailer,
path,
q,
request,
rootpath
The above list includes all of the main dependencies
Other useful dependencies which will be saved as devDependencies include
gulp,
gulp-autoprefixer,
gulp-concat,
gulp-less,
gulp-minify-css,
gulp-ng-annotate,
gulp-sourcemaps,
gulp-uglify,
yargs
To install all dependencies above, run npm install 'dependency name here' from your project directory in the command line.
P.S:- Add dependency name without the quote.
For example, to install the dependency bcryptjs you just have to run the following command
npm install bcryptjs and so on for all other dependencies.
For dependencies that should be saved as devDependencies add the clause --save-dev directly after the npm install command
For example, to install gulp as a devDependency run this command
npm install gulp --save-dev
That will install and save gulp as one of the devDependencies for the project.
After installing all dependencies accordingly your package.json should bear much resemblance to the screenshot below
Step 2
After installing all dependencies we now create the server.js file for our project where we will import all the modules needed for our backend server.
Before creating the new file you need to start mongodb so it can listen for any database connections.
After starting MongoDB you can move on to the next step
In the server folder containing the package.json file add the following file add a new file and name it server.js.
Open the server.js file and add the following code
require('rootpath')();

var  express  =  require('express');

var  ejs  =  require('ejs');

var  app  =  express();

var  compression  =  require('compression');

var  session  =  require('express-session');

var  MongoStore  =  require('connect-mongo')(session);

var  bodyParser  =  require('body-parser');

var  config  =  require('config.json');


// enable ejs templates to have .html extension

app.engine('html', ejs.renderFile);

app.set('view engine', 'html');


// set default views folder

app.set('views', __dirname  +  '/../client');


// enable gzip compression

app.use(compression());


app.use(bodyParser.urlencoded({ extended:  false }));

app.use(bodyParser.json());

app.use(session({

secret:  config.secret,

store:  new  MongoStore({ url:  config.connectionString }),

resave:  false,

saveUninitialized:  true

}));


// redirect to the install page if first time running

app.use(function (req, res, next) {

if (!config.installed  &&  req.path  !==  '/install') {

return  res.redirect('/install');

}


next();

});


// api routes

app.use('/api/contact', require('./controllers/api/contact.controller'));

app.use('/api/pages', require('./controllers/api/pages.controller'));

app.use('/api/posts', require('./controllers/api/posts.controller'));

app.use('/api/redirects', require('./controllers/api/redirects.controller'));

app.use('/api/users', require('./controllers/api/users.controller'));


// make JWT token available to angular app

app.get('/token', function (req, res) {

res.send(req.session.token);

});


// standalone pages

app.use('/install', require('./controllers/install.controller'));

app.use('/login', require('./controllers/login.controller'));


// admin section

app.use('/admin', require('./controllers/admin.controller'));


// blog front end

app.use('/', require('./controllers/blog.controller'));


// start server

var  port  =  process.env.NODE_ENV  ===  'production'  ?  80  :  3000;

var  server  =  app.listen(port, function () {

console.log('Server listening on port '  +  port);

});
The code above comprises the code for our backend server and in it we imported all the modules needed in our project.
Here is the analysis of what each line and block of code does in the server.js file.
In the first few lines we add all the required modules needed for the
server.jsfile to functionThe first line sets the module
rootpathas a requirement, rootpath helps us ease the process of having to remember the paths to modules needed in the projectOn the second line we set
expressjsas a requirementvar express = require('express');. ExpressJS is a NodeJS framework for building web applications.The next set requirement is the
ejsmodule which stands for Embedded JavaScriptvar ejs = require('ejs');. EJS is a JavaScript templating framework that makes it easy to generate HTML markups from pure JavaScriptSince we have set express as a requirement in this file, on the next line we make a reference to the
express()method and assign it to the variableapp.var app = express();We add another required module
compressionwhich returns a middleware that tries to compress response bodies for all requests passing through itvar compression = require('compression');The next line sets a required module
express-session. Express session provides a way to store to store user data between requestsvar session = require('express-session');In order to store sessions on MongoDB, we add a new requirement
connect-mongowhich provides a way to store sessions on the MongoDB database.var MongoStore = require('connect-mongo')(session);Another required module is body-parser which parses data from all
POSTrequests intojsonformat.var bodyParser = require('body-parser');Finally we set the
config.jsonfile as a requirement, we have not created theconfig.jsonfile yet but will do right after we are done withserver.js.
- Since our
htmlcode will be rendered using theejstemplate we need to put ourejsmodule to use and set it so that all template files will be enabled to have a.htmlextension. The code for that purpose
app.engine('html', ejs.renderFile);

app.set('view engine', 'html');
- We also set the views folder which will contain all the code for our front end files by adding this line
app.set('views', __dirname + '/../client');
- To enable and use the required module
compressionin our project we use
app.use(compression());
- To enable and use
body-parser
app.use(bodyParser.urlencoded({ extended:  false }));

app.use(bodyParser.json());
- To enable and use
session
app.use(session({

secret:  config.secret,

store:  new  MongoStore({ url:  config.connectionString }),

resave:  false,

saveUninitialized:  true

}));
- If the admin is trying to gain access to the admin area for the first time we want the application to redirect to an install page where the admin can create a new account. To do that we add the following block of code
app.use(function (req, res, next) {

if (!config.installed  &&  req.path  !==  '/install') {

return  res.redirect('/install');

}


next();

});
We need to set the routes to the controller modules for our application and we use the following block of code.
app.use('/api/contact', require('./controllers/api/contact.controller'));

app.use('/api/pages', require('./controllers/api/pages.controller'));

app.use('/api/posts', require('./controllers/api/posts.controller'));

app.use('/api/redirects', require('./controllers/api/redirects.controller'));

app.use('/api/users', require('./controllers/api/users.controller'));

// standalone pages

app.use('/install', require('./controllers/install.controller'));

app.use('/login', require('./controllers/login.controller'));


// admin section

app.use('/admin', require('./controllers/admin.controller'));


// blog front end

app.use('/', require('./controllers/blog.controller'));
In the code block above we added the routes for standalone pages and features of our CMS among the added routes we have the following
- Contact Form Controller
- Pages Controller
- Posts Controller
- Redirect Controller
- Users Controller
- Install Controller
- Login Controller
- Admin Controller
- Blog Controller
All controller files will be located in the controllers folder which will be created along with the front end and services modules.
- We also need to allow AngularJS have access to the
jsonwebtokenmodule which is one the project dependencies installed earlier. We do that by adding the following
app.get('/token', function (req, res) {

res.send(req.session.token);

});
- Finally, to verify that our server is working and gain access to that server we set up a port and enable the server to listen at that port for any changes in the server file
var  port  =  process.env.NODE_ENV  ===  'production'  ?  80  :  3000;

var  server  =  app.listen(port, function () {

console.log('Server listening on port '  +  port);

});
- Before starting the server we need to create the
config.jsonfile, it will contain database configuration for the data to be passed to the database.
In the server directory create a new file config.json the code for config.json
{"connectionString":"mongodb://localhost:27017/meanie","secret":"REPLACE THIS WITH YOUR OWN SECRET, IT CAN BE ANY STRING","contactEmail":"YOUR EMAIL HERE","installed":true}
Save the file and open the command line to start the server.
To start the server from the from the server directory terminal, run
node server
At this point you should get a result identical to the screenshot below

Step 3
We are going to add some helper modules to help perform some specific functions.
To add these modules we first of all need to create a new directory in our server directory. Name the new directory helpers.
The first helper module we will use is the fs module which will allow us to work with the file system on our computer.
To use the fs module create a new file file-exists.js and in the file add the following code
var  fs  =  require('fs');


module.exports  =  fileExists;


function  fileExists(filePath) {

try {

return  fs.statSync(filePath).isFile();

} catch (e) {

return  false;

}

}
In the file above we have a function fileExists() which takes a parameter filePath
What this function does is to take the value filePath and tries to return a boolean by checking if the path provided in the filePath parameter is truly a file by using the isFile() method.
If it returns true the code runs if it returns false then it catches an error and returns false.
The second helper module we'll add is a file pager.js. In the helpers directory create a new file pager.js.
In the new file we have the code block below
var  _  =  require('lodash');


module.exports  =  pager;


function  pager(totalItems, currentPage, pageSize) {

// default to first page

currentPage  =  parseInt(currentPage  ||  1);


// default page size is 5

pageSize  =  parseInt(pageSize  ||  5);


// calculate total pages

var  totalPages  =  Math.ceil(totalItems  /  pageSize);


var  startPage, endPage;

if (totalPages  <=  10) {

// less than 10 total pages so show all

startPage  =  1;

endPage  =  totalPages;

} else {

// more than 10 total pages so calculate start and end pages

if (currentPage  <=  6) {

startPage  =  1;

endPage  =  10;

} else  if (currentPage  +  4  >=  totalPages) {

startPage  =  totalPages  -  9;

endPage  =  totalPages;

} else {

startPage  =  currentPage  -  5;

endPage  =  currentPage  +  4;

}

}


// calculate start and end item indexes

var  startIndex  = (currentPage  -  1) *  pageSize;

var  endIndex  =  Math.min(startIndex  +  pageSize  -  1, totalItems  -  1);


// create an array of pages to ng-repeat in the pager control

var  pages  =  _.range(startPage, endPage  +  1);


// return object with all pager properties required by the view

return {

totalItems:  totalItems,

currentPage:  currentPage,

pageSize:  pageSize,

totalPages:  totalPages,

startPage:  startPage,

endPage:  endPage,

startIndex:  startIndex,

endIndex:  endIndex,

pages:  pages

};

}
On the first line we set the JavaScript module lodash as a requirement, by assigning the require(lodash) method to the var _.
Lodash was installed earlier as one of the server dependencies.
Lodash does a good job of making JavaScript easier to write by providing a library of functions for working with arrays, objects and strings.
We also need to export the module so it can be put to use in other files and modules in our application. We achieve that by using the following line
module.exports = pager;
We also create a new function named pager and we assign three parameters to it totalItems, currentPage, pageSize
The second variable parameter of our function currentPage is assigned a method parseInt(currentPage || 1);.
The parseInt() method takes a string argument, parses it and returns an integer.
In this case it takes the value of the parameter currentPage or 1 and parses it as a string to return an integer as final value which is assigned to the variable currentPage.
The third variable parameter of our function pageSize is assigned the same method as earlier parseInt(pageSize || 5); which parses the value of the parameter pageSize or 5 and returns it as an integer assigned to the variable pageSize.
We also have a variable totalPageswhich take the value of the first and third parameter of thepager function, that is totalItems and pageSizeand divides it against each other with totalItems as the numerator.
The result of the division is then rounded off to the nearest integer greater than or equal to the said result using the JavaScript method Math.ceil() which is part of the JavaScript Math module.
We go on to create two new variables startPage and endPage, then an if... else statement is implemented.
Using all the variable created earlier in the pager function the statement checks to see if the overall number of pages amount to 10 or less, if that condition is true the variable startPage is assigned the integer value of 1 which signifies the first page on the list of pages.
Under the above stated condition the value of the variable endPage is set to be the value of an earlier variable totalPages.
What this if statement amounts to is that whenever the list of active pages is less than or equal to 10 then the integer value last active page should be equal to the integer value of total pages available.
After the if statement we have a else statement which is presented with more complexities than the if statement we just created.
Inside the else block we create a new if statement with the condition currentPage <= 6.
There are two new variables in the if block startPage and endPage.
startPage is assigned the value 1 and endPage is assigned the value 10.
Whenever the integer value for the currently active page is less than or equal to six, the first page on the list of shown pages will have the integer value of 1 and the last page on the same list will have the integer value of 10.
We now have an else if block of code with its own condition which states that currentPage + 4 >= totalPages.
The condition stated above means that if the integer value of the currently active page added to four is greater than or equal to the integer value total number of available pages the code in the else if block runs.
Inside the else if block we have a variable startPage which is assigned the value from the final result of the subtraction of 9 from the total number of available pages.
The next available variable endPage is assigned the value of the variable totalPages.
If it happens that the conditions in the first if and else if statements amount to the boolean falsethe last else statement runs.
In the last else block we have a variable startPage, here the value of startPage the result of subtracting the integer 5 from the value of currentPage .
We also have the endPage variable whose value is the result of the addition of the integer 4 to the integer value of the currentPage variable.
We also need to create program to index page items. To do that we add a new variable which will represent the point where the index will start from and we name it startIndex.
The value of the variable startIndex is the result of subtracting the integer 1 from the value of the currentPage variable and multiplying the result by the integer value of the variable pageSize.
The point at which the index will end is stored in a variable endIndex and the value is the result of finding the minimum between two integer values using the JavaScript Math.min() method.
The first value being the result of adding the integer value of pageSize to startIndex and subtracting 1 from it.
The second value is the result of subtracting 1 from the integer value of totalItems.
Finally, we create a variable pages and in the variable we put the lodash method _.range() to list the pages that fall within the range of the integer values of startPage and endPage + 1.
To complete our pager function we return the values of the variables we've created in the module as object properties and this can be found in the block
return {

totalItems:  totalItems,

currentPage:  currentPage,

pageSize:  pageSize,

totalPages:  totalPages,

startPage:  startPage,

endPage:  endPage,

startIndex:  startIndex,

endIndex:  endIndex,

pages:  pages

};
The pager.js module will provide all necessary values and parameters needed in the process of pagination when listing pages and posts.
The final helper module we'll add in our project will be named slugify.js.
To add this module create a new file in the helpers folder, call it slugify.js.
After creating the file add the following code in it
module.exports  =  slugify;


// convert string into slug

function  slugify(input) {

    if (!input)

    return;


// make lower case and trim

     var  slug  =  input.toLowerCase().trim();


// replace invalid chars with spaces

    slug  =  slug.replace(/[^a-z0-9\s-]/g, ' ');


// replace multiple spaces or hyphens with a single hyphen

    slug  =  slug.replace(/[\s-]+/g, '-');


    return  slug;

};
The purpose of the slugify module is to convert string characters in our application into slugs in order to make the content and URL much more SEO friendly and searchable.
In the slugify.js file we first of all export the slugify module to be available for use in other modules using the line
module.exports = slugify;
Following we create a function called slugify and it takes a parameter input which represents the string that will be converted into a slug once it is passed through the function.
In the function we make use of a if statement which verifies the status of the input to determine whether it should carry on with the slug conversion process using the current input.
Following that is a variable slug whose value is returned in lower case form with all existing whitespace removed.
Both of these are achieved by using the methods toLowerCase() and trim() respectively.
On the next line of code the value of the slug variable is then updated by removing all out of place symbols in the input using the method replace() to specify the unwanted symbols.
Finally we use return slug to round up our function execution.
That marks the end of creating our helpers module and the end of the first aspect of this tutorial in creating a CMS using the mean stack.
In our next tutorial we will work on creating controllers and services for all features and modules to be included in the application.
Curriculum
- Tutorial: Building an Invoice Template with MaterializeCSS and Jquery
- Simple Shopping Cart Using Vue.js and Materialize - 2
- Simple Shopping Cart Using Vue.js and Materialize - 1
Hey @gotgame
Thanks for contributing on Utopian.
We’re already looking forward to your next contribution!
Want to chat? Join us on Discord https://discord.gg/h52nFrV.
Vote for Utopian Witness!
Congratulations @gotgame! You have completed the following achievement on Steemit and have been rewarded with new badge(s) :
Click on the badge to view your Board of Honor.
If you no longer want to receive notifications, reply to this comment with the word
STOPDo not miss the last post from @steemitboard:
SteemitBoard and the Veterans on Steemit - The First Community Badge.
Hi @gotgame! We are @steem-ua, a new Steem dApp, computing UserAuthority for all accounts on Steem. We are currently in test modus upvoting quality Utopian-io contributions! Nice work!
Hello, as a member of @steemdunk you have received a free courtesy boost! Steemdunk is an automated curation platform that is easy to use and built for the community. Join us at https://steemdunk.xyz
Upvote this comment to support the bot and increase your future rewards!
Congratulations @gotgame! You have completed the following achievement on Steemit and have been rewarded with new badge(s) :
Click on the badge to view your Board of Honor.
If you no longer want to receive notifications, reply to this comment with the word
STOPDo not miss the last post from @steemitboard:
SteemitBoard and the Veterans on Steemit - The First Community Badge.