Understanding Relationships in Realm Database using Java in Android Studio - PART 1 (One To One and One To Many Relationship)

Repository
https://github.com/realm/realm-java
What Will I Learn?
- You will learn Relationships in Realm
- One To One Relationships
- One To Many Relationships
Requirements
- An Integrated Development Environment(IDE) for building Android Application(e.g Anroid Studio, IntelliJ)
- Android Device/Virtual Device.
- Little Experience in working with Realm Java.
- Java Programming Experience.
- Of course, willingness to learn
Resources
- Retrofit Website. https://realm.io/
- Retrofit Github. - https://github.com/realm
- Retrofit License - Apache License
Difficulty
- Intermediate
Tutorial Duration - 20 - 25Mins
Tutorial Content
In Today's tutorial, we are going to be learning about relationships in realm database. We are going to basically be looking at two levels of relationships - One To One, One to ManyRelationships`.
How Can Relationships be achieved in Realm Database?
Realm lets you define relationships between objects by linking them togther, a class becomes a realmObject is that class extends from the RealmObject class. i.e - public class MyClass extends RealmObject.
In order to explain the relationships, we are going to be creating an android application in which the langing page will have two buttons, each representing the two relationships.
Next, we will be creating two fragments which will be represent the relationships and once a user clicks any button, the appropriate fragment will be called.
We would be using the scenario of a Teacher and a Group in which a Teacher in a One-to-one relationship will be one teacher to one group and in a one-to-many relationship, one teacher will be assigned to many groups.
Outline
- Add our dependencies into our gradle files.
- Create Two Buttons in our activity_main.xml file.
- Create Two Fragments.
- Add Fragment Transactions in MainActivity.java class
- Create the Necessary Model Classes
- Show Relationships in Fragments
Dependecies used
- implementation 'com.jakewharton:butterknife:8.8.1'
annotationProcessor 'com.jakewharton:butterknife-compiler:8.8.1'
The ButterKnife dependency should be placed in your application level gradle file - "build.gradle" which will make the injection of views (e.g ImageView, TextView) as easy as possible which we will be seeing in this tutorial.
Realm dependency
Steps
Head to your project level gradle file and add the classpath dependency:
classpath "io.realm:realm-gradle-plugin:5.1.0"Next, head to your application level Gradle file "build.gradle" and add the realm-android plugin to the top of the file.
apply plugin:'realm-android'
Finally, refresh your Gradle dependencies.
After you have added the necessary dependencies, your application level Gradle file should look like this -

and your project level Gradle file should look like this

Create Two Buttons in our activity_main.xml file.
<RelativeLayout
    xmlns:android="http://schemas.android.com/apk/res/android"
    xmlns:tools="http://schemas.android.com/tools"
    android:layout_width="match_parent"
    android:layout_height="match_parent"
    tools:context=".MainActivity"
    android:id="@+id/mainLayout"
    >

    <LinearLayout
        android:layout_width="match_parent"
        android:layout_height="wrap_content"
        android:layout_centerInParent="true"
        android:gravity="center_horizontal"
        android:orientation="vertical">

        <Button
            android:id="@+id/oneToOne"
            android:layout_width="wrap_content"
            android:layout_height="wrap_content"
            android:text="1 - 1 Relationship" />

        <Button
            android:id="@+id/oneToMany"
            android:layout_width="wrap_content"
            android:layout_height="wrap_content"
            android:layout_marginTop="20dp"
            android:text="1 - Many Relationship" />

    </LinearLayout>
</RelativeLayout>
In the layout, we have a RelativeLayout as the root layout for the file which has the id - mainLayout, the id of the layout is neccessary as we would be using it in our FragmentTransaction later in this tutorial.
Next, we have a LinearLayout with a vertical orientation which means that the children views inside of it will be displayed from top to bottom. Then there are two buttons that are placed inside the linear layout with the id's - oneToOne,oneToMany with the text - 1 - 1 Relationship,1 - Many Relationship respectively.
In the layout code above, it is important to note that the LinearLayout is displayed in the center of the parent layout which is the RelativeLayout by this line - android:layout_centerInParent="true" and also, all buttons apart from the first button has a margin to their top of 20dp - android:layout_marginTop="20dp".
Create Two Fragments
We will be creating two fragments which we will be using to explain the two relationships we will be looking at today.
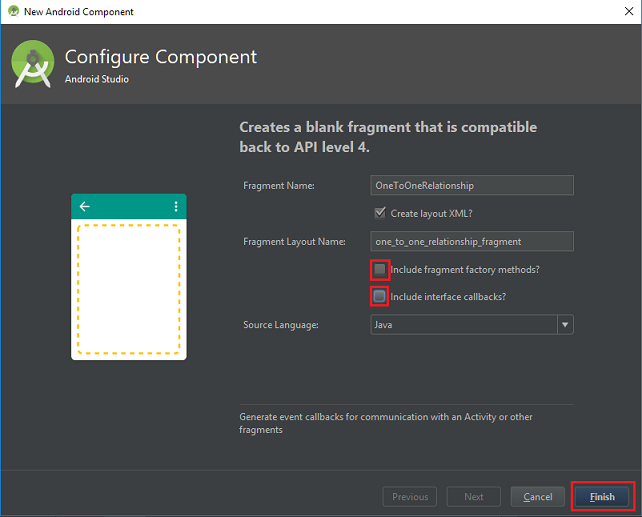
To create a new blank fragment, right click on your java folder => New => Fragment => Blank Fragment.

Next, Name your fragment - OneToOne and then do not forget to uncheck the - Include fragment factory methods? and include interface callbacks checkboxes
Repeat the process for the remaining fragment and make sure to give it a unique name as two fragments can't have the same name.
You can name the remaining fragment - OneToManyinorder to follow along with the tutorial.
Add Fragment Transactions in MainActivity.java class
Next, in our mainActivity.java we will be using butterknife to inject the onClick methods for our two buttons and then we will be using FragmentTransaction to call the aappropriate fragment based on the button that was clicked.
To inject the onClick methods of the buttons using butterknife, place your cursor on the layout name on the setContentView() method and then on windows - alt + ins => Generate ButterKnife Injection and then select the checkboxes shown in the image below:

Injected Code
@OnClick({R.id.oneToOne, R.id.oneToMany, R.id.manyToMany, R.id.inverseRelationship})
    public void onViewClicked(View view) {
        switch (view.getId()) {
            case R.id.oneToOne:
                showOneToOneFragment(); //User Added Method
                break;
            case R.id.oneToMany:
                showOneToManyFragment(); //User Added Method
                break;
        }
    }
Note: The showOneToOneFragment(),showOneToManyFragment()wasn't added by butterknife.
showOneToOneFragment
private void showOneToOneFragment() {
    OneToOne oneToOne = new OneToOne();
    showFragment(oneToOne);
}
In this method, we create a OneToOne Fragment object and then pass it as an argument to the showFragment() method.
The same step is taken in all the other methods -
private void showOneToManyFragment() {
    OneToMany oneToMany = new OneToMany();
    showFragment(oneToMany);
}
showFragment()
private void showFragment(Fragment fragment) {
    FragmentManager  fragmentManager = getFragmentManager();
    FragmentTransaction ft = fragmentManager.beginTransaction();

    ft.replace(R.id.mainLayout,fragment).addToBackStack(fragment.getTag());
    ft.commit();
}
Firstly, we get a FragmentManager object and set it to the getFragmentManger() and then we get a FragmentTransaction object - ft and begin a transaction with it on the FragmentManager object - fragmentManager.
We then call the replace method on the FragmentTransaction object passing the id of the view we want replaced and the the fragment to replace it as the arguments.
Note: The mainLayout id is the id of the RelativeLayout which is the root layout for our activity_main.xml file.
We then add the fragment to backStack using the addToBackStack() method and getting the tag from the fragment as the argument and finally we call commit() on the transaction.
Create the Necessary Model Classes
One To One Relationship
To set up a one-to-one relationship, one of the properties of a model will be a type of a RealmObject subclasses:
Crate two java class files - Group and Teacher and they must extend from the RealmObject class.
Teacher.java
public class Teacher extends RealmObject {
    public String name;
    public String course;
    public Group group;
}
The group property is of the type Group which is a RealmObject.
Group.java
public class Group extends RealmObject {
    public String name;
    public int number_of_students;
}
OneToOne.java
Firstly, we declear a realm object - private Realm realm;.
Inside our onCreate() method just before the return view line we insert the following codes.
...

Realm.init(getActivity());
Realm.deleteRealm(Realm.getDefaultConfiguration());

realm = Realm.getDefaultInstance();

realm.beginTransaction();

Teacher eben = realm.createObject(Teacher.class);

eben.name = "Ebenezer";
eben.course = "Computer Science";

Group red_group = realm.createObject(Group.class);
red_group.name = "RED GROUP";
red_group.number_of_students = 15;

eben.group = red_group;

realm.commitTransaction();

String toDisplay = eben.name+" Teaches "+eben.group.name+" with a number of "+eben.group.number_of_students;

relationshipOne.setText(toDisplay);

...
First, we initialize the Realm in our fragment, we then start with a clean slate by calling the deleteRealm() method on the defaultConfiguration file.
Next, we begin a realm transaction - realm.beginTransaction() and then we create a Realm object of the Teacher class, we set the name and the course - eben.name = "Ebenezer",eben.course = "Computer Science" respectively.
Next, we create a Group object - red_group and set its name to "RED GROUP" and the number of students to 15.
We then establish a one to one relationship between the Teacher eben and the Group red_group with this line - eben.group = red_group
Lastly, we concatenate the name of the teacher, the name of the group and lastly the number of students in the group.
We then set the text of a TextView in our OneToOne Fragment layout file - one_to_one_fragment.xml with the id - relationshipOne which was injected using ButterKnife to the value of the contatenated string.
Explanation
- We get the teacher's name by calling the
teacher.name - We get the name of the group the teacher is assigned to by -
eben.group.nameand then the number of students byeben.group.number_of_students
NB: You have to edit the layout of your OneToMany Fragment and input the following which just inserts a TextView to the layout and sets it to be displayed at the center of the screen-
<RelativeLayout
    xmlns:android="http://schemas.android.com/apk/res/android"
    xmlns:tools="http://schemas.android.com/tools"
    android:layout_width="match_parent"
    android:layout_height="match_parent"
    android:background="#FFF"
    tools:context=".OneToOne">

    <TextView
        android:layout_width="match_parent"
        android:layout_height="wrap_content"
        android:id="@+id/relationshipOne"
        android:text="@string/hello_blank_fragment"
        android:layout_centerInParent="true"
        android:gravity="center_horizontal"
        android:padding="10dp"
        />

</RelativeLayout>
One To Many Relationship
For the One to Many relationship, We head into our OneToMany.java class file and create one Teacher object and two Group realm objects and set the two Group objects to the Teacher Object hence creating a One to Many Relationship.
But before that, we have to create a new model class - TeacherMany which will have the following properties -
public class TeacherMany extends RealmObject {
    public String name;
    public String course;
    public RealmList<Group> groups;
}
RealmLists serve as containers of RealmObjects, also RealmList acts like a regular Java List.
OneToMany.java
Firstly, we declear a realm object - private Realm realm;.
Inside our onCreate() method just before the return view line we insert the following codes.
...
Realm.init(getActivity());
Realm.deleteRealm(Realm.getDefaultConfiguration());

realm = Realm.getDefaultInstance();

realm.beginTransaction();

TeacherMany teacher = realm.createObject(TeacherMany.class);
teacher.name = "Edet Ebenezer";
teacher.course = "Microbiolgy";

Group blue_group = realm.createObject(Group.class);
blue_group.name = "Blue Group";
blue_group.number_of_students = 15;

Group purple_group = realm.createObject(Group.class);
purple_group.name = "Purple Group";
purple_group.number_of_students = 18;

teacher.groups.add(blue_group);
teacher.groups.add(purple_group);

realm.commitTransaction();

String toDisplay = teacher.name+" is teaching "+teacher.groups.size()+" Groups Namely - "+teacher.groups.get(0).name+" with "+teacher.groups.get(0).number_of_students+" students"
        +" and "+teacher.groups.get(1).name+" with "+teacher.groups.get(1).number_of_students;

relationshipMany.setText(toDisplay);
...
Firstly, we initialize our Realm database, we start on a clean slate by deleting the realm with the defaultConfiguration, we get a then set the realm object to the Realm.getDefaultInstance().
We begin a realm transaction by calling the beginTransaction() on the realm object.
We then create a realm Teacher object - teacher with the name - Edet Ebenezer and the course - Microbiology.
We then create two realm Group objects - blue_group and purple_group with the names - Blue Group and Purple Group and the number of students - 15 and 18 respectively.
To the establish a One to Many relationship, we then add the set the two groups as a property of the Teacher object - teacher.group.add(blue_group); and teacher.group.add(purple_group);
Lastly, we concatenate the names of the teacher and the details of the two groups that has been assigned to him and then display it on a TextView with the id - relationshipMany that was injected using ButterKnife.
Explanation
- We get the teacher's name by calling the
teacher.name - We get the size of the groups that has been assigned to the teacher by calling the
teacher.groups.size(). - We get the name of the first group by calling the -
teacher.groups.get(0).nameand its number of students with -teacher.groups.get(0).number_of_studentsand we then repeat the same thing for the second group -teacher.groups.get(1).nameandteacher.groups.get(1).number_of_students.
NB: You have to edit the layout of your OneToMany Fragment and input the following which just inserts a TextView to the layout and sets it to be displayed at the center of the screen-
<RelativeLayout
    xmlns:android="http://schemas.android.com/apk/res/android"
    xmlns:tools="http://schemas.android.com/tools"
    android:layout_width="match_parent"
    android:layout_height="match_parent"
    android:background="#FFF"
    tools:context=".OneToMany">

    <TextView
        android:layout_width="match_parent"
        android:layout_height="wrap_content"
        android:id="@+id/relationshipMany"
        android:text="@string/hello_blank_fragment"
        android:layout_centerInParent="true"
        android:gravity="center_horizontal"
        android:padding="10dp"
        />

</RelativeLayout>
NB: We have to close the realm database on the onDestroy methodmof our fragment for both the OneToOne and OneToMany Fragments.
@Override
public void onDestroyView() {
    super.onDestroyView();
    realm.close();
}
Application Execution
Curriculum
- Creating Realm Objects from JSON in Android (Using String , HashMap and JSON File)
- How to Create Encrypted Realm in Java using Android Studio
- How to use GridView with Realm Database in Java using Android Studio
Complete Source code:
https://github.com/generalkolo/Realm-JSON/tree/master/Realm%20Relationships
Hey @edetebenezer
Thanks for contributing on Utopian.
We’re already looking forward to your next contribution!
Contributing on Utopian
Learn how to contribute on our website or by watching this tutorial on Youtube.
Want to chat? Join us on Discord https://discord.gg/h52nFrV.
Vote for Utopian Witness!
Thank you for your contribution.
While I liked the content of your contribution, I would still like to extend one advice for your upcoming contributions:
Looking forward to your upcoming tutorials. Good job!!!
Your contribution has been evaluated according to Utopian rules and guidelines, as well as a predefined set of questions pertaining to the category.
To view those questions and the relevant answers related to your post,Click here
Need help? Write a ticket on https://support.utopian.io/.
Chat with us on Discord.
[utopian-moderator]
Thanks @portugalcoin for taking time out.. I would reduce the name of subsequent contributions.