How to use GridView with Realm Database in Java using Android Studio

Repository
https://github.com/realm/realm-java
What Will I Learn?
- How to use GridView with Realm.
- How to use to add a realmchangelistener to a realm database.
- How to create a voting android application.
Requirements
- An Integrated Development Environment(IDE) for building Android Application(e.g Anroid Studio, IntelliJ)
- Android Device/Virtual Device.
- Little Experience in working with Realm Java
- Java Programming Experience.
- Of course, willingness to learn
Resources
- Retrofit Website. https://realm.io/
- Retrofit Github. - https://github.com/realm
- Retrofit License - Apache License
- Lombok Project - https://projectlombok.org
Difficulty
- Intermediate
Tutorial Duration - 25 - 30Mins
Tutorial Content
In today's tutorial, we are going to be developing a voting android application that we will be use realm as its database and then we are going to ultilize the RealmChangeListener object to automatically listen for changes on our realm and update the realm database.
The Application will be displaying the Image, Name and Vote count of three contestant and the user can vote as many times as he wishes by clicking the contestant he will like to vote for, we will be achieving this by setting a RealmChangeListener object on our realm database.
Outline
- We add our dependencies into our gradle files.
- Include GridView into MainActivity xml file.
- Create Single View for each the contestants
- Create Contestant Model and use the Lombok Library.
- Create custom Adapter extending BaseAdapter.
- Create and populate the Realm Database.
- Set the RealmChangeListener to our realm database.
- Application Execution
Dependecies used
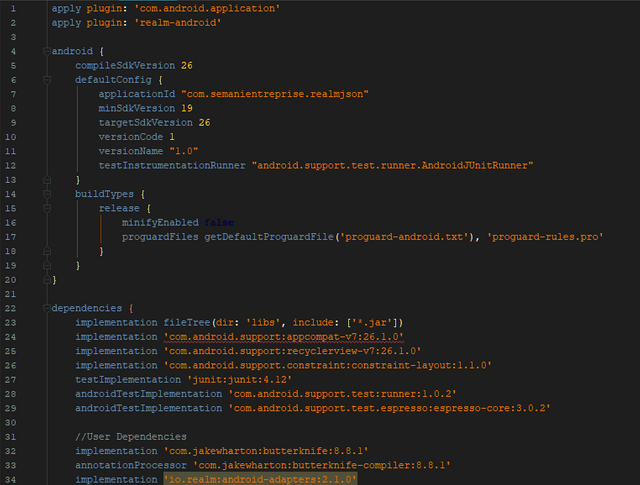
- implementation 'com.jakewharton:butterknife:8.8.1'
annotationProcessor 'com.jakewharton:butterknife-compiler:8.8.1'
The ButterKnife dependency should be placed in your application level gradle file - "build.gradle" which will make the injection of views (e.g ImageView, TextView) as easy as possible which we will be seeing in this tutorial.
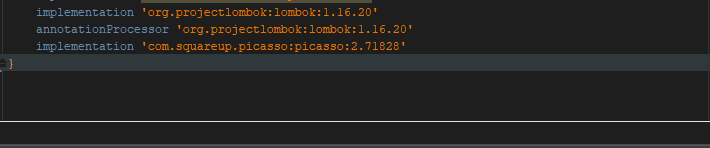
- implementation 'org.projectlombok:lombok:1.16.20'
annotationProcessor 'org.projectlombok:lombok:1.16.20'
The lombok dependency also is placed in the application level gradle file which makes the generator of getter and setter methods for our model classes by just adding the annotations @Getter for getters and @Setter for the setter methods.
- implementation 'com.squareup.picasso:picasso:2.71828'
We use the Picasso library to load the images of each contestant as it will be nice for the user to be able to see who they are voting for.
Realm dependency
Steps
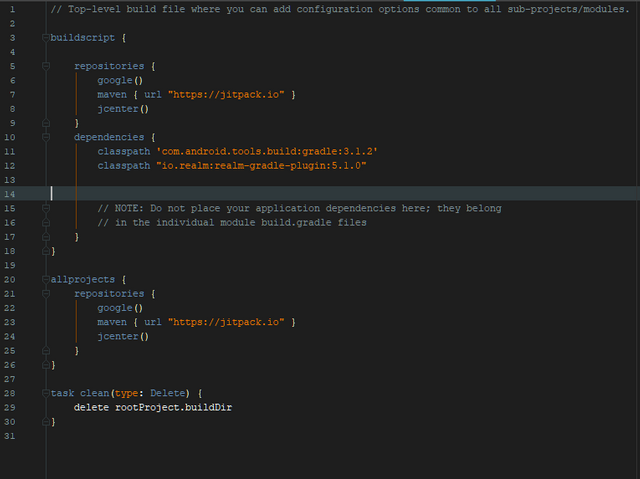
Head to your project level gradle file and add the classpath dependency:
classpath "io.realm:realm-gradle-plugin:5.1.0"Next, head to your application level Gradle file "build.gradle" and add the realm-android plugin to the top of the file.
apply plugin:'realm-android'
Finally, refresh your Gradle dependencies.
After you have added the necessary dependencies, your application level Gradle file should look like this -
and your project level Gradle file should look like this
Including a GridView element to our Activity layout file.
<LinearLayout
    xmlns:android="http://schemas.android.com/apk/res/android"
    xmlns:tools="http://schemas.android.com/tools"
    android:layout_width="match_parent"
    android:layout_height="match_parent"
    android:orientation="vertical"
    tools:context=".MainActivity">

    <TextView
        android:layout_width="match_parent"
        android:layout_height="wrap_content"
        android:textSize="17sp"
        android:padding="10dp"
        android:text="Contestants"
        android:textColor="#000"
        />

    <GridView
        android:id="@+id/contestant_list"
        android:layout_width="match_parent"
        android:layout_height="wrap_content"
        android:numColumns="1" />

</LinearLayout>
We are going to display the list of contestants using a GridView, we then have to add a GridView view in our activity_main.xml file and then because we want each item in the GridView on one line we have to set the numColumns property to 1 - android:numColumns="1" and to make the application more descriptive we add a text displaying - 'Contestants' just above the contestants list.
The id of the GridView - contestant_list.
Create Single View for each contestant
Inorder to display the contestant list, we create a layout file - contestant_view inwhich will contain a layout view on how we want all our list to be displayed.
Create a new layout file:
- right click on the res folder => New =>
Layout resource fileas shown in the image below.
<RelativeLayout
    xmlns:android="http://schemas.android.com/apk/res/android"
    android:layout_width="match_parent"
    android:layout_height="wrap_content"
    xmlns:tools="http://schemas.android.com/tools"
    android:padding="4dp">

    <ImageView
        android:id="@+id/image"
        android:layout_width="match_parent"
        android:layout_height="150dp"
        android:layout_alignParentTop="true"
        android:layout_centerHorizontal="true"
        android:layout_marginTop="12dp"
        android:src="@android:drawable/alert_dark_frame" />

    <LinearLayout
        android:layout_width="match_parent"
        android:layout_height="wrap_content"
        android:orientation="horizontal"
        android:layout_below="@+id/image"
        android:gravity="center"
        android:background="#615d5d"
        >
        <TextView
            android:id="@+id/name"
            android:layout_width="wrap_content"
            android:layout_height="wrap_content"
            android:layout_margin="12dp"
            android:textColor="#FFF"
            android:textSize="20sp"
            tools:text="Ebenezer"/>

        <TextView
            android:id="@+id/votes"
            android:layout_width="wrap_content"
            android:layout_height="wrap_content"
            android:layout_margin="12dp"
            android:textSize="18sp"
            android:textColor="#FFF"
            tools:text="0"/>
    </LinearLayout>
</RelativeLayout>
Code Explanation
The above code creates a layout as below:

We have a RelativeLayout as the root layout of this layout and we then have an ImageView with the id - image which will be used in displaying the image of each contestant and next we have a LinearLayout with a horizontal orientation which means that its children views will be displayed from right to left.
In our LinearLayout, we add two textviews that will be used to display the name of the contestant and their respective vote count, they each have the id of name and votes respectively.
Create Model Class
We will need to create a model class which will have both getter and setter method for the required field (name, vote and image ) of the each item in our lists.
- To create the single row layout, right click on the layout folder located under the res folder, select New and then click
Layout resource file.
To reduce boilerplate code, we will be using the lombok library (https://projectlombok.org) to set the getter and setter methods of the three fields by adding the @Getter and @Setter annotation to the respective field.
Your model class must extend realmObject as shown in the code below.
Countries Model Class
@Getter
@Setter
public class Contestant extends RealmObject {
    @PrimaryKey
    private String Name;
    private String Image;
    private long Votes;
}
Create custom Adapter
In today's tutorial, we will not be using the RealmRecyclerViewAdapter that we have been using in previous tutorials but we will be extending/inheriting from the BaseAdapter class.
Firstly, create a new java class file ContestantAdapter and extend the BaseAdapter.
public class ContestantAdapter extends BaseAdapter {

    private List<Contestant> contestants = Collections.emptyList();

    public ContestantAdapter(List<Contestant> contestants) {
        this.contestants = contestants;
    }

    public void setData(List<Contestant> details) {
        if (details == null) {
            details = Collections.emptyList();
        }
        this.contestants = details;
        notifyDataSetChanged();
    }

    @Override
    public int getCount() {
        return contestants.size();
    }

    @Override
    public Contestant getItem(int position) {
        return contestants.get(position);
    }

    @Override
    public long getItemId(int i) {
        return i;
    }

    private static class ViewHolder {
        private TextView name;
        private TextView vote;
        private ImageView image;

        public ViewHolder(View view) {
            name = view.findViewById(R.id.name);
            vote = view.findViewById(R.id.votes);
            image = view.findViewById(R.id.image);
        }

        public void bind(Contestant contestant) {
            name.setText(contestant.getName());
            vote.setText(String.valueOf(contestant.getVotes()));
            Picasso.get().load(contestant.getImage()).into(image);
        }
    }

    @Override
    public View getView(int position, View currentView, ViewGroup parent) {
        // GridView requires ViewHolder pattern to ensure optimal performance
        ViewHolder viewHolder;

        if (currentView == null) {
            currentView = LayoutInflater.from(parent.getContext()).inflate(R.layout.contestant_view, parent, false);
            viewHolder = new ViewHolder(currentView);
            currentView.setTag(viewHolder);
        } else {
            viewHolder = (ViewHolder)currentView.getTag();
        }

        Contestant contestant = contestants.get(position);

        viewHolder.bind(contestant);

        return currentView;
    }
}
Code Explanation
Firstly, we declear a List of Contestant type called contestants and initialize it to an empty collection - Collections.emptyList();.
We then initialize the contestant variable in our constructor which takes a List of Contestant type with the line - this.contestants = contestants;
setData()
We are going to call this method whenever there is a change in our realm database such as an update.
We firstly check if the contestant argument is null and if so we set it to an empty list and then we update the contestant variable in our ContestantAdapter class by setting its value to the new contestant list passed into the method and then we tell the adapter that there has been a change by calling the notifyDataSetChanged() method.
ViewHolder class
Here, we get the views in our single layout view for each contestant - contestant_view by using the view.findViewById().
bind()
This bind method will be used to get the details of each row of our contestants, it is important to note that this method take a contestant variable as its argument.
We set the name and vote of each contestant by calling the getter methods of each field and then we load each contestant image by using Picasso.
getView()
In the getView method, we inflate our single view layout contestant_view and then set a tag for it by calling the .setTag() method.
We then get a contestant object from the position argument and then pass the object as an argument to the bind() method then finally we return the view - currentView.
Create and populate the Realm Database
In creating and populating our realm database, we are going to be using a JSON file as this method is not new as it has been explained on tutorials - (here) and (here).
Create Realm from JSON File.
We would be using the create Realm From JSON File as explained in this tutorial -
here
- You have to first create the
rawandroid resource directory:
- right click on res folder => New => Android Resource Directory
- From resource drop-down , select raw and click OK button.
- Create JSON file
- right click on the raw folder located under res folder => New => File => contestant.json
Insert the following into the contestant.json file
[
  {
    "Name": "Ebenezer",
    "Votes": 0,
    "Image":"https://s31.postimg.cc/tonipm34r/Eben.jpg"
  },
  {
    "Name": "Dammy",
    "Votes": 0,
    "Image":"https://s31.postimg.cc/rwujuowmj/Dami.jpg"
  },
  {
    "Name": "Jude",
    "Votes": 0,
    "Image":"https://s31.postimg.cc/jrchwfl7f/Jude.jpg"
  }
]
This contains three JSON objects with the key of Name and Votes and Image.
MainActivity.java
Firstly, use butterknife to create an injection of the GridViewview by placing your cursor on the layout name on thesetContentView()` method => alt + ins => Generate ButterKnife Injection.
@BindView(R.id.contestant_list)
    GridView contestantList;
Next, we create a ContestantAdapter object, a Realm variable and also a ReamResults object of Contestant type:
private ContestantAdapter adapter;

private Realm realm;
private RealmResults<Contestant> contestants;
Next, we are goint to create a RealmChangeListener object of a RealmResult type Contestant type and then call the setData() method of the ContestantAdapter class and pass the changed contestant List on the onChange method -
private RealmChangeListener<RealmResults<Contestant>> realmChangeListener = new RealmChangeListener<RealmResults<Contestant>>() {
        @Override
        public void onChange(RealmResults<Contestant> constestants) {
            adapter.setData(constestants);
        }
    };
We then have an instance of Realm and also start the realm on a clean slate by deleting its previous configuration and then getting a default instance for the realm variable-
Realm.init(this);
Realm.deleteRealm(Realm.getDefaultConfiguration());

realm = Realm.getDefaultInstance();

fillUpDatabaseFromJSON();
Creating Realm Objects from JSON file
Next in our MainActivity.java file, we call the fillUpCountriesRealm() method that not only creates a realm database but also fills it up with the details inside of the countries.json file created above.
fillUpDatabaseFromJSON()
private void fillUpDatabaseFromJSON() {
        realm.executeTransaction(new Realm.Transaction() {
            @Override
            public void execute(Realm realm) {
                InputStream inputStream = getResources().openRawResource(R.raw.contestants);
                try {
                    realm.createAllFromJson(Contestant.class,inputStream);
                } catch (IOException e) {
                    if (realm.isInTransaction())
                        realm.cancelTransaction();
                }
            }
        });
    }
We execute a realm transaction on the realm variable by calling the executeTransaction() method and override the execute() method.
We use an InputStream object - inputStream to get the json file resource by calling the getResources() method and then calling the openRawResource() method with the contestants json file as an argument.
realm.createAllFromJson(Contestant.class,inputStream); creates a realm database of Contestant class and gets its values from the inputStream.
Link Adapter to GridView in MainActivity java class file
Next, we need to get all the objects in the Contestant realm database and then set it as an argument for our adapter and also set the adapter for our GridView.
We then have to use begin a realm transaction to get the objects of the Contestant class, store it in a RealmResults variable - contestants and then finally commit the transaction , next we set the adapter object to be a ContestantAdapter object passing the RealmResult now stored in the conrestants variable.
Inorder to increase the vote value of each contestant once they are clicked by the user, we have to set the setOnItemClickListener method on the GridView view - contestantList and lastly we add a changeListener on the GridView.
realm.beginTransaction();

contestants = realm.where(Contestant.class).findAllAsync();

realm.commitTransaction();

adapter = new ContestantAdapter(contestants);

contestantList.setAdapter(adapter); // Setting the Adapter
contestantList.setOnItemClickListener(this); // Adding onItemClickListener for the GridView

contestants.addChangeListener(realmChangeListener); // Adding a changeListener for the GridView
Implementation of the onItemClick() method
@Override
public void onItemClick(AdapterView<?> adapterView, View view, int i, long l) {

    Contestant modifiedContestant = adapter.getItem(i);

    // Acquire the name of the clicked City, in order to be able to query for it.
    final String name = modifiedContestant.getName();

    realm.beginTransaction();

    Contestant contestant = realm.where(Contestant.class).equalTo("Name",name).findFirst();
    contestant.setVotes(contestant.getVotes() + 1);

    realm.commitTransaction();
}
Firstly, we get a reference to the contestant object that the user clicked on by calling the getItem() method of the adapter class which returns a Contestant object (You can look at its method definition in our ContestantAdapter class).
We then get the name of the contestant that the user clicked on and store it in a String variable called name, which we then use in searching the realm database to find the contestant by calling the equalTo() method with the name of the field as its first argument and the name of the contestant as the second.
Upon getting the contestant, we increase the vote of the user by calling its setter method and increasing its votes value by 1 and we finally commit the transaction.
Complete MainActivity.java class
public class MainActivity extends AppCompatActivity implements AdapterView.OnItemClickListener {
    @BindView(R.id.contestant_list)
    GridView contestantList;
    private ContestantAdapter adapter;

    private Realm realm;
    private RealmResults<Contestant> contestants;

    private RealmChangeListener<RealmResults<Contestant>> realmChangeListener = new RealmChangeListener<RealmResults<Contestant>>() {
        @Override
        public void onChange(RealmResults<Contestant> constestants) {
            adapter.setData(constestants);
        }
    };

    @Override
    protected void onCreate(Bundle savedInstanceState) {
        super.onCreate(savedInstanceState);
        setContentView(R.layout.activity_main);
        ButterKnife.bind(this);

        Realm.init(this);
        Realm.deleteRealm(Realm.getDefaultConfiguration());

        realm = Realm.getDefaultInstance();

        fillUpDatabaseFromJSON();

        realm.beginTransaction();

        contestants = realm.where(Contestant.class).findAllAsync();

        realm.commitTransaction();

        adapter = new ContestantAdapter(contestants);

        contestantList.setAdapter(adapter);
        contestantList.setOnItemClickListener(this);

        contestants.addChangeListener(realmChangeListener);
    }

    private void fillUpDatabaseFromJSON() {
        realm.executeTransaction(new Realm.Transaction() {
            @Override
            public void execute(Realm realm) {
                InputStream inputStream = getResources().openRawResource(R.raw.contestants);
                try {
                    realm.createAllFromJson(Contestant.class,inputStream);
                } catch (IOException e) {
                    if (realm.isInTransaction())
                        realm.cancelTransaction();
                }
            }
        });
    }

    @Override
    protected void onDestroy() {
        super.onDestroy();
        contestants.removeAllChangeListeners();
        realm.close();
    }

    @Override
    public void onItemClick(AdapterView<?> adapterView, View view, int i, long l) {

        Contestant modifiedContestant = adapter.getItem(i);

        // Acquire the name of the clicked City, in order to be able to query for it.
        final String name = modifiedContestant.getName();

        realm.beginTransaction();

        Contestant contestant = realm.where(Contestant.class).equalTo("Name",name).findFirst();
        contestant.setVotes(contestant.getVotes() + 1);

        realm.commitTransaction();
    }
}
Thanks for the contribution.
Your contribution has been evaluated according to Utopian rules and guidelines, as well as a predefined set of questions pertaining to the category.
To view those questions and the relevant answers related to your post,Click here
Need help? Write a ticket on https://support.utopian.io/.
Chat with us on Discord.
[utopian-moderator]
Thanks @deathwing for taking time out to moderate my post.
Hey @edetebenezer
Thanks for contributing on Utopian.
We’re already looking forward to your next contribution!
Contributing on Utopian
Learn how to contribute on our website or by watching this tutorial on Youtube.
Want to chat? Join us on Discord https://discord.gg/h52nFrV.
Vote for Utopian Witness!