Creating a Contact Saving Android Application with Realm Database - PART 4
Resources about Realm
- Official Website
- Github code link
- License - Apache License
What Will I Learn?
- How to create a contact saving application
- Deleteing a contact detail from the realm database.
- How to use an alert Dialog to confirm users choice.
- How to create vector asset.
Requirements
- Java knowledge
- IDE for developing android applications(Android Studio or IntelliJ)
- An Android Emulator or device for testing
Difficulty
- Intermediate
Tutorial Contents
Tutorial concept
In todays tutorial, we are going to learn how to delete a contact from our realm contact application.
And to achieve this we will need to :
- Search for a user based on their email address.
- Display the contact details that matches our search.
- Upon click of delete button, confirm the users choice using an alert dialog.
- Once user confirms delete, delete the user else remove the alert dialog.
- Close the current activity upon delete and display a toast indicating a successful delete.
Lets begin:
Changes done to previous code file
MainActivity.java
@OnClick({R.id.addContact, R.id.readContact, R.id.updateContact, R.id.deleteContact})
    public void onViewClicked(View view) {
        switch (view.getId()) {
            ...
            case R.id.deleteContact:
                startActivity(new Intent(this,deleteContact.class));
                break;
        }
    }
The changes done to this code is located in our onclick method injected by butterknife to handle the click of our buttons on our landing page (MainActivity.java).
Hence when the user clicks the delete button, we start a new acivity with the java class file deleteContact.class with an explicit intent - startActivity(new Intent(this,deleteContact.class));
With that being done, create a new activity class file and call the java class file deleteContact.class and for this tutorial, the activity layout file will be activity_delete_contact.xml.
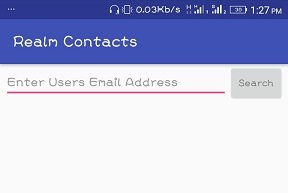
To achieve our expected result of deleting a contact from our realm contact application, firstly, we will create a layout which will have an edittext and a button, the edittext for entering of the contact's email address and the search button for clicking to search for the contact.
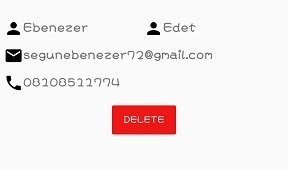
Once the contact is found in our database, the contact details will be populated in a relative view whose visibility will be set to gone from the xml file and once the user is sure that that is the user he intends to delete, he then clicks the delete button which will present him with an alert dialog confirming if he intends to delete the contact.
Layout
The below layout is built:
- The layout where the user will enter the contact's email to be deleted.
The layout which will hold the contact details once such user is found,
NB: Its visibility will be set to gone as seen in the code - android:visibility="gone"
Code
<?xml version="1.0" encoding="utf-8"?>
<RelativeLayout xmlns:android="http://schemas.android.com/apk/res/android"
    xmlns:tools="http://schemas.android.com/tools"
    android:layout_width="match_parent"
    android:layout_height="match_parent"
    tools:context="com.semanientreprise.realmcontacts.deleteContact">

    <LinearLayout
        android:id="@+id/searchContainer"
        android:layout_width="match_parent"
        android:layout_height="wrap_content"
        android:layout_marginLeft="5dp"
        android:layout_marginRight="5dp"
        android:orientation="horizontal">

        <EditText
            android:id="@+id/search_emailAddress"
            android:layout_width="0dp"
            android:layout_height="wrap_content"
            android:layout_weight="4"
            android:hint="Enter Users Email Address"
            android:inputType="textEmailAddress" />

        <Button
            android:id="@+id/search_btn"
            android:layout_width="0dp"
            android:layout_height="wrap_content"
            android:layout_weight="1"
            android:hint="Search" />

    </LinearLayout>

    <RelativeLayout
        android:id="@+id/searchResultContainer"
        android:layout_width="match_parent"
        android:layout_height="wrap_content"
        android:layout_below="@+id/searchContainer"
        android:layout_marginLeft="5dp"
        android:layout_marginRight="5dp"
        android:layout_marginTop="50dp"
        android:visibility="gone"
        >

        <LinearLayout
            android:id="@+id/delete_nameContainer"
            android:layout_width="match_parent"
            android:layout_height="wrap_content"
            android:orientation="horizontal">

            <TextView
                android:id="@+id/delete_firstName"
                android:layout_width="0dp"
                android:layout_height="wrap_content"
                android:layout_weight="1"
                android:drawableLeft="@drawable/ic_person"
                android:hint="First Name"
                android:textSize="19sp" />

            <TextView
                android:id="@+id/delete_lastName"
                android:layout_width="0dp"
                android:layout_height="wrap_content"
                android:layout_weight="1"
                android:drawableLeft="@drawable/ic_person"
                android:hint="Last Name"
                android:textSize="19sp" />

        </LinearLayout>

        <LinearLayout
            android:layout_width="match_parent"
            android:layout_height="wrap_content"
            android:layout_below="@+id/delete_nameContainer"
            android:orientation="vertical">

            <TextView
                android:id="@+id/delete_email"
                android:layout_width="match_parent"
                android:layout_height="wrap_content"
                android:layout_marginTop="10dp"
                android:drawableLeft="@drawable/ic_email"
                android:hint="Email"
                android:textSize="19sp" />

            <TextView
                android:id="@+id/delete_phone_number"
                android:layout_width="match_parent"
                android:layout_height="wrap_content"
                android:layout_marginTop="10dp"
                android:drawableLeft="@drawable/ic_phone"
                android:hint="Phone Number"
                android:textSize="19sp" />

            <Button
                android:id="@+id/delete_btn"
                android:layout_width="wrap_content"
                android:layout_height="wrap_content"
                android:layout_gravity="center"
                android:layout_marginTop="10dp"
                android:backgroundTint="#ef1616"
                android:text="Delete"
                android:textColor="#fff" />

        </LinearLayout>

    </RelativeLayout>

</RelativeLayout>
Code explanation.
For the drawableLeft value - android:drawableLeft="@drawable/ic_phone", this displays a vector asset by the left hand sie of the textView as seen below:
To create a vector asset:
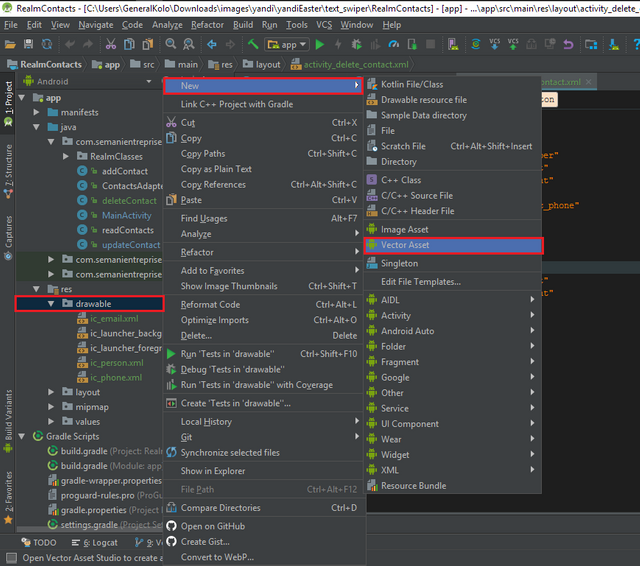
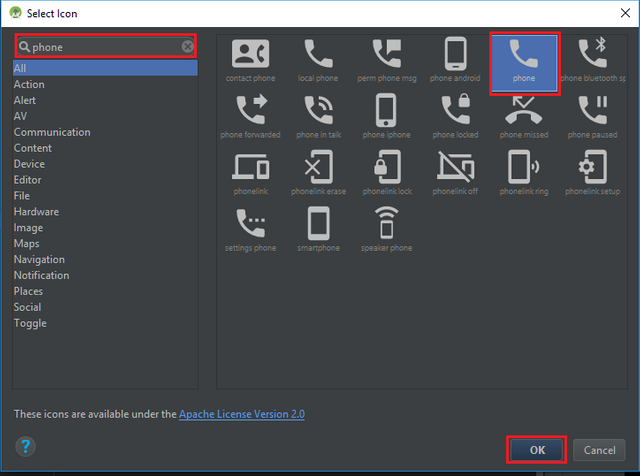
- Right Click on your drawable folder located in your res folder, then select new and then vector asset:
drawable -> new -> vector asset:
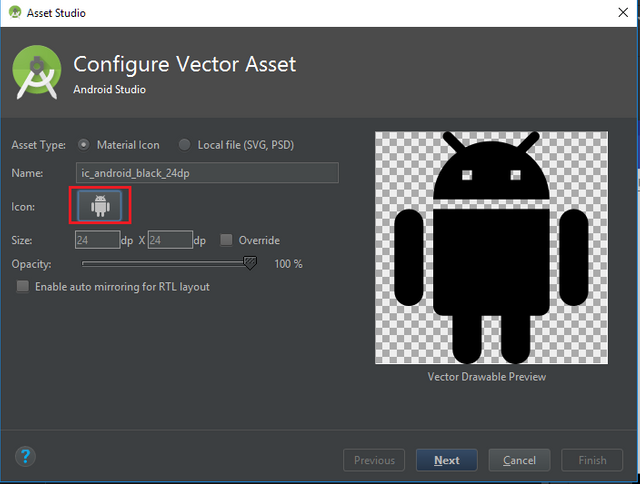
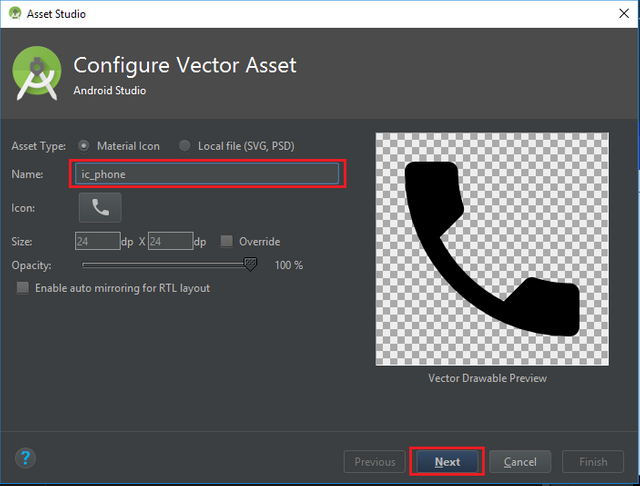
Next, leave every other thing and click the android image to select another asset you intend to use, for this tutorial we used three - #### ic_email_black_24dp , ic_person_black_24dp, ic_phone_black_24dp which were renamed to ic_email, ic_person, ic_phone
After selecting the appropriate vector asset you intend to use, click the next button and finally click the finish button as shown in the image below.
Resource for Vector Asset
Next, we head over to our java class file - deleteContact.java
Inorder for us to be able to control the visibility of the relative layout with the id - searchResultContainer which is the layout responsible for housing the user details once found in the database, we must also inject it using butterknife amongst others.
Butterknife injections
@BindView(R.id.search_emailAddress)
EditText searchEmailAddress;
@BindView(R.id.delete_firstName)
TextView deleteFirstName;
@BindView(R.id.delete_lastName)
TextView deleteLastName;
@BindView(R.id.delete_email)
TextView deleteEmail;
@BindView(R.id.delete_phone_number)
TextView deletePhoneNumber;
@BindView(R.id.searchResultContainer)
RelativeLayout searchResultContainer;
Next, we declear a realm variable - Realm and a Contact variable -contact` which will be used for realm operations throughout this activity and used to hold a single detail.
Realm realm;
private Contacts contact;
As seen in our previous tutorials, we initialize realm and also get a default instance in our onCreate method as shown:
Realm.init(this);
realm = Realm.getDefaultInstance();
If you have rightly injected the onClick method for both buttons, the search and the update button in your java class file then we make the following edit to the two methods.
@OnClick({R.id.search_btn, R.id.delete_btn})
    public void onViewClicked(View view) {
        switch (view.getId()) {
            case R.id.search_btn:
                String search_email = searchEmailAddress.getText().toString();
                if (!search_email.isEmpty())
                    searchForContact(search_email);
                else
                    showToast("Please enter user email address");
                break;
        }
    }
Code Explanation
When the search button is clicked, we firstly get the email the user entered and store it in a String variable - search_email.
Next we check to ensure that the email entered is not empty but if empty, we display a toast message to the user saying - Please enter user email address.
If the email is not empty then call we call the searchForContact() method with the user email as the argument.
searchForContact() method
private void searchForContact(String search_email) {
        realm.beginTransaction();

        contact = realm.where(Contacts.class).equalTo("email", search_email).findFirst();

        realm.commitTransaction();

        if (contact == null)
            showToast("No contact with such email found");
        else
            showContactDetails(contact.getEmail(), contact.getFirstName(), contact.getLastName(), contact.getPhoneNumber());

    }
Firstly, we begin a transaction - realm.beginTransaction();.
contact = realm.where(Contacts.class).equalTo("email", search_email).findFirst();
The above line checks the Contact database and checks the email field is there exist any row of data that equals the entered email by the user by using the .equalTo("email",search_email) , next we use the .findFirst() method to get the first occurance.
Next we commit the transaction realm.commitTransaction();.
Next we check if the returned contact is null, meaning no such contact exist and if thats the case we display a toast with the message - "No contact with such email found".
And if a user exist with the email, we call the showContactDetails() method with the details of the contact - email, first name, last name, phone number .
showContactDetails()
private void showContactDetails(String email, String firstName, String lastName, String phoneNumber) {

        searchFirstName.setText(firstName);
        searchLastName.setText(lastName);
        searchEmail.setText(email);
        searchPhoneNumber.setText(phoneNumber);

        searchResultContainer.setVisibility(View.VISIBLE);
    }
This method sets the details of the user into the four textviews so that the user can see the complete details of the contact he wishes to delete.
Once the user is sure he itends to delete the retrieved contact, he clicks the delete button.
DELETE BUTTON
case R.id.delete_btn:
                showConfirmationDialog();
                break;
showConfirmationDialog() method.
private void showConfirmationDialog() {
        String contactName = contact.getFirstName()+" "+contact.getLastName();

        final AlertDialog.Builder alterDialogBuilder = new AlertDialog.Builder(this);

        alterDialogBuilder.setTitle("CONFIRM ACTION");
        alterDialogBuilder.setMessage("Do you want to delete contact \""+contactName+"\" ?");
        alterDialogBuilder.setPositiveButton("Yes", new DialogInterface.OnClickListener() {
            @Override
            public void onClick(DialogInterface dialogInterface, int i) {
                realm.beginTransaction();
                RealmObject.deleteFromRealm(contact);
                realm.commitTransaction();

                showToast("One Contact Deleted");
                finish();
            }
        });
        alterDialogBuilder.setNegativeButton("No", new DialogInterface.OnClickListener() {
            @Override
            public void onClick(DialogInterface dialogInterface, int i) {
                //Don't do anything
            }
        });

         AlertDialog alertDialog = alterDialogBuilder.create();
        alertDialog.show();
    }
Firstly, we concatenate the first name and last name of the contact to be delete and save it in a String variable called - contactName.
Next, we declear an AlertDialog.Builder object called - alterDialogBuilder.
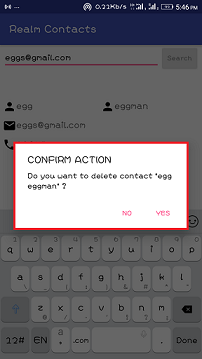
This object is used to set up neccessary details for the alert Dialog we intend to use, which will be used to confirm the users action to delete the contact.
We then setup some information of the alertDialog:
- Title -
alterDialogBuilder.setTitle("CONFIRM ACTION");. - Message -
alterDialogBuilder.setMessage("Do you want to delete contact \""+contactName+"\" ?");.
NB: In setting the message, we display the contacts full name which is already stored in the contactName String variable.
- Postive Button and a DialogInterface Listener -
alterDialogBuilder.setPositiveButton("Yes", new DialogInterface.OnClickListener() {
            @Override
            public void onClick(DialogInterface dialogInterface, int i) {
                realm.beginTransaction();
                RealmObject.deleteFromRealm(contact);
                realm.commitTransaction();

                showToast("Contact Deleted");
                finish();
            }
        });
NB: Here we set the text that should be displayed on the positive button which is always the button to the right in an alert Dialog.
We then set an onclick listener to the positive button, and once the user confirms that he really wants to delete the contact by clicking on the positive button, we search for the begin a realm transaction - realm.beginTransaction();,
and since our contact class extends from the RealObject we delete that contact using - RealmObject.deleteFromRealm(contact); and then we commit the transaction - realm.commitTransaction();.
We then use our showToast() method to send display a toast - "Contact Deleted" and then we close the activity by calling the finish() method.
- Negetive Button and a DialogInterface Listener
alterDialogBuilder.setNegativeButton("No", new DialogInterface.OnClickListener() {
            @Override
            public void onClick(DialogInterface dialogInterface, int i) {
                //Don't do anything
            }
        });
NB: Here we set the text that should be displayed on the negetive button which is always the button to the left in an alert Dialog and when the user clicks this button, we don't do anything and let the default behavior of alertDialog do the job for us by dismissing the alertDialog it self.
We then create an alertDialog using the alertDialogBuilder variable - AlertDialog alertDialog = alterDialogBuilder.create(); and then we call the show() method on the alertDialog - alertDialog.show();.
Resources on alertDilaogs
showToast() METHOD
private void showToast(String message) {
        Toast.makeText(this, message, Toast.LENGTH_LONG).show();
    }
Application execution
Complete application code can be found here - https://github.com/generalkolo/Realm-Contacts/


Hey @edetebenezer
We're already looking forward to your next contribution!
Utopian Witness!
Vote for Utopian Witness! We are made of developers, system administrators, entrepreneurs, artists, content creators, thinkers. We embrace every nationality, mindset and belief.
Want to chat? Join us on Discord https://discord.gg/h52nFrV
Thank you for the contribution It has been approved.
Need help? Write a ticket on https://support.utopian.io.
Chat with us on Discord.
[utopian-moderator]
Thanks @portugalcoin for taking time out to moderate my post.