Creating a Contact Saving Android Application with Realm Database - PART 2
What Will I Learn?
- How to create a contact saving application
- Reading the contacts from the realm database.
- Create a custom Adapter
Requirements
- Java knowledge
- IDE for developing android applications(Android Studio or IntelliJ)
- An Android Emulator or device for testing
Difficulty
- Intermediate
Tutorial Contents
Continuing from our last tutorial - Creating a Contact Saving Android Application with Realm Database - PART 1 , today we are going to take a step forward to reading the already saved contacts that exist in our realm database.
Things to Note.
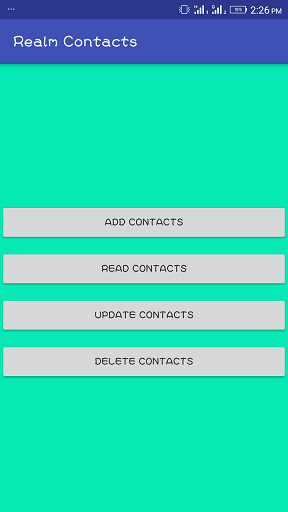
Inorder to make our application UI more user friendly, a landing layout was created which looks like this:

And upon clicking on any of the button, the appropriate activity is started which makes the application more user friendly and makes it easy to navigate.
Codes:
<?xml version="1.0" encoding="utf-8"?>
<RelativeLayout xmlns:android="http://schemas.android.com/apk/res/android"
    xmlns:tools="http://schemas.android.com/tools"
    android:layout_width="match_parent"
    android:layout_height="match_parent"
    android:background="#06e9b4"
    tools:context="com.semanientreprise.realmcontacts.MainActivity">


    <LinearLayout
        android:layout_width="match_parent"
        android:layout_height="wrap_content"
        android:orientation="vertical"
        android:layout_centerInParent="true"
        >

        <Button
            android:id="@+id/addContact"
            android:layout_width="match_parent"
            android:layout_height="wrap_content"
            android:text="Add Contacts"
            android:layout_marginTop="10dp"
            />

        <Button
            android:id="@+id/showContact"
            android:layout_width="match_parent"
            android:layout_height="wrap_content"
            android:text="Show Contacts"
            android:layout_marginTop="10dp"
            />

        <Button
            android:id="@+id/updateContact"
            android:layout_width="match_parent"
            android:layout_height="wrap_content"
            android:text="Update Contact"
            android:layout_marginTop="10dp"
            />

        <Button
            android:id="@+id/deleteContact"
            android:layout_width="match_parent"
            android:layout_height="wrap_content"
            android:text="Delete Contact"
            android:layout_marginTop="10dp"
            />

    </LinearLayout>

</RelativeLayout>
Code explanation.
Firstly, the layout has a relative layout as its root layout and it''s background color is changed to light green by this ling - android:background="#06e9b4" and then has a linear layout as its child element and as explained in the last tutorial, the linear view helps to display views horzontally or vertically and for this linear layout, its children views will be displayed vertically as specified by this line - android:orientation="vertical" and its children views will also be placed at the center of the screen which is indicated by this line - android:layout_centerInParent="true".
Next, there are Four buttons with the id's - addContact, showContact, updateContact and deleteContact respectively.
This id's will help us when we are injecting the views with butterknife plugin as explained in our last tutorial.
Next we head over to our mainActivity java file to make some changes.
Now inject the button onClick methods for each button as below:
@OnClick({R.id.addContact, R.id.readContact, R.id.updateContact, R.id.deleteContact})
 public void onViewClicked(View view) {
switch (view.getId()) {
            case R.id.addContact:
                startActivity(new Intent(this,addContact.class));
                break;
            case R.id.showContact:
                startActivity(new Intent(this,readContacts.class));
                break;
            case R.id.updateContact:
                break;
            case R.id.deleteContact:
                break;
        }
    }
The switch statement is used to know which of the button was clicked by the user and then an implicit intent is used to fire up the appropriate activity - i.e startActivity(new Intent(this,addContact.class));.
For now we only have two activities and we will keep adding more as the tutorial progresses.
Next, create two new activities and name the first java class file addContact.java and the next readContact.java.
For the addContact.java, copy the previous code that was in your mainActivity.java file and paste it in the addContact.java and do the same for the activity_main.xml file, copy the previous code and paste in the activity_add.xml if you followed the defulat namings.
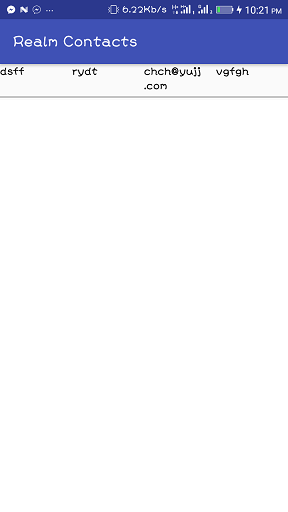
For this tutorial we are going to be dealing with the second button that shows the contacts already existing in the database.
Firstly, we will be developing the UI and then we move to the java class file.
Inorder to display the contact details correctly, we are going to be using a recylerview which will be need a layout sample of how each of the contacts will be display, then we create a custom adapter and finally we link then together.
For the single contact display, creat a new layout file and for the sake of this tutorial, we are going to name it - single_contact_layout which will look like this -

Code
<RelativeLayout
    xmlns:android="http://schemas.android.com/apk/res/android"
    android:orientation="horizontal"
    android:layout_width="match_parent"
    android:layout_height="wrap_content">

    <LinearLayout
        android:layout_width="match_parent"
        android:layout_height="wrap_content"
        android:orientation="horizontal"
        android:id="@+id/details_Container"
        >

        <TextView
            android:layout_width="0dp"
            android:layout_weight="1"
            android:layout_height="wrap_content"
            android:text="First name"
            android:textSize="16sp"
            android:textColor="#000"
            android:id="@+id/first_name"
            />

        <TextView
            android:layout_width="0dp"
            android:layout_weight="1"
            android:layout_height="wrap_content"
            android:text="Last name"
            android:textSize="16sp"
            android:textColor="#000"
            android:id="@+id/last_name"
            />

        <TextView
            android:layout_width="0dp"
            android:layout_weight="1"
            android:layout_height="wrap_content"
            android:text="Email"
            android:textSize="16sp"
            android:textColor="#000"
            android:id="@+id/email"
            />

        <TextView
            android:layout_width="0dp"
            android:layout_weight="1"
            android:layout_height="wrap_content"
            android:text="Phone Number"
            android:textSize="16sp"
            android:textColor="#000"
            android:id="@+id/phonenumber"
            />

    </LinearLayout>

    <View
        android:layout_width="match_parent"
        android:layout_height="0.5dp"
        android:background="#000"
        android:layout_below="@+id/details_Container"
        android:layout_marginTop="5dp"
        />
</RelativeLayout>
Code Explanation.
A relative layout is the root layout of the file, next is a linear layout inwhich its children views will be displayed horzontally.
The linear view has four children views inwhich each contacts first name, last name, email and phone number will be displayed.
Next, we need to note the id's of this text view as we will be using them when creating our custom array adapter - first_name, last_name, email, phonenumber.
Lastly, a straight line is drawn using a view element with a height of 0.5dp and a color of black (#000) and is placed below the linear layout that houses the details of the contacts.
Next, in the activity_read_contact.xml file add the following code which creates a recyclerviews in the layout:
<android.support.v7.widget.RecyclerView
        android:layout_width="match_parent"
        android:layout_height="wrap_content"
        android:id="@+id/contacts_recView"
        />
The important thing here to note is the id of the recyclerview - contacts_recView.
With that being done, we move to creating our custom array adapter that will be used to link the data's of every contact in our database to the recycler view.
Next, we create a new java class file - ContactsAdapter.java, extend the Recycler.view<> class :
public class ContactsAdapter extends RecyclerView.Adapter<ContactsAdapter.ContactsViewHolder>
the <ContactsAdapter.ContactsViewHolder> signifies the ViewHolder class we intend to use which will be found in the same file as the recylcerview adapter (ContactsAdapter.java).
private List<Contacts> arrayList;
private Context context;

public ContactsAdapter(List<Contacts> arrayList, Context context) {
        this.arrayList = arrayList;
        this.context = context;
    }
The code above has two private variables, one a list of Contact class type and another a context varibale which are both initialized in the constructor.
The arrayList variable will be used to house the list of contacts gotten in the java class file as explained later in this tutorial.
Next, inorder to completely get the array adapter working, we must over write three methods - onCreateViewHolder which we have to inflate the row layout and then return an instance of the class ContactsViewHolder, next we override the onBindViewHolder class which we set the value of the four ediitext which is used to indicate the first name, last name, email and phone number of each contact and lastly we override the getItemCount() method which we return the size of the list inwhich the contacts are stored in.
Methods overridden.
- onCreateViewHolder()
@Override
    public ContactsViewHolder onCreateViewHolder(ViewGroup parent, int viewType) {
        View view = LayoutInflater.from(parent.getContext()).inflate(R.layout.single_contact_layout, null);
        final ContactsViewHolder contactsViewHolder = new ContactsViewHolder(view);
        return contactsViewHolder;
    }
The inflation of the custom way we want each contact details displayed is indicated in the line - View view = LayoutInflater.from(parent.getContext()).inflate(R.layout.single_contact_layout, null);where the reference of the single_contact_layout is gotten using the R.layout.single_contact_layout.
- onBindViewHolder()
@Override
    public void onBindViewHolder(ContactsViewHolder holder, int position) {
        holder.firstName.setText(arrayList.get(position).getFirstName());
        holder.lastName.setText(arrayList.get(position).getLastName());
        holder.phoneNumber.setText(arrayList.get(position).getPhoneNumber());
        holder.email.setText(arrayList.get(position).getEmail());
    }
This method binds our data to our UI which is the single_contact_layout.xml file and inflate the view with the details of the contact based on the current index position gotten from the 'position' variable passed as its argument.
- getItemCount()
@Override
    public int getItemCount() {
        return arrayList.size();
    }
This returns the size of the array
In this same adapter class we have the ViewHolder class defined as below:
class ContactsViewHolder extends RecyclerView.ViewHolder {
        @BindView(R.id.first_name) TextView firstName;
        @BindView(R.id.last_name) TextView lastName;
        @BindView(R.id.phonenumber) TextView phoneNumber;
        @BindView(R.id.email) TextView email;

        public ContactsViewHolder(View itemView) {
            super(itemView);
            ButterKnife.bind(this, itemView);
        }
    }
Here we we usert he id's of the four textviews specified in the custom view file of each contact (simple_contact_layout.xml) and bind them, this is achieved with butterknife injection also and then we have the class constructor following right below it.
Finally, we move to our readContacts.java class file which is the java class file that our show contacts layout file is binded to.
Firstly, get a reference to the recycler view we created in the layout file earlier which should have the id - contacts_recView with butterknife injection which should look like this - @BindView(R.id.contacts_recView) RecyclerView contactsRecView;
Next, Create a layout manager variable and also a recyclerview adapter varibale as shown below:
private RecyclerView.LayoutManager contactsLayoutManager;
private RecyclerView.Adapter contactsAdapter;
This will be used to firstly create a layout manager which later will be set as the layout manager of the recycler view and the adapter varibale will be set as the ContactAdapter object.
Next, declear a real varibale which we will be using throughout this activity to interract with our realm database - Realm realm;
Next, in our onCreate method we have to initialze the Realm database and also get a default instance after which we can begin a realm transaction.
Realm.init(this);
realm = Realm.getDefaultInstance();
realm.beginTransaction();
Inorder for us to get all the contacts in our realm database, we have to run a read command to the real database which is done as :
RealmResults<Contacts> results = realm.where(Contacts.class).findAll();
We first of all set the results variable of type Contacts and then we used the .where() and .findAll() commands to get realm to fetch us all contacts in the database.
With that done, we have to commit the transaction - realm.commitTransaction();
We then initialize the layout manager to be a VERTICAL linear layout manager as we want the contacts to be displayed top to bottom and not right to left and we set the layout manager as the layout manager of the recycler view:
contactsLayoutManager = new LinearLayoutManager(this, LinearLayoutManager.VERTICAL, false);
contactsRecView.setLayoutManager(contactsLayoutManager);
Lastly, we initialze the contactsAdapter and then set it as the adapter for the recycler view:
contactsAdapter = new ContactsAdapter(results,this);
contactsRecView.setAdapter(contactsAdapter);
Hey @edetebenezer
We're already looking forward to your next contribution!
Decentralised Rewards
Share your expertise and knowledge by rating contributions made by others on Utopian.io to help us reward the best contributions together.
Utopian Witness!
Vote for Utopian Witness! We are made of developers, system administrators, entrepreneurs, artists, content creators, thinkers. We embrace every nationality, mindset and belief.
Want to chat? Join us on Discord https://discord.me/utopian-io
Keep up the good work.Great video.Thanks for sharing.
@steemshiro thanks... It means a lot to me that you think it's a great video..... I would definitely keep up the good work
You are most welcome
This comment has received a 0.28 % upvote from @booster thanks to: @steem69.
Thank you
This comment has received a 0.15 % upvote from @speedvoter thanks to: @tute.
Thank you
You have a minor misspelling in the following sentence:
It should be argument instead of arguement.Awesome post!! Keep it up and check out THIS POST as well as I have something similar.
Thank you for the contribution It has been approved.
Need help? Write a ticket on https://support.utopian.io.
Chat with us on Discord.
[utopian-moderator]
Thanks @portualcoin for taking time out to moderate my post