Creating RPC Server on Web Browser - part 3 Create reverse RPC through WebSocket
Repository
- https://github.com/bigstepinc/jsonrpc-bidirectional
- https://github.com/nodejs/node
- https://github.com/webpack-contrib/webpack-serve
- https://github.com/oclif/oclif
What Will I Learn?
- create custom REPL
- create reverse RPC connection
- pause/resume WebSocket connection
- define RPC endpoint on the websocket client (web browser)
Requirements
- Basic understanding of Javascript and Typescript
- Basic understanding of client-side Javascript and nodejs API
- Basic understanding about WebSocket protocol
- Some knowledge about event-based programming
- Install npm or yarn
- Install some code-editor/IDE (VSCode or alike)
- A web browser that supports current W3C HTML5 Standard
Difficulty
- Intermediate
Tutorial Contents
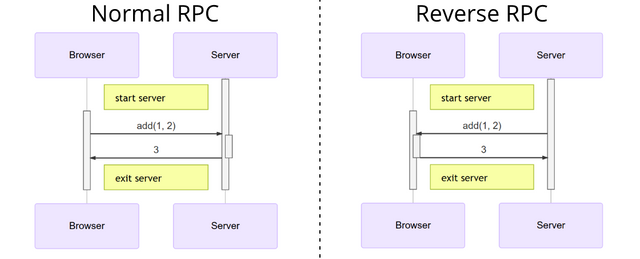
Remote Procedure Call (RPC) is a way of modeling communication between 2 processes as a straightforward function calls, either on the same host or on the different machines. Although RPC is a pretty common pattern in computing, it's often criticised. The problems arise when a programmer is not aware whether a function call is local or if it's a slow RPC. Confusions like that result in an unpredictable system and add unnecessary complexity to debugging and can result in unmaintainable spaghetti code.[1] Base on author experience, one way to mitigate this is by applying/using IDL (Interface Definition Language) to create a solid API specification. However, in this tutorial, we don't use IDL since we will use JSON-RPC (which is pretty common, flexible, but don't have IDL). Also in this tutorial, we create reverse RPC rather than any common RPC implementation out there as shown in Figure 1.
🎉 Preparation
JSON-RPC is a stateless, light-weight remote procedure call (RPC) protocol which use uses JSON (RFC 4627) as data format.[2] It is transport agnostic and in this case, we will use it for IPC (Inter Process Communication) to execute some procedures/endpoints that are implemented in the Web Browser. Luckily, there is a library called jsonrpc-bidirectional that can be run either in the web browser or in the nodejs. First, we need to install and configure it to be able to run in the web browser as shown in Code Change 1.
yarn add jsonrpc-bidirectional ws
yarn add @types/ws --dev
1. Install
jsonrpc-bidirectionaland it's peer dependecywsexternals: { electron: 'null', ws: 'WebSocket', uws: 'WebSocket', 'node-fetch': 'fetch', cluster: 'null', 'fs-extra': 'null' },2. In ./webpack.config.ts, exclude some dependencies to make
jsonrpc-bidirectionalwork in Browsertarget: 'web', // [optional] default is 'web' dev: { publicPath: '/', stats: 'errors-only', // don't print when new compilation happen },3. In ./index.ts on
serveoptions, disablewebpack-serveverbose log output
The jsonrpc-bidirectional package are quite a bit unique because it supports web browser and nodejs by using a library that serves as a polyfill for nodejs. In Code Change 1.2, we exclude some dependencies from the output bundles because jsonrpc-bidirectional support targeting both web browser and nodejs which in some section depends on nodejs specific packages like ws and node-fetch. This way jsonrpc-bidirectional can be used in the web browser without causing a runtime error. Also in that configuration, some package replaced by null since it's not available in Web Browser API while ws/uws replaced with Websocket and node-fetch replaced with fetch because it was polyfill for nodejs to make it compatible with Web Browser API.
Webpack is a Javascript bundler and because JavaScript can be written for both server and browser, it offers multiple deployment targets. At first release, webpack was mean to bundle packs CommonJs/AMD modules for the browser which until now the default target for webpack is web browser. In Code Change 1.2, we avoid to output something in the console when new compilation happen by making it only output when errors happen (stats: 'error-only'). The stats option precisely control what bundle information gets displayed.
Fun fact: the npm descripton of webpack still not being updated until now.
⌨️ Create custom REPL
A Read–Eval–Print Loop (REPL) is an interface that takes single user inputs (i.e. single expressions), evaluates them, and returns the result to the user which usually is a particular characteristic of scripting languages. REPLs facilitate exploratory programming and debugging because the programmer can inspect the printed result before deciding what expression to provide for the next read.[3] A REPL can be useful for instantaneous prototyping and become an essential part of learning a new platform as it gives quick feedback to the novice. In this part, we will implement REPL functionality to control our LED component as shown in Code Change 2.
import {EventEmitter} from 'events'
import {Client} from 'jsonrpc-bidirectional'
import readline = require('readline')

export default class extends EventEmitter {
  isPause?: boolean
  private promptOnce?: boolean

  private client?: Client // for integrating with custom RPC method and help autocomplete
  private repl: readline.ReadLine
  .
  .
}
1. Preparation
function autoComplete(keywords: string[], line: string) {
  const hits = keywords.filter(c => c.startsWith(line))
  // show all keywords if none found
  return [hits.length ? hits : keywords, line]
}

export default class extends EventEmitter {
  .
  .
  private get functionList() { // https://stackoverflow.com/a/31055009
    return Object.getOwnPropertyNames(
      Object.getPrototypeOf(this.client)
    ).filter(f => f !== 'constructor')
  }
}
2. Helper function to instantiate
readlineinterfaceconstructor() { super() this.repl = readline.createInterface({ input: process.stdin, output: process.stdout, completer: (line: string) => autoComplete(this.functionList, line), prompt: '⎝´•‿‿•`⎠╭☞ ', }) console.clear() // proxy some event to be used in main program this.repl.on('close', () => this.emit('close')) this.repl.on('pause', () => this.isPause = true) this.repl.on('resume', () => this.isPause = false) }3. Constructor of REPL class
to(client: Client) { if (!this.client) this.repl.on('line', line => this.callRPC(line)) this.client = client this.repl.prompt() // this.repl.on('line', this.listen) --cause-> this.client == undefined 🤔 } async callRPC(line: string, clientRPC?: Client) { let result const client = clientRPC || this.client const [command, ...args] = line.trim().split(' ') // prompt when user press ↙️enter if (!line.charCodeAt(0)) this.repl.prompt() else this.emit('beforeExec', line) if (this.functionList.includes(command)) result = await client else result = await client!.rpc(command, args, /*notification*/true) this.emit('afterExec', line, result) if (result) { console.log(`\n${result}\n`) this.emit('afterPrint', result, line) } this.repl.prompt() }4. Helper functions to listen REPL input
  pause() {this.repl.pause()}
  resume() {this.repl.resume()}
  close() {this.repl.close()}

  promptAfter(delay: number) {setTimeout(() => this.repl.prompt(), delay * 1e3)}
  promptOnceAfter(delay: number) {
    if (!this.promptOnce) {
      this.promptAfter(delay)
      this.promptOnce = !this.promptOnce
    }
  }
5. Helper function which will be used in conjunction with some Tab and Webpack events
Nodejs has built-in module for doing REPL namely readline and repl. Both module can connect to any stream object such as process.stdin and process.stdout. In Code Change 2.1, we use readline module instead of repl to compose our REPL helper class because repl module only support Javascript expression which concludes it's quite tricky to create custom expression on top of JS expression. If we look at Code Change 2.3, we construct our repl interface when the REPL class instantiate then store it to private repl. We also need to clear the console after repl interface is created then proxied some repl event to our REPL class member variable and event.
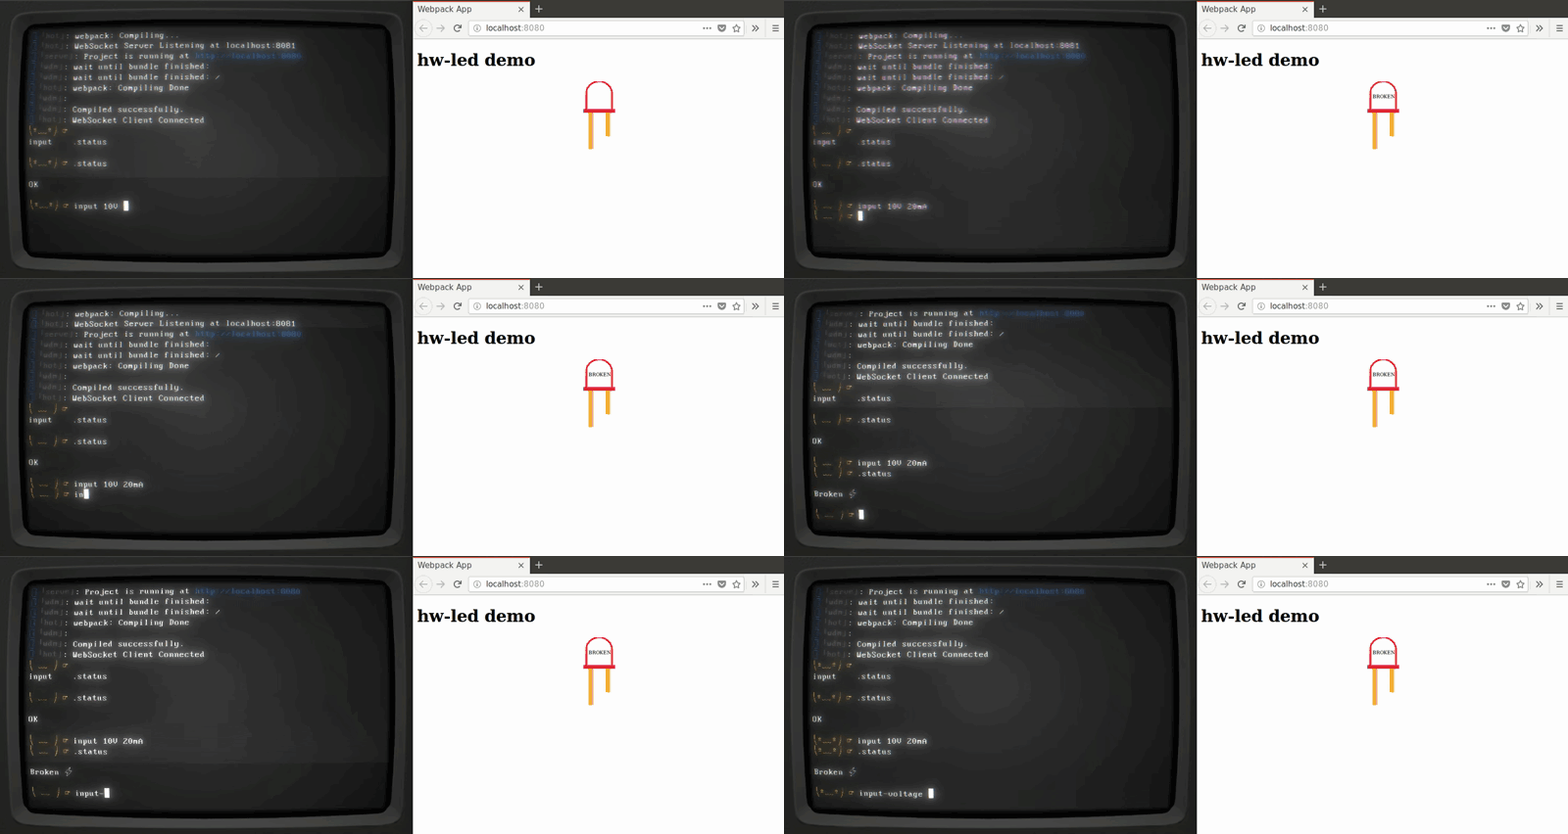
In Code Change 2.4, we now begin to implement how we will parse the input that end-user type from their console. First, we need to listen line event (shown in function to(client)) which that event will fire each time the user press Enter. Every time the user press Enter, it will call function callRPC which parse the user input and transform it into JSON-RPC then call a procedure defined by the end user that are run on the Web Browser (we will explore it in the next step). Next, we define some helper function that we will use in the main program as shown in Figure 2.1.
  const repl = new REPL()
  .
  .
  webpackServer.on('build-finished', () => repl.promptOnceAfter(1))//seconds
  repl.on('close', () => webpackServer.close())

  tab.on('hide', () => {if (tab.allInactive) repl.pause()})
  tab.on('show', () => {if (repl.isPause) repl.resume()})
  tab.on('close', () => {if (tab.allClosed) repl.close()})
1. Usage ⤴️
2. Result ⤴️
🌐 Create RPC-server on client
WebSocket is a bidirectional communication protocol over a single TCP connection. In 2011, this protocol was standardized by the IETF and the API for accessing WebSocket was being standardized by W3C in form of Web IDL.[4] The WebSocket interface does not allow for raw access to the underlying network. For example, this interface could not be used to implement an IRC client without proxying messages through a custom server.[5] The main advantage of WebSocket which use by jsonrpc-bidirectional is a two-way ongoing conversation can take place between the client and the server. In order to create an RPC endpoint in the Web Browser, we need to create WebSocket connection as shown in Code Change 3.
const JSONRPC = require('jsonrpc-bidirectional');
export const EndpointBase = JSONRPC.EndpointBase;

class DOMPlugin extends JSONRPC.ServerPluginBase {
  constructor(elementsGenerator) {
    super();
    this.getElements = elementsGenerator;
  }

  callFunction(incomingRequest) {
    const {endpoint, requestObject:{method, params}} = incomingRequest;
    if (typeof endpoint[method] !== 'function') {
      incomingRequest.endpoint[method] = () => this.getElements().map(
        el => el.setAttribute(method, params[0])
      );
    }
  }
}
1. In ./public/RPCServer.js, plugin to control an attribute of specific DOM
let _registered, _DOMPlugin;
let _server = new JSONRPC.Server();

// By default, JSONRPC.Server rejects all requests as not authenticated and not authorized.
_server.addPlugin(new JSONRPC.Plugins.Server.AuthenticationSkip());
_server.addPlugin(new JSONRPC.Plugins.Server.AuthorizeAll());
2. In ./public/RPCServer.js, define the initial state of RPCServer class, instantiate JSONRPC Server, and add the default plugin
export default class {
  constructor(path) { // used by the end-user
    let url = new URL(path, `ws://${window.location.host}`)
    this.websocket = new WebSocket(url);

    let wsJSONRPCRouter = new JSONRPC.BidirectionalWebsocketRouter(_server);
    wsJSONRPCRouter.addWebSocketSync(this.websocket);
  }

  close(message) { // used in index.js
    this.websocket.close(1001, message);
    _registered = false;
  }

  static get registered() {return _registered} // used in index.js

  static register(endpoint, elementsGenerator) { // used by the end-user
    if (_DOMPlugin) { // ↙️ cleanup
      _server.unregisterEndpoint(endpoint);
      _server.removePlugin(_DOMPlugin);
    }
    else _DOMPlugin = new DOMPlugin(elementsGenerator);

    _server.registerEndpoint(endpoint);
    _server.addPlugin(_DOMPlugin);
    _registered = true;
  }
}
3. In ./public/RPCServer.js, RPCServer class definition
import RPCServer from '#/RPCServer'

let rpc;
const visibilityChange = skip => {
  if (document.hidden) {
    if (!skip) sendState('tab/hide');
    if (rpc instanceof RPCServer) rpc.websocket.close();
  } else {
    if (!skip) sendState('tab/show');
    if (RPCServer.registered) rpc = new RPCServer('/rpc');
    else setTimeout(() => visibilityChange(true), 1000); // to give a time for RPCEndpoint instantiate
  }
}

document.addEventListener('visibilitychange', () => visibilityChange());
4. In ./public/index.js, pause RPC connection when switch Tab
  import RPCServer, {EndpointBase} from '#/RPCServer'

  class LedEndpoint extends EndpointBase {
    constructor() { super('LED', '/rpc', {}) }

    get leds() { return Array.from(document.getElementsByTagName('hw-led')) }

    input(incomingRequest, voltage, current) {
      this.leds.forEach(led => {
        led.setAttribute('input-voltage', voltage);
        led.setAttribute('input-current', current);
      });
    }

    '.status'(incomingRequest) {
      return this.leds.map(
        led => led.vueComponent.broken ? 'Broken ⚡' : 'OK'
      );
    }
  }

  let endpoint = new LedEndpoint();
  RPCServer.register(endpoint, () => endpoint.leds);
5. In ../example/led-webcomponent/demo.html, how to use
RPCServerclass
The jsonrpc-bidirectional library has a feature called Plugin which can be used to implement custom middle layers. In Code Change 3.1, we create Plugin called DOMPlugin that can control the attributes value of an DOM Element. Because by default JSONRPC.Server class will implement an Auth layer which will reject all request that is not authenticated and not authorized, we need to disable Auth layer as shown in Code Change 3.2. In Code Change 3.3, we create a helper class called RPCServer to instantiate our JSON-RPC Server using jsonrpc-bidirectional and also create a mechanism to register RPC Endpoint defined by the end-user. We implement some static function and getter in RPCServer class because we need to implement singleton pattern since WebSocket API doesn't have open function which the only way to re-open the connection is to instantiate WebSocket class. After that, we can use the RPCServer class as shown in Code Change 3.4 which implement how to pause and resume the connection as depicted in Figure 3.
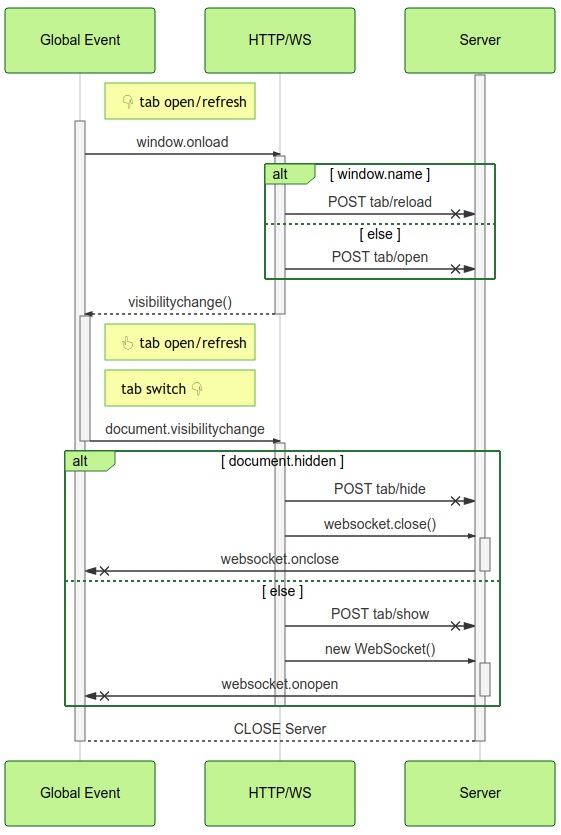
As we can see in Figure 3, we only pause the connection when the tab is inactive (document.hidden) and resume the connection when the tab is active. We do this by instantiating WebSocket class after tab/show state is send and call .close() function when tab/hide was send. Notice that one of both states will be sent even the Tab Browser is newly opened or reloaded.
⚙️ Create RPC-client on server
Normally in RPC connection, the caller is the one that is also who initiate a handshake (request to open connection). However, in reverse RPC scenario, the caller is the one who accepts a handshake (response to open/close connection). The reverse RPC can only happen in the protocol/transport layer that supports full-duplex communication. The protocols that are available in Web Browser which support full-duplex communication is WebSocket and WebRTC. For WebSocket connection, it needs to upgrade the connection from HTTP to WebSocket as shown in Figure 4.
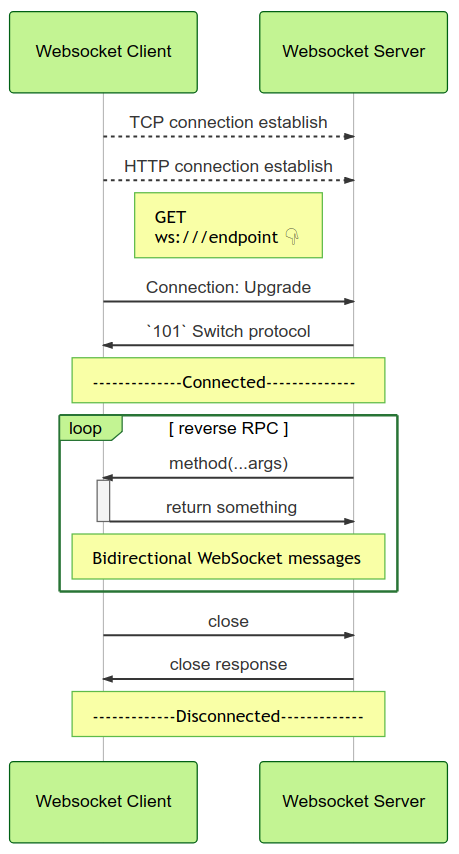
In Figure 4, to open a WebSocket connection, the WebSocket client need to request an upgrade connection via HTTP GET method by instantiating WebSocket class (Code Change 3.3). After that, the server will respond with code 101 which mean switch the protocol for that endpoint from HTTP to WebSocket. This will also trigger websocket.onopen event in the Web Browser. After the connection is established, the WebSocket client and server can speak and hear each other at the same time (bidirectional). Although they can send and receive data to/from each other at the same time, we only need the server request data from the browser in form of RPC connection which we will implement in Code Change 4.
import JSONRPC = require('jsonrpc-bidirectional')

export default class extends JSONRPC.Client {
  input(voltage: string, current: string) {
    return this.rpc('input', [voltage, current])
  }

  '.status'() {
    return this.rpc('.status', [])
  }
}
1. In ./controller/rpc/led.ts, custom RPC methods for controlling our virtual LED
import {EventEmitter} from 'events'
import {IncomingMessage} from 'http'
import {Socket} from 'net'

import JSONRPC = require('jsonrpc-bidirectional')
import WebSocket = require('ws')

export {default as LED} from './led'

export default class<T extends JSONRPC.Client> extends EventEmitter {
  private jsonrpcServer = new JSONRPC.Server()
  private websocketServer = new WebSocket.Server({noServer: true})

  private client!: T
  private ClientClass: T
  private server?: EventEmitter

  constructor(ClientClass: T) {
    super()
    this.ClientClass = ClientClass
    this.jsonrpcServer.registerEndpoint(new JSONRPC.EndpointBase('LED', '/rpc', {}, ClientClass))

    // By default, JSONRPC.Server rejects all requests as not authenticated and not authorized.
    this.jsonrpcServer.addPlugin(new JSONRPC.Plugins.Server.AuthenticationSkip())
    this.jsonrpcServer.addPlugin(new JSONRPC.Plugins.Server.AuthorizeAll())
  }
  .
  .
}
2. In ./controller/rpc/index.ts,
ClientRPCclass definitionget Client() {return this.client} close() { this.websocketServer.removeAllListeners() this.websocketServer.close() }3. In ./controller/rpc/index.ts inside
ClientRPCclass, helper function used in the main program ./index.tsupgrade(server: EventEmitter) { if (this.server) this.server.removeAllListeners() // ⬅️ flush out previous server server.on('upgrade', (response, socket, head) => this.websocketUpgrade(response, socket, head) ) this.server = server return this } private websocketUpgrade(upgradeRequest: IncomingMessage, socket: Socket, upgradeHeader: Buffer) { const wsJSONRPCRouter = new JSONRPC.BidirectionalWebsocketRouter(this.jsonrpcServer) this.websocketServer.handleUpgrade(upgradeRequest, socket, upgradeHeader, webSocket => { const nWebSocketConnectionID = wsJSONRPCRouter.addWebSocketSync(webSocket, upgradeRequest) this.client = wsJSONRPCRouter.connectionIDToSingletonClient( nWebSocketConnectionID, this.ClientClass ) this.emit('connected') }) }4. In ./controller/rpc/index.ts inside
ClientRPCclass, function to handle Websocket upgrade
Although we have defined the RPC endpoint/method in the Code Change 3, we can create a helper class to send JSON-RPC call to the Web Browser using jsonrpc-bidirectional. That helper class we defined in Code Change 4.1 will also act as a list of function to the autocomplete feature for the REPL interface. In Code Change 4.2, we begin to implement helper class called ClientRPC to create and handle RPC connection via WebSocket. Upon instantiating ClientRPC class, WebSocket and JSON-RPC server was created but not yet ran. In the constructor of ClientRPC, we register the helper class that inherits JSONRPC.Client which like the class we defined in Code Change 4.1. Notice that after registering the helper class, we still need to disable the need of to authenticate and authorize request (Code Change 4.2) even though we have disabled it on the Web Browser side (Code Change 3.2).
We see that in Figure 4, to open WebSocket connection on existing port, the WebSocket client will request a connection upgrade. The current mechanism to request upgrade is by instantiating WebSocket class in the web browser in the same port. When the Browser requests a connection upgrade, we can handle the upgrade session as shown in Code Change 4.4. Actually, we don't need to handle the upgrade session if koa instance expose http.Server object but since koa doesn't expose it, so we don't have a choice. After the RPC connections is establish, we emit event connected from ClientRPC class as shown in function websocketUpgrade.
⛓ Gluing it all together
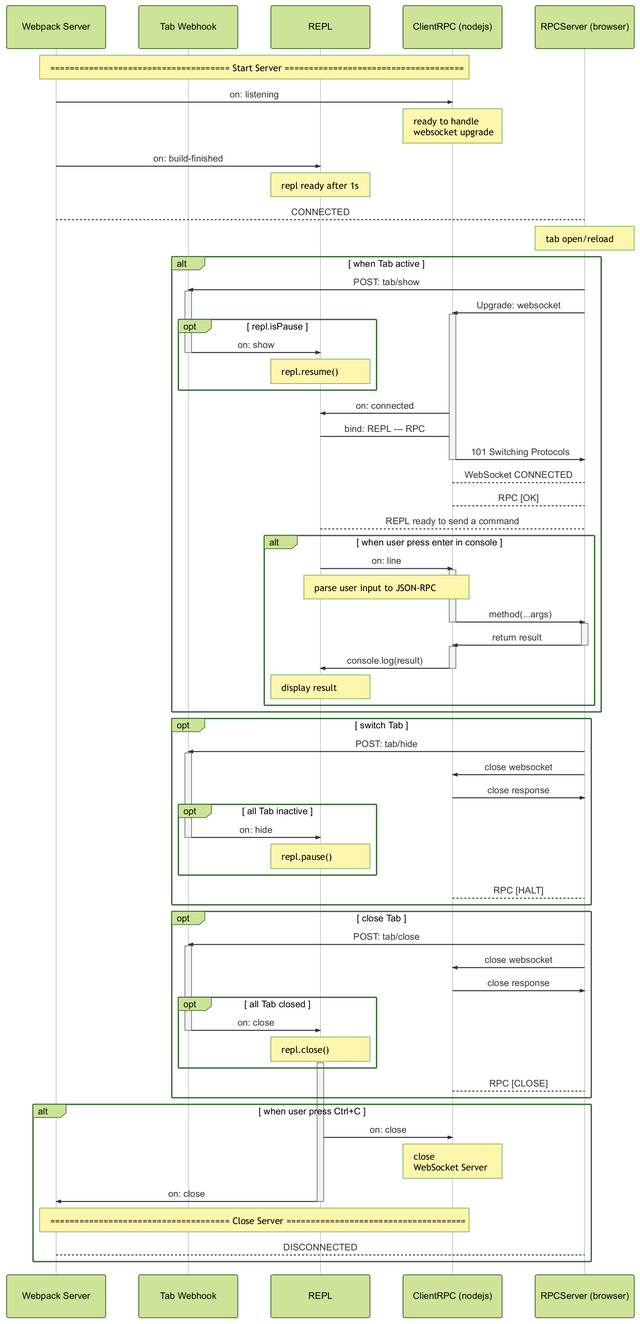
Figure 5 is the sequence diagram of the complete program (and yes, it's quite long 😂). Basically, we have 4 component on the server side (Webpack Server, Tab Webhook, REPL, and ClientRPC) and RPCServer which run on the Web Browser. Each of the components on the server side can listen to each other event. For starter when Webpack Server finish building, REPL component will start receiving input after 1 seconds. After that, it safe to assume that the Server side and the Client side are CONNECTED. Also, if we look carefully at the REPL component, it clearly says that all server-side component will send a signal to the REPL component. After it's CONNECTED and the tab is opened, we have 4 state/condition depend on the user interaction.
- when Tab active: This is a condition when the user mostly enters at the first time, especially when they opened the first tab. This condition is also active when switching from one active Tab to another one that is inactive. Some important thing that happens in this state are:
- REPL interface will be active (accept user input)
- create WebSocket connection
- bind REPL interface with ClientRPC so that whenever the user sends a command via REPL interface, it will be converted into JSON-RPC call, sent to RPCServer through WebSocket, and display the returned value in the console
- switch Tab: This is a condition when the user switches a Tab that makes the Tab transition from active state to inactive. When the Tab begins to be inactive, it will:
- close WebSocket connection
- REPL interface will be inactive (pause), all user input will only be cached
- close Tab: This is a condition when the user closes one of the opened Tabs. What the program does in this state is similar with the switch Tab condition except it doesn't pause REPL interface. Also if the Tab that the user close is the last one,
it will close the REPL interface and transition to the state when user press Ctrl+C. - when user press Ctrl+C: This is a condition when user press Ctrl+C when in the console and REPL interface is not paused. Basically, this condition will close the server just like closing an application when a user sent SIGINT.
import ClientRPC, {LED} from './controller/rpc'
import event, {tab} from './controller/event'
import REPL from './interface/repl'
.
.
  async run() {
    const {args, flags} = this.parse(ReverseRpc)
    const webpack = new WebpackConfigure(config)
    // @ts-ignore BUG: can't write class inheret another class from ambient declaration
    const remote = new ClientRPC(LED)
    const repl = new REPL()
    .
    .
1. Instantiate class for doing RPC call and run REPL interface
    .
    .
    webpackServer.on('listening', ({server}) => {
      remote.upgrade(server)
            .on('connected', () => repl.to(remote.Client))
    })

    webpackServer.on('build-finished', () => repl.promptOnceAfter(1))//seconds

    tab.on('hide', () => {if (tab.allInactive) repl.pause()})
    tab.on('show', () => {if (repl.isPause) repl.resume()})

    tab.on('close', () => {if (tab.allClosed) repl.close()})

    repl.on('close', () => {
      remote.close()
      webpackServer.close()
    })
  }
2. Inside
async run(), create event flow logic
In Code Change 5, we combine all the component we have build by listening to some events that change over the program was run. First, we need to instantiate ClientRPC and REPL class as shown in Code Change 5.1. Notice that when instantiating ClientRPC, we need to provide helper class that inherits JSONRPC.Client like in Code Change 4.1. Next, we can glue it all together as shown in Code Change 5.2. There is something interesting thing here because we need to prompt REPL only once with one second's delay after build finished. Also, we use repl.to(remote.Client) to bind REPL and ClientRPC together so whenever a user sends a command via REPL interface, it will be parsed then sent to Web Browser via RPC through WebSocket connection.
Conclusion
Summary, by using reverse RPC through WebSocket, we are able to create a REPL interface that can control webapp behavior (in this case are LED webcomponent). This concept has some benefits and limitations that I can think of:
feature/benefit:
- debugging our application using REPL interface
- because we listen to the state of the Tab Browser, we can pause/resume the REPL interface which is useful if we want to debug multiple conditions
- the user can customize the RPC endpoint and that's mean the user can decide which parts of the webapp that can be controlled via REPL interface
limitation/bug:
- hot reloading does not work as I expected (seems the problem are in svelte-loader)
- no introspection feature because
RPCServerdoesn't send information about the RPC endpoint that the end-user create (seems I need to implement this by transforming endpoint class into JSON and send it as a beacon data when jumping into development phase 🤔) - no security feature. Well it's not meant to be used in the production environment but it's possible to implement the security feature like auth and XSS filter
- no option to build it as a static HTML. This feature is important if we want to serve it in Github page or others and it's possible to implement this thanks to webpack
Parting words
This is the third part of this series. Actually, the REPL feature is just a way to send RPC command since I can't think any others way 😂. Seems REPL will be one of the main features for dev tool that I want to build. Glad that I do PoC first and not directly develop it 😆. Anyway, these series consist of 4 parts:
| Topic | Goal | Progress | |
|---|---|---|---|
| part 1 | more focus on how to utilize oclif, webpack, and svelte | create custom CLI to serve incomplete HTML like file | complete |
| part 2 | focus on how Tab Browser event works | listen to Tab Browser activity in the server | complete |
| part 3 | begin to enter the main topic "Creating RPC Server on Web Browser" | create reverse RPC through WebSocket | complete |
| part 4 | focus on how to create a proxy that bridge between Unix Socket and WebSocket | end-user can create Rust program to control the HTML like file via Unix Socket | 😎 |
The last parts will be a bit tricky (but not as tricky as this part). For the last part I'm still uncertain if I need to use nanomsg to achieve compatibility with many different Operating System, using Unix Socket, or maybe just use stdin/stdout like how VSCode approach this problem. Maybe I need to wait nanomsg 2.0 a.k.a nng to support Javascript and Rust. For now, using UDS (Unix Domain Socket) will do since Windows 10 now support Unix Socket. Also, I probably will use IDL (Interface Definition Language) to define and generate RPC protocol across different programming language.
References
Curiculum
- Creating RPC Server on Web Browser - part 1: Serving incomplete HTML file
- Creating RPC Server on Web Browser - part 2: Listen to browser Tab activity on the server side
- Related Tutorials
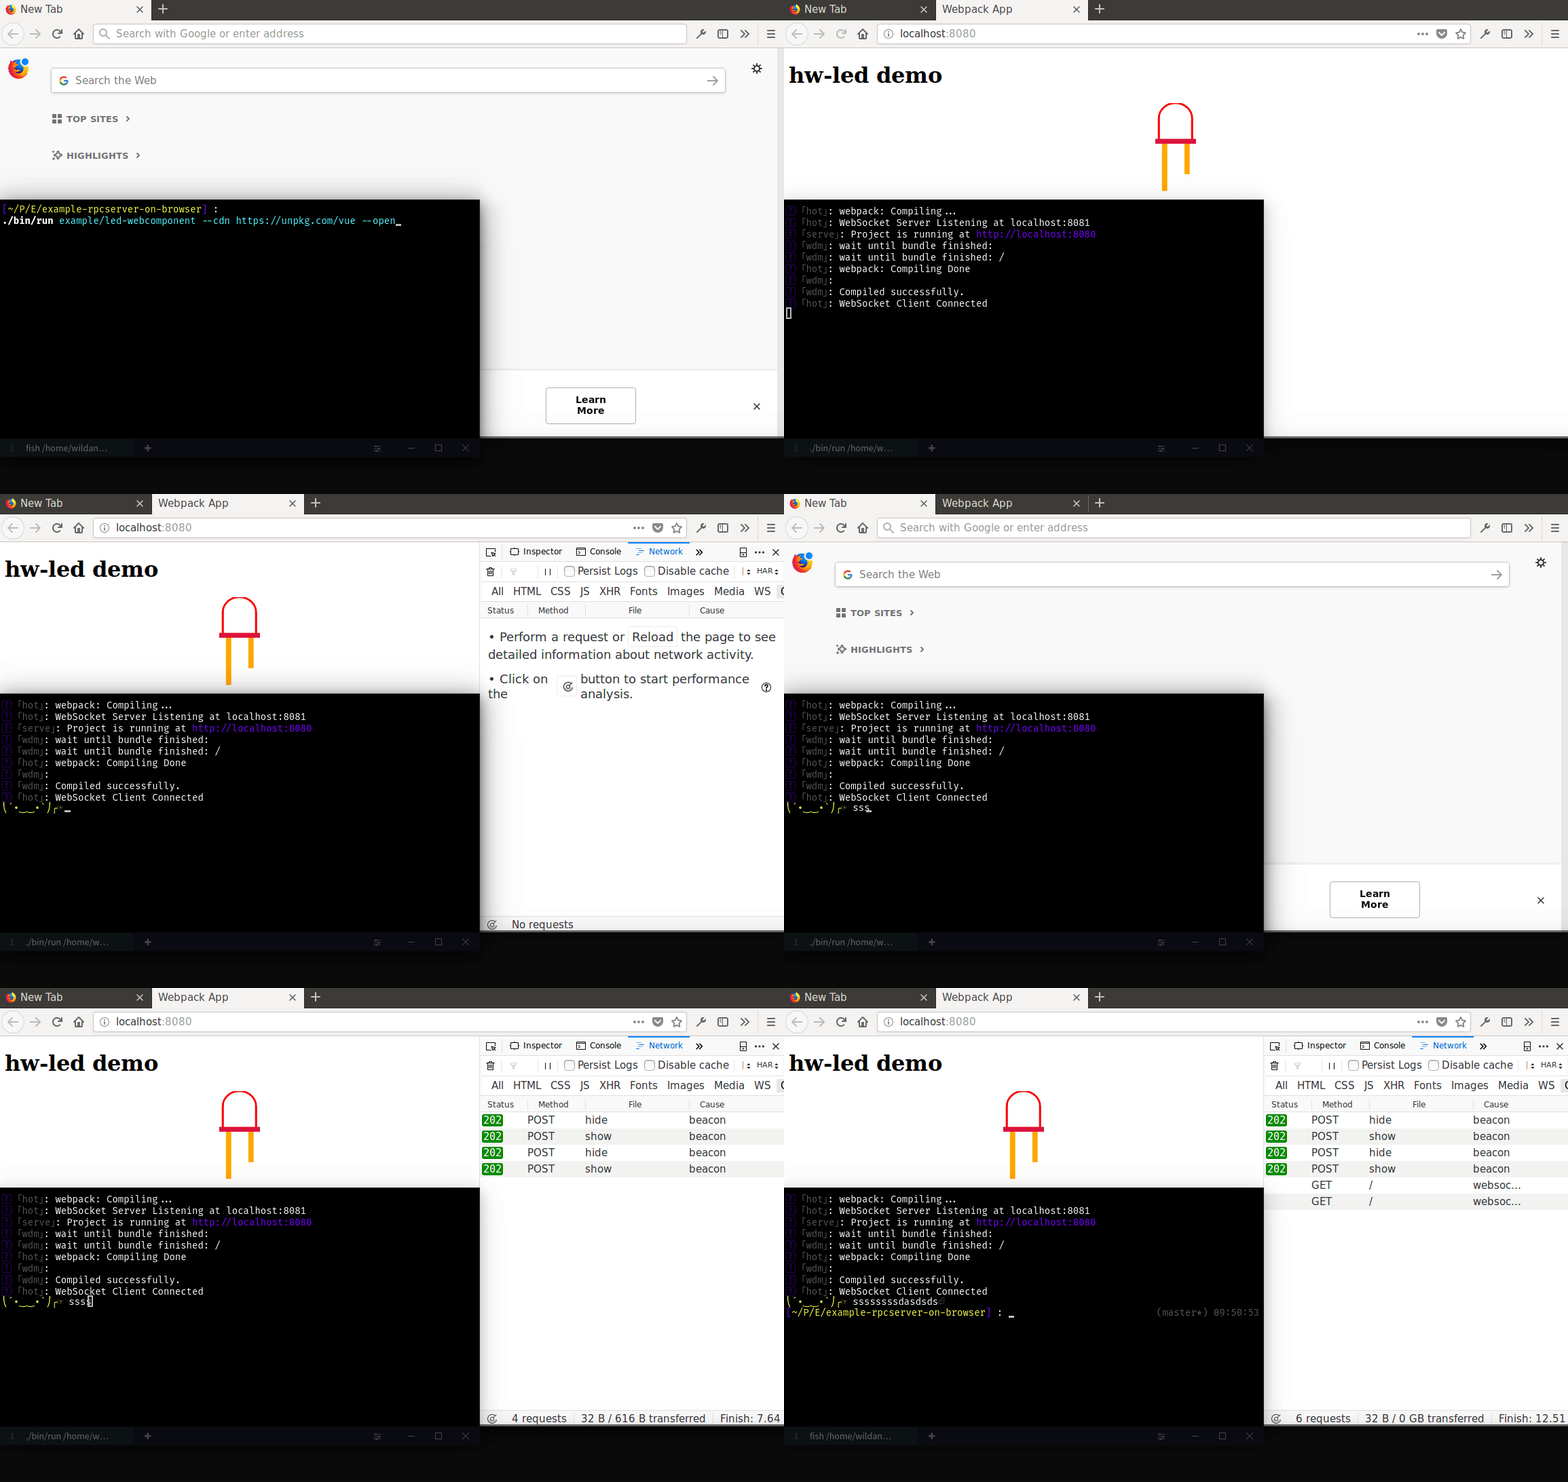
Thank you for another great tutorial @drsensor.
Always appreciative of your well-structured formatting, academic-level referencing, .. not to undermine the content itself :)
keep them coming ! :)
Your contribution has been evaluated according to Utopian policies and guidelines, as well as a predefined set of questions pertaining to the category.
To view those questions and the relevant answers related to your post, click here.
Need help? Write a ticket on https://support.utopian.io/.
Chat with us on Discord.
[utopian-moderator]
Hi @drsensor, I'm @checky ! While checking the mentions made in this post I noticed that @ts-ignore doesn't exist on Steem. Maybe you made a typo ?
If you found this comment useful, consider upvoting it to help keep this bot running. You can see a list of all available commands by replying with
!help.nope
oh that was hilarious :)
Hey @drsensor
Thanks for contributing on Utopian.
Congratulations! Your contribution was Staff Picked to receive a maximum vote for the tutorials category on Utopian for being of significant value to the project and the open source community.
We’re already looking forward to your next contribution!
Want to chat? Join us on Discord https://discord.gg/h52nFrV.
Vote for Utopian Witness!