Building an iOS Audio Editor with Swift(#2)-Adding the Audio Recording Functionality
Repository
https://github.com/apple/swift
What Will I Learn?
- You will learn how to add images to your iOS project
- You will learn how to manipulate and alter states of UIViews
- You will learn about the UI Navigation Controller and how to add it to your project
- You will learn how to add a second View Controller to iOS project
- You will learn about Segue's in iOS
- You will learn about the AVFoundation class in iOS used for Audio Video processing
- You will learn how to create an audio recording file in an iOS application
Requirements
- Basic knowledge of the Swift Programming Language
- MAC OSx High Sierra version 10.13 and above
- Xcode version 9.3 Editor
- Previous Tutorial
Difficulty
Choose one of the following options:
- Basic/Intermediate
Tutorial Contents
In the previous tutorial, we took the first steps towards building the audio editor app. Designing the main storyboard UI and connecting the views to our View Controller. We also added a fading animation to our Recording button to indicate the start of a recording.
Please read the previous tutorial as we will be building on some concepts introduced there.
Adding Images to our Project
As stated in the previous tutorial, i will be outlining how to add image files to our project here. In the navigator panel of xcode, we see a folder called Assets.xcassets, simply drag your image file from wherever location it is into this folder. This creates an Image Set. An Image Set is a collection of images that fit into any screen density or device. For iOS we have 3 sets: 1x, 2x and 3x which mean the size of the image for each of these categories respectively is bigger and fits for a larger screen.
To use an added image to the storyboard we simply follow the steps below,
- Simply click on the view that you want to set its background.
- Click on the utilities panel and show the attributes inspector, then select the Image property and choose from the images uploaded on the Assets folder.
Now that we know how to add images to our project, lets make some changes to views in our View controller to enhance user experience.
I have renamed my ViewController.swift file to SoundsRecordingController.swift to reflect what the controller does since we will soon be adding a new controller. On app launch we want our stopRecordingButton to be disabled since no recording is in progress and for the recordingLabel to read Tap to Record, we also want our recordingButton to be inactive and for the label to change to Recording in Progress when the recordingButton is clicked.
Lets implement the code for this. In the viewDidLoad() method, type in the following lines of code, i have assumed you have reference to your views using @IBOutlet in your SoundsRecordingController class as i taught how to do this in the first tutorial.
override func viewDidLoad() {
        super.viewDidLoad()

        stopRecordingButton.isEnabled = false //disables stop recording button
        stopLabel.isHidden = true //Hide Stop Label

    }
The viewDidLoad() method is the method called when the view has finished loading and is visible. In this method, we have simply set the isEnabled property of the stop recording button to false so as to disable it. We have also set the isHidden property of our stop label to true so as to hide our stop label when the views are initially displayed.
Now to enable the stop recording button when the start recording button is clicked, lets modify our recordAudio() method, which is the @IBAction method that is called when start recording is clicked,
@IBAction func recordAudio(_ sender: AnyObject) {

        stopRecordingButton.isEnabled = true //enables stopRecording button
        stopLabel.isHidden = false
        recordingButton.isEnabled = false
        recordingLabel.text = "Recording in Progress"
        setUpAnimation()
    }
In this method, the stopRecordingButton has been enabled and also the stopLabel becomes visible due to their properties being set correspondingly. The recordingButton isEnabled property has been set to false to disable the recordingButton and the recordingLabel text has been changed to "Recording in Progress". Another modification done to this method is creating a function for our animation when the recordingButton is clicked, the setUpAnimation() function thus contains code for our animation and is shown below,
func setUpAnimation(){
        self.recordingButton.alpha = 0.0


        UIView.animate(withDuration: 2.0, animations: {
            self.recordingButton.alpha = 0.0
        }) { (finished) in

            UIView.animate(withDuration: 2.0, animations: {
                self.recordingButton.alpha = 1.0
                //fade in button
            })
        }
    }
Now we have to return to the original state of the views when the stopRecordingButton is clicked, in the stopRecording() method, add the following lines of code,
@IBAction func stopRecording(_ sender: UIButton ) {
        stopRecordingButton.isEnabled = false
        stopLabel.isHidden = true
        recordingButton.isEnabled = true
        recordingLabel.text = "Tap to Record"

    }
Properties are set on all the views to ensure that the stopRecordingButton is disabled, the stopLabel disappears, the recordingButton is made active for clicking again and the recordingLabel is changed to "Tap to Record" as it was on app launch.
Adding a Second Controller
We have to add a second controller to our main.storyboard that would be called to display when the stopRecordingButton is clicked and this storyboard will show the various options to play the recorded voice at different pitches/frequencies. To add a second controller, we first however need to add something called a Navigation Controller.
The Navigation Controller also known as UINavigationController is a class that is used for multiple views in iOS. It handles a stack of view controllers and can add to its stack a new view controller and also remove the recently added view controller from the stack.
However, the Navigation Controller must always have a rootview and this rootview is the entry point of the application or the first ViewController that is seen when the app launches. It is indicated by a grey right pointing arrow. A ViewController can have its property of is Initial View Controller checked to make it the first View controller shown by the application.
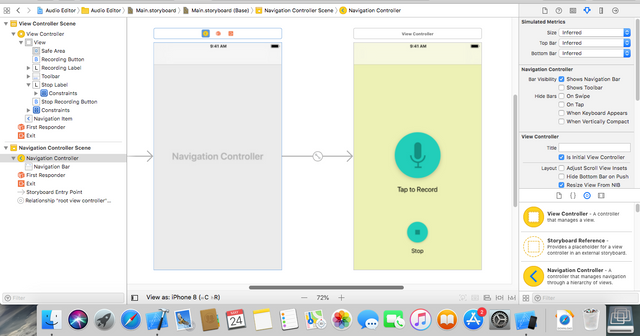
To add a Navigation Controller, simply drag it from the Object Library onto the storyboard for it to display. In similar fashion we can drag a ViewController from the Object Library to the story board as well.
.png)
The Main.storyboard is shown having the Navigation Controller as the entry point and it connects to the Sounds Recording Controller as shown by the arrows in the screenshot
Now that we have added a new ViewController, to move from one controller scene to the next, we make use of an iOS concept called a Segue. A segue is used for transitioning from one View Controller to the next. To add a segue to our controllers, we simply select our Sounds Recording Controller, hold ctrl button on our MAC keyboard and create a drag to our second controller. On drag creation, a menu pops up asking for the type of segue to be created, for now we are only creating a Show Segue which implies show the second view controller on click of the stopRecordingButton.
Running the app and testing, clicking on the stopRecordingButton now launches a second screen which has a navigation back button that helps us to migrate back to the Sounds Recording Controller scene. For now lets not bother about the UI look on our second controller, we will take care of that soon. Instead we focus on actually starting a recording and saving to our device when recording is complete in the application.
Adding Recording Functionality
The AVFoundation package/module is a set of classes in iOS that help us to manipulate audio and video in our iOS device. It provides an abstract layer for interaction between our app and the underlying audio/video hardware of our iOS device. Lets get started by importing this package into our SoundsRecordingController.swift class and use it to record our audio by creating a variable instance of a class in the package known as AVAudioRecorder. See code snippet below,
var audioRecorder : AVAudioRecorder!

func initializeRecorder(){
// we set up our audio recorder here
}
We then create a function called initializeRecorder() that will be used to set up our audio recorder when the recordingButton is clicked, add the following lines of code to this function,
let directory =  NSSearchPathForDirectoriesInDomains(FileManager.SearchPathDirectory.documentDirectory, FileManager.SearchPathDomainMask.userDomainMask, true)[0] as String
        let recordingName = "myRecording.wav"
        let pathArray = [directory, recordingName]
        let filePath = URL(string: pathArray.joined(separator: "/"))//filepath is an optional URL
        print(filePath!)
First of, a directory path is gotten from the device which will be the location in which the recorded file will be saved. The NSSearchPathForDirectoriesInDomains() function which is inherited from the Foundation class which the AVFoundation class subclasses is used to create a directory path. It takes in 3 parameters:
A FileManager.SearchPathDirectory which returns a list of possible directories in the document of which documentDirectory is one of them and is where i have chosen to save my recorded file.
FileManager.SearchPathDomainMask which returns a list of possible domains for which the directory should be searched for. I have chosen to use the userDomainMask which is the domain for personal files of the user.
An ExpandTiles boolean variable that when set to true expands tiles in the specified directory path
It is worthy of mention that the NSSearchPathForDirectoriesInDomains() method returns a string array of path options and we simply select the first element and cast to a string, thus the directory constant is a String.
Next up we create a constant to hold the name we want to give to our recorded file and create a pathArray constant that stores the recordingName and directory constants in an array.
A constant called filePath is then created which uses a struct called URL to create a url path with the directory joined with the recordingName using the pathArray.joined() method and passing in a seperation tag of "/" for the two strings to be joined. We then print out this filepath to console so we know if our app works when we run it.
We create an AVAudioSession object which will simply be used to access and set the type of audio to be created and how it should be played. Add the following code below to the initializeRecorder() function,
let session = AVAudioSession.sharedInstance()

  try! session.setCategory(AVAudioSessionCategoryPlayAndRecord, with: .defaultToSpeaker)
The AVAudioSession has a static method called sharedInstance() that returns an instance of the class since only one shared instance exists per iOS device for every app installed on the device. This session object created is used to set the category of the audio to Play and Record using the default speaker of the iOS device. This is done in a try block and i chose not to catch any exception thrown here using the exclamation mark after the try keyword.
Next up, we create a recording and store it in this url location using the name specified earlier. Add the following code to the initializeRecorder() function,
try! audioRecorder = AVAudioRecorder(url: filePath!, settings: [:])
        audioRecorder.isMeteringEnabled = true
        audioRecorder.prepareToRecord()
        audioRecorder.record()
In our try statement, we use the AVAudioRecorder class to create an audioRecorder using the url earlier created and an empty settings Dictionary parameter. The dictionary parameter determines the alteration of the recorded file in terms of Time Pitch Algorithm, AVAudioQuality etc. This created audio recorder is then assigned to our global audioRecorder variable and is then used to call its prepareToRecord() and record() methods. These lines of code ensures recording commences.
To make sure our recordingButton starts the recording, we add the initializeRecorder() function to our recordAudio() function, see code below,
@IBAction func recordAudio(_ sender: AnyObject) {

        stopRecordingButton.isEnabled = true //enables stopRecording button
        stopLabel.isHidden = false
        recordingButton.isEnabled = false
        recordingLabel.text = "Recording in Progress"
        setUpAnimation()
        initializeRecorder()
    }
This ensures recording starts when the recordingButton is clicked.
Next up we have to stop the recording and dispose of the audio session so as to save resources. Add the following lines of code to the stopRecording() function,
        audioRecorder.stop()
        let session = AVAudioSession.sharedInstance()
        try! session.setActive(false)
In these lines of code, we call the stop() method on the audioRecorder. Also, we get the shared instance of the AVAudioSession and set its active state to false in our try block.
Running the app in an emulator and recording, we see the filepath printed to the console. Navigating to this path within our MacOs machine, we see our recorded file saved in that location.
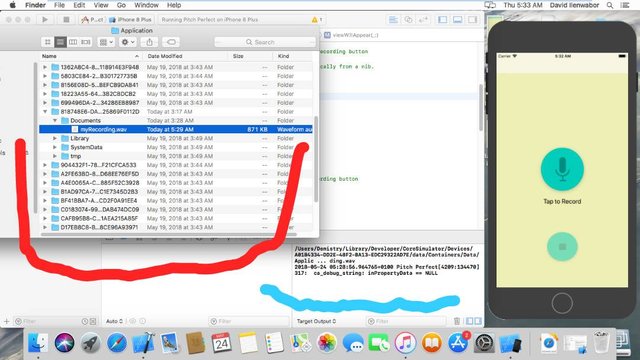
Screenshot showing app running in emulator, with filepath printed in Blue console area and navigation to filepath folder of emulator(Red area) showing the save Recorded file
In the next tutorial, we will make our audio recording more efficient and add more functionality.
Supplementary Resource
Check out full code from the view controller class,
https://github.com/demistry/Audio-Editor/blob/master/Audio%20Editor/SoundsRecordingController.swift
Hey @davidemi
Thanks for contributing on Utopian.
We’re already looking forward to your next contribution!
Contributing on Utopian
Learn how to contribute on our website or by watching this tutorial on Youtube.
Want to chat? Join us on Discord https://discord.gg/h52nFrV.
Vote for Utopian Witness!
Congratulations @davidemi! You have completed some achievement on Steemit and have been rewarded with new badge(s) :
Click on any badge to view your Board of Honor.
For more information about SteemitBoard, click here
If you no longer want to receive notifications, reply to this comment with the word
STOPDo not miss the last announcement from @steemitboard!