Java Graphical User Interface (GUI) - Creating a Calculator App with Netbeans IDE
What Will I Learn?
- You will learn how to create a Calculator App.
- You will learn basic Java GUI concepts such as using Java swing containers and controls
Requirements
- A desktop computer or laptop with Windows, Mac OS, Linux or Ubuntu Os is required.
- The Java Software Development Kit must be installed on your system
- Netbeans IDE should also be installed on your system
Difficulty
- Intermediate
Tutorial Contents
This is the first of a three part series tutorial that will teach Java users how to create a Calculator app with Netbeans using the Java GUI. In the first part of this tutorial, we will be working on our design interface using swing containers and swing controls such as JPanel, JButton, JRadioButton, and JTextArea. By the end of this tutorial, we should have a complete design of our calculator app.
Using Java GUI
Java GUI is much easier to use because it simply involves dragging and dropping of the containers and controls you wish to implement on your app. Once you drag and drop, Netbeans automatically inserts the lines of codes for these controls or containers into your source code. All you would need to do later is to edit or add codes to the ones already written.
Creating the Calculator App
The first thing we need to do is to create a package. If you are learning this, then you should be able to create a package by now. However, I will still show you how to do that.
Creating a Project in GUI
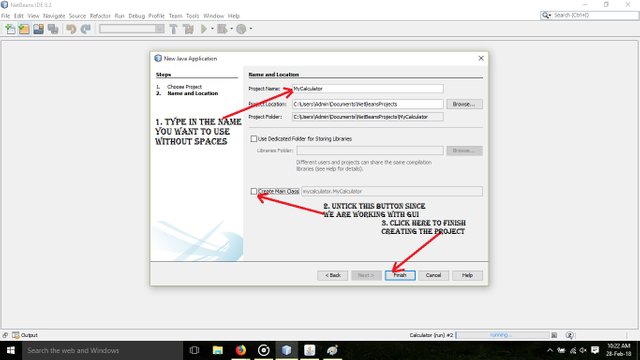
The Screenshots below detail how to create a New Project in Netbeans.
Screenshot 1
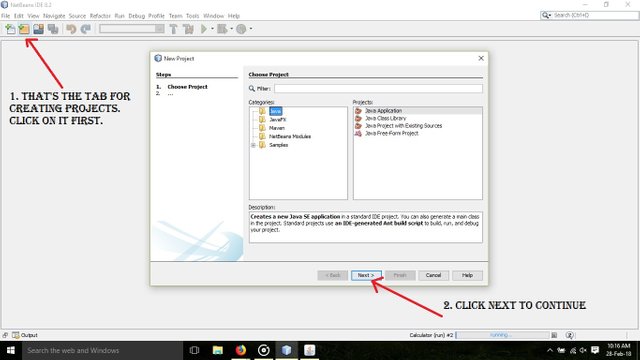
Screenshot 2
Creating Your JFrame Form
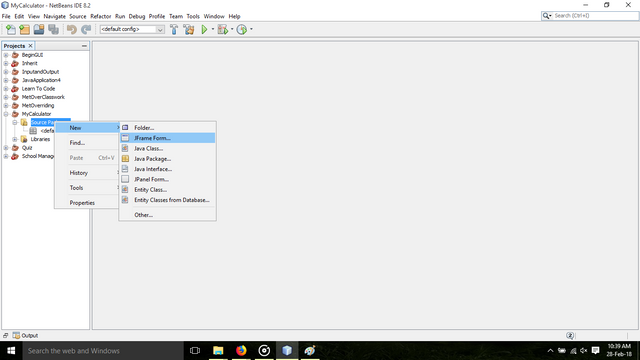
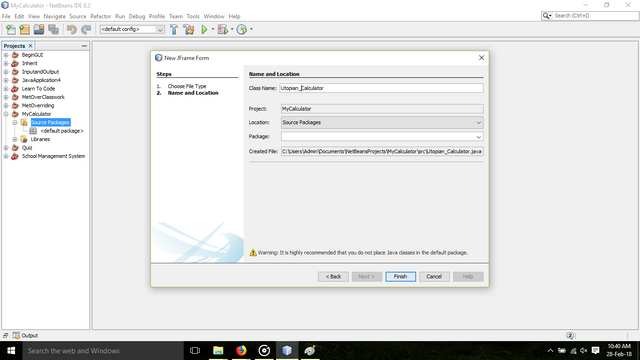
The next step would be to create your JFrame Form. This is the framed window where your JPanel will be created. The screenshots below shows how to create the JFrame Form.
Screenshot 1
After this, type the name you want to save the Form with and click next to finish.
Screenshot 2
Creating your JPanel Form
The JPanel Form is the container where controls, images, texts etc. can appear. Below are detailed screenshots to help you with the JPanel Form:
Drag and drop the JPanel Form from the Palette to the JFrame you have created.
Screenshot 1:
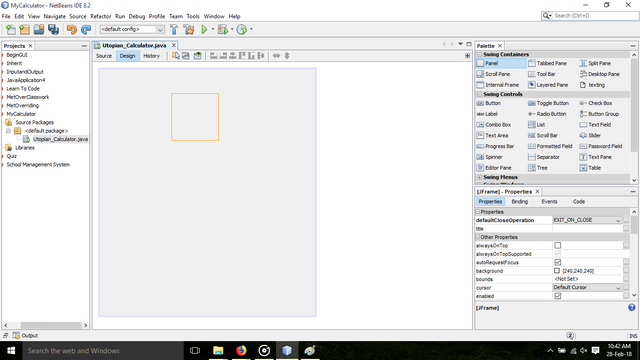
Extend it to the borders of your JPanel form.
Screenshot 2:
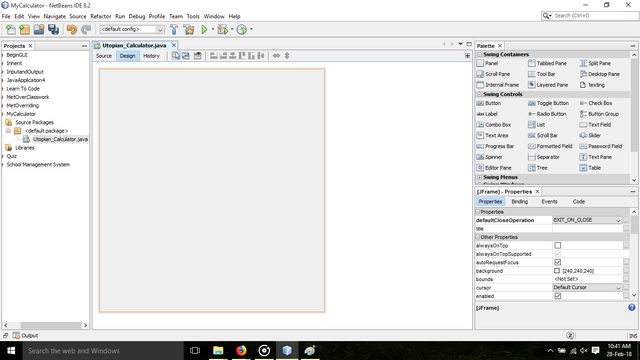
Once done, you can now change the background colour of your JPanel and its borders as well via the Properties Tab by your right hand side, or by right clicking with your cursor over the JPanel.
Screenshot
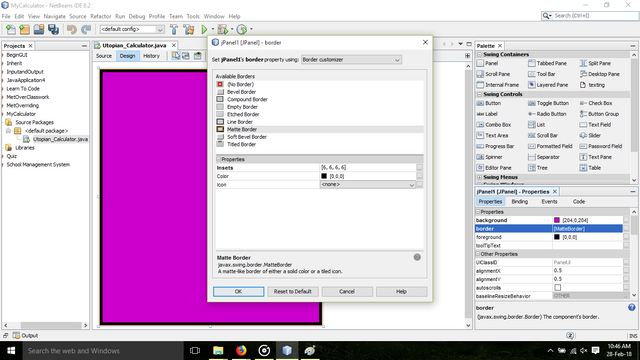
JLabel, Image Icon, JTextArea, JRadioButtons and JButtons
At the top of the calculator, the name of the app has been placed within the app. This is done with the use of the JLabel. Drag and drop the JLabel and replace the text with what you want to be shown there. For this tutorial, I used “Utopian Calculator” for the name of my calculator and edited its icon via the Properties Tab at the right.
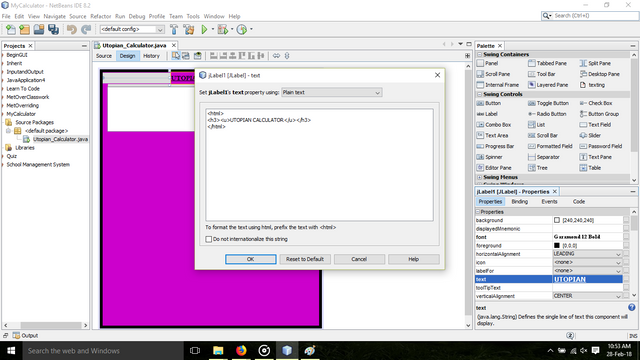
To import an Image Icon like I did with the Utopian Logo, simply download the Logo you want to use and click on the button close to the Icon Tab like shown in the screenshot below to import the icon.
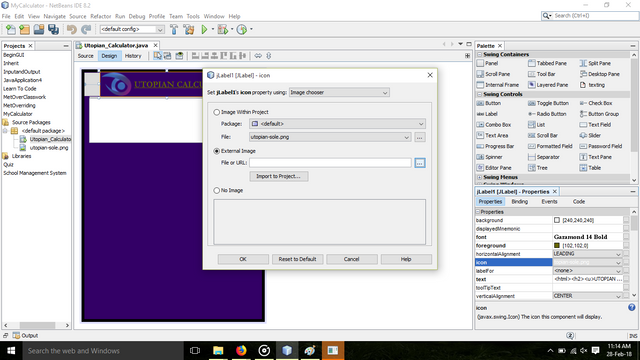
The JTextArea is where the numbers you click on and the outputs of your calculations will be shown. You can either use the JTextField or the JTextArea, depending on your preference. Simply drag and drop any of these from the Palette tab at the right side of your computer screen.
The JRadioButton is used to select one choice from two or more different choices. To implement them, simply drag and drop the JRadioButton to your panel. However, if you are using two or more different Radio Buttons, it is unusable till you add them to a Button Group. Thus, drag the Button Group from the Palette and place on the JRadioButtons, then from the properties Tab of each of the Radio Buttons, edit the Button Group of the different buttons to reflect the name of the Button group you have in your panel.
The JButtons are the buttons that will be implemented so as to be able to carry out a particular action assigned to it. For example, when you assign the value of ‘1’ to a button, and you click on it, it shows that ‘1’ in the Text Field or Area.
After arranging your JButtons, click on each button and from its properties Tab, edit and assign numbers to them. You can change font and font sizes of the text. You can also assign a background color to the JButtons from the properties Tab.
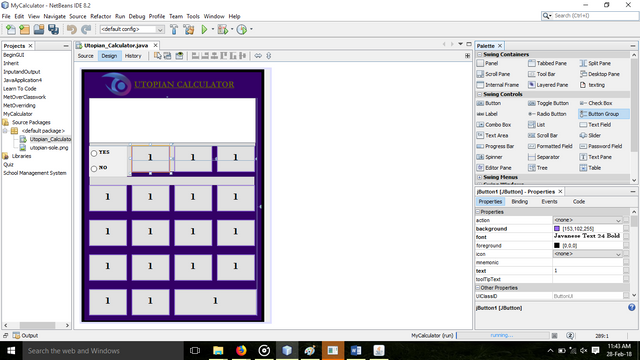
Testing our Design
Right Click on the JFrame in the project tab and click on ‘Run File’.
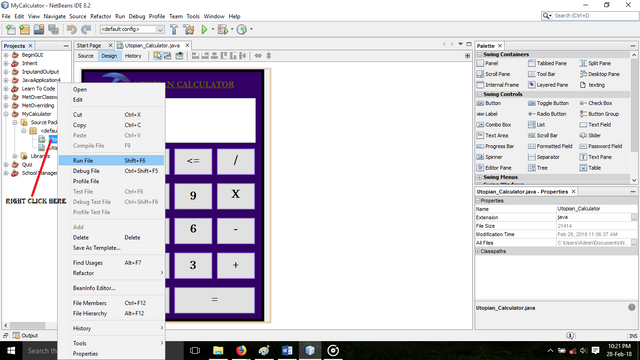
The Output is how the final design of our Utopian_Calculator looks like. The Screenshot below shows more.
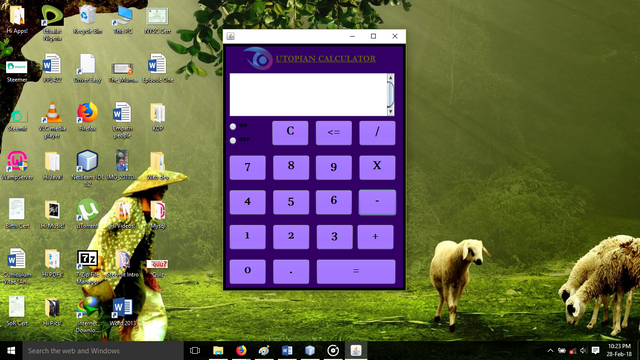
Take Home Assignment
Design A Calculator App for Steemit, DSound or DLive. Endeavor to import its Logo into your design.
Curriculum
- This is the first of a three part tutorial series that will teach you how to create a calculator app. Watch out for the next tutorial that will teach how to assign values to the JButtons so that they can appear in the JTextField or TextArea.
Posted on Utopian.io - Rewarding Open Source Contributors
Thank you for the contribution. It has been approved.
You can contact us on Discord.
[utopian-moderator]
Hey @laxam, I just gave you a tip for your hard work on moderation. Upvote this comment to support the utopian moderators and increase your future rewards!
This post has received a 9.16% upvote from @lovejuice thanks to @curtwriter. They love you, so does Aggroed. Please be sure to vote for Witnesses at https://steemit.com/~witnesses.
Thank you for the contribution. It has been approved.
You can contact us on Discord.
[utopian-moderator]
Thank you Sir @laxam!!
@curtwriter, could you please change repository to https://github.com/dmlloyd/openjdk or proper Netbeans IDE mirror (if exists on GitHub) ? It doesn't look like current repository is used much. Thanks.
Alright. I will do that immediately.
@laxam, I can't seem to edit the repository. How can I go about it please?
This post will be switched back in pending state, after that repository field will be editable again. I'll leave another comment here what that happens. Don't worry, I will re-approve the post as soon as repo field is updated.
I have edited the repository. Thanks @laxam
Perfect, thanks.
Hey @curtwriter I am @utopian-io. I have just upvoted you!
Achievements
Suggestions
Get Noticed!
Community-Driven Witness!
I am the first and only Steem Community-Driven Witness. Participate on Discord. Lets GROW TOGETHER!
Up-vote this comment to grow my power and help Open Source contributions like this one. Want to chat? Join me on Discord https://discord.gg/Pc8HG9x
Please keep this up!
This post just got a free resteem to 5200 followers.
I am not a bot. Upvote this comment if you like this service