Android App Development Series #6 - SteemJ: Voting, Following, Posting, and Commenting on the Steem Blockchain
Repository
https://github.com/aosp-mirror/platform_build
https://github.com/marvin-we/steem-java-api-wrapper
What Will I Learn?
- You will learn how to create Posts and Comments, anywhere on the Steem Blockchain.
- You will learn how to manage your/a users Followers/Following, as well as Voting Ability.
Requirements
State the requirements the user needs in order to follow this tutorial.
- Average knowledge of Java, and XML.
- Android Studio installed on your operating system of choice.
- A device to run the application within, can be a physical device, or a VM like the one included in Android Studio's 'Device Manager'.
-Access to a Steem Account.
Difficulty
- Basic
Tutorial Contents
Introduction

Self-Generated Image
Hello Steemians :] I hope you guys have been having a solid week so far, as it has been quite an adventure for me. My harddrive was near death, and after about a good 30 hours of 'chkdsk'ing, and more, I seem to have bought it a little more time :) This also means I can get back to writing, so I am very excited to be making this tutorial, as it has been quite the dull week so far! In our tutorial today, we will be taking a look at the 'SteemJ' Java Library.
Screenshot
This Library is quite powerful, though I must admit it is not the most advanced one I have seen so far. Regardless, most of the major operations on the blockchain can be accomplished using this single library in your application. So far in our tuts, we have done things like request JSON data from the Steemit Website, but today we will be doing much deeper operations than that. The SteemJ Library interacts directly with the blockchain, giving you much more power, like the ability to create 'custom operations'.
Following/Followers, and Voting/Removing Votes
Allright guys, so the first thing we will need to do, is create a new project for us to work on. I have named mine 'SteemSurfer', but you may name yours as you please. I have also named our main activity 'HomePage.java'. This activity will be where we handle all of our Voting, and Follower activity for our accounts. Aside from this activity, just to make things simpler for the next few bits of this tut, I would like to you create two new classes. The first one will be called 'Following.java', and the second, will be called 'Voting.java'.
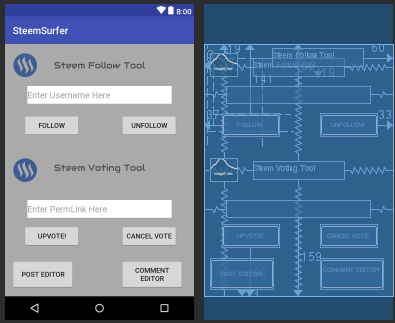
These two classes will be where the majority of our code is done, as near all of these operations cannot be run on the Main UI Thread. We will get to them shortly, but for now lets set up our home page activity. As you will see in the image below, there are quite a few widgets we will need to add to this page to get everything done in a clear and explanatory way. (Many of the functions you will see in this tut, can be used far more effectively within the code, but I have chosen to force the user to input certain bits of data, so that it can be clear what we are doing with our operations.

Screenshot
So, like mentioned above, for this activity, we will need numerous widgets to be added. As usual, the XML Layout files for each activity can be found through the link below, but just to go over it quickly, we will need 2 EditTexts, for inputting Username and Permlink data, as well as 6 buttons. Of these Buttons, 2 are responsible for Voting/Unvoting, 2 for Following/Unfollowing, and 2 further buttons, that will link to our other activities, where we will handle posting, etc.
Once you have your layout set up like mine, we can get down to the code. In HomePage.java, we will Simply be setting up a lengthy amount of onClickListeners. Before this, we will need to initialize all of our views as variables, so as to refer to them during run.
Button followB = (Button) findViewById(R.id.followButton);
Button unfollowB = (Button) findViewById(R.id.unfollowButton);

final EditText username = (EditText)findViewById(R.id.usernameET);
final EditText url = (EditText)findViewById(R.id.permlinkURL);
Button upvote = (Button) findViewById(R.id.upvoteButton);
Button cancelV = (Button) findViewById(R.id.CancelButton);
Button postCreator = (Button) findViewById(R.id.postEditorButton);
Button commentCreator = (Button) findViewById(R.id.commentEditorButton);
Once you have completed this, the next and final step for this page are really rather simple, though they may not make the most sense just yet, but I assure you they will when nearing the end of this tutorial. First, lets go ahead and set up our Follower Buttons. You can see this in the upcoming code snippet directly below.
followB.setOnClickListener(new View.OnClickListener() {
    @Override
    public void onClick(View v) {
        String[] strings = {username.getText().toString()};
        new Following().execute(strings);
    }
});
unfollowB.setOnClickListener(new View.OnClickListener() {
    @Override
    public void onClick(View v) {
        String[] strings = {username.getText().toString()};
        new unfollow().execute(strings);
    }
});
As you can see from the segment of code above, we have set up 2 onClickListeners, and attached them to our 'Follow', and 'Unfollow' buttons. Inside of these listeners, the code is quite similar between them, but with slight important variances so be sure to pay attention to what is happening. These two Listeners are exactly the same as each other, both creating a String Array, and storing the value of our TextView, at the time of Click.
Screenshot
Next our Following class will be executed. Most of the work is handled there, but for now, we will simply pass in our String Array 'strings'. Now lets go ahead and set up the next two Buttons, which will be responsible for handling our Voting functions.
upvote.setOnClickListener(new View.OnClickListener() {
    @Override
    public void onClick(View v) {
        String[] strings = {url.getText().toString(), username.getText().toString()};
        new Voting().execute(strings);
    }
});
cancelV.setOnClickListener(new View.OnClickListener() {
    @Override
    public void onClick(View v) {
        String[] strings = {url.getText().toString(), username.getText().toString()};
        new Unvote().execute(strings);
    }
});
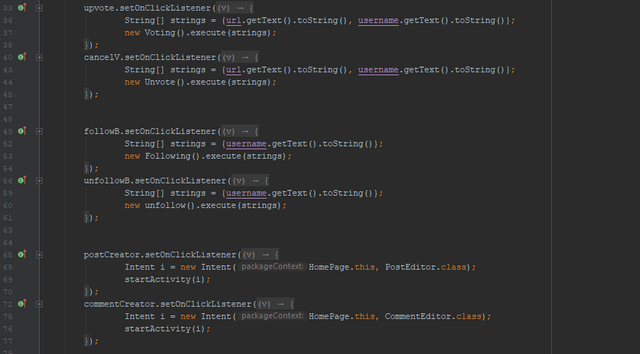
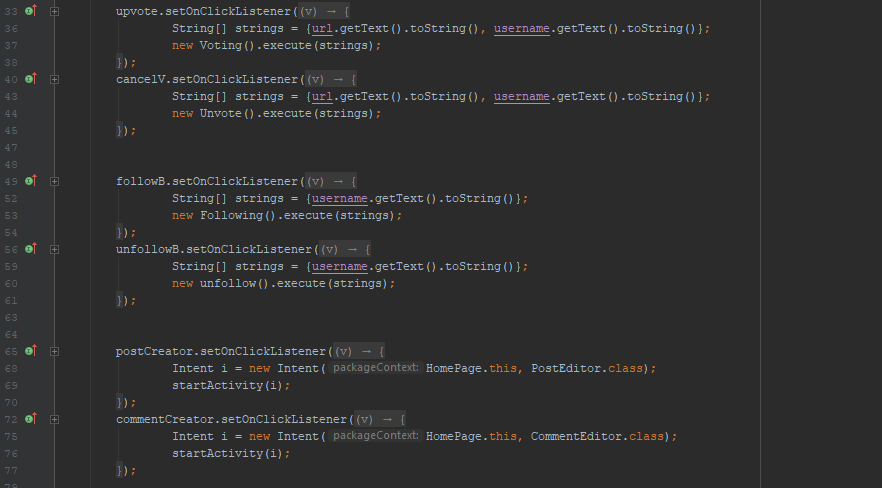
So these two Listeners are a bit different from our Follower controls that we just created earlier. As you can see, this time when we create our String Array, we add two elements of data, including the Permlink(url) of the Post or Comment that we would like to vote on, or remove our vote from, as well as the username of the Post's Creator. This string array is then passed into our execute function of our Voting Class. After we set up our next two buttons, we will be taking care of all of our Classes, so not to worry.
postCreator.setOnClickListener(new View.OnClickListener() {
    @Override
    public void onClick(View v) {
        Intent i = new Intent(HomePage.this, PostEditor.class);
        startActivity(i);
    }
});
commentCreator.setOnClickListener(new View.OnClickListener() {
    @Override
    public void onClick(View v) {
        Intent i = new Intent(HomePage.this, CommentEditor.class);
        startActivity(i);
    }
});
The two Buttons, which we initialize and set up Listeners for in the segment of code directly above, will be used to switch activities. This will be handled using a simple Intent. I will not be explaining this step, as by now you should have a decent understanding of what is happening there. Next, we will need to handle our Class files, but first I would like to talk about classes a bit.
Follow Class: Following.java
Following.java, is a Class that we have set up earlier in this tutorial. A Class, in Java is essentially a 'blueprint' detailing how individual objects are to be created. We will be using our Classes, to handle work outside of the thread. A Class file, can also have Sub-Classes, should you choose, and we will be using this feature in order to keep our project Neat and Tidy. Our Following.java Class, has 1 Sub-Class, which will be responsible for handling the Unfollowing operations of our account. First, lets handle the Following Class.
public class Following extends AsyncTask<String, Void, Void> {

    String postingKey = "YOUR_PRIVATE_POSTING_KEY_GOES_HERE_IN_QUOTES";

    @Override
    protected Void doInBackground(String... strings) {

        return null;
    }

}
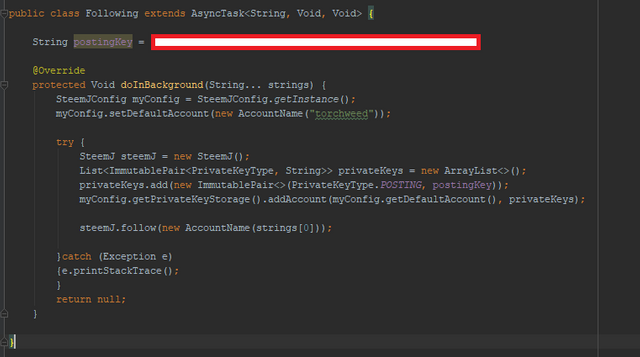
As is shown in the code segment above, our Following Class, as well as all others for this Project, will be Extending the AsyncTask Class. When you first try to set this up, it will throw some errors, telling you that this class requires you to override the doInBackground() functions, and we have set ours up so that a String Array of Data can be passed into the method. We have also set up a Class wide variable which will hold our Private Posting Key/s. Once this is done, lets set up our doInBackground function now.
@Override
protected Void doInBackground(String... strings) {
    SteemJConfig myConfig = SteemJConfig.getInstance();
    myConfig.setDefaultAccount(new AccountName("torchweed"));

    try {
        SteemJ steemJ = new SteemJ();
        List<ImmutablePair<PrivateKeyType, String>> privateKeys = new ArrayList<>();
        privateKeys.add(new ImmutablePair<>(PrivateKeyType.POSTING, postingKey));
        myConfig.getPrivateKeyStorage().addAccount(myConfig.getDefaultAccount(), privateKeys);

        steemJ.follow(new AccountName(strings[0]));

    }catch (Exception e)
    {e.printStackTrace();
    }
    return null;
}
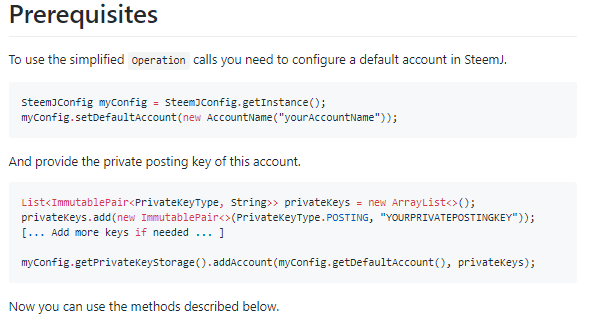
So lets break this previous segment down into a few parts, so as to make it simpler to understand. The first six lines of code, are simple prerequisite lines of code, that are required by SteemJ in order to use any of the operations provided by the library. The first two lines create a 'Configuration Instance' of SteemJ, as well as set the default account the we will be using to complete operations.
For the purposes of this tutorial, I will be using a secondary account of mine, which is used to upload gaming clips by me and my lady :) It is not a very active account, and will only be used in lieu of using my own. The following image details the prerequisite lines of code required, and can be viewed more in depth at This Link.
Screenshot
The next four 'prerequisite' lines of code, are responsible for creating a SteemJ Object, an Immutable Pair list containing our private keys, and finally assigning our keys to our configuration instance. I will not be explaining those again, or much further, as that is another persons work, and all info needed can be found in the link provided above.
Screenshot
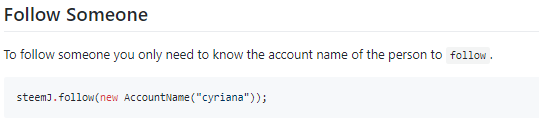
Once we have set up our 6 required lines, we will finally implement our Follow Operation. This is done quite simply, using 'steemJ.follow(new AccountName(strings[0]));'. The String Array 'strings' was passed in from our HomePage activity, and contains the username of the user we would like to follow, at position 0.
Screenshot
Unfollow Sub-Class: Following.java
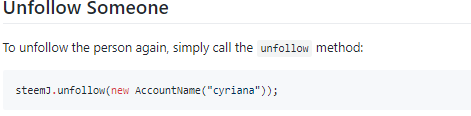
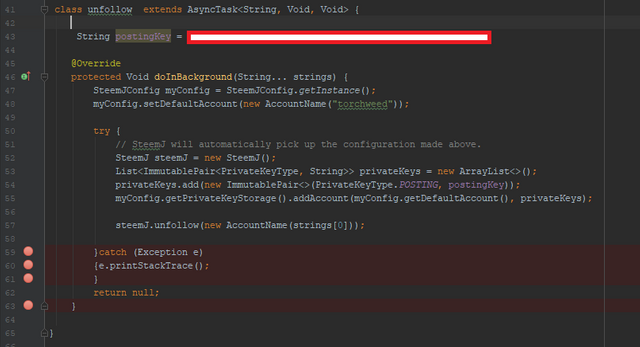
As I mentioned earlier, each class is allowed to use Sub-Classes, and we will be using one here, in order to handle the Unfollow functions of our account. This class is executed when our 'Unfollow' Button is clicked. You will see that this class, is quite similar to the Following Class, however instead of a Follow SteemJ Operation, we will be using the 'Unfollow' Operation. The format for this function can be seen in the image below.

Screenshot
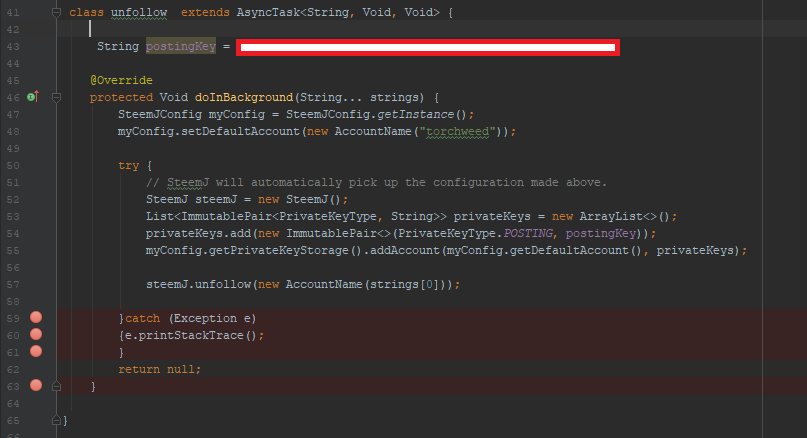
Aside from this, just like the rest of our Classes, our unfollow class will be extended from AsyncTask, so as to be run in a background thread. We will also need to implement the 6 Prerequisite lines of code, in order to be able to use the operations from the SteemJ Library. This will be done within each class that uses a SteemJ Operation. I will include a code segment, as well as an image of my code below, though there will be very little difference from our Follow Class.
 class unfollow  extends AsyncTask<String, Void, Void> {

    private Exception exception;

     String postingKey = "ENTER_YOUR_PRIVATE_POSTING_KEY_HERE_IN_QUOTES";

    @Override
    protected Void doInBackground(String... strings) {
        SteemJConfig myConfig = SteemJConfig.getInstance();
        myConfig.setDefaultAccount(new AccountName("torchweed")); //Account that will be used for operations

        try {
            // SteemJ will automatically pick up the configuration made above.
            SteemJ steemJ = new SteemJ();
            List<ImmutablePair<PrivateKeyType, String>> privateKeys = new ArrayList<>();
            privateKeys.add(new ImmutablePair<>(PrivateKeyType.POSTING, postingKey));
            myConfig.getPrivateKeyStorage().addAccount(myConfig.getDefaultAccount(), privateKeys);

            steemJ.unfollow(new AccountName(strings[0])); //unfollow username at element 0 of strings[]

        }catch (Exception e)
        {e.printStackTrace();
        }
        return null;
    }

}
It should be mentioned, that it is best practice to store these functions within Try/Catch blocks, as catching any form of error should the RPC node be down, etc will stop our application from crashing. This Class, is a very simple subclass, requiring the exact same data, the username to be fed through the String Array.
Screenshot
Voting Class: Voting.java
This is where we will handle all of our voting operation code. The main class, Voting, will be used to handle the UpVote operation, and the Sub-Class will be used to cancel the vote. I am not going to bother including the prerequisite lines anymore, as it is taking up quite a bit of space, and there is still a bit to go.
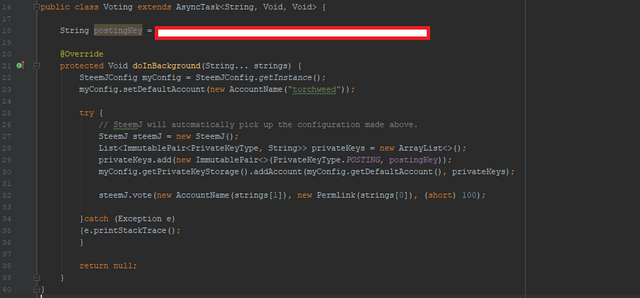
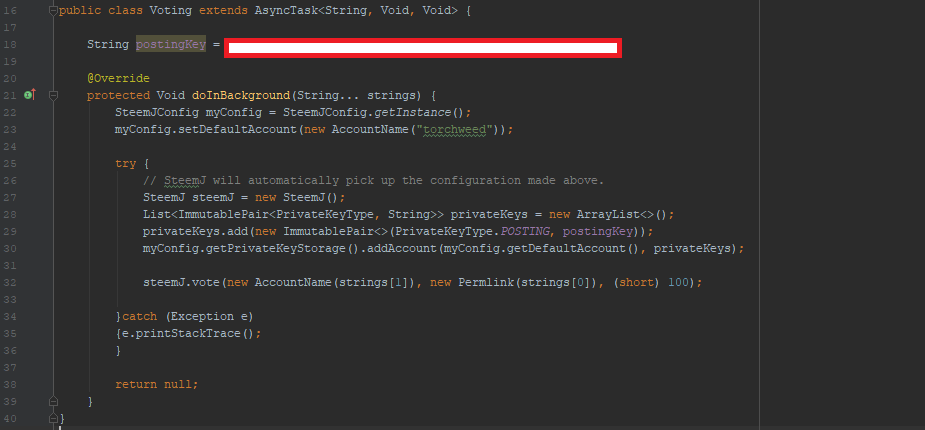
public class Voting extends AsyncTask<String, Void, Void> {

    String postingKey = "ENTER_YOUR_POSTING_KEY";

    @Override
    protected Void doInBackground(String... strings) {

        try {
            steemJ.vote(new AccountName(strings[1]), new Permlink(strings[0]), (short) 100);
            // strings[1] contains the username, strings[0] contains the Permlink of the Post, and finally an Integer '100'
            // represents our desired voting weight.

        }catch (Exception e)
        {e.printStackTrace();
        }

        return null;
    }
}
In the above segment, we can see our Voting class, where we handle all Upvote Operations given by user. We use the Upvote Operation, and pass several bits of required data into it. Our String Array contains both the Username of the Post Creator, as well as the Permlink of the Post. FInally, we use an integer to represent the full weight that we would like to assign to the given Vote.
Screenshot
Unvote Sub-Class: Voting.java
The Unvote Sub-Class will be where we handle all of the code required to remove a vote from a post or a comment. This class will be executed much the same as the others, with its own personal variances. Like above, the following segment of code will outline how this is done.
class Unvote extends AsyncTask<String, Void, Void> {

    String postingKey = "ENTER_POSTING_KEY_NOW";

    @Override
    protected Void doInBackground(String... strings) {

        try {
            steemJ.cancelVote(new AccountName(strings[1]), new Permlink(strings[0]));

        }catch (Exception e)
        {e.printStackTrace();
        }

        return null;
    }
}
One more time just like above, the same information will be fed to this process. This data consists of the Username of the Post Creator, as well as the Permlink of the article that the user would like to remove their vote from. This is handled using the cancelVote() Operation of SteemJ. The String Array in this example is the same one from the Voting Class. This is pretty much it for Voting as well as Following Operations, and you should be able to use each one at this point. Next up we will be taking care of the Posting Operations.
Posting/Deleting Posts - PostEditor.java
Screenshot
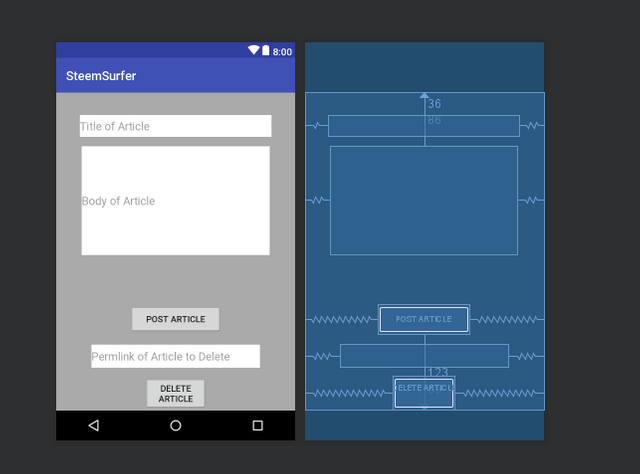
So, for the Posting portion of this application, we will need to use a new activity, one which I have chosen to name 'PostEditor.java', and you may do the same. In this activity, we will implement 3 EditTexts, as well as 2 Buttons. The EditTexts will be for obtaining the title of the article, the body of the article, as well as a 3rd EditText that will obtain the Permlink, necessary for removing the post from the chain. The two buttons will be for post creation, as well as deleting the posting. XML code can be found, as always via the github link below. Now lets get into the onCreate function of our PostEditor.
final EditText Title = (EditText)findViewById(R.id.editText5);
final EditText Body = (EditText)findViewById(R.id.editText3);
Button post = (Button)findViewById(R.id.button9);
final EditText permlink = (EditText)findViewById(R.id.editText4);
Button deletePost = (Button)findViewById(R.id.button3);
First off, in the segment above, we initialize and assign all of our views to variables. These lines, as well as the next bit coming up, will all be placed into the onCreate() method of our PostEditor.java file. After this, we will need to implement 2 onClickListeners, attached to our Buttons, which will be responsible for handling our yet to be created Posting and Commenting Classes. You can go ahead and create those now, and for this project I will be naming them Posting.java and Commenting.java. Once those Classes have been created, lets set up our Listeners.
post.setOnClickListener(new View.OnClickListener() {
    @Override
    public void onClick(View v) {
        String[] PostContents = {Title.getText().toString(), Body.getText().toString()};
        new Posting().execute(PostContents);
    }
});

deletePost.setOnClickListener(new View.OnClickListener() {
    @Override
    public void onClick(View v) {
        String[] permL = {permlink.getText().toString()};
        new DeletePost().execute(permL);
    }
});
The first listener, creates a String Array named PostContents,and stores the data entered into our TextViews, for both the Title, as well as the body. It then passes that information into our Posting AsyncTask to be handled. The second Listener simpled stores the Permlink of the post that you would to delete, as that is all that is needed to be passed into our DeletePost AsyncTask. That will be all for this activity, as most of the work is handled off of the main thread.
Posting Class - Posting.java
This class, much like the others will be handled quite in the same manner as we have been going so far, though again, there will be some small differences here and there, so take note of the changes if you are still getting used to this language. The code segment below, is a simplified version of our Posting Class, though the full code can always be found below. I have removed the 6 mandatory lines, like in the examples above.
public class Posting extends AsyncTask<String, Void, Void> {

    String postingKey = "ENTER_POSTING_KEY_HERE";

    @Override
    protected Void doInBackground(String... strings) {

        try {
            steemJ.createPost(strings[0], strings[1], new String[] { "test", "development", "steemdevs" });

        }catch (Exception e)
        {e.printStackTrace();
        }

        return null;
    }
}
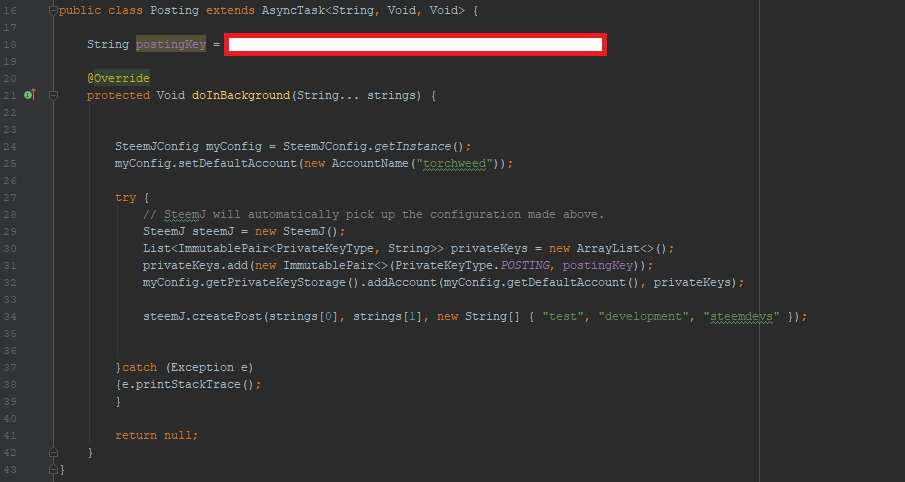
In the code above, smack in the middle of our doInBackground method, we will be calling our SteemJ createPost() Operation, and handing in a couple variables from the Post Editor. Our String Array 'strings' contains the users desired title for the post, as well as the body of the post, all obtained from the EditTexts in our PostEditor activity. This can be seen more clearly in the following image.
We also implement a final string array in the preceding operation, so as to store our tags, which for some reason I chose not to include, though I really wish I had something to show you guys now. Either way it is a good test of your skills I guess, perhaps see if you can implement an EditText in order to acquire tags from a user. Next up is our DeletePost Class.

Screenshot
DeletePost Sub-Class - Posting.java
This Sub-Class is where we will handle the deletion of posts. This is a very quick doInBackground, requiring us to simply call the deletePostOrComment method of our SteemJ Object, and feed it the Permlink of the post or comment that we are aiming to remove. Though in this Class, 'strings' is a String Array, it contains only the one element, which is our required Permlink.
class DeletePost extends AsyncTask<String, Void, Void> {

    String postingKey = "STORE_POSTING_KEY_HERE";

    @Override
    protected Void doInBackground(String... strings) {

        try {
            steemJ.deletePostOrComment(new Permlink(strings[0]));


        }catch (Exception e)
        {e.printStackTrace();
        }

        return null;
    }
}
Commenting/Deleting Comments - CommentEditor.java
Screenshot
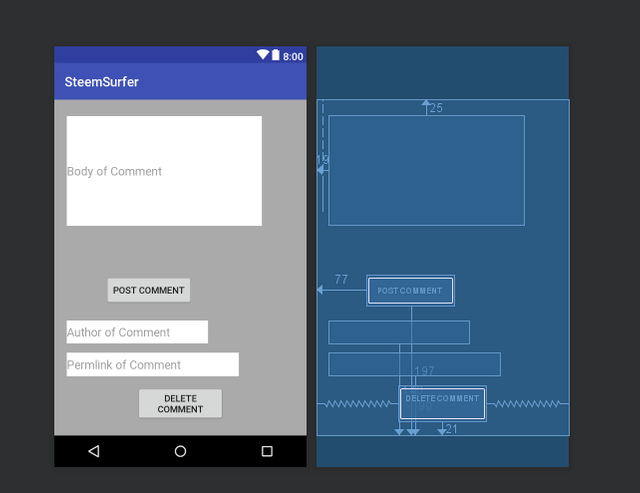
Finally, we have reached the last segment of this tutorial, which is where we will be creating one final activity. This activity in my project, has been named CommentEditor.java, and the layout is quite similar to our PostEditor's layout file, being that it again consists of 3 TextViews, as well as 2 Buttons.
However, the TextViews this time, will be used for obtaining the body of the comment, the author of the comment, as well as the permlink of the comment, respectively. The code for the onCreate section of our CommentEditor.java file, is as follows.
final EditText Body = (EditText)findViewById(R.id.editText7);
final EditText Author = (EditText)findViewById(R.id.editText8);
final EditText Permlink = (EditText)findViewById(R.id.editText6);

Button create = (Button)findViewById(R.id.button11);
Button delete = (Button)findViewById(R.id.button10);

create.setOnClickListener(new View.OnClickListener() {
    @Override
    public void onClick(View v) {
        String[] CommentDetails = {Body.getText().toString(), Author.getText().toString(), Permlink.getText().toString() };
        new Commenting().execute(CommentDetails);
    }
});
delete.setOnClickListener(new View.OnClickListener() {
    @Override
    public void onClick(View v) {
        String[] CommentDetails = {Body.getText().toString(), Author.getText().toString(), Permlink.getText().toString() };
        new DeleteComment().execute(CommentDetails);

    }
});
Like in the previous PostEditor Activity, we first initialize our TextViews and Buttons, followed by attaching two Listeners to our Buttons. The first of these listeners, executes our Commenting AsyncTask, passing in the body of the comment, followed by the name of the author of whoever wrote the post or article that you are attempting to comment on.
The 3rd element passed into our 'CommentDetails' string array, is the permlink of the parent article mentioned which you are commenting on.The second listener, passes the same information through to our DeleteComment() AsyncTask Class, though we really only need the permlink of the comment, which is stored at location [2] of our CommentDetails array. (I have realized at this point, this second class is unneccessary, as the DeletePost Class could be used here instead, however it is a good teaching example so I will leave it in. ^_^ Be smarter than me and waste less time! )

Screenshot
Commenting Class - Commenting.java
This class, which will need to be created if you haven't already, oops, is where we will handle the creation of a users posts. As you can see in the code segment following, do this by using the createComment Operation of our SteemJ Object. The data passed in through our string array this time, is our Parent Author(User who created post to comment on), followed by our Parent Permlink, with the body of the comment being entered last.
public class Commenting  extends AsyncTask<String, Void, Void> {
    String postingKey = "ENTER_POSTING_KEY";

    @Override
    protected Void doInBackground(String... strings) {

        try {
            steemJ.createComment(new AccountName(strings[1]), new Permlink(strings[2]), strings[0], new String[] { "test" });

        }catch (Exception e)
        {e.printStackTrace();
        }

        return null;
    }
}
Finally, we implement a separate string array like in the posting example above, which will be for using tags, which I have chosen to skip here. The next, and I believe Final thing that we have to get done for this application, is to set up our DeleteComment Class, which is where we will handle deletion of comments, of course.
DeleteComment Sub-Class - Commenting.java
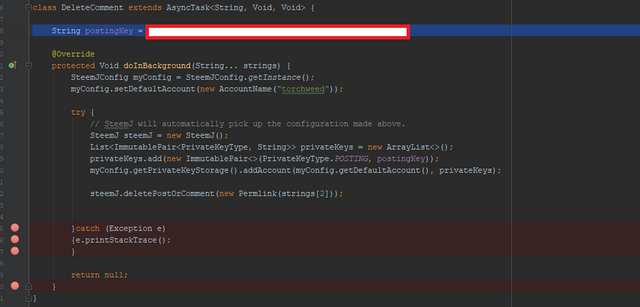
So as I have mentioned earlier in this post, I realize now that this step was unnecessary, though it is good practice, so we will be carrying on with it. The reason that we do not really need this step, is because the method which grants us the ability to delete a comment, provided to us by SteemJ, is the same one that is used to delete a post, and we could technically recycle its use, though I prefer this way to show things clearly.
This Sub-Class will be quite similar to the rest, and I will get through it rather quickly since we are now nearing the end of the tutorial, and I do not want to bore you with the repetition. Unfortunately, though boring, repeating practices is one of the best ways to learn them.
class DeleteComment extends AsyncTask<String, Void, Void> {

    String postingKey = "Enter_Posting_Key_Here";

    @Override
    protected Void doInBackground(String... strings) {

        try {
            steemJ.deletePostOrComment(new Permlink(strings[2]));


        }catch (Exception e)
        {e.printStackTrace();
        }

        return null;
    }
}
In the above segment of code, we iterate out the standard AsyncTask methods, etc, I'm sure you get the idea by this point. We use the deletePostOrComment method of SteemJ, and pass in one simple peice of data, stored in our string array at element #2, you guessed it, the permlink of the url.
Screenshot
Conclusion
Well guys, this has been a bit of a long one, but I hope you have made it all the way to the end with me, because at this point, you have a very basic, custom working Steem application, designed with alot of the functionality that you will need to get by. Within this application, you can now post, comment, vote and follow, though there are many more operations provided to you by SteemJ, including even custom broadcast transactions, which we will hopefully be getting into shortly.
I wanted to say a few words, in regards to the main developer behind the Jsteem Library, who has put alot of time and effort into this project, so that we are able to use it to develop powerful android utilities that interact with our beloved blockchain.
This developer is also a Steemian, of course, and though I do not know much about the user @dez1337, and though it seems like he is no longer actively posting at this point in time, I am very thankful for all of the work he put into this project, and I would like to say thank you, that it is an excellent piece of work as well.
Curriculum
- Android App Development Series #5 - Animation Basics 1: ObjectAnimator, AnimatorSets, Basic Movement, and Grow/Shrink,
- Android App Development Series #4 - Parsing 'Jsoup' HTML Data, Storing Data Using SharedPreferences, Spannable Strings and More Custom Adapters
- Android App Development Series #3 - Intent Extras/Bundles, ListView, and Custom Adapters
- Android App Development Series #2 - Web Requests and Parsing JSON Objects
- Android App Development Series #1 - Basic Web Browser
Proof of Work Done
https://github.com/cerulean-skies/android-app-development-series/blob/master/Series%20%236.md
Thank you for your contribution.
Thank you for your good work and we look forward to more tutorials.
Your contribution has been evaluated according to Utopian policies and guidelines, as well as a predefined set of questions pertaining to the category.
To view those questions and the relevant answers related to your post, click here.
Need help? Write a ticket on https://support.utopian.io/.
Chat with us on Discord.
[utopian-moderator]
Thank you @portugalcoin! I always enjoy reading your review, and I am so glad to hear that you have enjoyed this tutorial.
Thank you for your review, @portugalcoin!
So far this week you've reviewed 6 contributions. Keep up the good work!
Hey, @ceruleanblue!
Thanks for contributing on Utopian.
We’re already looking forward to your next contribution!
Get higher incentives and support Utopian.io!
Simply set @utopian.pay as a 5% (or higher) payout beneficiary on your contribution post (via SteemPlus or Steeditor).
Want to chat? Join us on Discord https://discord.gg/h52nFrV.
Vote for Utopian Witness!
Woot! Thought this sent earlier, but regardless as always thanks a bunch for the support utopian, and I am so glad to hear that you guys enjoyed this formatting, I will be trying to stick to that and perhaps even make it better where I can. Hope your week is starting out excellent.
Hi @ceruleanblue!
Your post was upvoted by @steem-ua, new Steem dApp, using UserAuthority for algorithmic post curation!
Your post is eligible for our upvote, thanks to our collaboration with @utopian-io!
Feel free to join our @steem-ua Discord server
Congratulations! Your post has been selected as a daily Steemit truffle! It is listed on rank 19 of all contributions awarded today. You can find the TOP DAILY TRUFFLE PICKS HERE.
I upvoted your contribution because to my mind your post is at least 10 SBD worth and should receive 119 votes. It's now up to the lovely Steemit community to make this come true.
I am
TrufflePig, an Artificial Intelligence Bot that helps minnows and content curators using Machine Learning. If you are curious how I select content, you can find an explanation here!Have a nice day and sincerely yours,

TrufflePigCongratulations @ceruleanblue! You have completed the following achievement on the Steem blockchain and have been rewarded with new badge(s) :
Click on the badge to view your Board of Honor.
If you no longer want to receive notifications, reply to this comment with the word
STOPDo not miss the last post from @steemitboard:
Hi, please i've been trying to follow this article and series .. but i'm getting error at the point where steemj is initialized during runtime after compilation.
SteemJ steemJ = new SteemJ();