Android App Development Series #4 - Parsing 'Jsoup' HTML Data, Storing Data Using SharedPreferences, Spannable Strings and More Custom Adapters
Repository
https://github.com/aosp-mirror/platform_build
What Will I Learn?
- You will learn how to use 'jsoup' to parse web data.
- You will learn how to implement more interesting Custom Listview Adapters.
- You will learn how to store and retrieve data from your SharedPreferences file.
Requirements
- Average knowledge of Java, and XML.
- Android Studio installed on your operating system of choice.
- A device to run the application within, can be a physical device, or a VM like the one included in Android Studio's 'Device Manager'.
Difficulty
- Basic
Tutorial Contents
Introduction
I am very excited to go through this next piece of the application with you guys. I have chosen a few different methods that I can show you, and that work towards our goal of creating a handy Steem application. Today, we are going to be working on something I like to call, a 'curation tool'!
This peice of the application, is designed to find undervalued posts, and show them to you in a user friendly way. We will be using A Listview, with a Custom List Adapter, in order to display the info to the user.
Currently, as the app is quite obviously still being developed, it is only designed to search the 'utopian.rocks' website, for accepted articles, though I would like to implement other sources soon. For now, let get to the coding!
Changes to MainActivity.java
So, most of this will be done in new activities, classes, etc, however, there is one minor change we must make, and that is to implement a new onClickListener(). Don't forget to initialize your Button. Complete XML code can be found in the link below.
testbutton.setOnClickListener(new View.OnClickListener() {
    @Override
    public void onClick(View v) {
    Intent testI = new Intent (MainActivity.this, BGTesting.class);
    startActivity(testI);
    }
    });
New Activity BGTesting.java
Well now, as you may have noticed in the changes above, we will be using a new activity for this section of the project. You can go ahead and create this empty activity now. This activity will consist of a Listview, and a simple button. We will also need to implement several more variables, just for the purposes of how our code is set up.
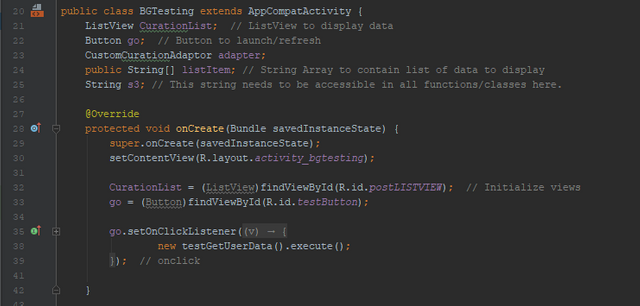
public class BGTesting extends AppCompatActivity {
    ListView CurationList;
    Button go;
    CustomCurationAdaptor adapter;
    public String[] listItem; // String Array to contain list of data to display
    String s3; // This string needs to be accessible in all functions/classes here.
So, our actual BGtesting file will be rather short, and now that I think about it, you should probably rename it :P but the main thing we will be doing inside of our onCreate function is calling our next class, which you will see shortly. Here is the onCreate():
@Override
protected void onCreate(Bundle savedInstanceState) {
    super.onCreate(savedInstanceState);
    setContentView(R.layout.activity_bgtesting);

    CurationList = (ListView)findViewById(R.id.postLISTVIEW);
    go = (Button)findViewById(R.id.testButton);

    go.setOnClickListener(new View.OnClickListener() {
        @Override
        public void onClick(View v) {
            new testGetUserData().execute(); // execute our underlying class testGetUserData
        }
    });
 }
As you can see from the previous segment, we initialize our views, and then set up a simple onClickListener, whos only purpose is to make a new execution call to our class, which we will start right now in the blocks below. The first thing we do, is create a class-wide variable, for our Progress Dialog. As this is a rather lengthy process, depending on the amount of data being fetched, we don't want the user looking at a blank screen the entire time during loading.
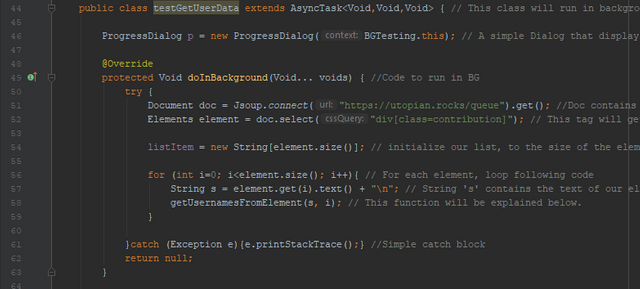
This is where ProgressDialog comes in. We will set it up later, but for now, simply set the variable to be acessible class-wide. Next, we will need to set up our doInBackground method. First, we create a Document, which will store all of the data returned to us by Jsoup, from the given url. (This url right now is utopian.rocks list, though I can already think of three other sites to get posts that are about to be voted from, including just watching bot transfers lol.)
public class testGetUserData extends AsyncTask<Void,Void,Void> {

    ProgressDialog p = new ProgressDialog(BGTesting.this); // A simple Dialog that displays progress of function.

    @Override
    protected Void doInBackground(Void... voids) {
        try {
            Document doc = Jsoup.connect("https://utopian.rocks/queue").get(); //Doc contains HTML data from Jsoup
            Elements element = doc.select("div[class=contribution]"); // This tag will get us all post data

            listItem = new String[element.size()]; // initialize our list, to the size of the list of elements

            for (int i=0; i<element.size(); i++){
                String s = element.get(i).text() + "\n"; // String 's' contains the text of our elements.
                getUsernamesFromElement(s, i); //
                }

    }catch (Exception e){e.printStackTrace();}
        return null;
}
After 'doc' has been created, We create a new Elements object, 'element', and use the tag 'div[class=contribution]' in order to retrive each item from the list of items on the webpage. After this, we set our listItem array, to the size of the number of elements. Now we know how many elements there are, we can use that to loop through them.
During this loop, one method is called, and a String is created, to be passed into the method, containing the single element, from the list of elements. Lets check out this getUsernamesFromElements method now. Also rename this :P Oh yes, and try/catch blocks are important as well, mostly for handling errors without crashing, as well as debugging.
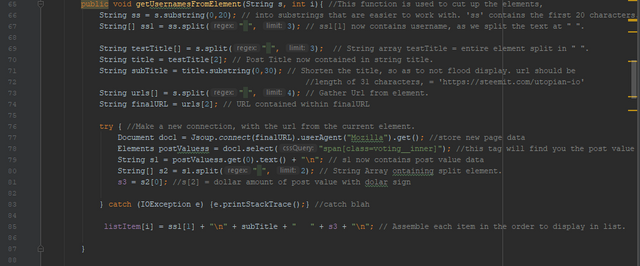
 public void getUsernamesFromElement(String s, int i){ //This function is used to cut up the elements,
    String ss = s.substring(0,20); // into substrings that are easier to work with. 'ss' contains the first 20 characters.
    String[] ss1 = ss.split(" ", 3); // ss1[1] now contains username, as we split the text at " ".

    String testTitle[] = s.split(" ", 3);  // String array testTitle = entire element split in " ".
    String title = testTitle[2]; // Post Title now contained in string title.
    String subTitle = title.substring(0,30); // Shorten the title, so as to not flood display. url should be
                                                                 //length of 31 characters, = 'https://steemit.com/utopian-io'
    String urls[] = s.split(" ", 4); // Gather Url from element.
    String finalURL = urls[2]; // URL contained within finalURL
Alright, so as you can see in the segment above this paragraph, we are going to be doing a bunch of string manipulation here. The first two lines, are responsible for creating a substring, consisting of the first 20 characters of an element. This substring is then split at the " "empty charachter, into a maximum of 3 segments. The next String array created is equal to the split values, and ss[1] now contains the username of the element.
In the following three lines, we do the same for our post URL, only in the 3rd line, we shorten the substring, in order to keep the view clean. Finally, we create a variable containing the full url, which will be used very shortly.
    try { //Make a new connection, with the url from the current element.
    Document doc1 = Jsoup.connect(finalURL).userAgent("Mozilla").get(); //store new page data
     Elements postValuess = doc1.select("span[class=voting__inner]"); //this tag will find you the post value

     String s1 = postValuess.get(0).text() + "\n"; // s1 now contains post value data
     String[] s2 = s1.split(" ", 2); // String Array ontaining split element.
      s3 = s2[0]; //s[2] = dollar amount of post value with dolar sign

     } catch (IOException e) {e.printStackTrace();} //catch blah

      listItem[i] = ss1[1] + "\n" + subTitle + "   " + s3 + "\n"; // Assemble each item in the order to display in list.

     }
This is the end of our getUsernames function, and as you can see, we will be repeating the process of creating a new Jsoup connection, only this time, we will be scraping steemit.com for the post data. The Document contains page data, Elements contains elements of the page, which are attributed to the tag 'span[class=voting__inner]'. You could also use this method to retrieve vote numbers, etc. We however, simply create a String 's1', which contains the entire value of the post, in USD, STU, etc.
From this string, we then cut our own substring which contains simply the USD value of the post, as well as the preceding '$'. Outside of our exception, we assign each listItem[i] in our list, a corresponding value of Username, followed by Post URL, and finally the Post USD Value.
public boolean saveData(String[] array, String arrayName, Context ctex){ //Method to save our array to SharedPreferences
    SharedPreferences prefs = ctex.getSharedPreferences("ArrayData", 0); //open file
    SharedPreferences.Editor editor = prefs.edit(); //new editor
    editor.putInt(arrayName +"_size", array.length); //maintain size of array for integrity
    for(int i=0;i<array.length;i++) // for i in array,
        editor.putString(arrayName + "_" + i, array[i]); //input string
        return editor.commit();//final save
    }
Now, we do not need to save the data at this current stage in our application, as there is no place to display it currently, but I thought I would take the time to show you all how to use something called SharedPreferences to save data. SharedPreferences creates a secure file for you to store, maintain, and retrieve application specific data.
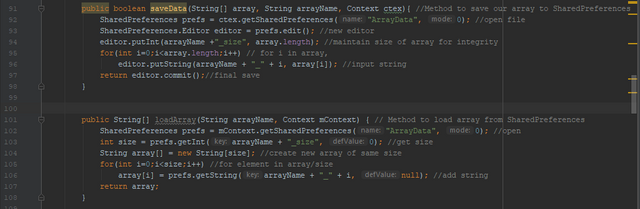
We do this for our array of list items, by creating a function, 'saveData' passing the array in, as well as a name for the array as a reference, followed by a context. First we create/get the file, thenwe create and attach an editor to the file 'prefs'. We use the editor, to save the size of our array. This is useful when retriving the array. Finally a for loop, followed by a final save. In the for loop, we enter each line of our array into our file.
public String[] loadArray(String arrayName, Context mContext) { // Method to load array from SharedPreferences
    SharedPreferences prefs = mContext.getSharedPreferences("ArrayData", 0); //open
    int size = prefs.getInt(arrayName + "_size", 0); //get size
    String array[] = new String[size]; //create new array of same size
    for(int i=0;i<size;i++) //for element in array/size
    array[i] = prefs.getString(arrayName + "_" + i, null); //add string
    return array;
    }
The preceding segment of code, can be used to return the array to us apon a simple 'loadArray()' call. In essence, it loops through each string, placing them into a new array, for the size of array as previously indicated by save method. These methods will not be used until next time, but to test, you can attach it to a textView, etc if you please. Lets carry on with our onPostExecute() function now.
@Override
protected void onPostExecute(Void aVoid) { // the final steps to our Async Task
    super.onPostExecute(aVoid);
    saveData(listItem, "Urls", BGTesting.this); //save array to preferences
    adapter = new CustomCurationAdaptor(BGTesting.this, listItem); //implement new adapter
    CurationList.setAdapter(adapter); //atach list to adapter
    p.dismiss(); //end of progress, so end of dialog
    }
In this method, we first call to our saveData() method, and pass in our Array of list items, as well as a Title, and Context. Next, we assign our adapter, to a new CustomCurationAdapter, consisting of Context, as well as our Array. Finally, we dismiss the ProgressDialog, as this is the final step, and the user is now free to browse the fully loaded list.
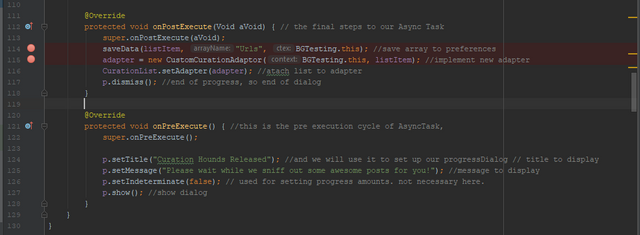
The last thing we need to do for this class, is set up our onPreExecute function. We will take advantage of this method, in order to build our ProgressDialog. The Title, as well as Message, are simply what to display to the user, and setIndeterminate, applies when you want to wait a predetermined amount of time. We do not need this, as longer lists will take longer to handle.
@Override
 protected void onPreExecute() { //this is the pre execution cycle of AsyncTask,
    super.onPreExecute();

     p.setTitle("Curation Hounds Released"); //and we will use it to set up our progressDialog // title to display
     p.setMessage("Please wait while we sniff out some awesome posts for you!"); //message to display
     p.setIndeterminate(false); // used for setting progress amounts. not necessary here.
     p.show(); //show dialog
    }
}}
Finally we show the dialog. At this point, the user is aware that the application is working, and that he/she should simply wait a few seconds for the end result. This will be the end of our BGTesting.java file, which leads us rather swiftly into a new Custom
New Class CustomCurationAdapter.java
This is our Custom Adapter for our Listview. It has been specifically designed to be able to display information, in exactly the way that I would like to. In the following code, you can see how we set up our CustomCurationAdapter.

public class CustomCurationAdaptor extends ArrayAdapter<String> {

    public TextView singleTV;
    public ImageView unfollow;

    public CustomCurationAdaptor(@NonNull Context context, String[] items1) {
        super(context, R.layout.curation_tool_row, items1); //context of application, custom layout file, and array of items
    }
The first thing required, is a constructor for this class, you can see that in the code segment above, directly below where we initialize our views. This constructor requires Context, a Custom Layout File, as well as a String Array of list items to display.
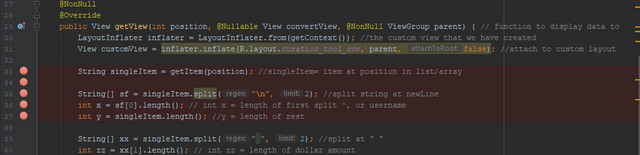
@NonNull
@Override
public View getView(int position, @Nullable View convertView, @NonNull ViewGroup parent) {
    LayoutInflater inflater = LayoutInflater.from(getContext());
    View customView = inflater.inflate(R.layout.curation_tool_row, parent, false);
As you can see in the image obove, the next method we will need to override, is our getView function. We will need to create a new LayoutInflater, as well as a new View to display. This view, should be fed from our custom layout file.
String singleItem = getItem(position); //singleItem= item at position in list/array

String[] sf = singleItem.split("\n", 2); //split string at newLine
int x = sf[0].length(); // int x = length of first split ^, or username
int y = singleItem.length(); //y = length of entire string

String[] xx = singleItem.split(" ", 2);
int zz = xx[1].length(); // int zz = length of dollar amount
In the above segment, we first take a String from the position of which our list is at, and then create several new variables that are used to house the size of different peices of the entire list item. The first segment of the string, is the username, followed by the url of the post, and finally, the posts current value. You will see why we do this in the next segment.
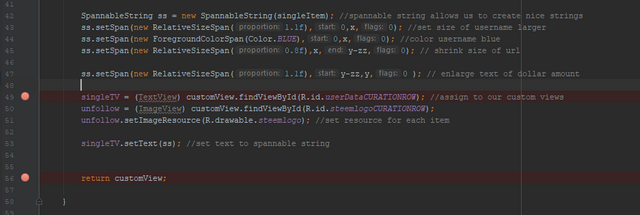
SpannableString ss = new SpannableString(singleItem); //spannable string allows us to create nice strings
ss.setSpan(new RelativeSizeSpan(1.1f),0,x,0); //set size of username larger
ss.setSpan(new ForegroundColorSpan(Color.BLUE),0,x,0); //color username blue
ss.setSpan(new RelativeSizeSpan(0.8f),x,y-zz,0); // shrink size of url
ss.setSpan(new RelativeSizeSpan(1.1f),y-zz,y,0 ); // enlarge text of dollar amount
A Spannable string, is used to display a string in many different fancy ways. Above, we set our spannable string, to have the text of the username, as well as the post value, to be larger than the post URL. The username is also set to blue.
singleTV = (TextView) customView.findViewById(R.id.userDataCURATIONROW);
unfollow = (ImageView) customView.findViewById(R.id.steemlogoCURATIONROW);
unfollow.setImageResource(R.drawable.steemlogo); //set image resource for each item
singleTV.setText(ss); //set text to spannable string
return customView;
}}
Finally, we assign our views in a way that we can use them, and set the textview of each list item in our custom listview, to the value of the spannable string that we have created. This is all that needs to be done here, your adapter is now complete!
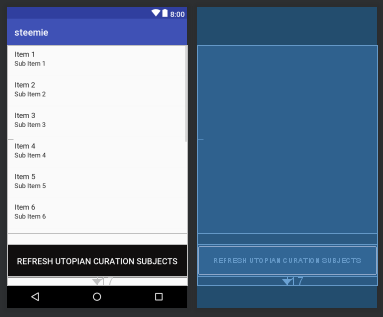
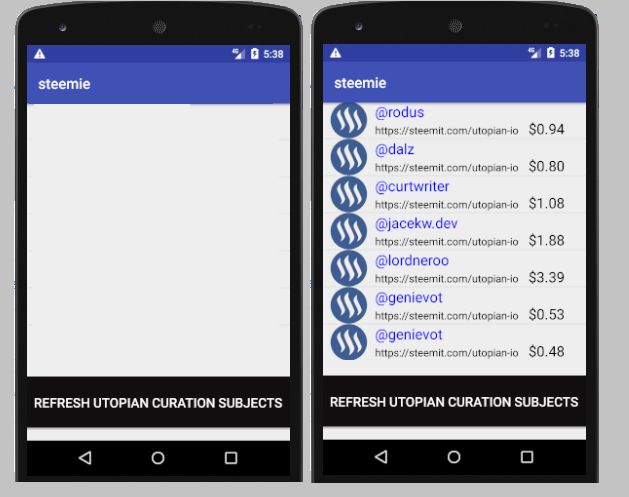
Layout File: activity_bgtesting.xml
A Rather simple layout, consisting of a Button, which will be used to launch the first call to our webpage, or simply to refresh the data within the ListView, as well as a Listview, that will be used to display all of the information we have previously discussed.
<?xml version="1.0" encoding="utf-8"?>
<RelativeLayout xmlns:android="http://schemas.android.com/apk/res/android"
    xmlns:app="http://schemas.android.com/apk/res-auto"
    xmlns:tools="http://schemas.android.com/tools"
    android:layout_width="match_parent"
    android:layout_height="match_parent"
    tools:context=".BGTesting">

<Button
    android:id="@+id/testButton"
    android:layout_width="match_parent"
    android:layout_height="70dp"
    android:layout_alignParentBottom="true"
    android:layout_alignParentStart="true"
    android:layout_marginBottom="17dp"
    android:background="#100e0e"
    android:text="Refresh Utopian Curation Subjects"
    android:textAppearance="@style/TextAppearance.AppCompat.Button"
    android:textColor="@android:color/background_light"
    android:textSize="18sp" />

<ListView
    android:id="@+id/postLISTVIEW"
    android:layout_width="wrap_content"
    android:layout_height="400dp"
    android:layout_alignParentTop="true"
    android:layout_centerHorizontal="true" />

</RelativeLayout>
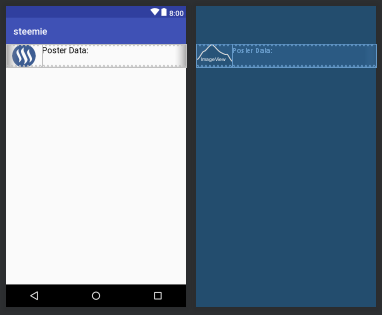
Layout File: curation_tool_row.xml
This too is a rather simple layout file, consisting of a single 'cell' or 'row', that we want to be one item in our list. For this example, we have used an image, as well as a TextView. If you are in need of any other XML layout files, they can be found on my github pages, however I thought it would be best for you all to see here how the Custom row is applied to the main View.
<?xml version="1.0" encoding="utf-8"?>
<LinearLayout xmlns:android="http://schemas.android.com/apk/res/android"
    xmlns:app="http://schemas.android.com/apk/res-auto"
    xmlns:tools="http://schemas.android.com/tools"
    android:layout_width="match_parent"
    android:layout_height="50dp">

<ImageView
    android:id="@+id/steemlogoCURATIONROW"
    android:layout_width="0dp"
    android:layout_height="50dp"
    android:layout_weight="1"
    android:padding="0dp"
    android:paddingBottom="0dp"
    android:paddingLeft="0dp"
    android:paddingRight="0dp"
    android:paddingTop="0dp"
    app:srcCompat="@drawable/steemlogo" />

<TextView
    android:id="@+id/userDataCURATIONROW"
    android:layout_width="0dp"
    android:layout_height="50dp"
    android:layout_weight="4"
    android:text="Poster Data:"
    android:textColor="@android:color/black"
    android:textSize="18sp" />

</LinearLayout>
Conclusion
Well guys, that is it for this one, we've learned a few more techniques, gotten some good work done, and put some solid work into the foundation of our curation tool. We now have a list full of valuable posts, and a method of sniffing them out. In the coming tutorials, I plan to implement tap-voting, automated, who knows lmao, I have a bunch of ideas, and I am having alot of fun with these, so I hope you are too.
I also hope that these have been inspiring you to play around a little on your own, and see what kinda things you can build, especially for our beloved Steem platform! If any of you guys are working on anything, I would love to hear about it in the comments below. I am also almost always down to help out, or collaborate on an interesting idea. You can find me in most of the main Discord Rooms under the same username, or just leave a comment below :) Hope you enjoyed this one.
Happy Hunting,
Cerulean.
Curriculum
Include a list of related tutorials you have already shared on Utopian that make up a Course Curriculum, if applicable.
- Android App Development Series #3 - Intent Extras/Bundles, ListView, and Custom Adapters
- Android App Development Series #2 - Web Requests and Parsing JSON Objects
- Android App Development Series #1 - Basic Web Browser
Proof of Work Done
https://github.com/cerulean-skies/android-app-development-series/blob/master/Series%20%234.md
Thank you for your contribution.
Your contribution has been evaluated according to Utopian policies and guidelines, as well as a predefined set of questions pertaining to the category.
To view those questions and the relevant answers related to your post, click here.
Need help? Write a ticket on https://support.utopian.io/.
Chat with us on Discord.
[utopian-moderator]
Thank you for your review, @portugalcoin!
So far this week you've reviewed 6 contributions. Keep up the good work!
Hi @ceruleanblue! We are @steem-ua, a new Steem dApp, computing UserAuthority for all accounts on Steem. We are currently in test mode upvoting quality Utopian-io contributions! Nice work!
Hey @ceruleanblue
Thanks for contributing on Utopian.
We’re already looking forward to your next contribution!
Want to chat? Join us on Discord https://discord.gg/h52nFrV.
Vote for Utopian Witness!
test
Stay strong buddy... Leak my last post on steemit to whaleshares. Meeting you was a highlight in my life... you're totally cool and I'm happy to have met the person that you really are... Total respect for you today and forever.