Django (RESTful API) plus ReactJS (with Redux) Tutorial: Implementing RESTful API (Part 5)
![]()
Source: django-rest-framework.org
In this modern age, the Internet has become so ubiquitous that it has made an impact in everyone’s life in one way or another. Either we browse it using our desktops or mobile phones, the Internet is undoubtedly the best way to socialize, communicate, be informed, and learn. But, have you ever wondered where and how our devices get their data? In this lesson, we will not discuss the nitty gritty aspects of how our devices work and communicate. That is an entirely different and long topic. What we will do is examine one way on how a server and a device like a browser or a mobile phone (which will be called client from here on out) talk with each other. Today, our main goal is to learn what is a RESTful API and how we can integrate it in a Django project.
What Will I Learn?
At the end of this tutorial, you are going to be able to:
- Define what is a client server system
- Define what is a RESTful API
- Describe Django Rest Framework and its use
- Integrate Django Rest Framework with a Django project
- Implement a RESTful API using Django
- Test out API using Advanced Rest Client
- Push updates to Heroku
Note: What will be discussed is just a brief overview of the concepts of internet communications and REST. Discussing the entire subject would not be enough for a single blog post.
Requirements
- Python (latest version)
- Pip (included in the Python installer)
- Any text editor or Integrated Development Environment (IDE) of your choice
- Advanced Rest Client (If not using Chrome, use any Rest Client available in your browser)
Difficulty
This tutorial assumes you know how HTML works, have basic understanding of JSON, HTTP requests/responses, and have already done the previous tutorials. If not, it is ideal that you need to do those first in order to follow the concepts that will be discussed here. If you are not a beginner and you are just looking for instructions on how to integrate the Django Rest framework for your project, then go ahead and proceed with reading.
Tutorial Contents
What is a client-server system?
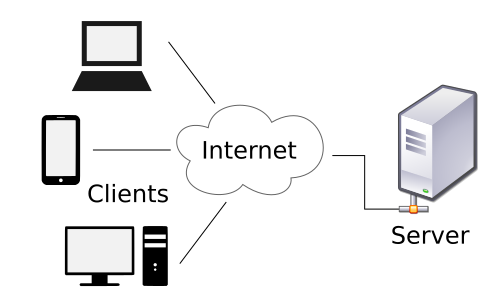
The client-server model is a distributed communication framework of network processes among service requestors, clients and service providers. The client-server connection is established through a network or the Internet.
Source: technopedia.com
Over the internet or a network, there are only two types of devices. There are servers and there are clients. Servers, as the name imply, serve the data or resources that are shared over the network. Clients, on the other hand, are the devices that are not servers. These are the machines that are used by everyone else for work, socializing, and other things. Basically, clients are what we use to access the data over the internet and servers are the machines that give the data.
What happens when I go to a website?
When we go to a website via a browser, we typically enter an address like www.google.com. Traditionally, our browser then asks Google's server to give or serve us the resources (which typically constitutes html, css, data, etc) needed to display the website.

This used to be the de facto setup for a website. For every link clicked, the whole html file is sent over the network. A major disadvantage of this is that, updating just a small part of the site would require the sending of the entire file. This would be inefficient for big apps and would result to heavy traffic.
In order to solve this problem, experts tried to find a way to make communication between the client and server lighter. This led to many technologies being developed, one of which was REST.
What is REST?
REST or RESTful API design (Representational State Transfer Application Program Interface) is a convention or an architectural style which describes how a client and server interact. As discussed above, it used to be that whenever a client tries to access a page or resource, the server sends big bloated files. REST tries to remedy that by sending strings of text only. These strings are in JSON format and are very lightweight. The JSON data sent by the server contains only the data needed by the part of of the site you want to update. REST enforces the use of HTTP on how it was meant to be used. If you want to create an entry, you request using the POST method. For updating and deleting, there are PUT and DELETE. For fetching data, we use the GET method.

What is Django Rest Framework?
Django Rest Framework (DRF) is a tool used to build REST APIs for Django projects. It is mainly used for handling the creation of endpoints or URLS, performing basic CRUD (create, read, update, delete) operations to the data (models), authenticating users, handling request permissions, and providing documentation for our API. This all means that we don't have to build our RESTful API from the ground up. We just need to install DRF and leverage its features to our project.
How do I install Django Rest Framework?
Launch the command line and activate virtualenv. Go to the root of the project and enter the command below to install it.
$ pip install djangorestframework
After installation, open the settings.py file of the project and add 'rest-framework' in the INSTALLED_APPS like the one below.
INSTALLED_APPS = (
    ...
    'rest_framework',
)
Open the urls.py file found on the same directory as settings.py and update the code like the one below.
from django.conf.urls import url, include
from django.contrib import admin
from rest_framework import routers
from app import views

urlpatterns = [
    url('admin/', admin.site.urls),
    url(r'^oauth/', include('rest_framework.urls'))
]
How do I create a RESTful API?
In this tutorial we will be creating an API for the ToDo model. First, we need to update the model to include more fields. Open models.py and update the whole file with the code below.
from django.db import models
from django.contrib.auth.models import User

# Create your models here.
class ToDo(models.Model):
    text = models.CharField(max_length=300, null=False, blank=False, verbose_name="To Do")
    done = models.BooleanField(default=False, null=False, blank=False)
    created_by = models.ForeignKey(User, blank=True, null=True, related_name="created by+", on_delete=models.SET_NULL)
    created_at = models.DateTimeField(auto_now_add=True, editable=False)
    updated_by = models.ForeignKey(User, blank=True, null=True, related_name="updated by+", on_delete=models.SET_NULL)
    updated_at = models.DateTimeField(auto_now=True, editable=False)

    def __str__(self):

        return self.text

    class Meta:

        verbose_name = "To Do"
        verbose_name_plural = "To Dos"
Since we have updated our model, we also need to update our database. To do this, we need to do a migration. Enter the commands below (via the command line interface).
$ python manage.py makemigrations <name-of-app>
$ python manage.py migrate
If migration is successful, we then proceed on creating serializers.
Serializers allow complex data such as querysets and model instances to be converted to native Python datatypes that can then be easily rendered into JSON, XML or other content types. Serializers also provide deserialization, allowing parsed data to be converted back into complex types, after first validating the incoming data.
Source: DRF official documentation
Basically, serializers are classes that will turn our models to JSON. Serializes also allow us to customize how our JSON data would look like. To create a serializer, go to the your app's directory and create a serializers.py file. After, paste the snippet below.
from rest_framework import serializers
from app.models import ToDo

"""Serializer for ToDos"""
class ToDoSerializer(serializers.ModelSerializer):

  class Meta:
    model = ToDo
    fields = '__all__'
What the code above does is create a ToDoSerializer serializer. It inherits the ModelSerializer class from DRF. The model field assigns the model we are going to use for our API. The fields field indicates what field from our ToDo model we are going to show. In the code above, we assigned 'all' since we want to display all the fields of our data.
After creating the serializer, we proceed in making the viewset. Viewsets let us define the behavior of our API. To create one, go to your app's directory and create a viewsets.py file. Paste the code below and hit save.
from rest_framework import viewsets
from app.serializers import ToDoSerializer
from app.models import ToDo

class ToDoViewSet(viewsets.ModelViewSet):
    queryset = ToDo.objects.all()
    serializer_class = ToDoSerializer
Now that were done creating the viewset, we need to assign this to a URL. Open the urls.py of the project's directory (same directory as settings.py) and paste the code below.
from django.conf.urls import url, include
from django.contrib import admin
from rest_framework import routers
from app import viewsets

router = routers.DefaultRouter()
router.register(r'to-do', viewsets.ToDoViewSet)

urlpatterns = [
    url('admin/', admin.site.urls),
    url(r'^api/', include(router.urls)),
    url(r'^oauth/', include('rest_framework.urls'))
]
What the code above does is register the viewset we made to the router object and assigned it to the "to-do" url. Then we assigned all the urls we registered in the router object to the "api" url. This all means that if we want to access our api, we need to use "/api/". After everything is done. Run the server and try and try to visit this url. You should see a landing page like the one below.

How do I test my API?
Before we proceed, populate your data with any data you want. You can test the API by using DRF's page. We can also test it out using third party applications like Advanced Rest Client. If you have it already installed, launch it.
We can try fetching the data by sending a Get Request. We should see results like the one with the red circle.

To create a new entry to our database, we just need to create a POST request.

Be sure to change the request header to "Content-Type: application/json"

As for the request body, we can use the JSON below.
{
  "text": "Go swimming",
  "done": false,
  "created_by": 1,
  "updated_by": 1
}
You should receive a 201 code if all went well.
To update data, we need to use the PUT, modify the url and add the ID of the entry we are going to edit.
http://127.0.0.1:8000/api/to-do/<id>/
In this example, we are going to update the entry that has the id 1.

For the body, we can use the JSON below.
{
  "text": "Go swimming and eat cake",
  "done": false,
  "created_by": 1,
  "updated_by": 1
}
Lastly, we need to make use of the DELETE request to remove an entry from the database. Just like put, we just need to modify the url and indicate the id of the item we need to delete.
http://127.0.0.1:8000/api/to-do/<id>/
Since we now have finished creating our RESTful API, we can push our updates to the cloud and test it out there.
$ git add .
$ git commit -m "Added static files"
$ git push heroku master
Curriculum
This is part 5 of the ongoing tutorial of building a single page application by using both Django and ReactJS. Next time, we will tackle OAuth2 authorization for our API. We will also proceed with discussing the use of Django REST Swagger to test out our API.
Part 1: Installing Django with Virtual Env
Part 2: Django Deployment to Heroku Cloud
Part 3: Using the Django Admin + PostgreSQL
Part 4: Handling of Static Assets in Heroku
Posted on Utopian.io - Rewarding Open Source Contributors
Hey @burdagay I am @utopian-io. I have just upvoted you!
Achievements
Suggestions
Get Noticed!
Community-Driven Witness!
I am the first and only Steem Community-Driven Witness. Participate on Discord. Lets GROW TOGETHER!
Up-vote this comment to grow my power and help Open Source contributions like this one. Want to chat? Join me on Discord https://discord.gg/Pc8HG9x
Thank you for the contribution. It has been approved.
You can contact us on Discord.
[utopian-moderator]