Django (RESTful API) + ReactJS (with Redux) Tutorial: Django Deployment to Heroku Cloud (Part 2)
Ask any programmer and he or she will tell you that they were welcomed by a “Hello World” program as beginners. It is a time-honored tradition in computer programming and is mostly used when introducing a new programming language or web framework. For this lesson, we will also do a “Hello World” program but with a twist. We will deploy the app in the cloud using Heroku.
What Will I Learn?
At the end of this tutorial, you are going to be able to:
- Create a Django project using virtualenv
- Create a Django application
- Define what is the cloud and its use
- Deploy the application to the cloud using Heroku Command Line Interface or CLI
- Use simple git commands for deploying the project
Requirements
- Python (latest version)
- Pip (included in the Python installer)
- Heroku account
- Heroku Command Line Interface (CLI)
- Git
- Any text editor or Integrated Development Environment (IDE) of your choice
Difficulty
This lesson is not for complete beginners. But, if you just know the basics like downloading and installing software, and following instructions then you are good to go. This will assume that you know how to enter commands in the command line and use git. This tutorial will also presume that you already know web servers or at least the basics of it.
Tutorial Contents
I. How do I properly create a Django project?
- First and foremost, we need to create a virtual environment then activate it. Part 1 of this tutorial is all about setting this up. Please check it out before proceeding with the next steps.
- Install the Django python package by entering the command below. Make sure that the virtualenv is activated.
$ pip install django - To confirm a successful installation, we should receive a message like the one below.
Collecting django Downloading Django-2.0.1-py3-none-any.whl (7.1MB) 100% |████████████████████████████████| 7.1MB 183kB/s Collecting pytz (from django) Downloading pytz-2017.3-py2.py3-none-any.whl (511kB) 100% |████████████████████████████████| 512kB 713kB/s Installing collected packages: pytz, django Successfully installed django-2.0.1 pytz-2017.3 - Create a Django project using the command below. Please note that the word "hello_world" can be replaced with any other word as long as it is valid. This will serve as the title of the project. For now, we will use "hello_world" since this is the project that we are currently doing.
For Windows:
$ python env\Scripts\django-admin.py startproject hello_worldFor Linux:
$ django-admin.py hello_world
Congratulations. You just created your first Django project!
II. How do I run the project?
- Go to the directory of the newly created project by entering the command below.
$ cd hello_world - To run the server, enter the command below.
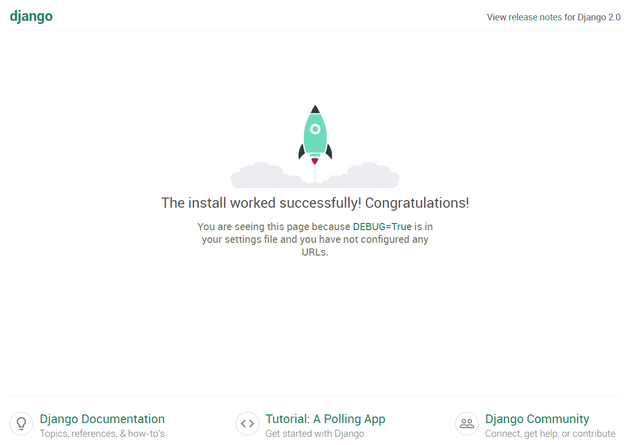
You have successfully ran the application if you'll see the same message as the one below.$ python manage.py runserverRun 'python manage.py migrate' to apply them. January 19, 2018 - 23:15:27 Django version 2.0.1, using settings 'hello_world.settings' Starting development server at http://127.0.0.1:8000/ Quit the server with CTRL-BREAK. - To view the page, copy the IP Address like the one shown above (http://127.0.0.1:8000/) and enter it in the address bar of the browser. You will see a page like the one below indicating that we have successfully ran the app on the local server.

Now that we've finished setting up our new project, we get down to business and create our first application.
III. How do I create an application?
- If the project is currently running, close it down by pressing control + C or launch a new command line from your project directory with the virtualenv activated.
- Create an application by entering the command below. Please note that the word "hello" can be replaced with anything as long as it is valid. It will serve as the name of our application.
$ python manage.py startapp hello - Expect a folder named "hello" with a folder structure inside like the one below
 __init__.py
    admin.py
    apps.py
    migrations/
        __init__.py
    models.py
    tests.py
    views.py
IV. How do I make the application say "Hello World"?
- Open the views.py file using a text editor in the "hello" folder.
- Add the code below to the file and hit save.
from django.shortcuts import render from django.http import HttpResponse def index(request): return HttpResponse("Hello World") - Create a urls.py file in the "hello" folder and open it. Then, add the code below and hit save.
from django.urls import path from . import views urlpatterns = [ path('', views.index, name='index'), ] - Go back up a folder and enter the "hello_world" directory. Open the urls.py file. Edit the code so that it would be similar to the lines below. Note: we can replace the word "hello_world/" to anything as long as it is valid. This will serve as our URL to locate the "Hello World" response.
from django.urls import include, path from django.contrib import admin urlpatterns = [ path('hello_world/', include('hello.urls')), path('admin/', admin.site.urls), ] - In the root directory of your project, go to the "hello_world" folder and open the settings.py file. Replace the
withALLOWED_HOSTS = []script with ALLOWED_HOSTS = ['127.0.0.1'] - Now, run the application again. But this time, enter this url (http://127.0.0.1:8000/hello_world/) instead. You should be greeted with a page saying "Hello World". Now, we are ready to deploy our app to the cloud.
V. What is Heroku?
Heroku is Platform as a Service (Paas) cloud offering that provisions the development of Web applications and services. It is a cloud application development platform that provides development tools, scalable processing power and cloud management functionality. Heroku was initially developed for Ruby on Rails and now support various other development languages.
Source: technopedia
Simpy put, Heroku is a service that lets you run a project on the cloud. When running in Heroku, anyone with an internet can access it provided they have the correct URL. Heroku is very easy to use. And most important of all, it is free.
VI. How do I deploy my project to the cloud using Heroku?
Register for an account and sign up. Please take note of your username and password since we will be using it later.
Make sure that you have git and the heroku CLI already installed. For confirmation, enter the commands below. If you encounter any problems, make sure to install them first before proceeding.
Heroku:
$ heroku helpGit:
$ git --versionLaunch the command line and activate the virtualenv of your project. Then traverse to the root of your project's directory. In our case, it would be hello_world.
Enter the commands below to install the gunicorn package (required by Heroku) and generate a "requirements.txt" file that will contain all our dependencies.
$ pip install gunicorn
$ pip freeze > requirements.txt
Create a "Procfile" file. Note: the name of the file is "Procfile" and it has no file extension.
Open the "Procfile" file and write the line below. After, hit save. Note: that the word "hello_word" should be replaced with your chosen project name.
web: gunicorn hello_world.wsgi --log-file -Go to the command line again add enter the commands below.
$ git init
$ git add .
$ git commit -m "First deploy to cloud"
You should see something similar below.
[master (root-commit) cf6369e] First Hello World application
 23 files changed, 198 insertions(+)
 create mode 100644 Procfile
 create mode 100644 db.sqlite3
 create mode 100644 hello/__init__.py
 create mode 100644 hello/__pycache__/__init__.cpython-36.pyc
 create mode 100644 hello/__pycache__/urls.cpython-36.pyc
 create mode 100644 hello/__pycache__/views.cpython-36.pyc
 create mode 100644 hello/admin.py
 create mode 100644 hello/apps.py
 create mode 100644 hello/migrations/__init__.py
 create mode 100644 hello/models.py
 create mode 100644 hello/tests.py
 create mode 100644 hello/urls.py
 create mode 100644 hello/views.py
 create mode 100644 hello_world/__init__.py
 create mode 100644 hello_world/__pycache__/__init__.cpython-36.pyc
 create mode 100644 hello_world/__pycache__/settings.cpython-36.pyc
 create mode 100644 hello_world/__pycache__/urls.cpython-36.pyc
 create mode 100644 hello_world/__pycache__/wsgi.cpython-36.pyc
 create mode 100644 hello_world/settings.py
 create mode 100644 hello_world/urls.py
 create mode 100644 hello_world/wsgi.py
 create mode 100644 manage.py
 create mode 100644 requirements.txt
If everything is fine so far, enter the command below and enter your Heroku credentials (username and password) when prompted.
$ heroku loginEnter again the command below. This command creates an instance where the application will reside. This may take a while depending on your internet connection. Just wait for the entire process to finish.
$ heroku createAfter the command above, enter the command below and wait for the deployment to finish. This command pushes your code to the repository inside Heroku.
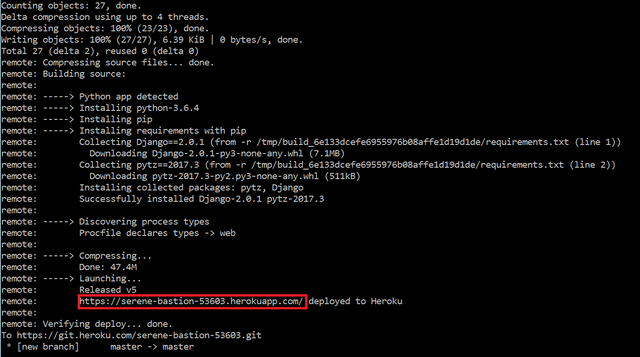
$ git push heroku masterYou should see something like the one below. If not, go over the instructions and try to find out what you've missed. To go to the "Hello World" message, copy the URL of your application (refer to the red rectangle below) and add the word "/hello_world/"

If the server responds with a "Hello World", then you just created your first Django application and successfully deployed it to the cloud.
Note: If you are getting a 'Disallowed Host' error message, please add the base domain name provided by heroku.
Example: serene-bastion-53603.herokuapp.com
Curriculum
This is part 2 of the ongoing tutorial of building a single page application by using both Django and ReactJS. Next time, we will be configuring the Django Admin site and use PostGreSQL as our main database. For the rest of the lessons, please refer to the link/s below.
Posted on Utopian.io - Rewarding Open Source Contributors


Thank you for the contribution. It has been approved.
You can contact us on Discord.
[utopian-moderator]
Hey @flauwy, I just gave you a tip for your hard work on moderation. Upvote this comment to support the utopian moderators and increase your future rewards!
Hey @burdagay I am @utopian-io. I have just upvoted you!
Achievements
Suggestions
Get Noticed!
Community-Driven Witness!
I am the first and only Steem Community-Driven Witness. Participate on Discord. Lets GROW TOGETHER!
Up-vote this comment to grow my power and help Open Source contributions like this one. Want to chat? Join me on Discord https://discord.gg/Pc8HG9x