How to set up and host multiple Tor Hidden Service website's using VestaCP
How to set up multiple Tor hidden services using VestaCP & Debian 8
Disclaimer: This guide is for educational purposes and historical reference only. Its purpose is to help those that have a right to privacy but are denied by oppressive governments. It is in no way intended to teach anyone to break the law. Tor has fully legitimate reasons for its use and is used everyday by reporters, dissidents, migrants and many others facing oppression. As Edward Snowden said "Tor is a critical technology, not just in terms of privacy protection, but in defense of our publication right -- our ability to route around censorship and ensure that when people speak their voices can be heard."
Now that's out of the way, lets begin!
To complete this tutorial you will need:
- A VPS/Dedicated server with a fresh install of Debian 6, 7, 8. Other Linux flavours also work, you just need to adjust the commands to fit the OS.
- Putty, if using Windows.
Log into your VPS as root and update the system
apt-get updateThen upgrade any outdated packages
apt-get upgrade -yAfter updating, reboot the server
rebootWe are going to install VestaCP which comes preinstalled with:
- Nginx
- IPtables
- fail2ban
- MySQL
- php-fpm
Apache is NOT used in this guide!
Download the VestaCP script using curl. If curl is not installed simply install it with
apt-get install curl -yNow grab the script from VestaCP, download it to your root folder using the command
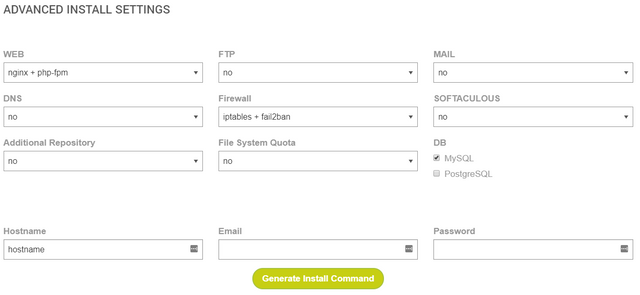
curl -O http://vestacp.com/pub/vst-install.shNow head over to the VestaCP website at https://vestacp.com/install and generate an install command with the following options
- WEB - nginx+php-fpm
- FTP - No
- Mail - No
- DNS - No
- Softaculous - No
- Firewall - iptables + fail2ban
- Additional Repository - No
- File System Quota - No
- DB - MySQL
- Hostname - hostname (this doesnt matter)
- E-mail - blank
- Password - blank
The script will generate a string of code you will use to install VestaCP which should look like the example below
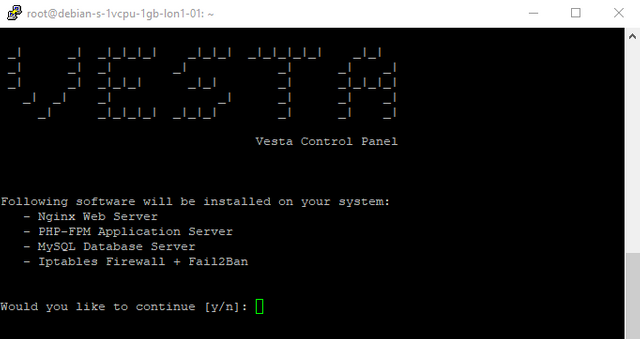
bash vst-install.sh --nginx yes --phpfpm yes --apache no --named no --remi no --vsftpd no --proftpd no --iptables yes --fail2ban yes --quota no --exim no --dovecot no --spamassassin no --clamav no --softaculous no --mysql yes --postgresql no --hostname hostnameGo back to your server terminal and paste the code in and hit enter, you will be presented with the VestaCP installer.
Press Y and begin the installation.
If you didn't enter an email when generating the install code, you will have to enter it here.
While VestaCP is installing you should install Tor Browser on any desktop PC/Laptop and open it.
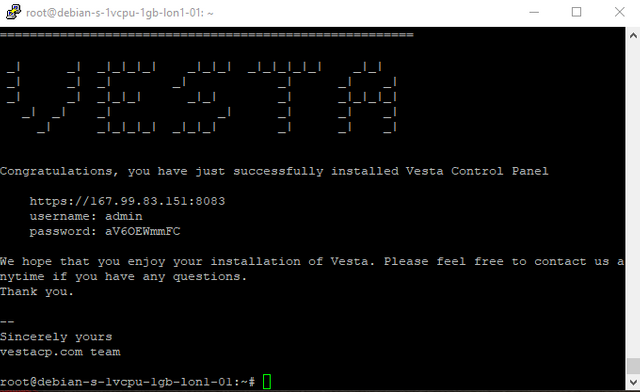
When VestaCP completes in around 15 minutes you will have your admin panel login details on screen.
Using Tor Browser, navigate to the IP address and port displayed at the end of the VestaCP install, make sure to use https://. You will be presented with a warning screen, Click advanced, allow exception, and confirm security exception.
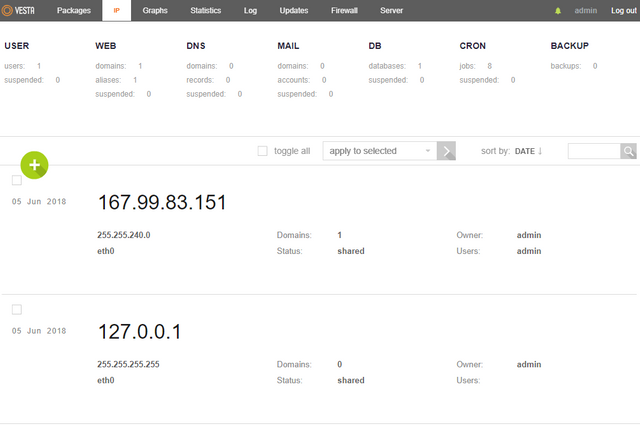
https://167.99.83.151:8083Log into VestaCP with the details provided and click the 'IP' tab. We need to add the localhost IP so that VestaCP will use Tor to connect to the Tor network. Click "Add IP" and enter
127.0.0.1
For the subnet use 255.255.255.255. Disable all mail and FTP services on this occasion since it is only for us to test. This is by no means secure, more on that later. You should now have this:
At this point you should test to see if your webserver is working over tor by putting the main IP of the server into Tor browser. eg. https://167.99.83.151, you should be presented with a default web page. Don't worry if it doesn't show, we can fix it later.
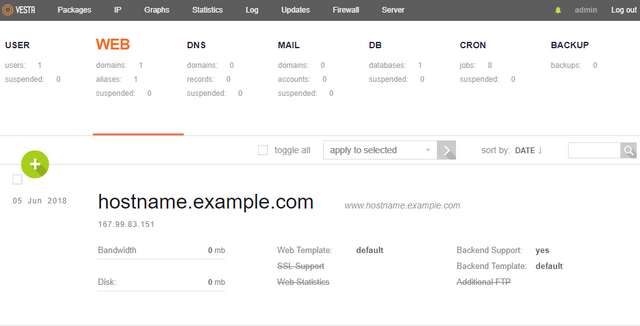
Log back into VestaCP and click the "WEB" section. Go ahead and delete the example hostname as we won't be needing it.
Installing Tor on Your Server
Log in via ssh as root and execute the following command
apt install torOnce Tor is installed we need to do a quick edit of the Tor config file called torrc, it is usually located in /etc/tor/torrc. Lets remove it and start fresh. Execute the following commands.
rm -f /etc/tor/torrc

echo "HiddenServiceDir /var/lib/tor/hidden_service/" >> /etc/tor/torrc

echo "HiddenServicePort 80 127.0.0.1:80" >> /etc/tor/torrc
Now start Tor
service tor startYou can find out wether Tor is running correctly by using
service tor status -lif it shows any errors and tor has not started, you need to retrace your steps to find the problem, it could be something as simple as the wrong clock time on the server, check the Tor logs for details.
If everything went well you should have an auto-generated file that contains your .onion hostname, do
cat /var/lib/tor/hidden_service/hostname and press enter, you should be greeted with the hostname printed in the terminal.
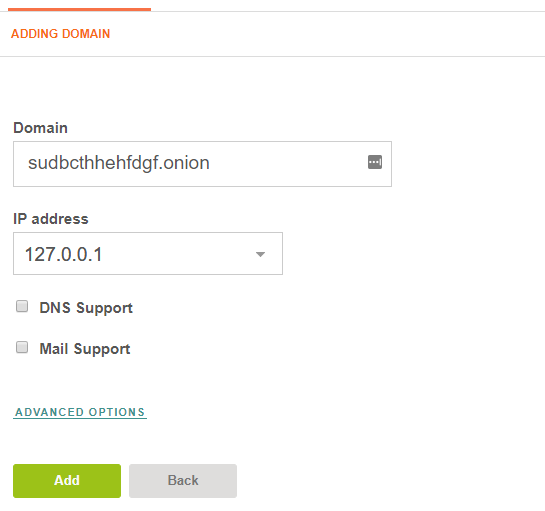
Copy the .onion address and add it in your VestaCP, when choosing an IP choose "127.0.0.1".
Uncheck, DNS Support if it is checked, also uncheck Mail Support.
Now we have finished! You should be able to go to your .onion domain and it will show the default VestaCP webpage. Now all you have to do is upload your files to the server and your new Hidden Tor Site is LIVE!
Please be aware this is FAR from secure, in the next part we will go over hardening your server and securing it.
If you want to add more Tor services, simply run the two commands again
echo "HiddenServiceDir /var/lib/tor/hidden_service/" >> /etc/tor/torrc

echo "HiddenServicePort 80 127.0.0.1:80" >> /etc/tor/torrc
But change the folder location to
echo "HiddenServiceDir /var/lib/tor/hidden_service1/" >> /etc/tor/torrcIf you want to add another just change the directory again and restart Tor. You may also need to restart nginx to get your sites to show.
service tor stopservice tor start <----------this will generate the new .onion address!service nginx reloadservice tor status - use this to check that tor started correctly.Until next time!

Check out https://steemit.com/@a-0-0
Congratulations @dazeb! You have received a personal award!
Click on the badge to view your Board of Honor.
Do not miss the last post from @steemitboard:
Congratulations @dazeb! You received a personal award!
You can view your badges on your Steem Board and compare to others on the Steem Ranking
Vote for @Steemitboard as a witness to get one more award and increased upvotes!