[3d Printing] It's A Steemit Christmas, Charlie Brown or A Very Steemit Christmas Ornament (Part II)
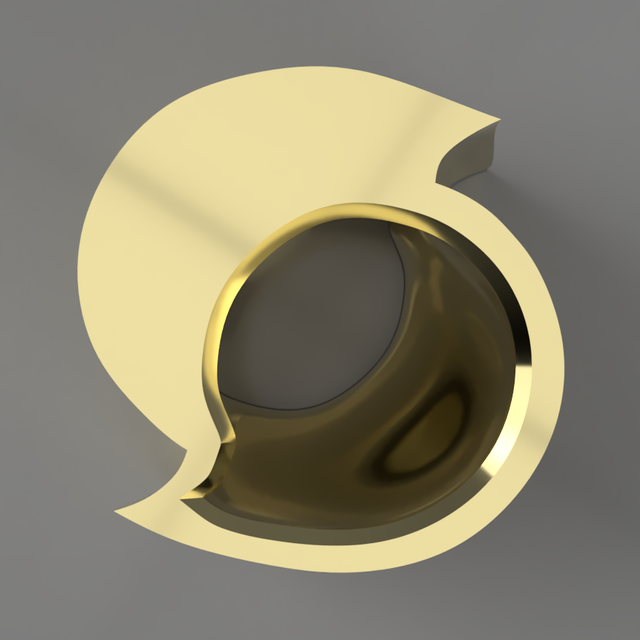
When last we spoke, I had just walked you through the construction of the Steemit Christmas Ornament by working our way, step-by-step, through constructing it in Onshape. The results speak for themselves.
Unfortunately, this is where things stop being quite so pretty and start being a lot more fiddly and engineering driven. Why? Because we have to move away from the field of the abstract and speculative and into the reification of this object from the Neoplatonic ideal to a real thing.
Real things have problems. I don't mean that in a specific sense, but that once you take things from your model to any sort of physical manifestation, you will start to see all the problems that may have been in the model originally or exist purely as a side effect of turning it into the piece that you have in front of you. You have to be steeled to this experience. Sometimes it's worse than others, but there's always some of it there.
(If you've ever recorded music or voice work, think about how you felt the first time – and every time – that you listened to a recording of yourself. That feeling? Makers get it all the time.)
But first – to the slicer!
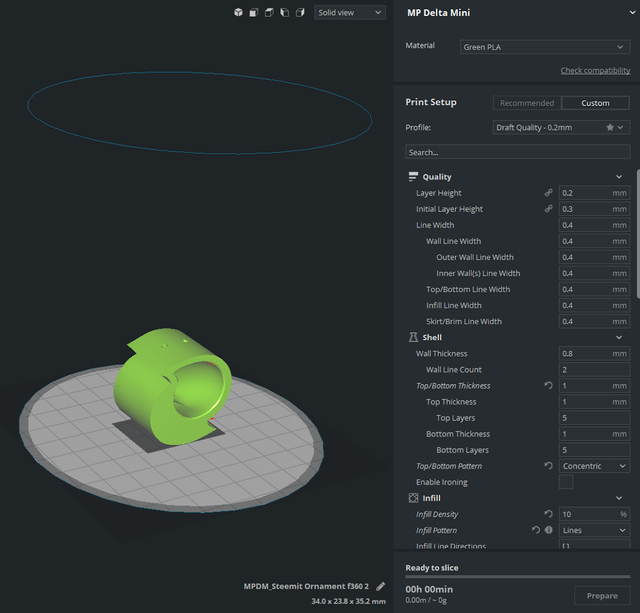
This is in Ultimaker Cura 3.1, the latest version of the software available and a pretty effective slicing platform. A lot of people have a lot of different preferences in the slicer that they use with their printer, most of them being pretty good. I'm rather fond of this one because it has a ridiculous number of settings and does a pretty good job. (Before this I was rather inclined to MatterControl, but I was printing across the Wi-Fi network directly from my desktop to the printer and very few slicers could actually handle that with any degree of alacrity. When the next version of MC comes out, I'll give it another looking at because I'm not one to abandon perfectly good tools. Also, they're both free.)
You can see some of my settings here on the right, but yours are probably going to vary based on the needs of you and your printer. For the prototype, I decided to go with a relatively rough 0.2 mm layer height and a two perimeter outer wall. With something this small, you don't really need a whole lot of rigidity. In fact, I probably could have dropped the amount of infill from 10% to 5% but it would be perfectly reasonable to take it even as high as 20% if you are concerned about the fact that the top surface is relatively flat, featureless, unsupported block.
Speaking of that top surface – this is the way that the model came into the slicer. What needs to be done? You could print it in this orientation, but you would need at the very minimum a significant brim because there's just not enough material to keep it stuck to the surface. You would probably actually want some supports just to be extra safe.
Or there's a much easier solution.
Just rotate the thing and put it flat on the bed. No muss, no fuss, and it's largely ready to go.
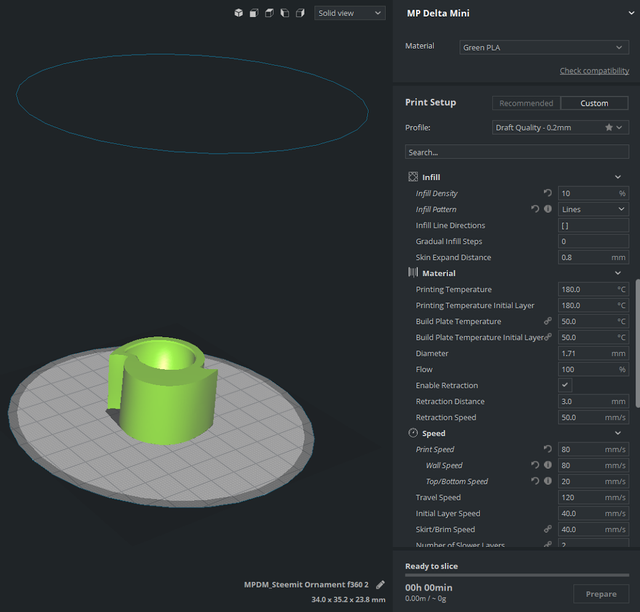
Again, settings are going to be specific to your particular printer and your particular filament. Not only that, they very well may differ based on the weather. While PLA is pretty resistant to concerns about humidity, it still reacts a bit. How warm or cold is the room in which the printer is sitting? Is there a draft? That can be a really significant question; the cooling draft can be really good for one side of your object but cause the other two to warp and lift off the surface.
If you're printing with ABS, not only do you have to worry about the hygroscopic nature of the material itself but you really want to have an enclosed printer which completely isolates the build plate from drafts and keeps the heat in. Without that, you're probably not going to have a good print – even for a prototype.
I'm printing this somewhat experimentally at 80 mm/s all the way around. That's probably pushing the limits of the machine on an object which is all curves. There's not really enough straight line action to get up to speed to make full use of the flying head. More reasonably, I could've gone with 60 mm/s for the wall speed and an initial layer speed of 30 or maybe 20 mm/s. The trade-off is that things take longer, but you get a nicer, more controlled print.
You'll see some of the fallout from these decisions in just a moment.
Let's look inside just to get an idea of what's going on. We'll tell Cura to slice the model and then look down through the layers.
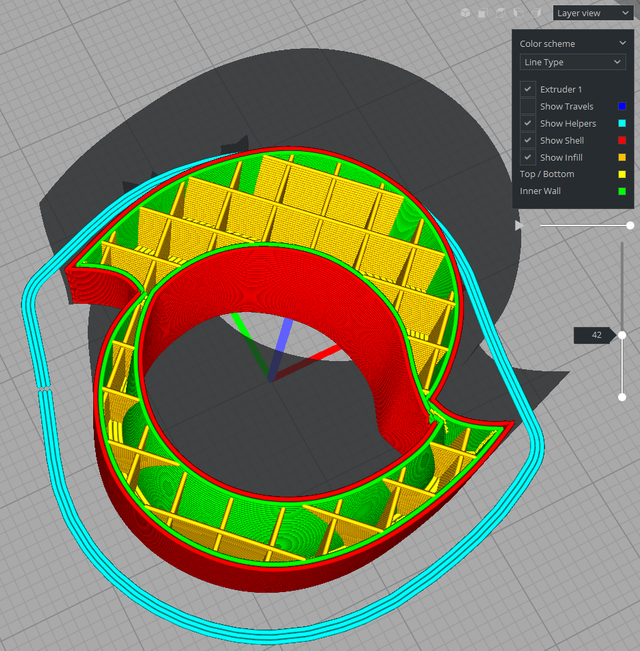
Here you can see how some of my decisions percolate down and change the model itself. The outer walls are red, the inner walls are green, the infill is yellow, and because of the downward perspective, you can actually see the inner wall of the curved inner surface supporting the infill.
PLA is capable of a pretty significant overhang without any sort of support, so despite the fact that the inside of this wall curves notably, it doesn't need any supports. Things just work and you want that to be the case with all of your designs.
On the outside you can see the skirt, a few lines of extruded filament that the system lays down on the bed outside of the printed object just to prime the pump and make sure that plastic is actually ready to go from the heated nozzle. You don't want to start printing your object without plastic actually ready to go, and I find that a nice skirt helps a lot.
All right, we have a sliced file which is ready to be saved to gcode and transferred by drag-and-drop right over to our OctoPrint server.
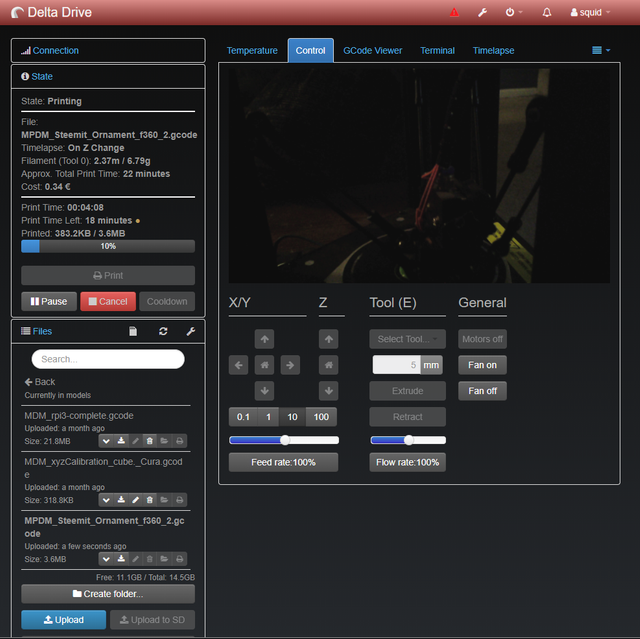
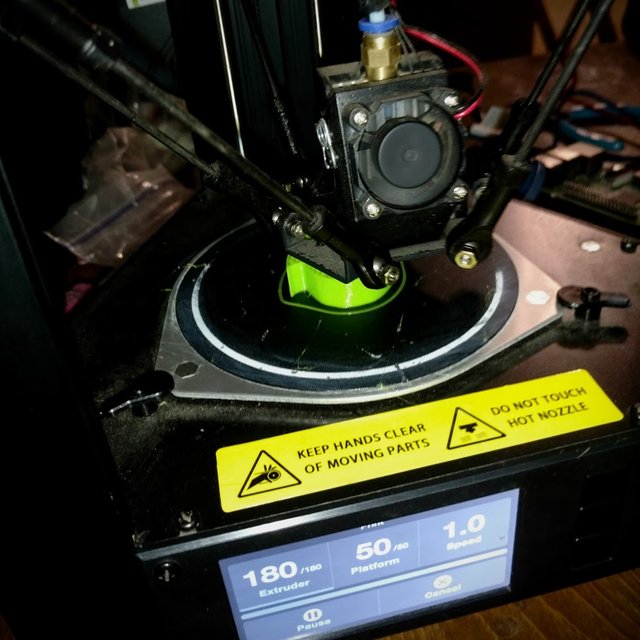
This is the OctoPrint interface for my Monoprice Mini Delta, and to the terrible quality of streaming video that I get out because I just slapped a webcam on it yesterday to see if it would work. (And by "slapped it on," what I mean is that I gently attached it and then wrestled with configuration issues for an hour and a half.)
We're ready to rock-and-roll! Cue the timelapse!
I would apologize for the poor quality, but you were well warned. It needs a lot more light, a somewhat better angle pointed down, and generally just a better set up. But it works! It works pretty well.
What do we have? What is the ultimate result of this prototype effort?
Let's look.
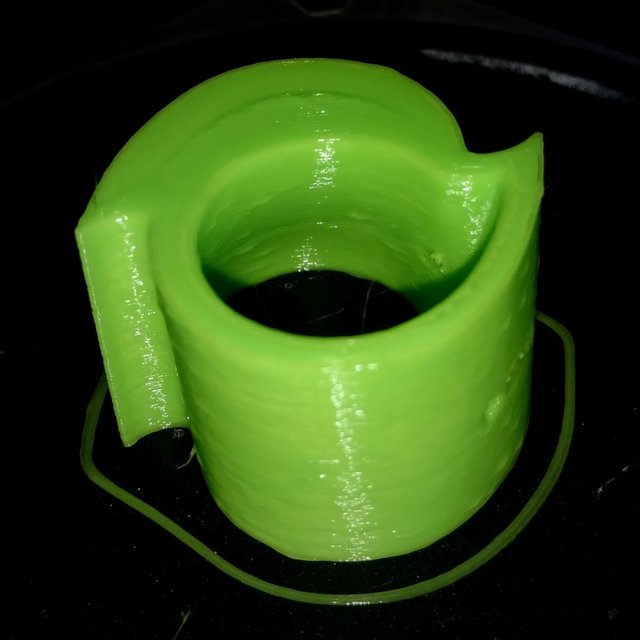
Even still sitting on the bed you can see some of the negative repercussions. The 0.2 mm layer height gives us a very visible kind of banding – in fact, it might actually be more visible in these flash-lit photos then it is on the actual model. There's a little bit of over-extrusion that you can make out in the slightly raised ridge of that top surface and in some of the unevenness going down the side, again somewhat exaggerated by the lighting situation. The holes (or rather "hole") have turned out just fine, even though they aren't quite as crisp as we might like. Given the resolution, that's amazing.
Let's look around a bit more.
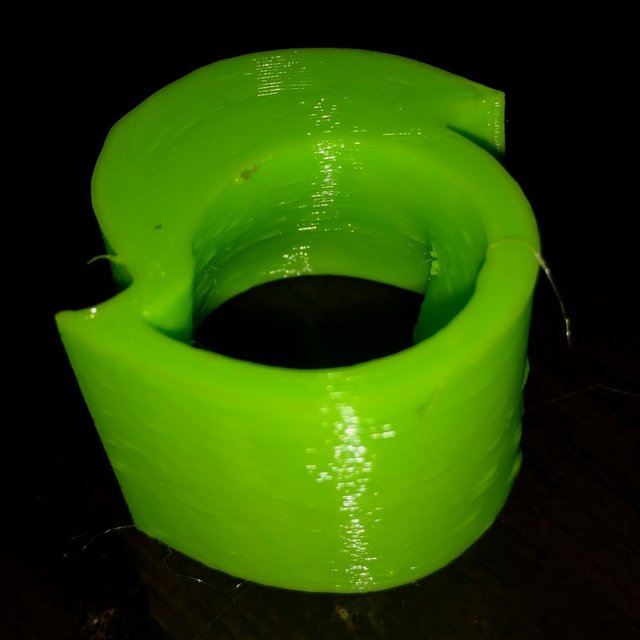
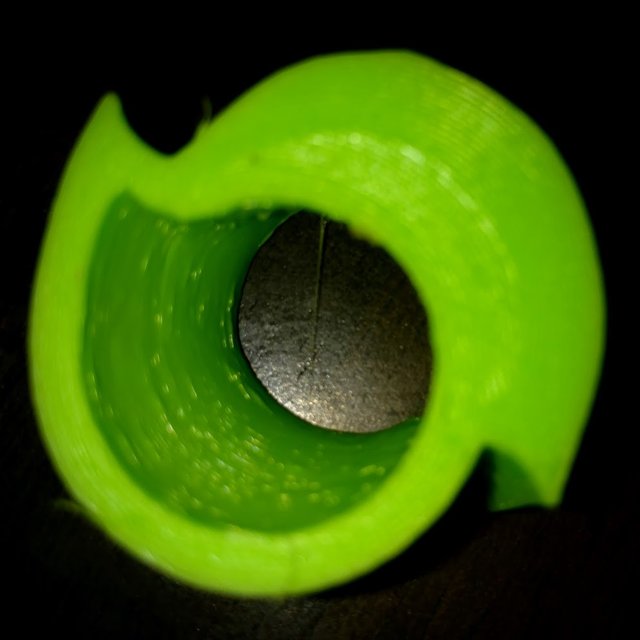
It's pretty easy to tell that there are some retraction artifacts along the inner wall here, likely because we were printing extremely fast for something this size and shape, and it's amazing that it turned out as well as it did. The flash lighting really highlights every flaw in a surface so it's a little bit unfair to use this sort of thing for final judgment. There's a tiny bit of stringing here and there which suggests we need to either increase our retraction or decrease the temperature a little bit – though paradoxically an increase in temperature might reduce it as well if the stringing is caused by the plastic not being liquid enough to break free when the head moves to another position. This is the sort of thing that trial and error was made for.
Still, looking good.
The important question is not something I can show you in pictures, however. And that is…
How does it feel in the hand?
That's a combination of factors. Does it seem like it's the right size? Does it feel solid enough? Does it seem like other production processes could do a good job with it? Are the edges sharp where we want them and curved elsewhere? Are the chamfers and fillets as great or as small as you want?
Is it ready to go?
I have to say – pretty much. Looking at it in my hand, it feels a little bit small for a Christmas ornament. Unless you have a smaller tree and then it might be perfect. Remember, it's about 34 mm from top to bottom, which is not a huge bit of kit.
Production of something about this size and shape via Shapeways would be at the cheapest somewhere around $12 USD. At the very least. With markup, you're probably looking at a minimum of pricing at $15, and that pretty much ignores the amount of labor that went into doing the design in the first place. For an actual gold metal ornament, the base price is going to be almost $77 and the markup would have to bring it to at least $85 to make it worth selling.
Remember the square-cube law. Increasing the size of the ornament by scaling it up is most likely going to increase the price rather dramatically. This is going to limit your options.
Does it feel good in the hand? It feels a little small. Does it feel good from the perspective of having a more capable manufacturer produced a piece for you and do the distribution? Price is probably going to make that the limiting factor.
Let's talk about Shapeways for a bit, because as a new Maker, it's one of the easiest places to build a storefront and actually get things in front of people that you can buy.
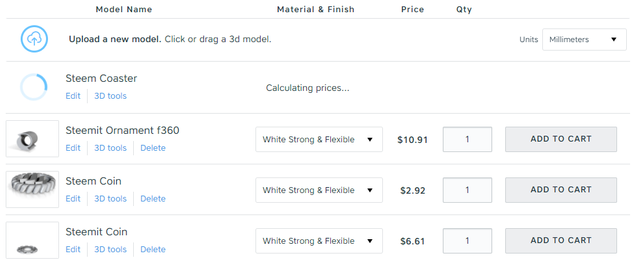
Step one is to simply get the model on Shapeways. They make that extremely easy – much easier than it used to be. All you need to do is drag-and-drop your STL into your workshop – and wait. Sometimes this waiting can be significant, especially around the holidays when everyone is trying to get their Christmas themed goodies up on the server. This is a good time for you to kick back, relax, go have another cup of chai, and come back in a few minutes to see if the system has actually decided basic costs for production and whether or not there are some issues with your design.
Because every material has different tolerances for Shapeways' industrial printing processes, each time you upload a new model it has to run the gauntlet of "will this print effectively in every material?"
Eventually, you get to find out.
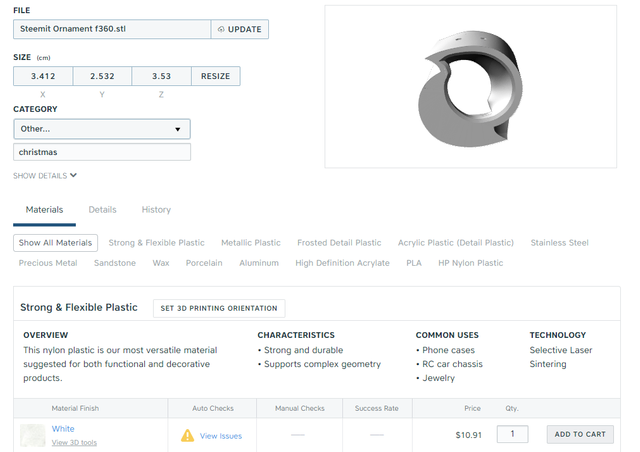
Of particular importance is double checking the size of the import for the model. You would not believe how many times I have exported a model and imported it elsewhere, and it's completely the wrong scale. Orders of magnitude difference. You expect it to be millimeters and it comes in centimeters, you expect it to be meters and it comes in centimeters – just be careful. Check that first.
After that notice the link next to the white, strong and flexible plastic – "view issues." This interface is going to become your best friend and worst enemy. Why? Because it's going to tell you all the places where your model gives rise to problems in every single material on the site.
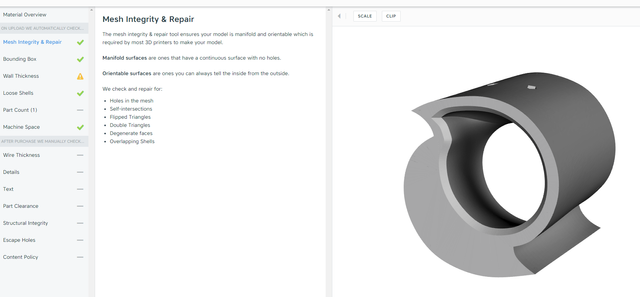
When you first get down into "view issues," this is what you see. A list of checkboxes which show what things have passed, what things are currently unrelated or untested, and what things could be a problem. Most of these things are actually fixable via the Shapeways interface itself, which saves a lot of trouble.
"Wall thickness" is an issue for the white, strong and flexible material. Let's take a look at that.
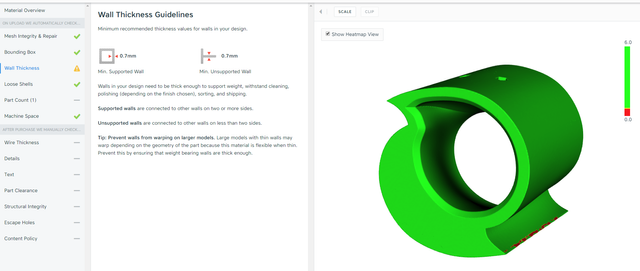
Pay attention to the wall thickness guidelines. They will differ based on whatever material that you are looking at. In this case, 0.7 mm is both the smallest supported wall and unsupported wall for this material. If you were intending to design something with narrow pipes connecting parts of the model, for example, 0.7 mm is the absolute thinnest that you would design something to be able to be printed - in this material.
The only part of the model which shows an issue is where it comes to a sharp external point at the end of either sweep. That's perfectly reasonable and unlikely to be a severe manufacturing defect when/if someone buys one. That being the only problem here, things look pretty good.
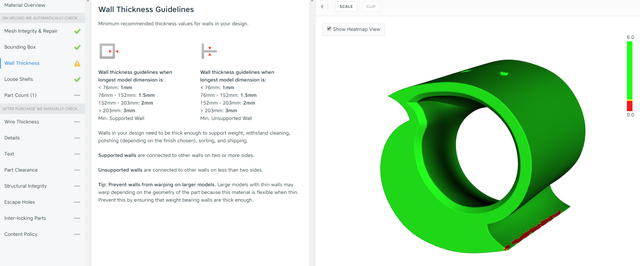
Let's compare that to the gold-plated steel, which is one of the cheaper metal versions that we can order. Again, the issues are all around wall thicknesses. With the metal printers that Shapeways uses, the larger the overall object, the thicker that any individual wall needs to be in order to be consistently printable.
The largest axis is 35 mm, so our minimum wall thickness at any given point is 1 mm. Just like before, the issues that show up are at the sharp edge of the sweep and entirely expected.
Should someone (including yourself) order one of these in this material, it would be well within expectation for those sharp points to be rounded a little bit. That's just the nature of the process by which these things are made.
Hold on, I think I have something for that here.
Metal printing is hard.
Once you've gone through the materials and checked the model to make sure it's printable in a way that you're comfortable with for each of the materials you want to offer, it's time to press the button that says "Sell This Design," and prepared to do the really hard part.
Write ad copy.
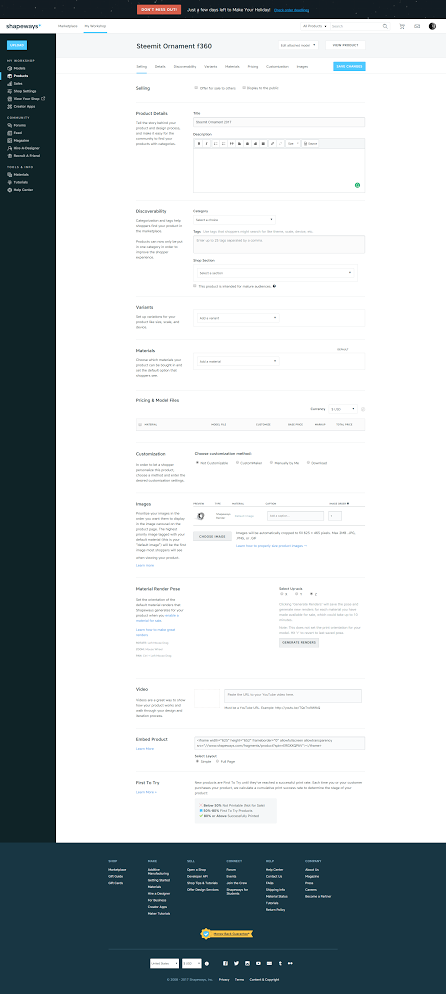
There is simply no way around it – there is a lot of stuff on this page. And all of it is important, from a good title for the object, which will mean that people will see it and understand what it is, to a good description for the object, which deepens that understanding and acts as a call to action for the people who are looking at your page and might want what it is that you're offering, to the category and tags, which provide a way for people to actually find your object because you are putting up signposts describing in short phrases and words what it is that you're actually selling.
Those are the absolutely, without question, no hesitation, the most important parts of the things on this page. Even if you screw up figuring out what materials you want to sell in or any of the rest – the signals to everyone else who might have interest in what you're providing are just as important as creating and conceiving the object itself.
At least if you want anyone to buy it.
(Left as an exercise to the reader is to write the thesis which connects what I'm talking about here with writing on and creating for Steemit. Please have your work turned in by Friday afternoon. Grades will not be available until the following Friday.)
I'm just going to take a few minutes here and fill this out. You won't notice, but the editor will.
[Insert incidental music here.]
Eventually – and I say this after having time to read my email, go to Chrono.gg for for the latest videogame deal, pick it up, have a couple of failed submissions to the shop, re-price things twice – your store will go up with the new object and all the renders that go with it, and you'll be ready to sell.

You can see the completed store page over here: Steemit Christmas Ornament 2017
(Always leave yourself a little margin for doing things that work more than once. If this is just the ornament for 2017, what will the ornament for 2018 look like? Remember to create a little hunger in the market.)
But what if you're the kind of person who doesn't want to sell things or you want to give things away on top of the things that you sell. After all, there are a lot of ways to be involved with a community. Providing the ability for other people to engage with your 3D models if they have their own 3D printers is just one more way you can give.
If you're worried about whether or not somebody is likely to download your design and then have it printed somewhere else, robbing you of your margin – this is probably not the field for you. It's perfectly okay to only offer things for sale, and most of the time I would advise that as your main way forward. But if your ego can afford the hit, put your stuff up in as many places as possible – and don't be shy about linking back to where people can buy it even from the places they can get it for free. You never know when someone will want to follow the lead.
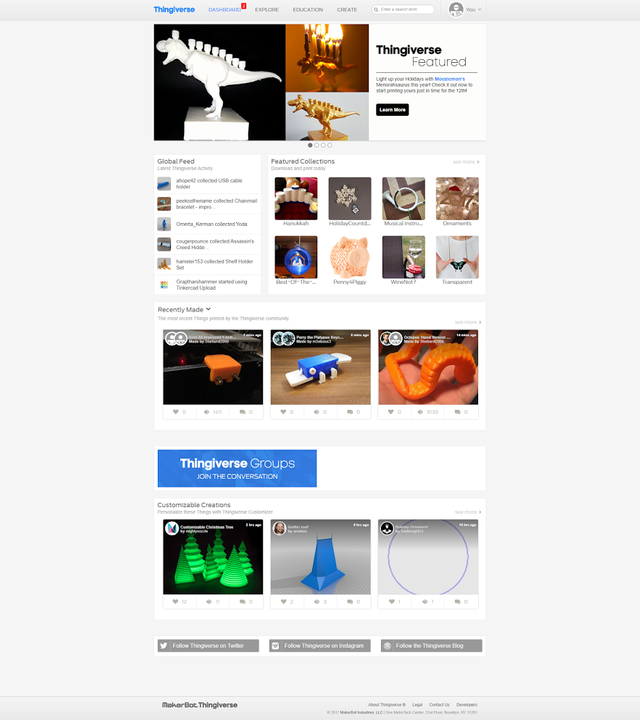
Let's talk about Thingiverse.
Now that you've got a product up on Shapeways, you've done most of the work that you're going to need to do to get something up on Thingiverse. You'll want some pictures of your prototype, which you should have. You'll want to know the best, or at least plausible, parameters for printing the thing, which you should have. You'll want the STL file, which you absolutely should have. If you modeled it using parametric CAD like I do, you very well may have STEP files which can let people import the geometry and make their own modifications to it as they need far more easily than the triangular mesh of the STL. And you should have the ad copy already written because good ad copy is a joy forever – and too much work to throw away.
(I won't lie, a giant dinosaur menorah almost makes me want to take up Judaism. I'm pretty radically atheistic but – come on. Dinosaur menorah!)
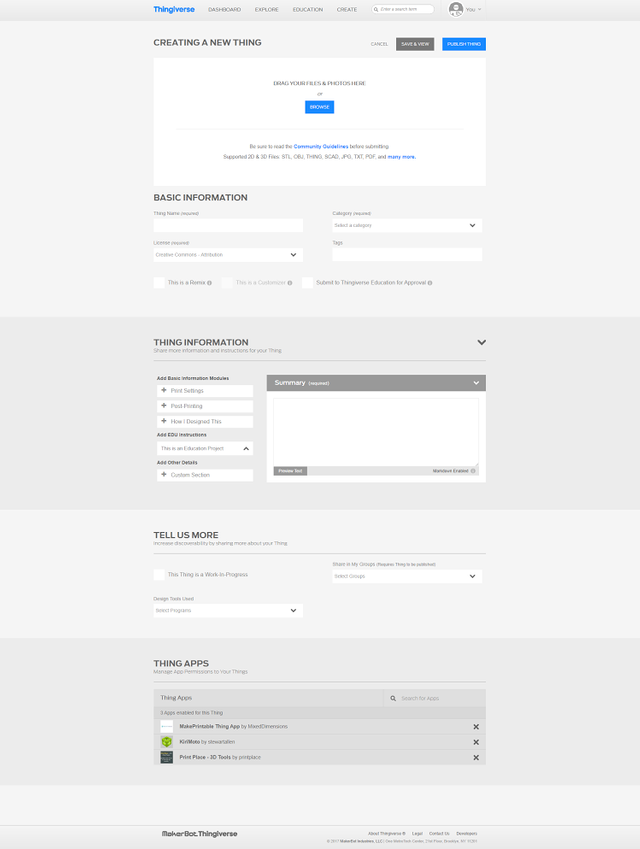
Your task is to click on the CREATE button at the top of the screen and end up here. This is where the work starts.
Most of this you've already decided and can probably cut-and-paste from your Shapeways entry (or vice versa if you happen to do this the other way around). Remember that on Thingiverse, you can upload all kinds of attached supporting files. The original design specs, sketches, the object file itself in multiple formats, pictures – your goal is to make an interesting site about the thing that you've created, one that will be helpful to other people who have the same interests.
I'll just go ahead and get this filled in as I go.
Important safety tip: the tag system on Thingiverse is very fiddly. Don't think that you can put in a series of tags separated by spaces or commas – what you want to do is start typing the first part of a tag and then either click on or arrow down to one that exists and select it. If you have to create a whole new tag because one doesn't exist, type in the tag and hit enter. The tag will appear underneath the tag entry slot.
Also, pay attention to the license options. I'm perfectly okay with this being released under the Creative Commons – Attribution License but you may have other intents or desires. There are a ton of options and don't be afraid to do a little basic research finding out about them if they interest you.
(Did you catch my mistake? I almost submitted it with infill being "10," rather than "10%." It's a minor thing and pretty much anyone would know what I actually meant, but you want to catch as many errors as you can as early as possible. This is true in all things.)
I made sure to link to the first part of this two-part article that you're currently reading where I talk about the design. Whenever you can, avoid wasting work. If you talk about something, if you write about something, if you make a video about something, and it comes up in another context – link to it. Not in the middle of something unrelated but when that content would be a good adjunct, talk about it. This will help people find things that they like more organically, and that's going to result in your work making more people happier.
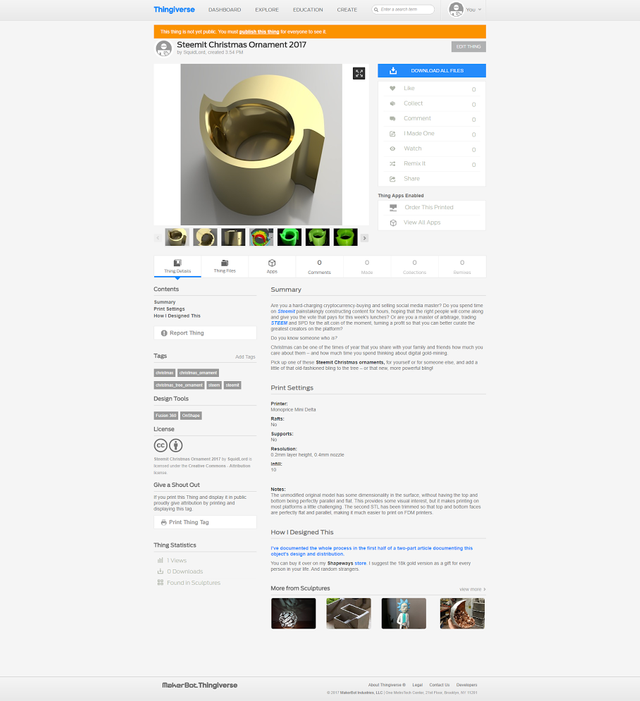
A tap of the publish button and – presto. The object is live on Thingiverse, it can be downloaded and printed by people, they can submit pictures that they have made out of various materials or on their personal printers.
Here it is: Steemit Christmas Ornament 2017 on Thingiverse.
Now go forth, make and create freely, share your creations for money or for free, and tell me about how you've used the information that I've given you today! Encourage somebody else. Pass it on.
That is how better things come into being.
Oh man I so want a 3D printer 🎅 🙏
These days you can get an entry-level 3D printer for a very reasonable price. And I'm not talking about a kit printer that you have to put together over the course of the weekend, yet utterly frustrated, burn yourself with a soldering iron, and start wondering if you had chosen the wrong path in life – I mean things that can work right out of the box.
The Monoprice Select Mini V2 is one of the best reviewed and best-loved small format, out-of-the-box 3D printers that I can think of. You can pick one up for under $230 USD, have it shipped to you, open it up, put it on the table, plug things in, feeding the filament, and be printing one of the test objects in only a little more time than it takes to tell you about it.
Personally, I decided to go with the Monoprice Mini Delta when they were in their Kickstarter phase, mainly because I wanted to be sure to actually get my hands on one. They are supposed to be releasing some more stock with the second wave design changes from their early adopters (like including a cooling fan underneath for the control board) during the holiday season. Hit the website, keep an eye on things, and maybe you can get another one of the good entry-level predators for under $250 USD.
If an assembled system is still too rich for your blood at that price point and you feel up to the challenge of assembling an entire printer from kit form, you can find prices as low as $150 USD on some pretty decent printers.
The 3D Printing Professor just put out a video talking about "what 3D printer should I buy" in the last couple of days. Let me dig that up for you.
There's no reason that you shouldn't be able to get your hands on one – or to persuade Santa that you have been terribly good this year and deserve the ability to make physical items out of nothingness! Or at least that's how I justified it last year.
Upped, here and on Thingiverse !
Thank you kindly. It's always good to find an audience that is appreciative of your work.
Is there anything that you would like to see done in a similar style in the future? I am totally down to take requests.
If you want you could look into designing a Side panel for the SteemPi TV-Box Project and contribute it through Utopian and get extra rewards:
https://steemit.com/utopian-io/@techtek/design-a-awesome-steempi-tv-box-side-panel-in-2d-or-3d-and-contribute-it-through-utopian
(if you want more details or specific file formats, let me know)
Yeah, dump all the tasty formats, details and the inside scoop on me.
If you want, please join and find me in the SteemPi Discord server:
https://discord.gg/RMXbqmG
I hear Chris Hansen knocking at your door!
That he should come in! I love to entertain. I'm sure we would have many things to talk about. Perhaps his obsession with children.
Hi Creep show Lex. . How ya doin?
Well, it might mean that I get an unnatural sexual pleasure from – the continuation of the line above which normal people who have reading comprehension probably picked up – 3D modeling.
I'm not saying that that's true, but I am going to say that you are presenting an awfully bonobo-like sexual display, preening for my attention. I don't think I don't notice. Pressing questions, a consistent theme…
Is there something we need to talk about? Are you sublimating some sort of strange desire for me?
I wouldn't mind if you were. I'm pretty amazing! It's completely comprehensible that you would be sexually obsessed with me. I don't have a problem with that.
But if you're not quite ready to admit it… You might need to talk to someone.
But it's okay. If you want to fantasize about me having sex with children and that gets you off – I'm an open-minded kind of guy. You do you, boo-boo. You do you.
See a doctor for your mental illness
It's okay. You can tell us. It's safe here. You can come out.
We are all friends. If you have some urges that you need to discuss with us, that's okay. We are here for you. We would never want you to feel disappointed that your advances are being somewhat sidestepped. It's not because you're a bad person.
Come on. You can tell me. Just between us girls, am I right?
We were wondering since your profile says your a "fetishist". . What does that actually mean?
Yer an A1 freak show home-boy. . see a doctor.
He just wants to play!
With his copyrighted Logo