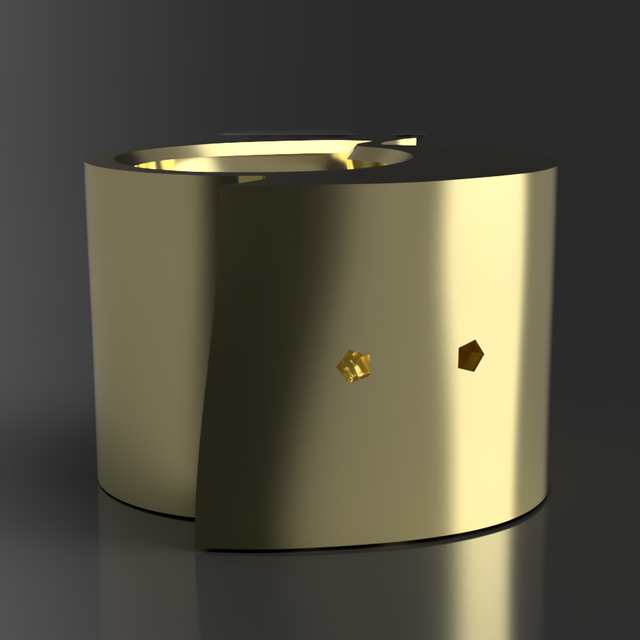
[3d Printing] It's A Steemit Christmas, Charlie Brown or A Very Steemit Christmas Ornament
You know Dasher and Dancer, Prancer and Vixen – but what about the magical shiny-nosed social media platform which has a logo with a mohawk, Steemit?
That's a silly question. Of course you know Steemit! You're here, after all.
(If that is too small an image or you just want to link to the full-size deal, there you go. I get a little tired of images being just a little too small to fully enjoy, so you're going to get links to the originals. Just click on the image. It's a pain, but I do it just for you!)
Let's talk about how you go about designing such a thing from the ground up. In part two, we'll talk about printing and look at the rough prototype. We'll talk about surface finish, stringing, and a couple of small hazards along the way.
Let's start with the basic construction of the piece, however.
We all know the Steemit logo and, love it or hate it, it does have some interesting properties. The inset talk bubble is probably the most interesting part because it keeps a constant distance from the outer shell while leaving a massive volume at the top. A sane graphic designer would suggest that it is woefully unbalanced.
I'm not sane but I do have a certain affection for balance. When I was looking at this logo it occurred to me that balance is certainly possible, but only in three dimensions. If you were to, say, take another copy of the logo, move it directly away from the first, then flip it upside down, you could describe an interesting volume, especially inside the talk bubble as those sharp edges spin around the interior volume to connect.
That was the idea. But all ideas start with getting the information into the system. Firstly, starting with the logo itself.
(From here on you'll notice that all of the illustrative images have what is effectively a timeline on the left side, showing each step of making this object along the way. This is one of the advantages of parametric CAD systems that fills me with joy on a regular basis. Think of it as helping you to learn as you do.)
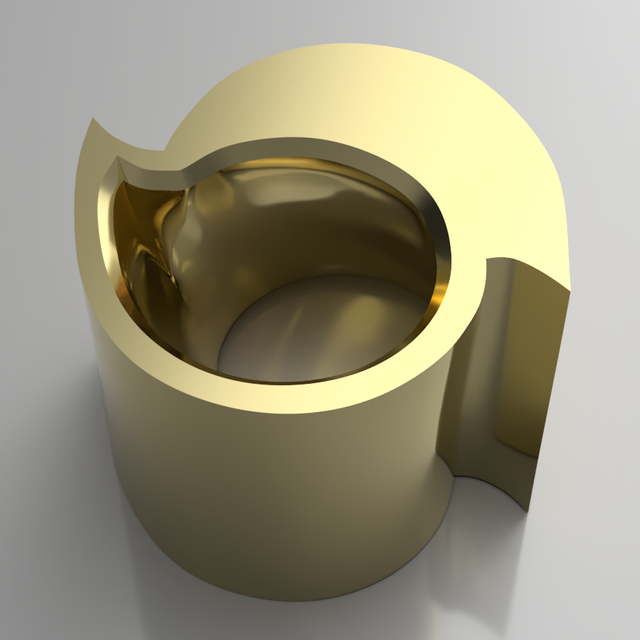
Technically, that started with Photoshop. I took the published Steemit logo, cropped out just the iconic part, used at the magic wand action to trim out all of the white sections, told Photoshop to trim off any invisible blocks around the edges that I may have missed, and then exported it as a PNG. Someone else may have used Adobe Illustrator to go ahead and make a DXF to be imported into a CAD system, but I've had enough experience to realize that does not end well if you want to do any sort of actual manipulation to the shape. You end up with a very fixed number of very short straight lines which approximate curves and not real curves.
That does not end well.
Instead, I took the rasterized image into Onshape and used the edges to tell the system exactly how large I wanted this logo to be interpreted as – in this case, 35 mm high. Once you have the basic canvas scaled, everything else is easy.
You're probably wondering why there's a diagonal line slashing across the form. Adding a diagonal line which is connected to opposite corners allows you to pin the center point of the line to the overall space origin, meaning that it is fixed in place and you can build other, more complex geometry off of it without trouble. Whenever I'm working with some sort of imported canvas, I always find some part of it that I can pin down in the global space or to another part that already exists to keep things from moving around while I'm working on them.
Having brought the form in, it was time to do the slightly more tedious part – trace the outlines with manual splines. You would think that this would really just be an accumulation of three-point arcs, but despite what it looks like nothing is quite circular. Everything is just a little bit off. Because of that, using arcs will make you tear your hair out, so splines are really the best choice here. Just make sure to start and stop a spline on any sharp point.
The construction lines both vertical and horizontal were just there to help me keep a sense of space when putting in the sketched lining.
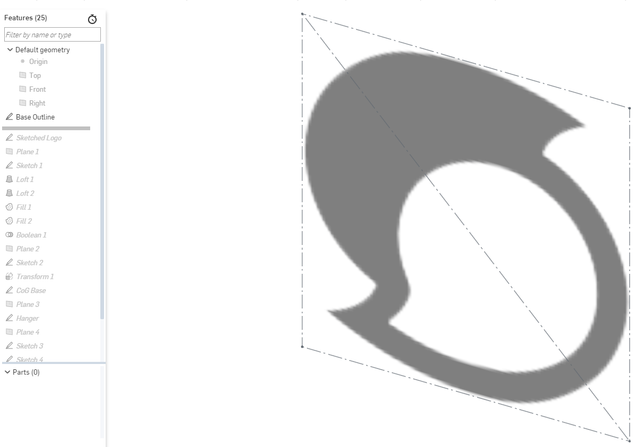
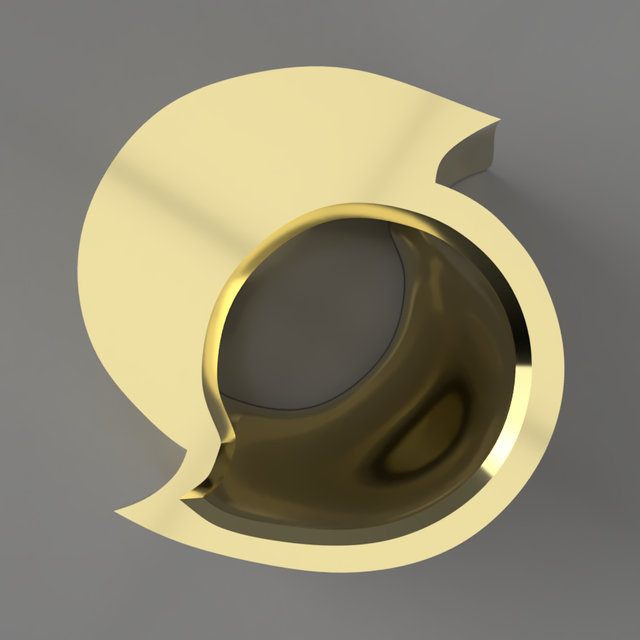
Once the sketch was finished and in the system, the next step was to make the duplicate so that it could be turned around and the volumes lofted. I decided that a roughly cubical space was a good idea in order to mimic the traditional Christmas ornament sphere, so the plane on which the duplicate logo lies is 35 mm from the original. That's just a constructed offset plane from the bottom which makes things easy for everybody.
In the illustration, it has already been flipped and the things are ready for lofting.

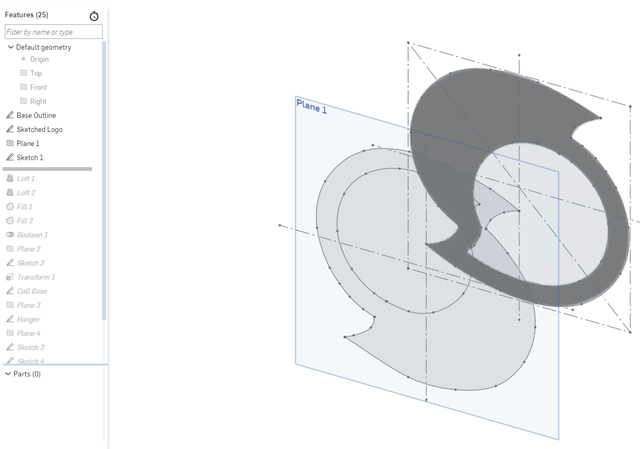
And here's where things start to get a little complicated.
Onshape is extremely picky about the surface is that it will loft to one another. Not unusual, not even surprising, but once in a while, it's a real problem. For instance, I just couldn't get the entire outer outline to loft up to the closer one because that shape had an inner cut out. I simply couldn't figure out how to get it to ignore that inner section for the sake of the loft.
In retrospect, it might have been possible to take the inner section and move it to a second sketch on the same plane so that there was no interference, that has its own problems with maintaining alignment with the original intent. No good. No good at all.
Instead, I did a standard loft from one speech bubble to the other, resulting in that grey volume in the illustration and used Onshape's new facility with making compound curves into surfaces to loft the outer line of both sketches into a bounded surface.
Now, having a surface that you want to turn into a volume is easy.
All you have to do is choose one set of contiguous edges that you want to turn into a new face and give the Fill command. Once you do that on both sides, you've defined a perfectly reasonable volume that you can then treat like any other part.
You can see the original grey colored speech bubble having a bit of Z-fighting because it shares the same surface with the outer gold colored volume. We want that. In fact, we need that, because the next step is the one that brings things all together.
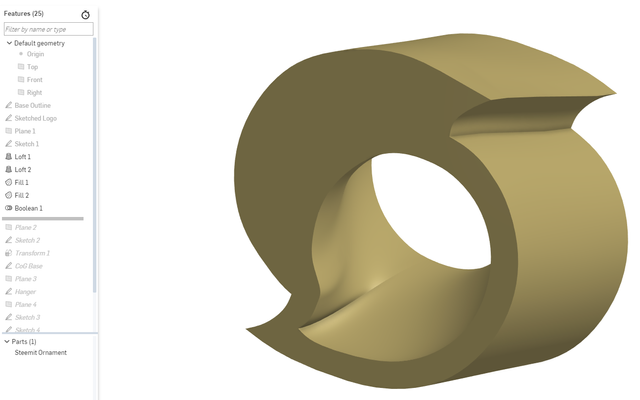
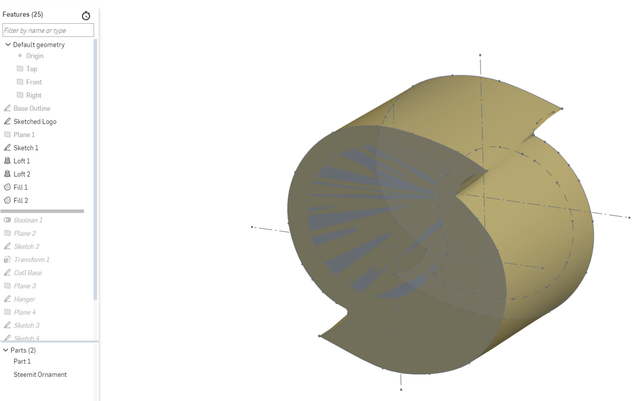
60% of the time Boolean is your friend 100% of the time. The ability to take one volume and remove another volume or add another volume to it is one of the most powerful parts of any CAD system. That comes to our rescue here by letting us remove that inner speech bubble volume from the overall outer volume, and provides that really cool vanishing increase that we were looking for with the original design.
This gets us most of the way to where we want to be. We have an object which looks like a Christmas ornament and it has the shape that we intended to create – but it's missing something vital.
What kind of Christmas ornament can't be hung from the Christmas tree? Not a very good one.
So being me, with the weird sort of obsessiveness that comes with that, I set about finding the center of mass of the subject.
I know, I know. An easy estimation would've sufficed.
But this is me.
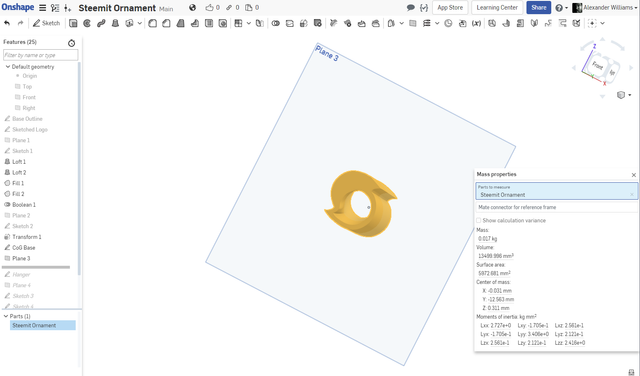
Onshape has the really useful ability to take a part for which a material has been set and calculate a whole pile of information about how large it is, how heavy it is, what its surface area is and – usefully – what the center of mass is.
You can see that here in this illustration, along with a whole bunch of information neither of us really knows what to do with. But the important thing is to note that the mass really wasn't that far off of the planar center; under 1/3 of a millimeter is pretty minor. A smart person would've also been able to guess that the center of mass in the Y plane, depth in this case, would be about exactly 1/2 of the distance between the original sketches.
But I'm not normal, and I'd rather calculate than guess.
So I built an offset plane, put a point on it, put in the exact measurements, and away I went.
It's time for a hanging.
Who wants to hang things from a simple cylinder? Too easy. Too boring. Too safe.
I want to hang things from pentagrams! Everything I make is secretly a tool for worshiping the devil!
Or something like that.
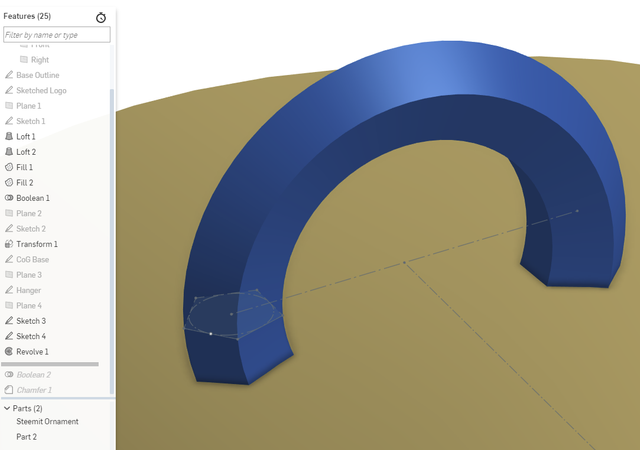
I decided that a point directly above the center of mass was a fine place to hang something from, so I dropped a quick sketch with some's construction geometry, stretched out a small inscribed pentagram, centered it on a circle which was sketched around the offset point, then proceeded to do a revolve.
Have you found my problem yet?
Think about how a 3D printed object is printed on most FDM printers. One of the logo faces will be on the print surface, a head that squirts hot plastic will be moving around above it, it will build up to about 12.5 millimeters above the build plate – and then it will have to build an unsupported several millimeter hoop which, at that point, will be horizontal.
That is not a thing that will work without putting in supports, and supports are a pain in the butt to break cleanly off of the bottom of a piece. If you can at all avoid having supports, avoid supports.
But I did have something useful. After all, I did a full 360° revolve of that pentagon around that orthogonal axis.
Remember our old friend Boolean?

What if we just removed that revolved volume rather than adding it to the volume of the ornament? That would give us an area within which someone could put a hook or, more pleasingly, run a piece of string or a pipe cleaner to hang the piece from whatever they like. It's still perfectly centered above the center of mass so no matter how you did it it would hang appropriately.
It also means there's nothing that needs to be unsupported in the actual printing of the piece. Since it's a relatively small volume, the outer walls will be more than enough to support the creation of this little internal tube.
Aces!
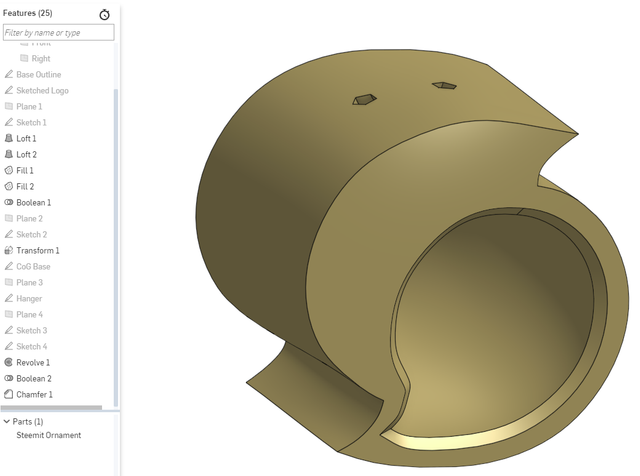
The thing that occasionally passes for an artistic designer inside of me couldn't resist putting just a little chamfer on the edge of that inner chat bubble. It draws the eye along the smooth curve inside and will end up catching light quite nicely hanging amidst all the twinkling joy on your tree.
You can also see the holes for hanging at the top of the part so we have a clear orientation for presentation.
Job done!
Or is it?
After all, we still don't have a physical object. All we have is a set of instructions for how to tell a machine to make it.
And before we even think about taking this into production through Shapeways or whatever your personal choice of manufactury is, we need a prototype. It doesn't have to be a great prototype, and in fact it can be kind of rough and ready – that's what prototypes are for.
So all that will be in part two of this article, because we're already long beyond the interests capabilities of most people when it comes to reading. Even with pretty pictures.
I'll leave you with a few more pictures of renders of this Steemit Christmas Ornament and leave you to think about what kind of potential it has for tomorrow, where we'll finish printing a prototype and making it available to other people.
Tune in next bat time on the same bat channel!
This is so creative! Great idea :) This gem of a post was discovered by the OCD Team!
Reply to this comment if you accept, and are willing to let us share your gem of a post! By accepting this, you have a chance to receive extra rewards and one of your photos in this article may be used in our compilation post!
You can follow @ocd – learn more about the project and see other Gems! We strive for transparency.
I appreciate your interest. What about it excites you most?
I just loved seeing the logo in a 3D form. I wasn't too big of a fan the logo when it first changed, but it has definitely grown on me, especially now when it's in a gold three demential trinket! I have a tiny monoprice 3d printer that's been sitting on my desk waiting to be used. So I think I might make a few ornaments with it thanks to your post!
I'll be honest, I actually don't think much of the logo. It's just a little too unbalanced and just a little bit too disconnected from the overall concept that it's trying to convey. Personally, I would've gone with the STEEM currency logo with an overlaid chat bubble of some sort; something that links the two concepts in a very visual manner.
But we have what we have.
Interestingly, my prototyping printer is also a Monoprice, but I'm betting you probably have the Mini and I've got a Delta Mini, which does a perfectly serviceable job of printing prototypes and getting a sense for whether things are about the right size, the right shape, etc.
In the next post will be a link to the Thingiverse model, of course, along with the Shapeways link just in case you decide you want one in actual gold. Or gold-looking steel. Or one of those precious metals.
You have to look after the clientele, right?
Your post just made me realize that at any moment people may start making steemit fidget spinners.
runs in sheer horror
Damnit, now you've set up my next project!