Markdown Editing for Steemit Posts. Easy Copy and Paste!
 Source: www.pixabay.com
Using Markdown on Steemit can really give your post a boost when it comes to presentation. Markdown might be a bit difficult from some so I made the perfect cheat sheet where you can just copy and paste all the markdown codes. This time I will also include some copy paste templates for everyone!
The only guide you will ever need! Steemit offers two ways of posting a new story. With the Editor and Markdown Editor. The Editor is simple and easy but lack some features that might make your blog look more professional and neat.
To get to the Markdown Editor, go to Submit a Story and click on Markdown:

Using the Markdown editor might be daunting at first but once you get used to it you will notice your posts looking so much better! Take some time, test the commands. You will get it in no time!
In this post you will find all the codes to make your editing easier. The best of all is you can simply COPY and PASTE whatever you may need. From there just insert your links and you are on your way to make an awesome looking blog!
At the end of the post I will make a downloadable Word Document containing all the codes as well as the templates. You can just copy and paste all the commands or templates while editing your post! Let's get started!

For centered pictures or text us the center command. To add a kine break (simply a blank line downwards) use the br command.
<center>your text or picture here</center><br>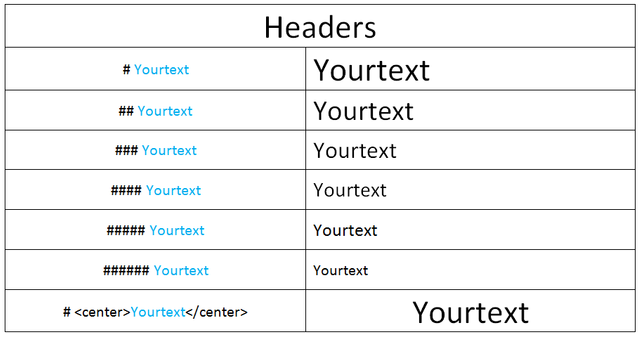
For headers use a # before your text. I like to center my headers so the commands will look like this:
# <center>HEADER</center>HEADER
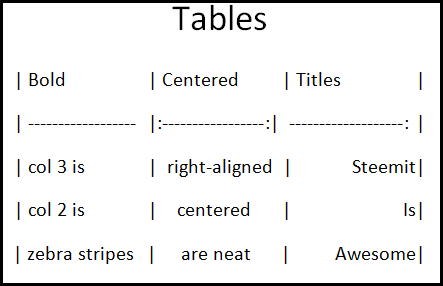
| MARKDOWN | FORMAT |
|---|---|
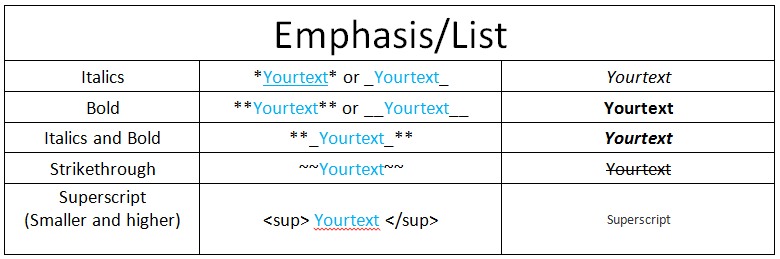
*Yourtext* or _Yourtext_ | Italics |
**Yourtext** or __Yourtext__ | Bold |
**_Yourtext_** | Italics and Bold |
~~Yourtext~~ | |
<sup> Yourtext </sup> | Superscript |
3<sup>2</sup> | 3 2 |
If you want to add code like above use `` with your code in between the `
How to use two columns.
` command to skip down a bit and start a new paragraph.
<div class=pull-left>WRITE ALL YOUR TEST HERE FOR THE LEFT COLUMN.</div><div class=pull-right>WRITE ALL YOUR TEST HERE FOR THE RIGHT COLUMN.</div>

Using this command you will no longer need to paste long ugly links, simply give your link a name and then paste the link.
[Steemit](https://steemit.com)Steemit

This will put a line through your page similar to the ones you can see in this post, nifty right?
--- or *** or ___If you would rather prefer text divider like the ones below, go to THIS POST for some links to dividers and THIS POST for some animated dividers. (Remember to center them)


ALL ABOUT PICTURES
Not Centered VS Centered

VS

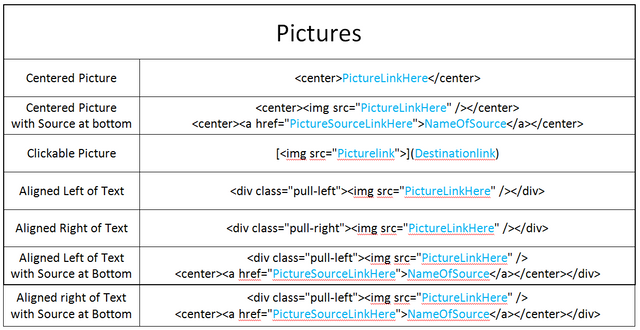
<center>picturelink</center>Places the picture in the center of your post.
Centered Picture with Source at bottom

<center><img src="http://imgur.com/eHI22wC" /></center><center><a href="PictureSourceLinkHere">NameOfSource</a></center>
Places the picture in the center of your post with a clickable source link at the bottom of your picture. You can give the little button any name you want and it will take you to the link you provided.
Clickable Pictures (nest your link in your picture)
To make a picture that will take you to a desired link when clicked use:
[<img src="http://imgur.com/eHI22wC">](Destinationlink)
This picture is centered.
<center>[<img src="http://imgur.com/eHI22wC">](Destinationlink)</center>

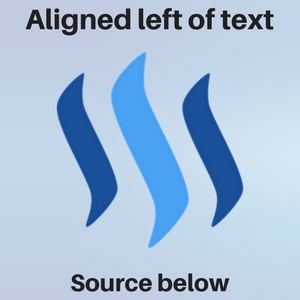
Aligned Left of Text

Places the picture to the left of your text.
<div class="pull-left"><img src="http://imgur.com/eHI22wC" /></div>
Whatever you write after this command will go to the right of the picture.
If you want to stop writing next to the picture and move down add as many <br> commands as needed.
Aligned Right of Text

Places the picture to the left of your text.
<div class="pull-right"><img src="http://imgur.com/eHI22wC" /></div>
Whatever you write after this command will go to the left of the picture.
If you want to stop writing next to the picture and move down add as many <br> commands as needed.
Aligned Left of Text with Source at Bottom
Here the picture is on your left, the same as the above examples, only difference is you now have the source of the picture. The source of the picture is a link, but since long links are so ugly we can simply rename it. Clicking on the name will then take us to the link.
--<div class="pull-left"><center><img src="http://imgur.com/eHI22wC" /> <a href="PictureSourceLinkHere">NameOfSource</a></center></div>
Aligned Right of Text with Source at Bottom

Here the picture is on your right, the same as the above examples, only difference is you now have the source of the picture. The source of the picture is a link, but since long links are so ugly we can simply rename it. Clicking on the name will then take us to the link.
<div class="pull-right"><center><img src="http://imgur.com/eHI22wC" /> <a href="PictureSourceLinkHere">NameOfSource</a></center></div>
Honestly, will be faster to use excel, take a screenshot and paste it here.
Just included this if anyone was interested. It's a nifty trick and will really make your post stand out.
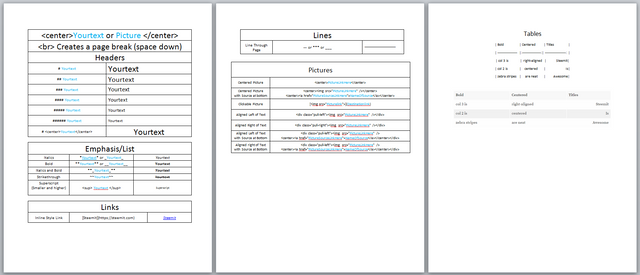
So there it is! Everything you need to make a beautiful and professional post here on Steemit. Using Markdown might not be easy at first but trust me it get's a lot easier and you will appreciate the extra things you can do. I simply shared what I have learned and made a Word Document so it will be easier for me and fellow Steemians to make better posts.
Thank you so much for reading! Now go out and post awesome stuff!

Resteem/Upvote? Only if you found this useful and think other Steemians will too.

Thank you for reading! Steem on Steemians!

Resteem/Upvote? Only if you found this useful and think other Steemians will too.
Thank you for reading! Steem on Steemians!
I'll be keeping this one to my blog also for future reference.Thanks for sharing this very useful post!
Most welcome mate! Glad some of it can be of some use and help you with your own editing. =)
I like it.gif)
Congratulations @scrooger! You won the raffle!
I have transferred the jackpot into your account!
Enjoy 💰💰💰
Great guide as always @scrooger :D..Always using your tips and tricks to edit my posts..thanks mate

I will be looking out for those changes! =P
This post will really come in handy. It taught me a few things I didn't know. Thank you for the help. Upvoted and resteemed so I always know where to find it.
Thanks so much for the Resteem! Upvote for that! Glad it could show you some new things. =)
I'm always trying to learn new markdown options to improve the quality of my posts. This is great for reference - you make it look a lot easier than anything else I've read on the topic. Thanks! Upvoted and Resteemed.
Thanks a lot! Glad you like it. Yeah, I made the cheat sheet for myself and use it for every post I write. Thanks for the resteem and the upvote!
Impressive, thanks!
Most welcome mate!
P.S. Cool name =)
good resource - I should do something like that for the Germans - lets see if there is something there ....
Steem On!
Upvoted & Resteemed - of course :-)
Thanks man! Much appreciated.
Clickable images! I was looking for that, how serendipitous. Upvoted in thanks!
Awesome! Glad you found something useful! =) Thanks for the upvote! =)
Thank you. Very helpful, especially the Google Drive link.
You are most welcome! Glad it is can help some of the newer users. =) Yeah, the google link helps a lot, that way you can always keep it close by.
thanks a lot for sharing it @scrooger its very useful . i have a question i use to do aligned picture with link i did .But when I submit it.said image not save properly.and i did not finish :( can you teach me how?thanks in advance
You are most welcome. =) that normally happens if the links has extra writing in it. Make sure it's only the picture link. Starting with http.... Ending with .jpeg/.png etc...
ok @scrooger thanks a lot :)followed you
Hope it works, let me know if it doesn't. =) Always here to help. =)