Steemit : A Newbie's Guide for Everything you need to know !! From Setting your Profile to Trading Market !!
Hello fellow Steemians
Steemit is an incredible site that pays the author to write quality contents so many people are joining the platform and the number of people joining it has increased at a tremendous rate in the past month or so. Even I joined Steemit in the month of June only.

So as many people are joining daily some after watching some videos or if a friends asks them to or any other reason. Many people must be there who don't know much about using Steemit or doing transactions or writing an effective article.
So in this blog I will show you all the things that are needed to use Steemit effectively.
I will be going through the following things :
- Basic things on the profile page -
- blogs
- comments
- replies
- rewards
- Submit a Story
- Settings
- how to put your profile picture
- Wallet
- how to convert Steem Dollar to actual money(Fiat Currency)
- using the Steemit Market
So lets start this blog/tutorial
Profile Page
Blog & Comments

IMPORTANT : 12 hours before the payout time, you will not be able to increase your payout even if you get a large number of upvotes.
You can upvote your own comments also in order to make more money, but that decreases the power with which you can vote for the next blog.
Replies & Rewards

Fig.3 shows the replies that you have received on your blogs or the replies on your comments. This is fairly easy to understand and nothing much to it.
Similarly Fig.4 shows the Rewards which has both Curation and Author Rewards.
Curation Rewards : these are the rewards that you will receive for Resteeming the blogs after the payout period. The calculation of curation rewards is a very complex process and you only need to know that you should resteem any article if you want to after 30 minutes.
This is because before 30 minutes all the rewards goes to the author and you will not receive anything even if you resteem it.
Author Rewards : these are the rewards you will receive for your blogs and these will include the amount that you will get and also the curation awards that will be given to someone who has resteemed your blog. The curation that will be cut can be maximum of 25% depending on the Steem Power of the person who has resteemed your blog.
Now that we know the basic of the profile page so lets move on to Submitting a Story.
Submit a Story
So this is the place where you will spend most of your time pouring out whats on your mind. So you need to know how to use it effectively.
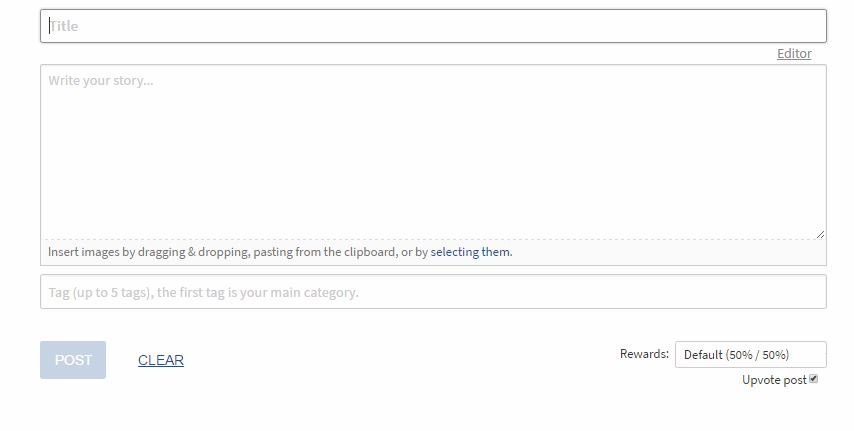
The above figure is self explanatory containing the space for title, writing your story, putting the tags and changing the rewards system to suit your needs.
Here the main thing you need to know is how to write the story more effectively using the editor to its maximum capability. I will show you the hacks you need for effective writing.
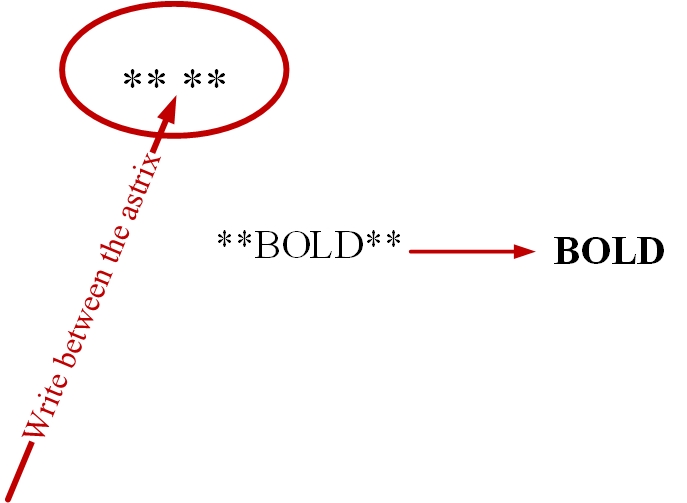
for writing in bold letters : write between the two asterix. eg. BOLD
for writing in Italics : write between one asterix. eg. Italics

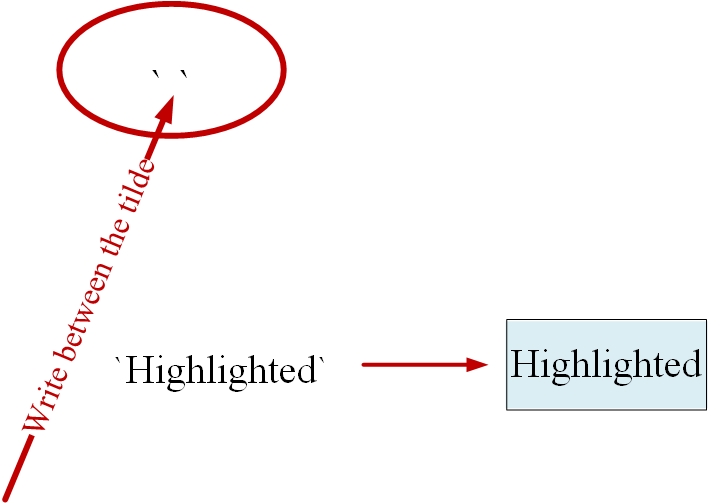
for highlighting text : write betwen three tilde symbol. eg.
Highlighted
for giving a Heading : you can use the Hash symbol for headings. The size of heading can also be changed by using different number of Hash together. eg


1
using one hash
2
using two hash
3
using three hash
4
using four hash
5
using five hash
6
using six hash
making a list : if you want to make a list of items then you just need to use one asterix then space before your text.
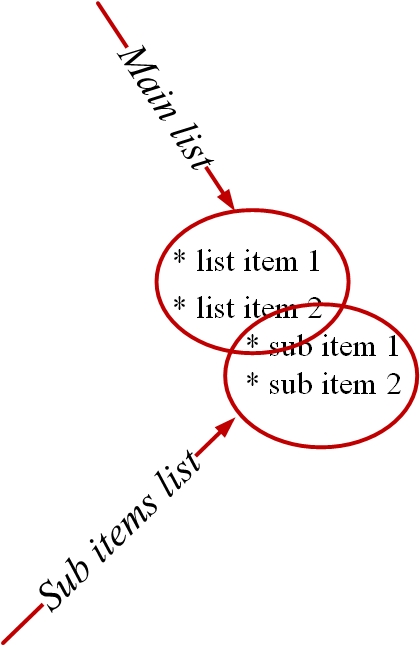
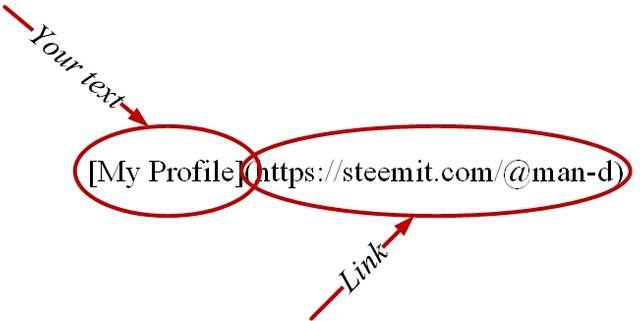
for making sub items list just give two space bfore the asterix then start your text.for including a clickable link in your blog for reference.
you need to write the text in between the square brackets[], which is followed by the link of the item you want to reference in simple brackets(). eg My Profile
for making a line so separate your text : write the text between dashes. eg.


Your text between the lines

- for centering your text : eg.
Centered Text
write your text in this syntax


I think using the above methods you can write an effective blog. So lets move on to the next topic which is topic number 3 for Settings
Settings
The only thing that is important in settings is displaying the profile picture. Many newbies don't get how to put a new profile picture. Even i got it after two days of struggle, so let us see how to do it.
The way I did it was, Go to the Submit a Story -> drag the picture you want to set as your profile picture in the write a story box -> then you will see a link inside the box-> copy the link inside the simple brackets,(), dont copy the brackets -> paste this link into Profile Picture URL box-> Done!
Its so simple. :)

Now let us move to the most important part which is Wallet :P
Wallet

In this figure you can see five things which are
- Steem
- Steem Power
- Steem Dollars
- Savings
- Estimated Account Value
Steem

Steem is the first thing when you click on Wallet. If you click on the down arrow for Steem block then you will see various options pop-up. These are very basic and simple things :
- Transfer : using this you can transfer you Steem to someone on Steemit or to an Crypticurrency Exchange. I will show you how to transfer at a later stage.
- Transfer to savings : if you want to transfer your Steem to your savings where it can earn interest for you then you can do that also using this option.
- Power Up : You can use your Steem to get your power up so that your votes will hold more power and will payout more per vote. This is a good option as if the price of Steem increases then your influence will also increase in Steemit.
- Buy/Sell/Market : you can buy or sell steem by using these options. By default if you click on buy/ sell, you will be taken to blocktrades site from where you can do your buying or selling. Clicking on Market, will take you to the internal buying and selling platform which I will discuss in detail at a later point.
Steem Power

Next is the Steem Power option. As I told you the amount of Steem Power you have decides the value of your upvote. Also more Steem Power will help in getting more curation rewards.
If you click on the down arrow then you will see two option, Power Down and Buy.
- Power Down : this means converting your Steem into Steem Dollats(SBD). This doesn't happen quickly but gradually in three months having equal weekly installments.
- Buy : this again means to buy Steem from blocktrades.
Steem Dollars

Steem Dollars or SBD in short are a part of reward you get for your blog and curation. This amount you can sell on any exchange of your choice to convert it into fiat money. By clicking on the arrow you will see six options which I will discuss in details.
- Transfer : For transferring some amount of your SBD to someone on Steemit or to an exchange. Which can be done like this :
- Transfer to Account

From the figure you can see how to send SBD to any person on Steemit.
Now if you want to send SBD to an exchange then the first thing you need is an account on any one exchange. In this blog I will be using the exchange Bittrex cause I find it comfortable to use. You can use others if you want like Poloniex.
Lets see how to transfer SBD to Bittrex.
The first page you will see after logging in your account on Bittrex is this :

On this page, you will se the option of Wallet on the top bar, click on it and your wallet will appear.
- Transfer to Account


In this figure you will notice '+'and '-' sign on the left of Steem Dollars. As you want to add SBD to Bittrex so you should click on '+' sign. After clicking on this, a dialog box will appear with Memo and Account name. Copy these two and paste on the Transfer dialogue box in steemit. As shown in figure below :

In this way you will be able to transfer SBD from Steemit account to Bittrex. There is no transaction fees as such to transfer from Steemit to Bittrex and you can even transfer a low amount like 0.001SBD if you want to learn how to do it yourself once.
Converting to Fiat Money
For this conversion I will be using and application called ZebPay. This app is used to buy and sell Bitcoins.
So its obvious that you will need a ZebPay account if you want to convert your Bitcoins to Money(Rupees).
To get an account approved you will need a PAN Card and a Bank Account whose details you will have to submit while registering for an account.
So after making a ZebPay account you will need to transfer your Bitcoins in your Bittrex account to ZebPay account. But, you only have SBD at this moment.!!
So you will need to convert your SBD to Bitcoin in Bittrex and then Transfer it to ZebPay from where you can sell the Bitcoins to get money in your bank account.
Now to convert SBD to Bitcoin, Go to your wallet in Bittrex and there find Steem Dollar under the title Currency name. Click on SBD. Shown in figure below.
After clicking on the SBD symbol you will see a new window opening, in this window there are options of selling or buying SBD. But we want to sell our SBD's to get Bitcoins, so we will concentrate on the Selling section.

So you will get a window like shown in the above figure. I n this window we have an option to see which you can see on the right side. Also it will show your available balance of SBD's.
Below the Available Balance you can see a block in which SBD is written, you have to enter the amount of SBD's you want to sell in this box.
Now as you need to sell so you should check the BIDS in the ORDER BOOK. Choose the BID price you want from these bids available.
As soon as you select the bid, the bid price will get copied to the box of BTC.
A total can be seen in the box below. This total is after deduction of transaction charges. So this is the amount of BTC you will get if you sell your SBD's at the choosen price.
Now you have successfully sold off your SBD's and received Bitcoins. Now all you need to do is transfer the Bitcoins to your ZebPay address.
This can be done easily, go to your Wallets in Bittrex-> find Bitcoin-> click on '-' sign to withdraw. You will get a dialog box as shown below :
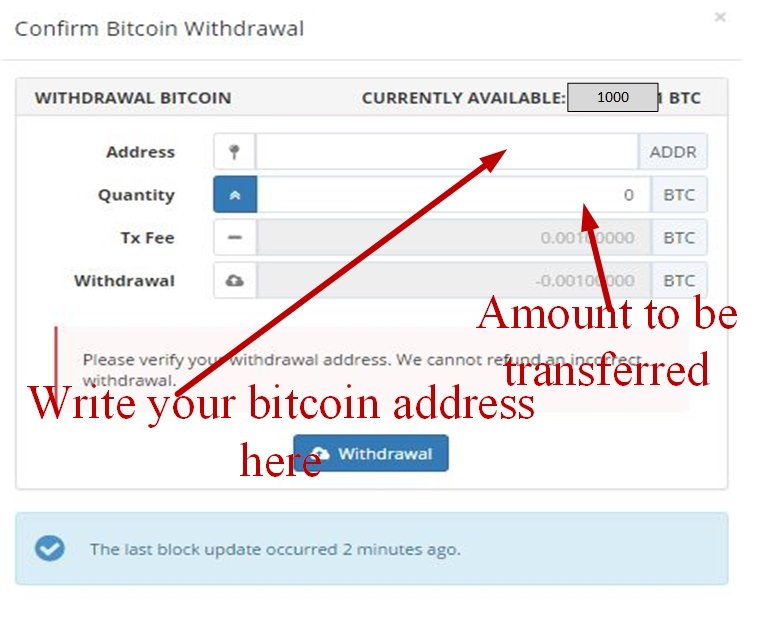
In this dialog box enter the amount of Bitcoins you want to transfer and enter the address to which you want to transfer.
In our case we are transferring to ZebPay, so you will have a Bitcoin address in ZebPay app. Copy and paste that address in Bittrex and click Withdraw. Some transaction fees will be cut depending upon the amount you transfer.
Your Bitcoins will be transferred to ZebPay, where you can sell it and the amount will be automatically transferred to your bank account.
Market in Steemit
Market is a place where you can sell and buy Steem for your SBD. The figure below shows the market and it has options of Buy Steem and Sell Steem.

First let us look at buying of Steem :
If you want to buy Steem then you should look at the Sell Orders. From here you can see the Price at which you can sell your SBD and buy Steem.

In this figure I have not included Sell steem option so that I can explain the buy steem clearly. So if you look at Sell Orders list you will see a number of prices given. You can choose any price by clicking on it.
In order to get maximum number of Steem you should choose the minimum price, but you will need for a good oppurtunity to do that and for that you need time. If you don't have much time just click on the first price and the enter the amount of SBD's you want to sell and click on BUY STEEM. Your order will be executed.
Now let see how to sell Steem.

For selling the Steem you have you need to check the prices on the Buy Orders. Here you would want to sell your Steem at the highest price to make the maximum profit so keep that in mind.
Just click on the price you like and then enter the amount of steem you want to sell. You will see the amount of SBD's you will get, if you are happy then click sell and you order will be placed.
So these were all the major things that you will need to know for this Steemit course as a newbie. I hope you learned something that you didn't already know.
So with this I would like to end this Blog/Tutorial.
I hope you liked this blog as I done a lot of hardwork in making this blog, so please Upvote if you liked it and Resteem so that others can also learn these things.
Great guide!!
I have an addition to add on to your guide that I posted the other day for those stuck with STEEM/SBD on Poloniex to transfer to Bittrex then to Steemit.
You can find it here: https://steemit.com/steemit/@nlizotte/how-to-trade-steem-and-sbd-from-poloniex-to-steemit
Upvoted. Keep up the guides :)
Poloniex has many problems that is why I avoid using it and have not talked about it. You can check out my article where I discuss about different exchanges in details, HERE
Well done and thank you, I can see allot of work went into this.
thanks @nicholas.leslie.
Ya a lot of work, but its worth it if you fellow Steemians appreciate it :D
If you will edit your post to remove the "introduceyourself" tag, I will upvote. This is a nice post. It would be a shame if people skip over it based on that. I will check back later.
done
Upvoted.
thanks a lot :). It took me a lot of time to make this post
It showed. I know that was a lot of work. The tag thing seems like a minor thing, but is important in the integrity of the site. Nice work.
I didnt actually know that thing. I thought the post is for newbie's so they will see it there.
Thanks
This article is fantastic !
thanks @mammasitta :)
Please Resteem if you really liked my article :) @mammasitta
Great info. As a newbie I will be bookmarking your guide and referring to it as I try to get my head around how this whole new Steemit world works. Thanks.
hehehe ya I know in the beginning this info is too much but I am sure you will get the hang of it :)
Thanks for putting this together! As a noob here, this is super useful.
I know what you mean I had to learn this all by myself so I thought of making it easy for everyone else :P
Just what I needed ! Thank you ! resteemed , so I can find it easily again ! Have a great day !
thanks @globaldoodlegems. I am glad I could help you.
Keep steeming :)
You are welcome .. and you too keep up the good steemin' !
Good information shared. Cheers!!!!
thanks @tamsguitar :)
Great post and lots of hard work in it, thanks man
thanks @gingyptian. Hope it helps you...
Thank you so much for this!! This is so helpful! I just joined recently and haven't quite made an introductory post yet. I'm also just getting used to navigating the SteemIt forum so your post is extremely helpful! Thank you for taking the time to do this :D
you are welcome @wongfullyright. I am happy to help you :)