How to Add Profile Picture & Cover Photo and Set Up Steemit Profile - Newbie Steemians Guide
Setting up Steemit profile is an easy task if you know how to do it. Due to a different procedure from all the other social media platforms, newbie Steemians can find it hard to set up their Steemit profile; especially not knowing how to add profile picture. If you are new on Steemit then, first of all, I welcome you here. Adding a profile picture in Steemit is a bit different but it would be easy once you go through this post.

Rest of the settings are simple enough but for the purpose of completing the process, all settings are briefly covered. The purpose of this post is to help beginners set up their profiles nicely and start contributing to the community with a better profile that can be trusted and liked by community members. Faceless profiles don't particularly do very well anywhere on the internet.
How to Set Up Steemit Profile
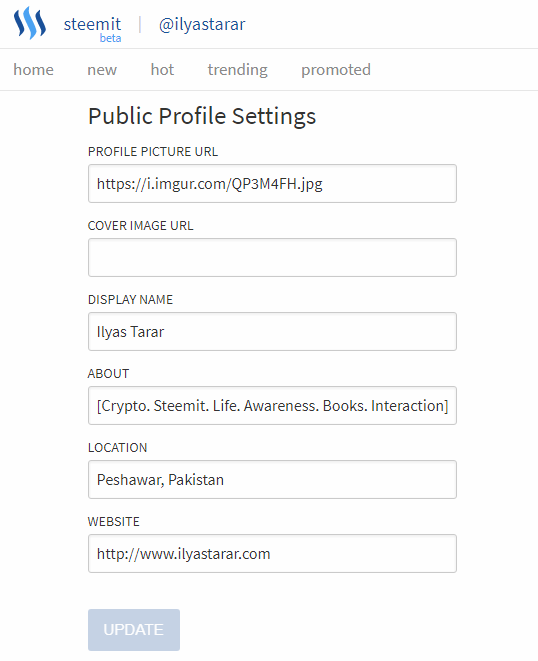
Here's a quick look at everything you need to update. The image below is from my settings page. Go to your settings page and update all the fields, or the ones you want to.

Let's see each step quickly.
- Profile Picture URL: You need to enter the image URL here. How to do that is covered in this post below.
- Cover Image URL: Covers are very recent development. Procedure is same as the ile picture.
- Display Name: Write your name. It will be your account on Steemit. You can use your own name or any name that you want to use as your account. For example @teamsteem (that's taken).
- About: Write some lines about yourself. Try to add relevant details about you, your mission, interests, and profession.
- Location: Write name of your city and/or country.
- Website: If you have a website, write it down. You can paste the link to any of your social media profile or a discord channel as well.
That's it. You are done with settings. You can change them anytime so don't worry about their permanence.
How to Add Steemit Profile Picture & Cover Photo
As the profile uploading procedure is a bit different to other social media platforms, I'll quickly cover the settings for you. Here you go.
To update profile picture, you will have to upload the image on the web first.
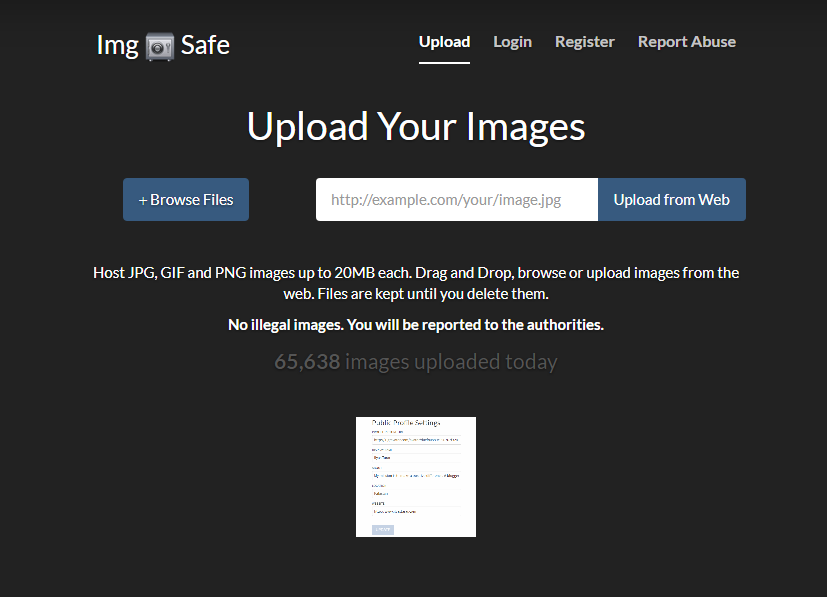
- Go to Img Safe website. If the site doesn't work, try CTRLQ website or google 'free image hosting' sites.
- From the Upload tab, click browse files and select your profile picture from the storage.
- Click upload.
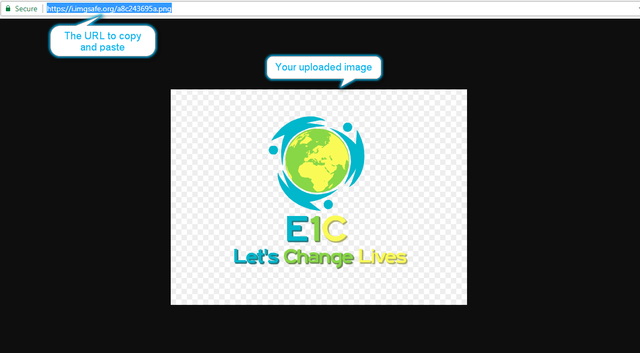
- After it is uploaded, click the image. A new window or page will open containing your uploaded picture.
- Copy the URL (website address) from the address bar.
- Paste it into the Profile / Cover Picture URL box in your settings page on Steemit.
Here's a visual guide if you didn't understand the verbal procedure or need visual aid.
Step # 1 : Upload Your Image to Image Hosting Site
Go to any of the websites mentioned above. On the Upload tab, click browse files. Select the files to upload and press the upload button below the image. (I tried signing up and signing in but it didn't work. If it works for you, great. Otherwise no need to login.)

Step # 2 : Copy / Paste the URL
Click the uploaded image. A new window will open. Copy the URL in the address bar and paste it in the Profile Picture URL box.

Note:- The image URL needs to have an image extension at the end to work (.jpg, .png etc.). Take care of that.
Conclusion
That's it. You are done with settings. I created the first such tutorial four months ago and people still comment to thank me for making the information available. It has since been seen by more than eleven hundred people.

However, the website options were limited to Img Safe only and I wanted to include more websites but couldn't because old posts cannot be edited. Hence this updated post. Here's the screenshot of the old post.
The old post is on top of the Google search pages for relevant queries. I updated the post to make the better information available to anyone who joins Steemit. Please consider upvoting and resteeming this helpful post. Thank you.

Dear Newbie Steemian,
Welcome to the platform. I am glad that hundreds of newbies find this post useful. It's been more than 7 months since this post was published but even now I keep getting comments on it, which is amazing.
When I wrote this post, I did not include any alternatives. Many people have had issues with the only website I mentioned. For this reason, I created an updated version of this tutorial with 18 options to choose from and more detailed instructions. I wanted to share the updated version in the comments so that you can go to that post for additional options.
Updated Tutorial (More Options)
To access the updated and more detailed guide, click the following link.
Link: How to Add Profile Picture on Steemit - Steemit Profile Picture Latest Guide 2018
Welcome to Steemit and have fun! Follow me to learn more about Steemit success.
With Love,
Ilyas
Thank you for this.
I’m new and would like to set up correctly.
I am also new here..
Thanks for posting this. It is very helpful.
So, I do not see these options when i go to my Settings tab. Has the platofrm updated since? Am i using the wrong key?
Thank you very much for this posting. As a newbie, I have been looking for and learning many how tos and this is super helpful! Thank you for you contribution. I have successfully set up my profile picture and am now looking to set up my cover image asap.
Welcome to Steemit and a happy stay here.
Your posting was so helpful that I decided to share it with other newbies who didn't have profile pictures or cover images. Thanks again!
...I enjoy your tutorials. However, if you wouldn't mind adding the ideal image size for the cover photo, that would be great (dimensions in pixels). As a newbie, I uploaded a cover image that looks it was too small, and has been over-stretched as a result!
The cover needs dimensions. Yes. Thank you. However, the desktop site and mobile site have different displays. I will see if I can come up with good information on that. For now, it's just hit and trial. Actually, cover photo wasn't there earlier. We only had profile picture.
ah, great... I'm not sure if the profile page is completely responsive or not... if it is, then there SHOULD be an ideal image size, and the image should then adjust based on device display. I think! :)
As a newbie that has tried several pictures for the cover photo before eventually stumbling on one that works, my advice is this: use a landscape photo rather than one having portrait dimensions. Secondly, the palette of the picture is quite important as it serves as the background for your 'about me' info. So, a neutral-colored picture or one with slightly dark tones is advisable so as to contrast effectively with the white-colored font of the 'about me' section. That's my two cents. Hope someone finds this helpful.
Interesting topic , I believe that many people will get benefit out of it.
Thanks for sharing. 🌹
Thank you very much. There were so many comments of relief on the earlier tutorial that I wanted to provide more information to people. The fact that my early post received 1104 views shows that new Steemians do find it very useful. I regularly receive comments on that post. This one will will do the same now.
This is very heltpful for a beginner like me. Thanks
Most welcome. Glad to help.
Hi. Funny but after I did update my profile images I cannot find the settings/profile in the Steem site menu. Where do I go to edit and view my profile? Thank you
The right top three bars is the site menu. Slightly left to it is your profile picture (if uploaded). You need to click that space to reveal your settings.
Can you tell me how can i create best cover pic in my steemit?
Good question. Make an account on Canva.com and make great cover photos for free.
What settings/template do you use with canva for your photos? I'm looking at the dimensions that would fit nicely on my profile. (I'm using a PC). Thanks in advance!
I used the Twitter header and made adjustments as needed. Keep your text to the middle of the header or it could be too big to be visible when you upload it to Steem. Hope this helps!
Thanks! :)
I got it dear. Best wishes...Keep posting.
Thanks for giving this information
Thank you so much for this very helpful post. Didn't know how to go about the whole profile update thingy, and then I came across your post. Just like that, my problems were solved. Thanks once again.
#Update: Don't forget to add the jpeg or jpg extension at the end of the link, fellas. I forgot and the image refused to show up on my page till I eventually figured out my mistake....some very long minutes later.
Thanks @ilyastarar for such an helpful post once again.
great information .. thanks for sharing ... really helpful