Tutorial: How To Resize Pics To Format Your Post Like A Pro
In this tutorial I'm going to cover some basics on how to size the pics within your SteemIt posts to fit the full width of the page, so that you have nice clean margins, to prettify your posts and provide a better user experience for your readers, which with any luck may also translate into some added Steem. So long as you're putting in the effort to create great content here on Steem, its worth paying attention to some of the finer details that will really make your content shine.
Here I'll cover the following tips:
- The best way to determine the correct size for a full-width pic (and I've already done it for you!)
- The free online tool I use to resize my pics, and a step by step tutorial on how to use it
- Bonus: Two more free online tools you can use to capture screenshots for editing or direct linking
Let's get started!
The first thing we want to know is what is the max-width in pixels for a full size image to take up the entire body of your post, so that the text above and below it will not overlap the images, and you will have a cleaner edge running down the right margin of your post in case you have many pics to share.
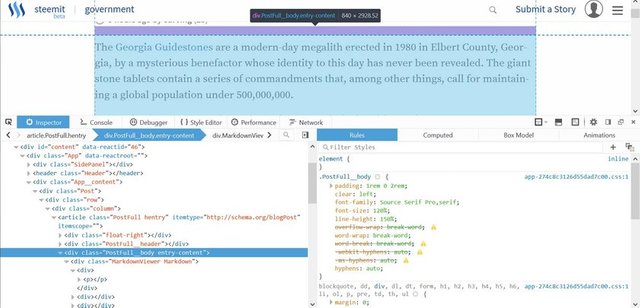
To ascertain this size, I navigated to one of my earlier posts, did a right-click, and selected the option for 'inspect element'. This opens up a window at the bottom of my browser, where I can view all sorts of code that governs the style and format of the Steem website.
Once I had done this, I found the appropriate code that specifies the main body of the post, and hovered over it with my mouse to reveal the following:
As you can see, this highlighted the exact size of the body of the post (in baby blue), and here below, I have zoomed in so that you can see the pop-up text has even specified for me exactly what the width of this section of the site is at it's max-width: 840 (pixels).
Now that I have this information, I can use it to resize all of my pics to fit the full width of my posts.
* One quick caveat. If you are resizing from smaller to larger, be careful because this will also decrease resolution and the pics may end up looking blurry if you blow them up too large. However this method is still great for optimizing very large pics down to the ideal size, or else if you have a pic that is slightly small and just need to scale it up by a small amount.
Resize Pics Tutorial
The handy, and free online utility I use to easily resize pics is located at PicResize.com. There may be other similar tools out there. If there is something better that you prefer, feel free to drop a comment below and let others know about it.
The one drawback to PicResize is that an advertisement will pop up in the left margin of the site, but you can easily escape it by clicking the little 'x' in the corner of the ad. In any case, they can be forgiven since they provide such a valuable tool for free, and of course they need to make some money on it.
Step 1
On the PicResize homepage, you'll see the following upload box. Browse to the photo you want to resize and once it is selected, click the 'continue' button as shown below:
Step 2
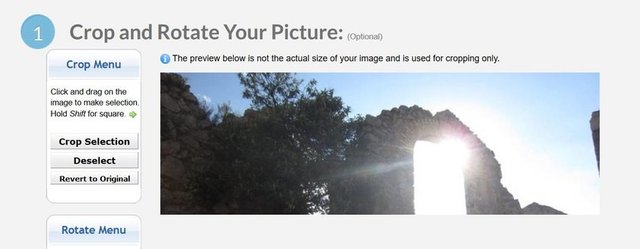
On the next screen, you will have the chance to crop your image, or even rotate it, if you choose, before resizing it. If you don't need to do either of these things, just scroll downward. Here you can see the pic I chose to resize, which was originally 1280 px in width.
Step 3
Once you scroll down, you'll see the section where you specify the amount to resize by. Select 'Custom' from the drop down menu, and then in the 'width' box, enter 840. Then hit the 'tab' key to commit the value. You can now see the size your image will take in the right-hand box has changed in the 'estimated final', as shown below.
Step 4
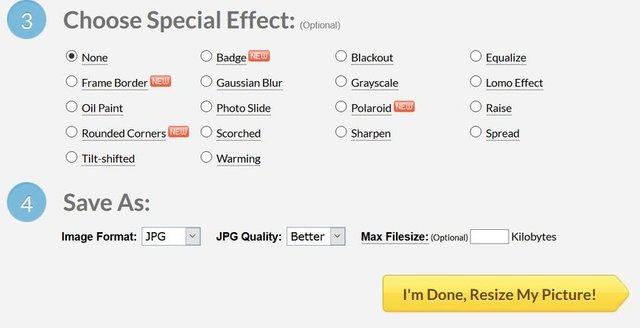
If you like, you can add special effects and filters to your photo. Otherwise, click on the button that says, "I'm Done, Resize My Picture".
Step 5
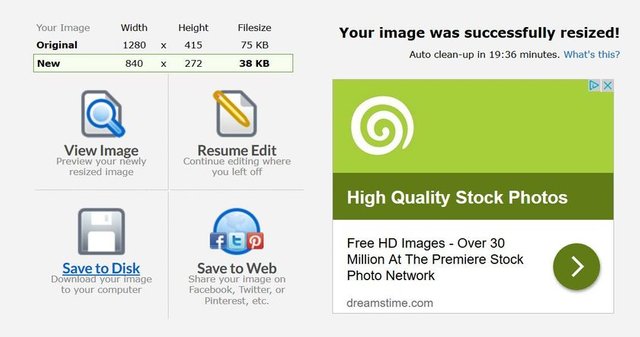
Now you're ready to save the newly resized image, which you can do here, by clicking on 'Save To Disk'.
And here is my final image, which I have subsequently edited in Gimp to add the text and arrows to show the actual size. In case you ever forget that it is 840 pixels, you can bookmark this page and come back to it any time.
Bonus Tools
Here are two other great, free online tools I turn to often when I need to get a quick screen capture, as for example with the images I posted for this tutorial, or if I need to send someone a direct link to a screenshot without having to save it to my device.
1. OnPaste - The power and ease of this utility is that you can quickly take a screenshot from anywhere on your device, then simply got to OnPaste.com, and use 'Ctrl+V' to paste it right into the tool. From there it is easy to crop the image to the area you want, and save it to your local drive. (There are some other editing tools as well, but which I seldom use myself).
2. Snag.gy - Snag.gy is the tool that I use whenever I need to send someone a screenshot of something on my local device. In the old days, I used to go through the trouble of grabbing a screenshot, then opening it in my photo editor (photoshop or paint), cropping and saving the file, then emailing it as an attachment. Nowadays, I simply go to Snag.gy, paste in the screenshot, then copy+paste the link into my emails or chats with no trouble at all.
I hope this tutorial has been helpful to some, along with the additional tools that you may find useful in your SteemIt adventures and elsewhere on the web. If you enjoyed this post, be sure to let me know in the comments. If you have any suggestions for how to improve it or would like to suggest other tools that you know of, do include that as well.


Thanks! Just had this problem today
You're welcome!
Thanks! Very useful information. One question -- how do you format images so they appear in the middle of a post? So far it hugs the right-most margins for each photo I choose. Thanks.
Thank you so much! I looked at a few image-related entries before uploading my first introductory post, and this was definitely the most helpful! Especially the sizing to fit the whole screen part.
You're welcome. Glad it was able to help you.
Great tutorial I upvoted, Here is another geat tutorial thanks
Steemit Posting Tutorial: Display any image in your Ad Title and stand out above the steemit crowd, Learn to Steemit like a Boss!
This should have more votes. Cheers!
Thank you man!
Have you tried to figure out how to get the optimal image size for Steemit that also looks good when you share the post of Facebook?
I have not, no. It seems these days Facebook doesn't often show the image for any post.
Very useful post, just what I was looking for!
Thanks @curving
Glad you got something from it!
Always useful with tips on photo editing.
Lasse Ehlers
What a super helpful, and highly detailed tutorial! Love all the visuals you provided, too. Thanks, @curving! 'Twas exactly what I needed.
You're very welcome Erika!
btw @erikaharris, I believe I may have met you in Acapulco last year, which I just realized after seeing you comment on @mikeonfire 's intro. Small world!!
Is that right? Well, hello again! Great to be re-connected here, @curving. :-)
I just joined recently, this post was very helpful. Thank you!
You're welcome. Glad you found it useful.