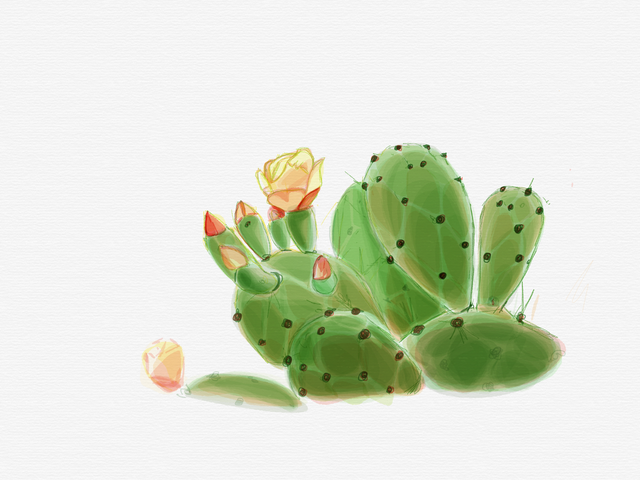
Como pinté una Chumbera, paso a paso # 3 / How I painted a Chumbera, step by step # 3
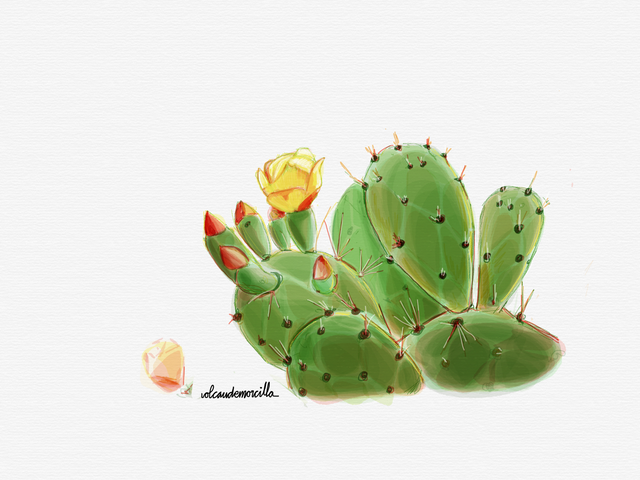
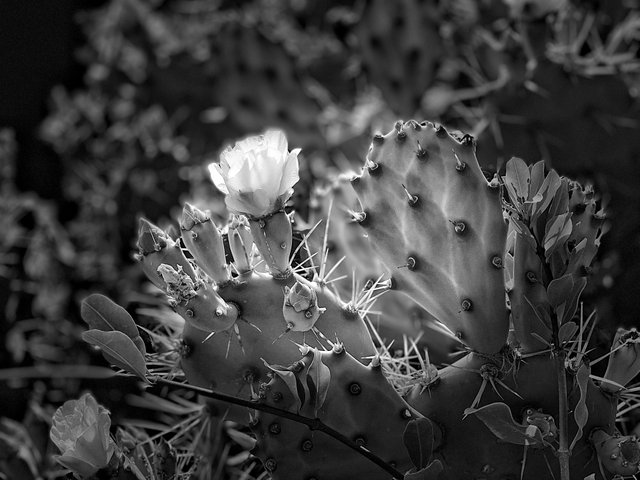
Siguiendo con el proyecto “paso paso”, hoy os voy a mostrar como pinté la chumbera que decora mi publicación que contiene el Haiku número 11.
Proyecto “Paso a paso”
Este proyecto consiste en iros mostrando cómo voy haciendo un dibujo y, a la vez, indicaros algún consejo que, tal vez, os pueda ser de utilidad.
Como os he indicado en otras ocasiones, lo primero es deciros que utilizó el programa Sketches y desarrollo la pintura en el iPad. Esta forma de dibujar me resulta práctica porque me permite dar “pasos atrás” si algo no me gusta o no me ha quedado bien.
Pintar en el iPad es mas sencillo. Todo el montaje previo a comenzar una pintura es mucho menos engorroso. También, está la ventaja de que esta forma de pintar es muy limpia y no produce olores.
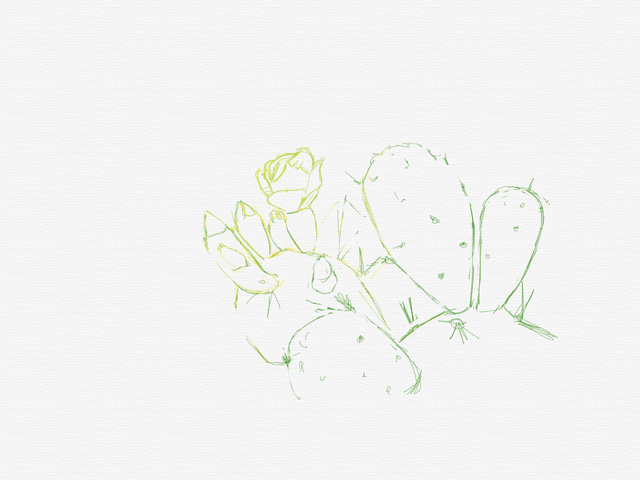
Primeramente, con la herramienta lápiz, pinté la silueta. Usando la goma y el lápiz, se puede ir mejorando y rectificando progresivamente el dibujo. Para facilitar el dibujo se puede calcar desde una fotografía porque el programa permite hacer capas.
Es muy importante el dibujo porque obtener un buen resultado se basa en tener un buen dibujo de base.
Un buen dibujo es la base de un buen resultado.
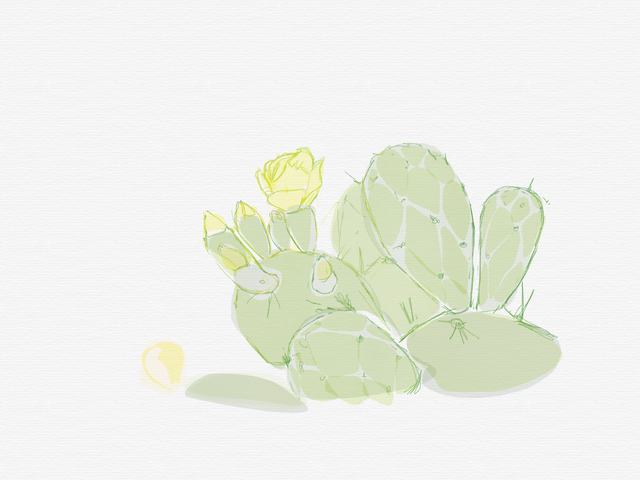
Luego fui rellenando los espacios con color. En este caso preferí utilizar sólo acuarela.
Lo bonito de la acuarela es su transparencia y sus puntos de luz. Al principio, puse el color muy transparente para ir, progresivamente, aplicando capas y aumentar su opacidad e intensidad del color.
En la acuarela, debemos pensar, antes de aplicar el color, donde quedaran los puntos mas claros y los blancos. Hay que cuidar bien donde se aplica la capa de color puesto que la acuarela no admite marcha atrás, ni rectificación.
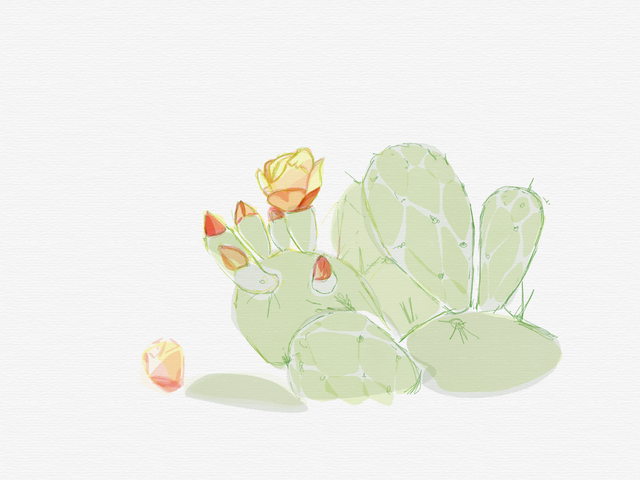
Progresivamente, fui dando diversas capas de acuarela dejando algunos espacios en blanco. Se debe planear de antemano cuáles serán las zonas de mayor color y por tanto menos trasparentes. De la misma manera, es muy importante determinar antes de comenzar a aplicar color, los espacios que quedarán en blanco o muy transparentes.
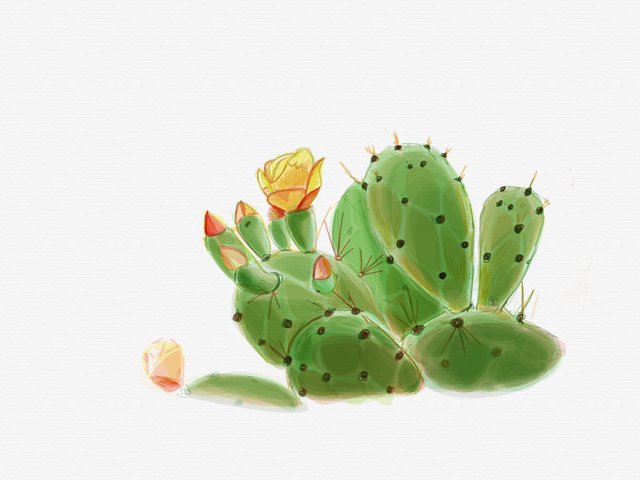
Fui añadiendo colores distintos para que no fuera todo tan homogéneo. Al final añadí pequeños toques de amarillo y de azul para resaltar las partes mas iluminadas y las sombreadas.
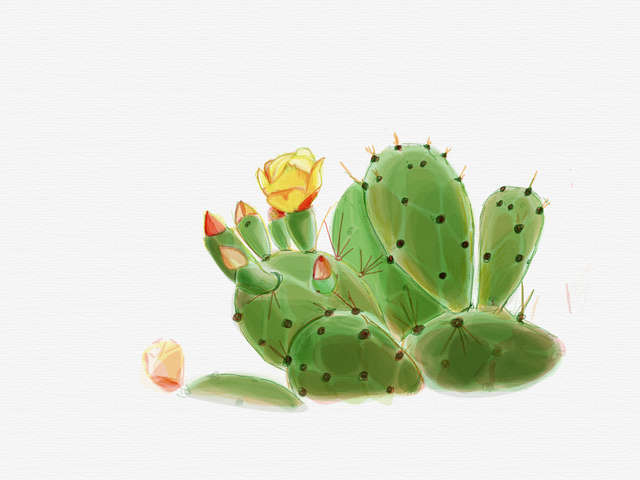
Un detalle muy importante es repetir los colores iguales a lo largo de todo del dibujo. Para integrar todas las zonas de la pintura entre sí, en todos los lados tiene que haber colores parecidos o similares.
Es decir, si se aplica un amarillo en una zona hay que repetir ese amarillo por todo el cuadro o si se aplica un rosa, ese mismo rosa debe estar sutilmente repartido por toda la pintura. Esta norma es la que aplicaba el famoso pintor Paul Cézanne en sus bodegones.
El proceso de pintura fue construyendo desde el claro al oscuro. Así, fui resaltando las zonas más oscuras y dejando sin tocar las mas luminosas.

Lo más bonito de la acuarela es su efecto de trasparencia y luminosidad.
Pretendí obtener un resultado imperfecto pero sugerente. No suele dar buenos resultados que esté todo excesivamente delimitado y perfilado. Como yo suelo decir: No me gusta que quede todo especialmente “relamido”.

Llega un momento en que la pintura está terminada. Lo importante es saber parar a tiempo y darse cuenta de que la pintura está completada, evitando así una excesiva perfección.
Espero que esta guía os haya sido útil y práctica. Si tenéis alguna pregunta, con mucho gusto os la puedo intentar contestar. De la misma forma, si me queréis dar algún tipo de consejo, también será bienvenido. Espero vuestros comentarios.
How I painted a Chumbera. "Step by step"
Continuing with the project "step step" today I am going to show you how I painted the prickly pear cactus that decorates my publication that contains the Haiku number 11.
This project consists of showing you how I am doing a drawing and, at the same time, indicating some advice that, perhaps, may be useful to you.
As I have indicated on other occasions, the first thing is to tell you that he used the Sketches program and developed the painting on the iPad. This way of drawing is practical because it allows me to take "steps back" if something I do not like or it has not stayed well.
Painting on the iPad is easier. All the assembly prior to starting a painting is much less cumbersome. Also, there is the advantage that this way of painting is very clean and does not produce odors.
First, with the pencil tool, I painted the silhouette. Using the rubber and pencil, you can gradually improve and rectify the drawing. To facilitate the drawing, it can be traced from a photograph because the program allows to make layers.
Drawing is very important because obtaining a good result is based on having a good basic drawing.
A good drawing is the basis of a good result.
Then I filled in the spaces with color. In this case I preferred to use only watercolor.
The beauty of watercolor is its transparency and its points of light. At first, I put the color very transparent to go, progressively, applying layers and increase its opacity and intensity of color.
In watercolor, we must think, before applying the color, where the clearest points and whites will remain. You have to take good care of where the layer of color is applied since the watercolor does not support reverse or rectification.
Progressively, I gave several watercolor layers leaving some blank spaces. It should be planned in advance what will be the areas of greater color and therefore less transparent. In the same way, it is very important to determine before starting to apply color, the spaces that will remain blank or very transparent.
I was adding different colors so that everything was not so homogeneous. At the end I added small touches of yellow and blue to highlight the most lighted and shaded parts.
A very important detail is to repeat the same colors throughout the entire drawing. To integrate all areas of the paint with each other, on all sides there must be similar or similar colors.
That is, if a yellow is applied in an area, that yellow should be repeated throughout the painting or if a rose is applied, that same rose should be subtly distributed throughout the painting. This standard is applied by the famous painter Paul Cézanne in his still lifes.
The painting process was building from the clear to the dark. So, I was highlighting the darkest areas and leaving the brightest without touching.
The most beautiful of the watercolor is its effect of transparency and luminosity.
I tried to obtain an imperfect but suggestive result. It does not usually give good results that everything is excessively delimited and outlined. As I usually say: I do not like that everything especially "relaxed".
There comes a time when the painting is finished. The important thing is to know how to stop in time and realize that the painting is completed, thus avoiding excessive perfection.
I hope this guide has been useful and practical. If you have any questions, I can gladly answer. In the same way, if you want to give me some kind of advice, you will also be welcome. I await your comments.

Cómo lo hago
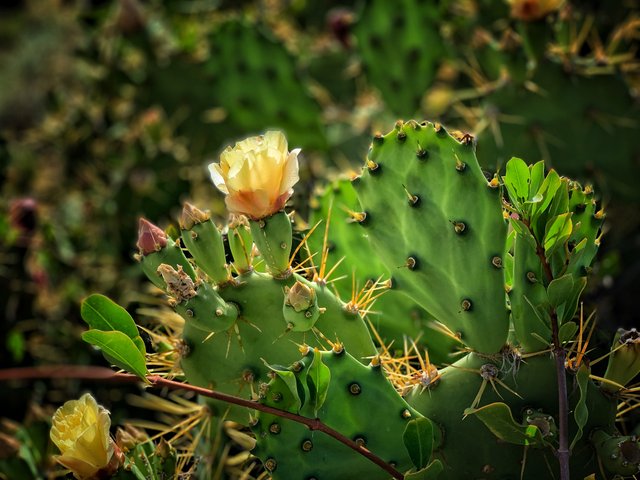
Fotografía la tomé con mi iPhone X.
Los dibujos los hice en el iPad con el programa Sketches.
For the photography I use my iPhone X.
For the drawings, I use the Sketches program and paint them on the tablet.
Si quieres ver como lo hago, visualiza estos cinco enlaces de publicaciones previas.
If you want to see how I do it, visualize these five links from previous publications.
Cómo pinté con acuarela una rosa


Original design for @talentclub de @carlos-cabeza
Las fotos son mías y originales. También, soy el autor del dibujo separador.
¡Espero tus comentarios!
The photos are originals and mine. Also, I am the author of the separator drawing.
I await your comments.
¡Buen Camino!
Esto está genial amigo, tienes un afecto al pintar sorprendente, muy buena técnica. Lo amé.
Aprecio mucho tu comentario pues para mi eres un referente y me fijo mucho en como haces tus maravillosos dibujos. Gracias 😊
Posted using Partiko iOS
Muchas Gracias, amigos 😊
Posted using Partiko iOS
Gracias por compartir tu contenido con la comunidad de El Arca (@elarca), el mismo ha sido votado por nuestra iniciativa de curación artística @stellae. Si deseas puedes delegar SP al proyecto: Delegate 25 SP Delegate 50 SP Delegate 100 SP Delegate 250SP Delegate 500SP o seguir nuestro trail de curación en Steem Auto.
Muchas Gracias amigos 😊
Posted using Partiko iOS
Muy bien captada la imagen. Parece que recreas muy bien en la mente cada detalle. No es solo cuestión de pulso y juego de colores, hace falta también creatividad y concentración.
Un poquito de todo, si. Donde mas problemas encuentro es en intentar resumir y no intentar reproducirlo todo con hiperrealismo. Es lo mas difícil, para mí. Un abrazo
Gracias por tu comentario. 😊😊
Posted using Partiko iOS
¡Saludos! Tu post ha sido votado y ha tenido resteem por el proyecto @votomasivo.
Apreciación: Me encanta tu trabajo, está muy lindo. Gracias por compartir el proceso, está buena la explicación del proceso.
¡No olvides invitar a tus amigos a unirse a nuestro trail de curación para apoyar post de calidad!
También puedes apoyanos uniéndote a nuestro fan base y delegándonos Steem Power. ↓
Sé parte de nuestra comunidad en Discord
Muchas Gracias, amigos 😊
Posted using Partiko iOS
Has recibido un upvote @celfmagazine. Proyecto de curación y revista digital de Arte y Cultura. Conoce más de nosotros clickeando en los siguientes iconos:
You have received an upvote by @celfmagazine. Curation project and Art and Culture digital magazine. Learn more about us by clicking on the icons below:
Muchas Gracias, amigos 😊. Pronto me uniré a vosotros, sin duda 😊
Posted using Partiko iOS