Como pinté con acuarela un lirio, paso a paso #1. / How I painted a lily watercolor, step by step # 1.
Desde niño me ha gustado dibujar y pintar. En realidad, todo lo que tiene que ver con la imagen, el diseño gráfico y fotográfico me apasiona.
Proyecto “Paso a paso”
He pensado un nuevo proyecto. Consiste en explicar paso a paso cómo realizo una pintura y daros algunos consejos. Tal vez alguno os resulte de utilidad.
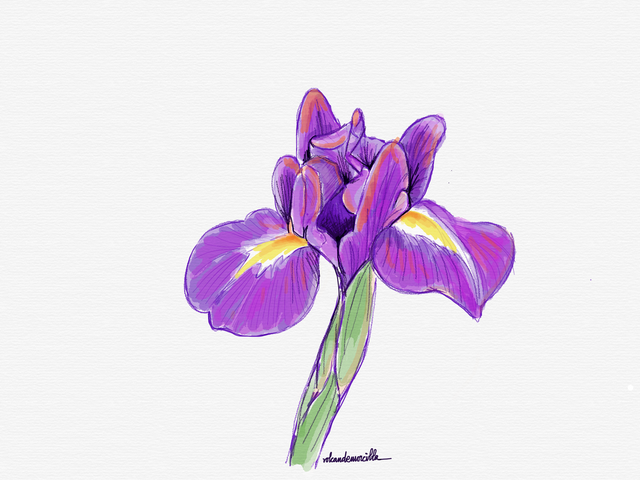
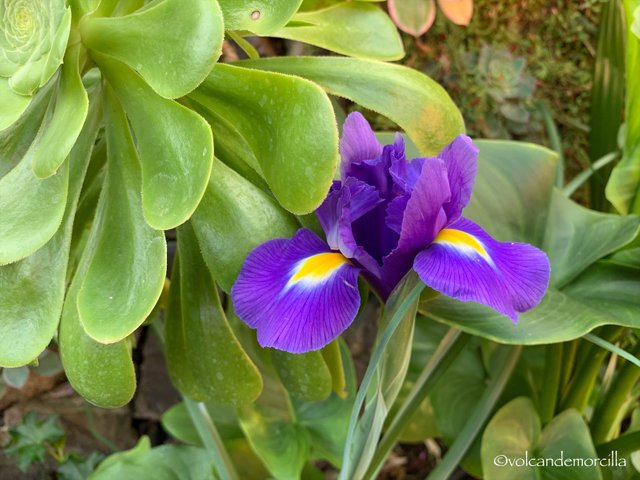
Ayer realicé el dibujo de un lirio para decorar la publicación que hice y que fue motivo de mi Haiku #9.
Hoy quiero enseñaros cómo lo hice “paso a paso”.
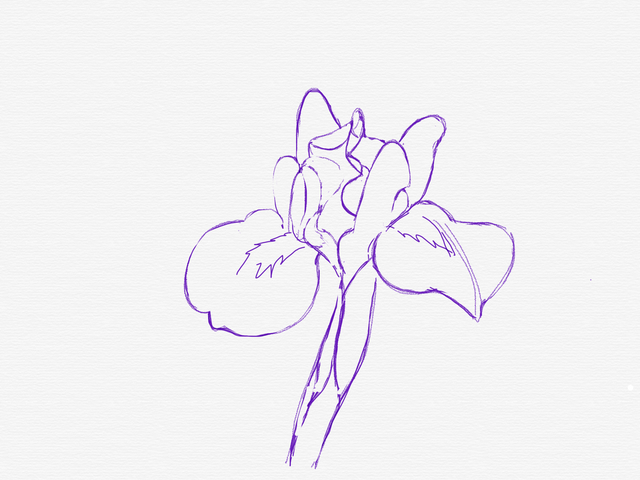
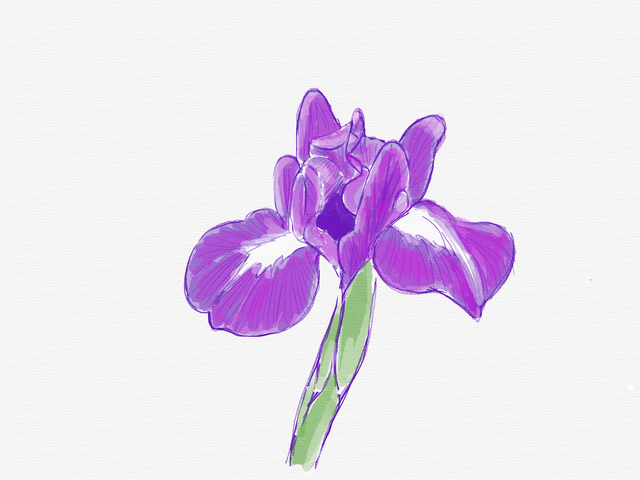
Primeramente, con la herramienta lápiz, pinté la silueta. Usando la goma y el lápiz, se puede ir mejorando y rectificando progresivamente el dibujo.
Un buen dibujo es la base de un buen resultado.
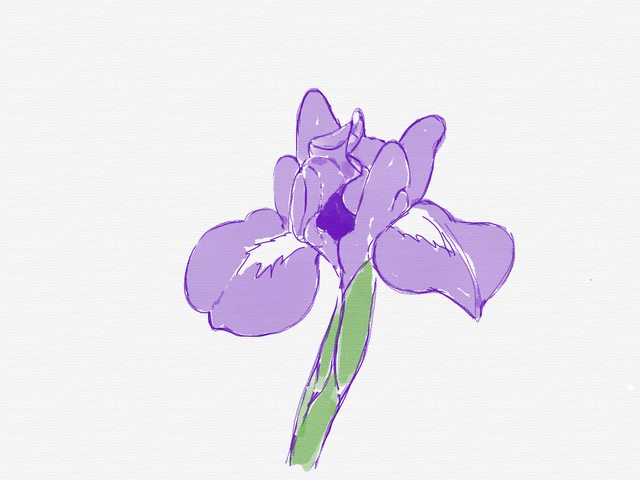
Luego fui rellenando los espacios con color. En este caso preferí utilizar sólo acuarela.
Lo bonito de la acuarela es su transparencia y sus puntos de luz. Al principio, puse el color muy transparente para ir, progresivamente, aplicando capas, para aumentar su opacidad y, por tanto, la intensidad del color.
Hay que cuidar bien donde se aplica la capa de color puesto que la acuarela no admite marcha atrás, ni rectificación alguna.
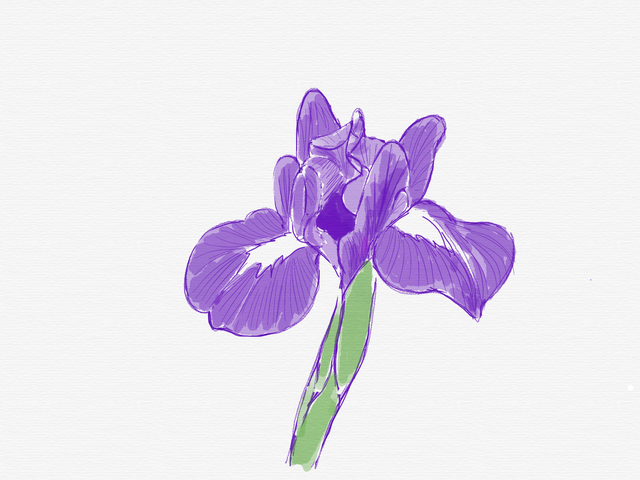
Progresivamente, fui dando diversas capas de acuarela dejando algunos espacios en blanco. Que tener en cuenta que las zonas de mayor color son menos trasparentes.

Fui añadiendo colores distintos para que no fuera todo tan homogéneo. Añadí, rojos, amarillos y azules. Hay que ir pintando todo en conjunto y a la vez.
El proceso de pintura es de claro a oscuro. Así, fui resaltando las zonas más oscuras y dejando sin tocar las mas luminosas.
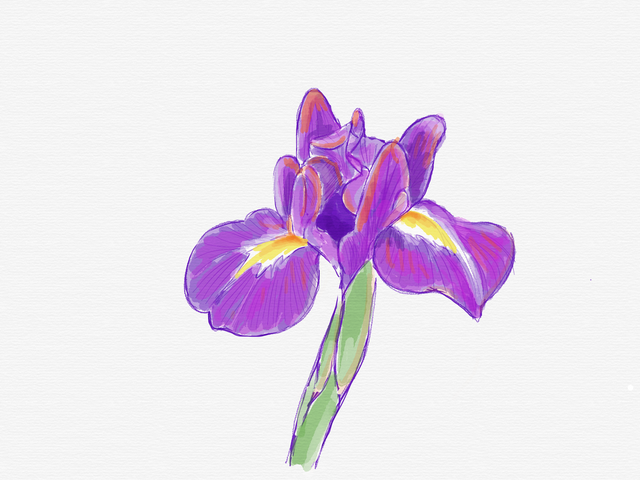
En la acuarela, siempre hay que dejar algunos espacios en blanco para resaltar la luminosidad. Son los puntos de mayor luz y hay que meditarlos y determinarlos antes de empezar a colorear.
Finalmente retoqué la silueta y los puntos más oscuros para realzar el volumen.
Espero que esta guía os haya sido útil y práctica. Si tenéis alguna pregunta, con mucho gusto os la puedo intentar contestar. De la misma forma, también será bienvenido si me queréis dar algún tipo de consejo. Espero vuestros comentarios.

How I painted a lily watercolor, step by step # 1
"Step by step" project
Since childhood I liked to draw and paint. In fact, everything that has to do with the image, the graphic and photographic design, fascinates me.
I have thought of a new project. It consists of explaining step by step how I make a painting and give you some advice. Maybe one of you will find it useful.
Yesterday I made the drawing of a lily to decorate the publication that I made and that was the motive of my Haiku # 9.
Today I want to show you how I did it "step by step".
First, with the pencil tool, I painted the silhouette. Using the rubber and pencil, you can gradually improve and rectify the drawing.
A good drawing is the basis of a good result.
Then I filled in the spaces with color. In this case I preferred to use only watercolor.
The beauty of watercolor is its transparency and its points of light. At first, I put the color very transparent to go, progressively, applying layers, to increase its opacity and, therefore, the intensity of the color.
You have to take good care of where the layer of color is applied since the watercolor does not support reverse or any rectification.
Progressively, I gave several watercolor layers leaving some blank spaces. Keep in mind that the areas of greater color are less transparent.
I was adding different colors so that everything was not so homogeneous. I added, reds, yellows and blues. You have to go painting everything together and at the same time.
The painting process is from light to dark. So, I was highlighting the darkest areas and leaving the brightest without touching.
In watercolor, you always have to leave some blank spaces to highlight the luminosity. They are the points of greater light and you have to meditate and determine them before you start coloring.
Finally I retouched the silhouette and the darker spots to enhance the volume.
I hope this guide has been useful and practical. If you have any questions, I can gladly answer. In the same way, you will also be welcome if you want to give me some kind of advice. I await your comments.
Cómo lo hago
Fotografía la tomé con mi iPhone X.
Los dibujos los hice en el iPad con el programa Sketches.
For the photography I use my iPhone X.
For the drawings, I use the Sketches program and paint them on the tablet.
Si quieres ver como lo hago, visualiza estos cinco enlaces de publicaciones previas.
If you want to see how I do it, visualize these five links from previous publications.


Original design for @talentclub de @carlos-cabeza
Las fotos son mías y originales. También, soy el autor del dibujo separador.
¡Espero tus comentarios!
The photos are originals and mine. Also, I am the author of the separator drawing.
I await your comments.
¡Buen Camino!
Te quedó espectacular amigo, me super encantó.
Muchas Gracias. Tu opinión es muy valiosa para mi que eres una gran artista. Un abrazo 😊
Posted using Partiko iOS
Debes tener un pulso extrordinario! He tratado de trabajar con el lápiz y hago de todo menos alguna figura geométrica jajaja uff! Para mí es muy difícil, será cuestiónde práctica? O existe alguna técnica? Saludos.
Hola:
Usando un lápiz digital no es tan difícil. Es como usar un lápiz o un bolígrafo normal. Prueba a ver y si te sale mal puedes dar unos pasos atrás o incluso borrarlo con la goma y rectificar.
Un abrazo
Ahhh!! ok ya entiendo, claro, pensé que utilizabas el mouse y tomabas el lápiz que supongo también puedes hacerlo, gracias por compartir tus conocimientos. Saludos
Dear friend, you do not appear to be following @artzone. Follow @artzone and get added to our voting list for valuable up-votes!
I would like to follow you but I do not know how
Muchas Gracias amigos 😊
Posted using Partiko iOS
Eres un artista!
Tal vez dibuje alguna de tus flores bonitas del pirineo. Me alegro mucho tu comentario, de verdad! Un abrazo😊
Posted using Partiko iOS
Que bien! Muchas Gracias, amigos 😊
Te quedó hermoso.
¡Felicidades!