Use your intuition: sound design intuitive experiments - episode 1

You have experienced this many times, for sure, and you just can't explain how in the world you did it. "How did I do that?", you ask yourself, oddly surprised at your sudden masterful abilities. But you shouldn't be any surprised. After all, your subconscious mind is a powerful machine capable of doing miracles for you, if you allow it to. And intuition is the master key that lets you access to that miracle maker machine.
This is not an article about intuition, though, or maybe it is. I've been recently trying out different techniques for boosting my use of intuition during the creative process, and when breaking down my own way of making music, I discovered that I was actually using intuition a lot, I was just not aware of it. For instance, every time I get stuck with a track, I listen to it several times before going to sleep. Next morning, all of a sudden, I have great and fresh ideas for fixing it. If asked why I'm doing this or that, I would say "I just feel like doing so".
One of the things that I like doing is to avoid following a script. I would just sit at the computer and try the first idea that comes to my mind, like "let's sample this sound". I would continue with "let's apply this effect", "let's sample it again", "let's change the pitch", and so on. There is absolutely no logic or rational processing and most of the times the things that I try out don't make any sense from a traditional musical perspective, and that's how I normally get those crazy sounds that I love so much.
This article is the first of a series of my documenting random "intuitive" processing, regardless of the result. This one starts with sampling a choir singing in a church in Berlin and we turn that sound into a sort of syncopated hi-hat, with several random and intuitive manipulations in between.
Example 1: from a mellow choir to a syncopated hi-hat
(note: scroll down to the bottom of the page for listening to these examples)
Stage 1: Sampling
During my last visit to Berlin, I was showing the city around to some "newbies" and as we got in the new Gedächtniskirche, a choir happened to be rehearsing there. It was the time when I was just collecting ideas for my new track and my intuition hit me immediately, "I have to record this". The result is a mellow choir singing, along with the reverberation of the church.
Stage 2: BEAP (Max/MSP)
Back from Berlin, I sat down in front of the computer with no clear idea of what to do. At that moment I remembered that I recently upgraded from Max 6 to Max 7 but didn't really explore all of its new features. The name "BEAP" popped out in my head, which is a kind of modular synthesis set that comes built-in. I skimmed over it and found "Granular". "That might be a granular synthesizer", I though, "a great way to start playing with this sampled choir". The result is a rhythmic patter similar to that of a step filter.
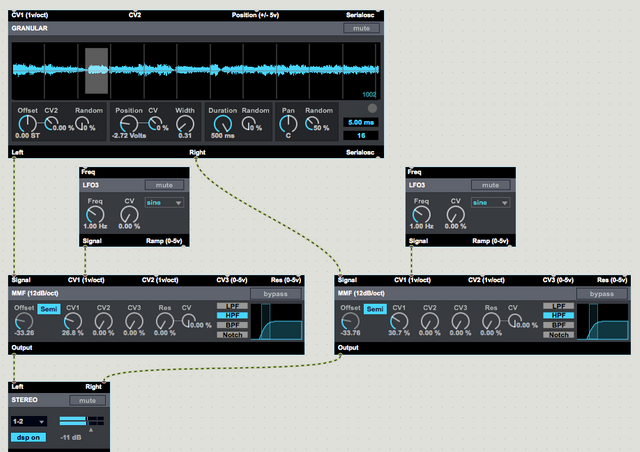
Image: Granular synthesis with BEAP (a modular synthesis emulator in Max 7)
Stage 3: Looping + pitch shifting (Ableton Live)
Sometimes, certain sounds are not interesting until they are played in a loop. Repetitive patterns create hooks, rhythms, danceable beats. The rhythmic pattern from the previous stage is a bit blurry and lame, so I took the part that I found more appealing and looped it. It was still boring, so I used Ableton Live's magic wand: transposition. As I explained in this other article, we can take advantage of the limitation of this algorithm to create interesting textures or patterns. The choir's pitch was shifted one octave above using the "Beats" algorithm, which sometimes forces the creation of subtle rhythmic patterns within the sample. The result is a more defined loop that still sounds like a step filter.
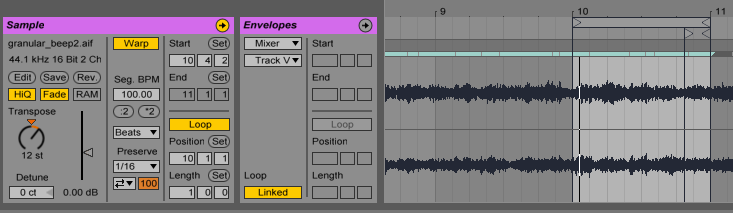
Image: Ableton Live: creating a loop and transposing it one octave above using the "Beats" algorithm.
Stage 3: Guitar pedals (Line 6 M9 Stompbox Modeler)
Whenever I have no idea of how to fix a sound that I'm not happy with, I use guitar pedals. The trick is to avoid the most obvious effects such as distortion or simple delays and go for those weird ones that guitar players never use. Traditional effects don't really bring too much to the table unless they are used in non-standard configurations, so I tend to combine the effects in non-logical ways. Not having to play the guitar at the same time gives you the advantage of having both hands free, so you can be turning two knobs at the same time and add more "movement" to the sound.
For this particular sample, I selected two neighboring effects in the group "Filter Modeler" ("V Tron" & "Voice Box", the first ones that appeared after turning the unit on) and switched from one to the other manually, according to the tempo that I wanted for the track (100 BPM). The result is a like the voice of a robot being drowned by a robot gangster for not paying the protection racket.
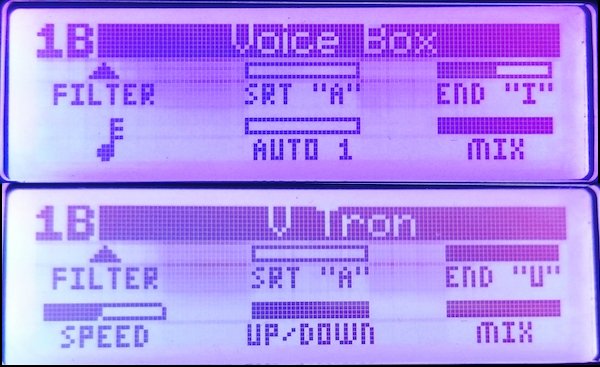
Image: Line 6 M9 Stombox Modeler. Top: Voice Box. Bottom: V Tron.
Stage 4: Bitcrusher + Drum Synthesizer (Reaktor Blocks)
Reaktor is one of these pieces of Software in which I'm not yet proficient, and I consider that to be a good factor. What I love about Reaktor Blocks is that it makes modular synthesis accessible to anyone on a budget. There are some Eurorack modules developed by Michael Hetrick that are just amazing. And the best of it all is that he made them available for free.
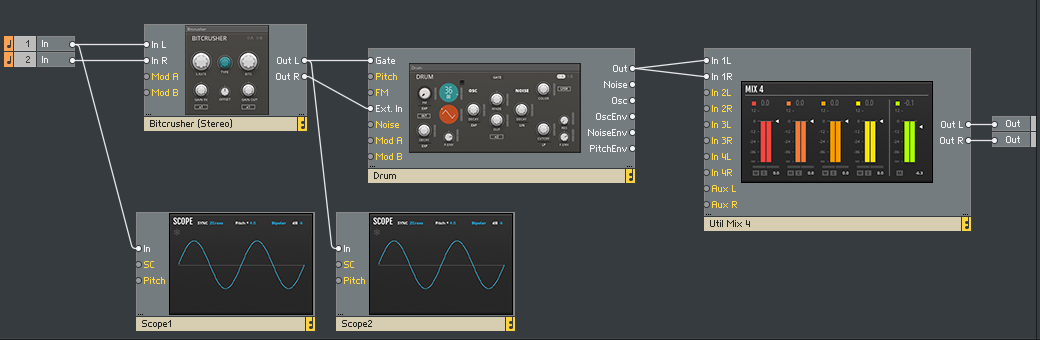
Image: Reaktor Blocks, design: Bitcrusher + Drum (both part of the "Euro Reakt 4.2" user library)
I took the sample from the previous stage and passed it through a "Bitcrusher", just because I liked the name. I was not exactly happy with the result so I grabbed another module called "Drum" and added it at the end of the chain. I loved the sounds that I got out of it, from a kick drum to a more snare-drum kind of sound. After tweaking it for a while, I stayed with a sort of hi-hat sound, slightly similar to flapping wings.
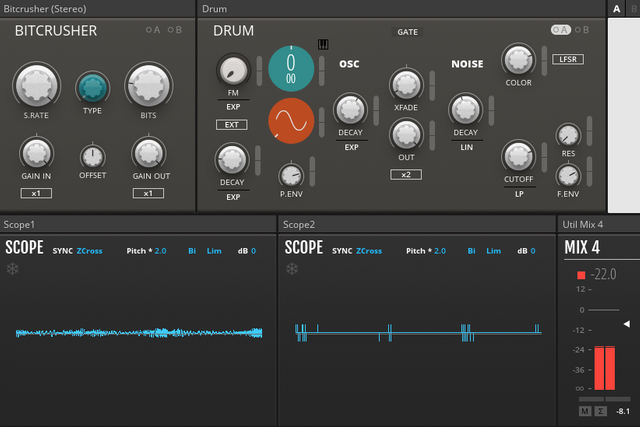
Image: Reaktor Blocks, settings: Bitcrusher + Drum
Listen to the audio track “Example 1” in the playlist at the bottom of the page, which contains the following clips:
Audio Clip 1: Stage 1 - Clean sample
Audio Clip 2: Stage 2 - The previous sample after applying granular synthesis with BEAP (Max 7).
Audio Clip 3: Stage 3 - The output from the previous stage being looped and transposed (1 octave above) in Ableton Live.
Audio Clip 4: Stage 4 - The output from the previous stage after being processed with a Bitcrusher and used as an input for a Drum synthesizer (Reaktor). What you hear is the output from the Drum synthesizer.
Audio Clip 5: The same audio clip as in "Audio Clip 4", put into a musical context.
Taking a nap
We could stop the experiment here. The final result is not exactly my definition of an exciting sound but remember that even the most dull sound can become a shiny start when put in the right context.
After finishing this experiment late at night, I went to sleep and I woke up next day with a new idea: what if I repeat the whole process again, this time having the final sound as an input? My intuition was talking to me, so I obeyed.
Example 2: from a syncopated hi-hat to an industrial riff
(note: scroll down to the bottom of the page for listening to these examples)
Stage 5: BEAP (Max/MSP)
I repeated exactly the same procedure as before, setting every parameter with the same values that were used before. The result is similar to the sound of waving an aluminium foil.
Stage 6: Looping + pitch shifting (Ableton Live)
Again, the same procedure was repeated, looping exactly at the same position and transposing the sample one octave above, and the result was a very nice industrial riff. It's a bit robotic, though, but that can be fixed with some effects later.
Listen to the audio track “Example 2” in the playlist at the bottom of the page, which contains the following clips:
Audio Clip 1: Stage 4 - The output from the previous example (Example 1 - Stage 4)
Audio Clip 2: Stage 5 - The same audio as "Audio Clip 1", after applying granular synthesis with BEAP (Max 7).
Audio Clip 3: Stage 6 - The output from the previous stage being looped and transposed (1 octave above) in Ableton Live.
Audio Clip 4: The same audio clip as in "Audio Clip 3", put into a musical context.
Taking a rest
I could have continued with the whole process, but the result from the rest of the stages would have been very similar and I'm happy with this sound. I started this whole intuitive process without any end result in mind and that's the magic of it. I believe that sound design is a lot about following your intuition. Remember, if you feel like doing something, even if it doesn't seem to make sense, do it. It's your subconscious mind talking to you, and it always has the best ideas.
Listen to the playlist on SoundCloud
Something new is coming... Stay up to date with Cracking Sound: Subscribe!
Written by Miguel Chambergo (aka Donatien Sade)
Listen to my music
Follow us on Facebook: Cracking Sound
This article was originally published in CrackingSound
Great article @crackingsound - I rely on intuition always now when creating music. We have such an infinite pallette of sounds and tools available to us with the touch of buttons, that intuition seems like the only way to decide which direction to go. And also then I know I'm somehow being truer to my unique self
Hi @greatdabu, thanks for reaching out and thanks for reading. I'm glad to hear that you follow your intuition for making music. The results are great.
Take care,
Miguel