Ableton Live magic tricks: twirl a knob and turn a voice into a beat
I was a teenager discovering the local underground scene when I heard a former punk-rocker saying in an interview that he rehearsed every song with his band at different speeds, from the original one that he conceived to faster and slower speeds. That way, he stated, they ensured that the song had the perfect speed.
I got intrigued by that approach and although I don’t really use it, there’s something similar that I do quite often: playing melodies at different octaves. For some reason, the same melody can sound terrible in one octave but amazing in another octave at the opposite end of the keyboard, especially with synthesizers.
It’s easy to switch octaves when using MIDI but when using recorded sounds… well, it all depends on the pitch-shifting algorithm. And here I’ll tell you a secret: terrible algorithms can do amazing sounds.
If you are an Ableton Live user, you might be very familiar with pitch-shifting. In this Software, “transposition”, as it’s called, is pretty easy and straight forward. At the pace of one semitone at a time¹, you can literally “transpose” any sound to any note in order to fit in your track’s chords, as easy as turning a knob is. If you have tried this feature before, you may know that it doesn’t always work well. Sometimes the sounds lose their original character and can be unrecognizable after the transposition. That may look like a limitation but it can actually work on your benefit.
Using Ableton Live’s transposition as a magic wand
As you may have noticed, the “transposition” feature has a small widget (or combo box) with the following choices: “Beats”, “Tones”, “Texture”, “Re-Pitch”, “Complex” & “Complex Pro”. It’s intended to help Ableton Live in choosing the right algorithm, because you, the producer, know better than anyone else what your sounds are about. For instance, if you are transposing percussive sounds, selecting “beats” will keep the transients that would otherwise be lost if “texture” is selected instead.
The trick, as you might have guessed, is to fool Ableton. If you have percussive sounds with very marked transients, select “texture” or “tones”. If you have a synth line, select “beats”. It’s all trial and error. However, in order to get the best out of this trick, the source sound must be complex enough to actually fool the algorithm.
Here’s how to do it:
– Select the source sound to be used as a foundation.
– Process the sound with some effects in order to get more harmonics. For instance, add some distortion, chorus, ring modulation, delays, etc. There’s no need to totally change the sound, but delays and modulation effects normally tend to confuse the algorithm more effectively.
– Transpose it to one octave above or below. Try all the choices and select the one you like the most. If one octave above or below doesn’t produce anything interesting, try two octaves (above or below). If it’s still not enough, try three or four octaves.
Some add-ons (optional):
– Create a copy of the original sound and treat it again but this time with a different algorithm. Play with the octaves until you get something appealing.
– Combine those two layers. You can even combine them with the original sound.
Is it that simple?
Yes, it is. It all sounds pretty simple and it actually is, that’s the beauty of it. Just the turn of a knob can create all that magic. Now let’s listen to some real examples.
Example 1:
For this example, I sampled my friend Анна‘s voice and processed it “a little bit” before sending it to Ableton Live. The processing chain is as follows: GRM Tools Contrast → High-Pass Filter → Compressor → Compressor → Soundtoys Decapitator → Compressor → Compressor → Octaver → Ring Modulator
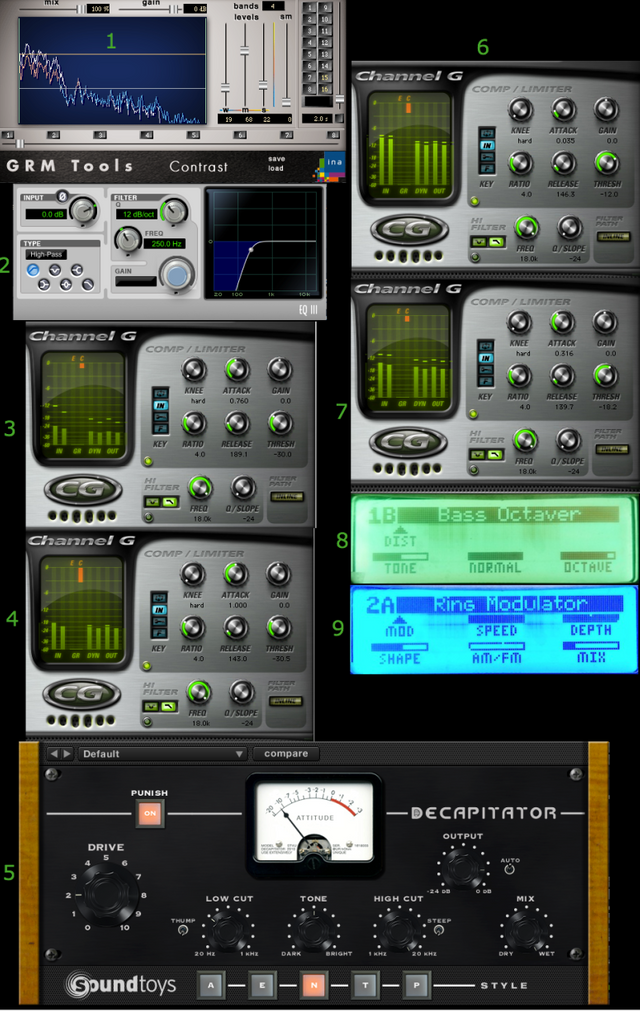
Image: Example 1: Voice – Processing chain
In Ableton, I created a loop and transposed it one octave above, selecting “Beats”. The result is amazing, a unique “industrial” sound, very organic and clean at the same time.
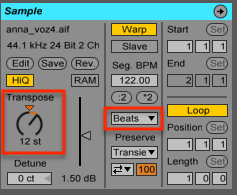
Image: Ableton Live: Transposing, one octave above, “Beats” mode.
Listen to the audio track “Example 1” in the playlist at the bottom of the page, which contains the following clips:
Audio Clip 1: Clean and untreated sampled voice
Audio Clip 2: Processed sample loop.
Audio Clip 3: The same sample as “Audio Clip 2”, only that the loop has a different starting point.
Audio Clip 4: The same sample as “Audio Clip 3”, transposed one octave above selecting “Beats”.
When listening to the result in “Audio Clip 4”, it doesn’t really seem to come from “Audio Clip 1”. There is no further processing in the audio clips (no equalization, no effects), all the magic comes from just transposing the voice from “Audio Clip 3”. This is a good example of what can be achieved with this simple technique.
Example 2:
This one is not so radical as the previous one, it’s more about creating a unique texture. For this example, I took a free synthesizer that comes with Ableton Live called “Ensemble Brass” and played a very basic chord progression. In order to get a more organic sound, the synth was processed as follows: Filter → Echo → Chorus.
I wanted it to be thick, so two copies (layers) of the processed synth were created in order to apply some layering. The first layer was transposed one octave below selecting “Tones” and the second layer, one octave above selecting “Beats”. Both layers were filtered individually, getting rid of the low frequencies and equalizing them differently. On each layer, the resulting sound has some kind of tremolo effect but unlike the standard tremolo effects, this one doesn’t seem to have a steady oscillation. When both layers are combined, we get a rhythmic and rich sound with a lot of character.
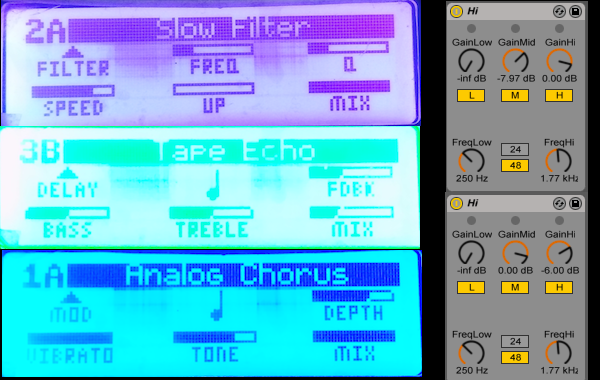
Image: Example 2. Left: Ensemble Brass – Processing chain. Top Right: EQ settings for first layer. Bottom Right: EQ settings for the second layer.
Listen to the audio track “Example 2” in the playlist at the bottom of the page, which contains the following clips:
Audio Clip 1: Clean and untreated synthesizer
Audio Clip 2: The same synthesizer as “Audio Clip 1” passed through an effects processor (see image above).
Audio Clip 3: Layer 1: the processed synthesizer after being transposed one octave below selecting “Tones” and equalized (see image above).
Audio Clip 4: Layer 2: the processed synthesizer after being transposed one octave above selecting “Beats” and equalized (see image above).
Audio Clip 5: Both layers combined (“Audio Clip 3” + “Audio Clip 4”).
Bonus track
Example 3:
If we combine both examples (the sampled voice turned into drums + the “textured” synthesizer) and we add a few more sounds (some kick drums here and there), we get this catchy rhythm that people can dance to in a party.
(This example is a rough excerpt of Donatien Sade’s upcoming new track).
Genuine mistakes
Sometimes, using software correctly can be too boring. Quoting David Bowie,
(…) I found that the most interesting aspect of the new music that we were doing at that time was actually working with synthesizers but throwing the manuals away so we had no idea how the damn things worked, and it was the mistakes that they made that we found more interesting (…).
That pretty much sums it all up. I’m always keen to exploring every piece of software and gear in ways and configurations that are not supposed to be used. It’s when escaping the “standard mode” that most of the interesting sounds are born.
Something new is coming... Stay up to date with Cracking Sound: Subscribe!
Written by Miguel Chambergo (aka Donatien Sade)
Listen to my music
Follow us on Facebook: Cracking Sound
This article was originally published in CrackingSound
————————
1: For fine-tuning at smaller divisions, the widget below the “transposition” knob allows to adjust the pitch at cent intervals.
Good one nice read. I am a big Ableton fan too and have come from using Cubase and Protoolson on past projects... but for studio work, making tracks and creating sound tracks, mainly for VR. I still think Ableton is a far quicker program to use for everything, especially with a lot of outboard synths which i run into a RME, which I find is the best audioboard with entry level pro quality AD/DA convertors.
Hi @beespace,
I also come from Protools and still use it for recording and mixing. For trying out ideas, though, I agree with you and also think that Ableton Live is far quicker. I love trying things out there and see how they blend in together.
Thanks for reaching out.
Take care,
Miguel
i like how you personify Live... "fool Ableton" hah.
extending on the topic of voice range (changing the octave a melody is played in or transposing a sample) i agree that some voices will sound better in different registers but what might also be important to consider is what else is happening in the song in each range. this is also called "tessitura" and most clear productions do not have many parts conflicting or overlapping tessitura. Especially in a vocal piece, it helps a ton to leave a window open for the vocal range, most importantly the intelligibility range, in most cases 1kHz-4kHz (if you want lyrics to be understood easily ).
anyway, the idea of not using tools how they are intended, is a powerful one.
Hi @donmoyer, thanks for reaching out.
Lots of my favorite producers leave that window open for vocals. There's one mastering engineering that told me once the same thing (he didn't use the term "tessitura", though). He was giving advice to producers and he commented on how important it is not to have frequencies "competing" with each other. I totally agree with that.
Mixing and production is a huge topic, and this article was rather oriented around sound exploration and creative uses of the transposition algorithm.
Thanks for your insight.
Take care,
Miguel