Digital watercolor step by step made in Adobe Photoshop.
Feliz inicio de semana para todos. En esta ocasión me gustaria mostrarles paso a paso como hacer una ilustración digital para que parezca hecha en acuarela. La presente ilustración fue hecha para un libro que muestra a los niños según su signo zodiacal (en este caso al ilustración representa al signo "Cancer")
Happy start of the week for everyone. This time I would like to show you step by step how to make a digital illustration so that it looks like watercolor. This illustration was made for a book that shows children according to their zodiac sign (in this case the illustration represents the sign "Cancer")

Para seguir paso a paso la presente ilustración necesitaran los siguientes utencilios:
1-Libro de bocetos,
2-Lapiz, sacapunta y borrador,
3-Tabla digital, en este caso use una Wacom Bambo Fun.
4-Conocimientos básicos de Adobe Photoshop. Conocer como manejar las Capas.
5-Textura de papel de acuarela o papel texturizado.
To follow this illustration step by step, you will need the following tools:
1-Book of sketches,
2-Pen, pencil and eraser,
3-Digital table, in this case I use a Wacom Bambo Fun.
4-Basic knowledge of Adobe Photoshop. Know how to handle the layers.
5-Texture of watercolor paper or textured paper.

1- Hacemos la ilustración a la lapiz en nuestro libro de bocetos. E este punto no es necesario tener una ilustración con demasiados detalles. Es un boceto básico que en los siguiente pasos será mejorada. Esta ilustración servirá como refrencias en los siguientes pasos.
1- We make the pencil illustration in our sketch book. At this point it is not necessary to have an illustration with too many details. It is a basic sketch that in the next steps will be improved. This illustration will serve as references in the following steps.

2- Escaneamos la ilustración (o te tomamos una fotografía). llevamos la imagen al computador y creando un nuevo proyecto en Adobe Photoshop. Las especificaciones son 20cms x 20cmx a 300 de resolución en modo de color RGB. Tendremos una capa de fondo que es el color blanco de la composición (layer name: "Fondo"). Encima de esa capa inicial ubicaremos el boceto (layer name: "Sketch"). Bajaremos la opacidad de la ilustración a un 30%.
2- Scan the illustration (or we take a picture). We take the image to the computer and create a new project in Adobe Photoshop. The specifications are 20cms x 20cmx to 300 resolution in RGB color mode. We will have a background layer that is the white color of the composition (layer name: "Fondo"). Above that initial layer we will place the sketch (layer name: "Sketch"). We will lower the opacity of the illustration to 30%.

3- Crearemos una nueva capa con el nombre de "INK". Esta capa será la ilustración lineal en negro. Recomiendo usar una tabla digital (Wacom Bamboo o Intous) para poder hacer el "Inking". Si no tienes una tabla digital es posible usar el "mouse" para este proceso de entintado, sin embargo, de esta manera será un proceso lento. Usaremos la herramienta "Brush" en Adobe Photoshop. Color negro. Para aquellas personas que tienen conceptos básicos de los "brushes" y desean saber mas de como usarlos en este proceso de entintado puede ver el siguiente enlace para mayor aclaración. https://community.wacom.com/inspiration/blog/2014/may/guide-to-working-with-brushes-in-photoshop
3- We will create a new layer with the name "INK". This layer will be the linear illustration in black. I recommend using a digital table (Wacom Bamboo or Intous) to do the "Inking". If you do not have a digital table it is possible to use the "mouse" for this inking process, however, in this way it will be a slow process. We will use the "Brush" tool in Adobe Photoshop. Black color For those people who have basic concepts of "brushes" and want to know more about how to use them in this process of inking can see the following link for further clarification. https://community.wacom.com/inspiration/blog/2014/may/guide-to-working-with-brushes-in-photoshop

4- El siguiente paso es agregar un color plano a cada elemento de la ilustración. Para ello es indispensable que la capa "INK" sea la primera en la lista de capas: de esta manera la linea negra del dibujo se veria encima de cualquier color que se aplique. Los siguientes pasos sos: 1-Ocultar la capa del boceto "Sketch" (se oculta la capa haciendo click en el simbolo del ojo al lado de la capa). 2- Debajo de la capa "INK" craremos un grupo llamado "Color". Cada color tendra su capa propia. Una capa para la piel, otra capa para el cabello, otra capa para la ropa, y asi sucesivamente. Recordar que la capa "INK" debe estar por encima de todas las demas capas.
4- The next step is to add a flat color to each element of the illustration. For this, it is essential that the "INK" layer be the first in the list of layers: in this way the black line of the drawing would be over any color that is applied. The following steps are: 1-Hide the layer of the sketch "Sketch" (the layer is hidden by clicking on the symbol of the eye next to the layer). 2- Under the "INK" layer, let's create a group called "Color". Each color will have its own layer. A layer for the skin, another layer for the hair, another layer for the clothes, and so on. Remember that the "INK" layer must be above all other layers.

5- El siguiente paso es agregar sombras y textura a cada capa de color como si fuera una ilustración hecha en acuarela. Para ello vamos a usar pinceles de Photoshop de acuarela. Los pinceles que use para esta ilustración los pueden descargar en el siguiente link: https://we.tl/alJeDfn9NL
Tambien puede conseguir una gran variedad de pinceles de acuarela en el siguiente enlace:
https://cssauthor.com/free-watercolor-photoshop-brushes/
Para aquellas personas que no saben cargar pinceles en Adobe Photoshop pueden revisar el siguiente enlace y seguir los pasos: http://akvis.com/en/photoshop-tips/load-brush.php
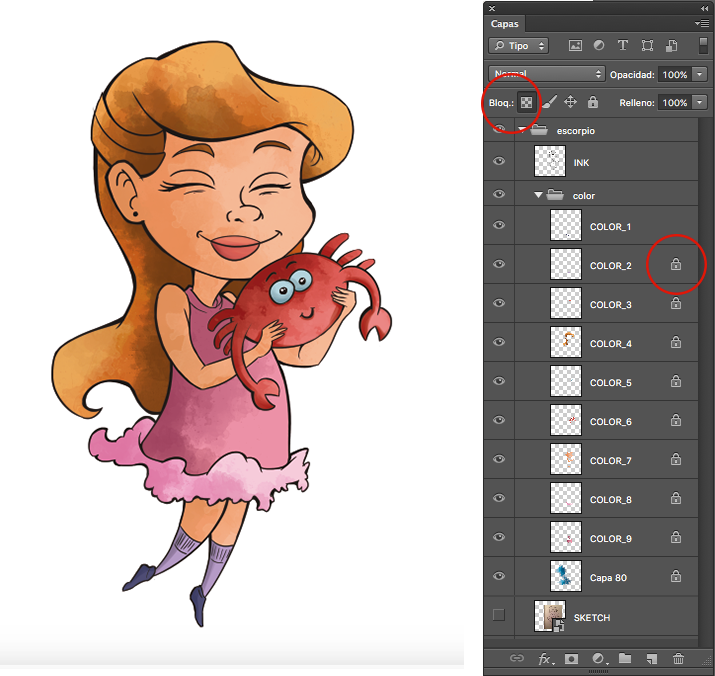
TIPS: A modo de recomendación para esta etapa sugiero antes de agregar cualquier sombra, Bloquear cada capa de color. Seleccionando una capa y presionando la opción de Bloquear capa (ver la imagen) se creara un simbolo de candado en la capa de color.
5- The next step is to add shadows and texture to each layer of color as if it were an illustration made in watercolor. For this we are going to use watercolor Photoshop brushes.
The brushes I use for this illustration can be downloaded at the following link:
https://we.tl/alJeDfn9NL
You can also get a wide variety of watercolor brushes at the following link:
https: //cssauthor.com/free-watercolor-photoshop-brushes/
For those people who do not know how to load brushes in Adobe Photoshop can check the following link and follow the steps: http://akvis.com/en/photoshop-tips/load-brush.php
TIPS: As a recommendation for this stage I suggest before adding any shadow, Block each layer of color. Selecting a layer and pressing the Lock layer option (see the image) will create a padlock symbol in the color layer.
6-Podemos agregar mas detalles a la ilustración. Una mancha de acuarela e incluso el simbolo del zodiaco en otra capa.
6-We can add more details to the illustration. A watercolor stain and even the symbol of the zodiac in another layer.

7- En el siguiente paso mostrare como agregar la textura del papel de acuarela para que parezca lo mas posible a esta tradicional técnica de ilustración manual. Crearemos una capa nueva encima de todas las demas capas que se llamara "textura" y colocaremos la imagen de la textura del papel de acuarela. Esta capa tapara todas las demas capas inferiores.
7- In the next step I will show how to add the watercolor paper texture to make it look as much as possible to this traditional manual illustration technique. We will create a new layer on top of all the other layers that will be called "texture" and we will place the image of the texture of the watercolor paper. This layer will cover all the other lower layers.

8- Despues de eso seleccionaremos la capa de papel de acuarela e iremos a modo de color y usaremos la opción de "multiplicar" esto significa que la capa se fusionara con las capas que estan debajo de ella misma. Luego de esto bajaremos la opacidad de la capa de textura de acuarela a un 60% y de esta manera ya tendremos una ilustracion digital que pareciera hecha en acuarela.
8- After that we will select the layer of watercolor paper and we will go to color mode and we will use the option of "multiply" this means that the layer will merge with the layers that are under it. After this we will lower the opacity of the watercolor texture layer to 60% and in this way we will have a digital illustration that looks like watercolor.

Espero que les haya gustado este tutorial. Es mi primer tutorial paso a paso en Steemit. Si te gusto puedes upvote este post y comentarlo. Agradecido con ustedes de su apoyo. Tambien pueden seguirme y ver mas trabajos de ilustracion de mi autoria en mi instagram: https://www.instagram.com/abrahmatan/
La ilustraciones de este post son propias de mi autoria. Por favor no usarlas a menos que se atribuya y se nombre al creador.
I hope you liked this tutorial. It's my first step-by-step tutorial on Steemit. If you like you can upvote this post and comment. I am grateful to you for your support. You can also follow me and see more illustration works of my authorship in my instagram: https://www.instagram.com/abrahmatan/
The illustrations in this post are typical of my authorship. Please do not use them unless the creator is attributed and named.
You've received an upvote from @slothicorn! Click Here to Read our New Curation Policy And Updated Rules
(@justatouchfey) ((.)ω(.))
Thanks @slothicorn to upvote to my work. I really appreciate it. I am going to post more digitalart and tutorials.