Self-Publishing with ProWebWriter on a $0 Budget - Part 3 - Uploading to Kindle Direct Publishing (KDP) Platform
Hello! You've stumbled upon a series I'm working on for the Steemit community on how to self-publish your book to Amazon, as well as other channels, on a ZERO budget.
If you missed the first two parts, here you go:
Please read through the entire post before your get started...and probably Parts 1 and 2 as well if you're new around here.
What You Will Need for Part 3
- A KDP account - https://kdp.amazon.com/
If you already have an Amazon account, you can sign in with those existing credentials. Otherwise, you will need to create a new account. - Your manuscript in Word doc format
- Your cover in JPG format - We created this in Part 2. If you used a different method to have your cover created it, it should still be in JPG format and sized to 2813 x 4500 pixels
- (Optional) A description of your book in 4000 characters or less - You will be required to type a description, whether you do it beforehand or on the fly is up to you. Here's a character counter for your convenience.
What You Will Learn in Part 3
- How to upload your files to KDP and create your book listing
- How to determine royalties and pricing
- How to select categories
- About Kindle Select
Are You Ready?
Today is the day. You become a published author once you complete this process. How does it feel? Great, right?
Let's do this!
Step 1. Log into KDP.
Your dashboard should default to your Bookshelf, but if not, click the Bookshelf tab in the navigation at the top of the page.
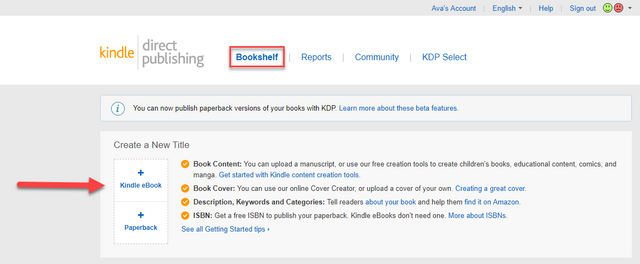
Step 2. Click the + Kindle eBook button as indicated in the image above. At the top of the page, you'll see that KDP breaks up your eBook listing into 3 sections:
- Kindle eBook details
- Kindle eBook content
- Kindle eBook pricing
NOTE: I'm going to run through each section step-by-step.
Kindle eBook Details
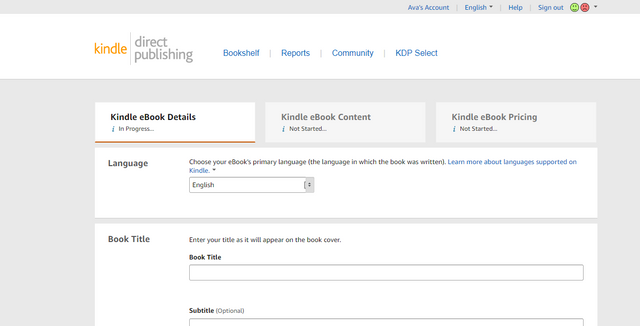
Step 3. Select the language your book is written in. Type your book title and subtitle. Fill in the Series information. (See below image for additional information on filling out this section.)
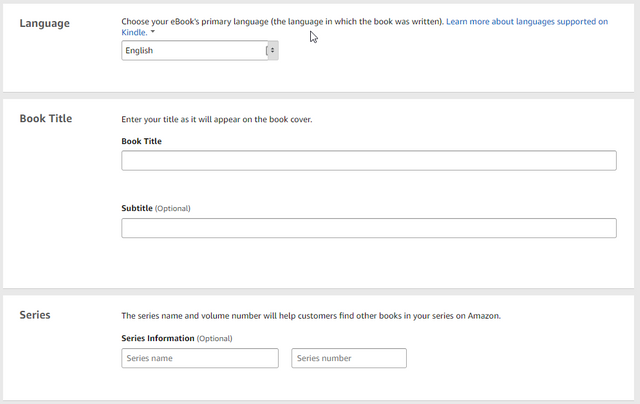
Select your language using the simple drop-down menu.
Type the title of your book in Title case.
Type the subtitle. This is optional. If your book doesn't have a subtitle, leave this blank. I suggest always including a subtitle that includes your keyword or gives more information about the topic of your book, but I don't recommend keyword stuffing like in this example:
The information you include about your book should always be for the reader to give them additional information on your work. None of these sections are intended for gaming the Amazon algorithm and using them in that manner will only cause you problems later on.
If your book will be a Series, type the name of your Series and "Book 1" or just "1" to indicate where the current title you're listing fits in that Series.
Step 4. Type the Edition number. Type the first and last names of the primary author. Enter information about anyone who contributed to your book. (More information below the image.)
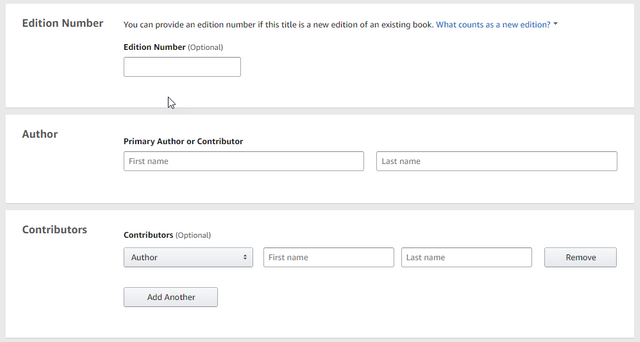
The Edition number is optional, but I usually put 1 in the chance that I make revisions to my book later on. At that point, I would enter 2 and so on.
Type your first and last name or that of your pen name into the Primary Author or Contributor fields.
Contributors are also optional and since the focus of this series is on a ZERO budget, I assume you don't have any. For future reference, this is where you can credit your Editor, Translator, Illustrator or any other contributor you would like.
Step 5. Type the description of your book. Click the radio button to indicate your publishing rights. (More info below image.)
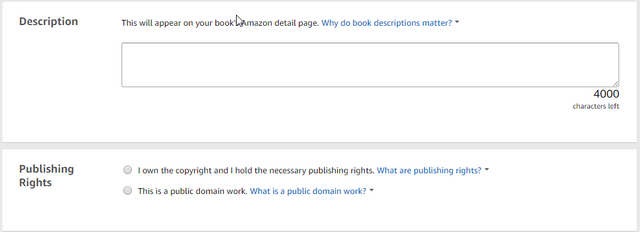
Type your description in 4000 characters or less. A pre-written description comes in handy here. You can simply copy and paste it into the text box.
Writing a book description can be an entire course in and of itself. It's not unlike writing an SEO article for the web. The most important thing to keep in mind when writing your book description is that this is a very significant selling tool for your book. It needs to be clear, concise, and informative. Include copy that will make them want to buy the book to see more. Don't keyword stuff...write this for the reader only.
Click the radio button to indicate your publishing rights. Ideally, this will be the first one.
Step 6. Type 7 keywords pertaining to your book. (More info after image.)
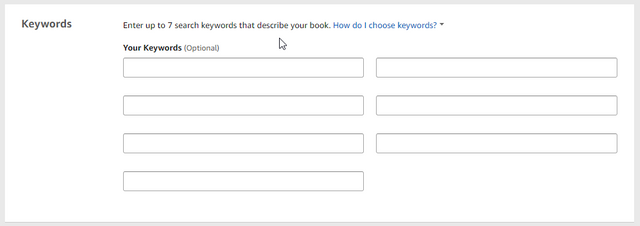
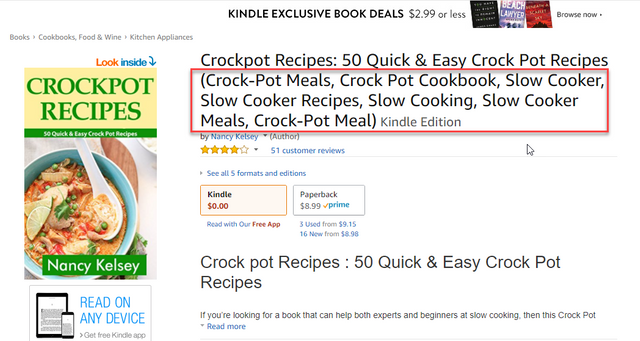
Again, keywords are more than just a passing thought. These terms are what pulls up your book in the Amazon search results. I'm going to use our example from Part 2 of this series.
Remember, we created a fake book idea so we could create a cover. Fading Sky is about a pilot who disappears into thin air and fits into the Mystery, Thriller, and Suspense genre.
My method for choosing keywords is simple. I go to the Kindle Store and I type keywords pertaining to my book into the search box and let the auto-suggest help me. These are terms that people are already typing into Amazon to find books. Let's try it with our example.
What I typed: What was suggested:
missing air missing airplane
airplane airplane books
airplane thrillers
airplane fiction
aviation aviation thrillers
aviation books
aviation fiction
aviation adventure
There are my 7 keywords and one to grow on!
What you should NOT include in your keywords:
- Another author's name (or anyone's name for that matter)
- Another author's book title
- Brands
Here's more from Amazon about keywords.
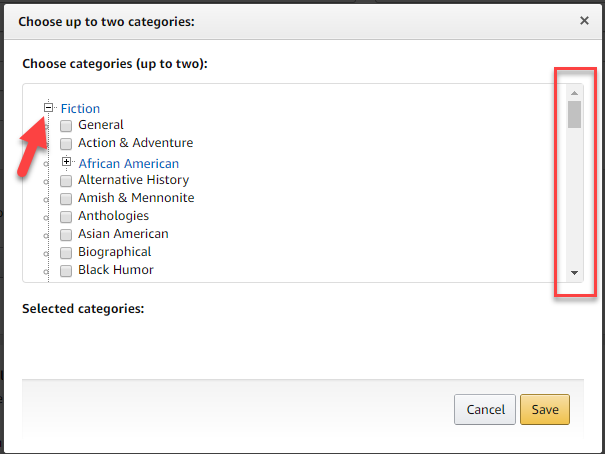
Step 7. Set your categories. (More info after image.)

Ugh, my least favorite part!
As you gain more experience with Kindle Direct Publishing, you will notice a few things. With categories, you will notice that you book is often listed in categories you didn't set. You will also find it nearly impossible to look at a book on Amazon in your genre and be able to match its categories.
KDP uses the BISAC Subject Headings List for categories which is pretty much the standard for the publishing industry.
Figuring out where your book fits is pretty much trial and error. Luckily, we only have to figure out two categories. Let's use our example and see what we can find.
In our case, we will click the + next to Fiction to view the sub-categories.
So in keeping with our Mystery, Thriller and Suspense genre, I scroll to M in the list. Right away, you will notice that these categories also do NOT match the genres on Amazon. I'm stuck with Mystery & Detective.
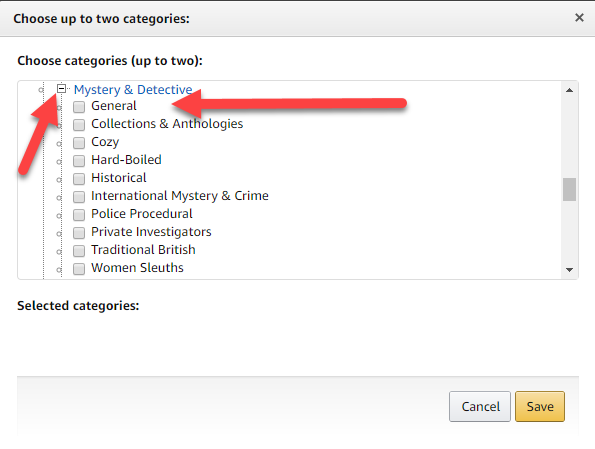
I'm going to go with General here since none of the others seem to fit my example. What is Hard-Boiled, ha!?!
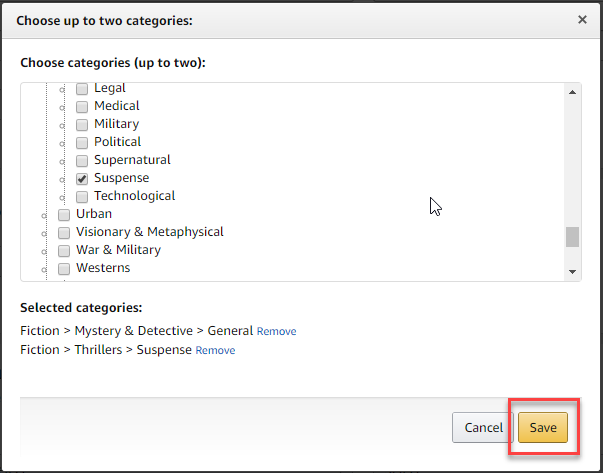
If I scroll down a little more, I run into the Thrillers. I'm going to choose Suspense here. You can see how my previous selection was added at the bottom of the window under Selected Categories.
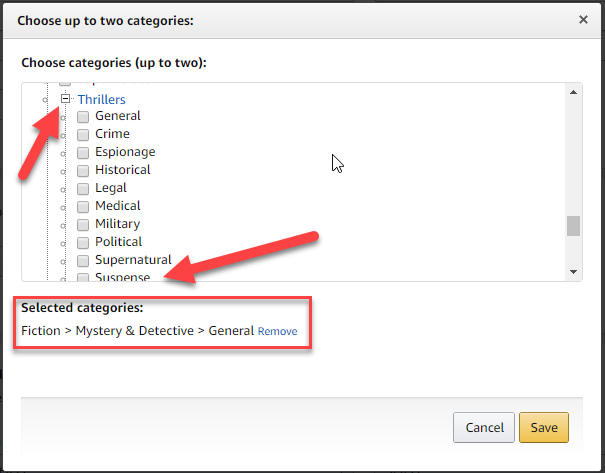
Once you've selected your 2 categories, click Save.
Step 8. Dance a little jig, pat yourself on the back because the hard part is over!!! *confetti
Step 9. Set your Age and Grade range. Specify if your book is available now or for pre-order. (More info after image.)
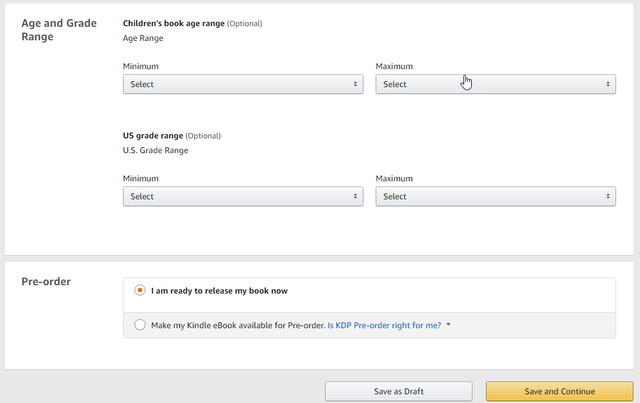
There are only two instances in which I would consider setting an Age and Grade:
- Your book is for children
- Your book is explicit (set for 18+)
Otherwise, ignore this section. Choosing specifics here can limit the distribution of your book.
Click the radio button that best specifies the availability of your book right now. In most cases this will be I am ready to release my book now. Pre-orders are kind of an advanced feature once you've built your audience and platform.
Click Save and Continue.
NOTE: At this point, you can stop and come back to complete the process at a later time. Simply log into your KDP account and click your title in your Bookshelf to continue.
Kindle eBook Content
Congratulations! You have graduated to the next section!
In this section, we will be uploading your manuscript and cover files, so have those ready to go!
Step 1. Upload your manuscript in Word doc file format. (More info after the image.)
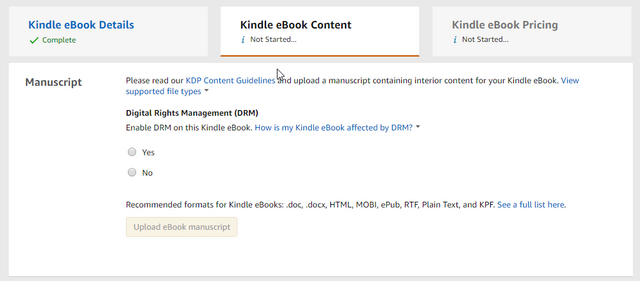
While KDP does accept multiple file types, I have found that Word is the easiest to work with because you will most likely need to make changes. It's a lot easier just to pop over to Google Docs, make the change, and re-download a new Word file than to mess around with PDF, epub files, and other stuff in my opinion. Then you just re-upload the new file and run the same checks again.
Click the radio button next to Yes or No for Digital Rights Management or DRM.
I always click Yes here. What DRM does is encrypt your file so it only works if it's been purchased from Amazon for a Kindle device or app. While this doesn't totally prevent piracy, it does make it a lot more difficult.
Click the yellow Upload eBook manuscript button. Navigate to your file on your computer and upload it.
KDP will upload your manuscript and process the file while you continue on.
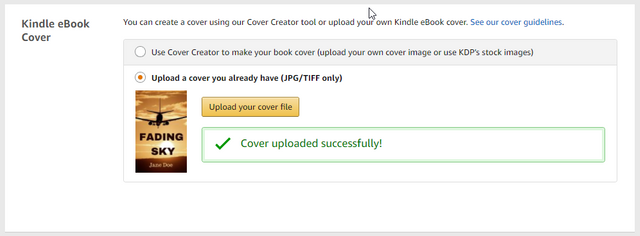
Step 2. Upload your cover file. (More info after image.)
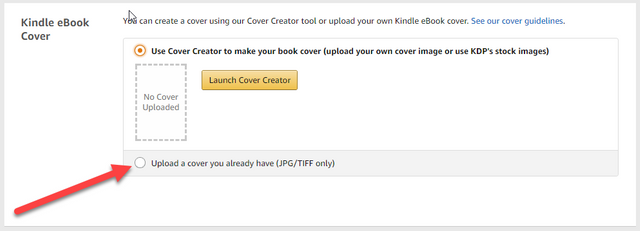
Click the radio button next to Upload a cover you already have.
Click the yellow Upload your cover file button.
KDP will upload your cover and process your file.
Step 3. Scroll back up to the Manuscript where you previously uploaded your manuscript file and check to see if KDP found any spelling errors in your file. (More info after image.)
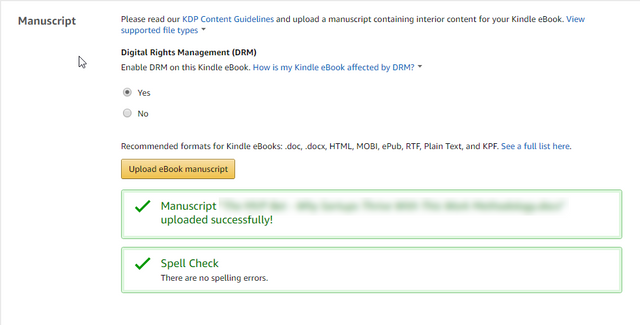
I used a dummy file here...that's why it's blurred out. You can see KDP didn't find any spelling errors. If it does, you will be able to view them here.
Then you can either fix them in your manuscript on Google Docs and re-upload a new file and/or disregard any that you need to. In the case of fiction books, made-up names and places will appear as typos here.
Scroll back down. You should notice that your cover file is uploaded, processed, and now appearing as a thumbnail in the Kindle eBook Cover section.
Step 4. Preview your book in the Previewer. (More info after image.)
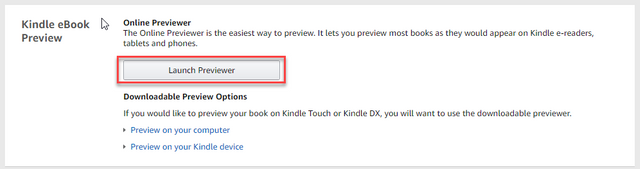
Click the Launch Previewer button to take a look at how your book will look on various Kindle devices.
You can choose Tablet, Phone, or Kindle E-reader from the drop-down menu to view your book on a simulation of that device.
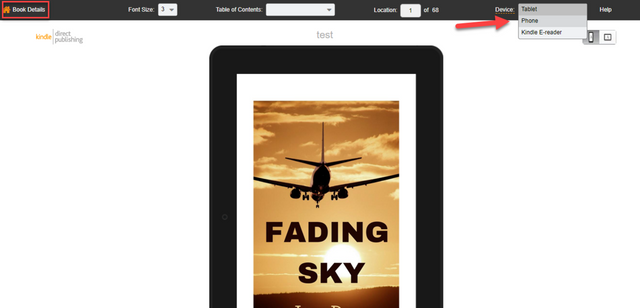
Page all the way through you book to ensure the following:
- There are Page Breaks after each heading and chapter where you wanted them
- All of your fonts fit on one line like the title, subtitle, etc.
If you see any problems, you will need to fix them in your Google Docs manuscript file, re-download your Word file, re-upload it to KDP, and check it again until you are satisfied. This process will be as easy or as painful as you make it in the formatting process covered in Part 1.
When you are satisfied, click Book Details in the top-left of the Previewer screen to return to KDP.
Step 5. Type (or paste) your ISBN. Type the name of your Publisher. (More info after image.)
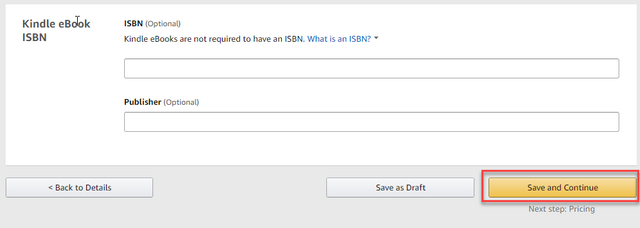
An ISBN is not required. Amazon will assign your book an AISN which is their in-house version. If you choose to publish in paperback later in this series, you can get a free ISBN then. In keeping with our ZERO budget model, I don't suggest messing with this now; however, you can buy an ISBN if you insist.
Type the name of your publisher. If you don't have one, use your own name, Amazon, Inc., or use a name you intend to publish all of your books under. I use my website address here.
Click Save and Continue.
NOTE: We've come to another point where you can take a breather if you choose. The bulk of the work is well and truly behind you. Great job!
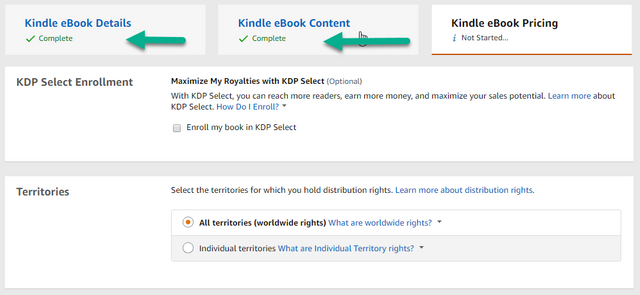
Kindle eBook Pricing
You're nearly there!
In this section, you will figure out if you want to participate in the Kindle Select program, set a price for your book, and set your royalty amount. Oh, and you'll also decide where around the world you want your book for sale. Exciting stuff, my friends!
Step 1. Enroll your book in Kindle Select by clicking the checkbox if you choose. Click the radio button next to the territories where you want to sell your book. (More info after image.)
KDP Select or Kindle Select is a program in which you enter into a 90-day contract with Amazon. During this time, you promise exclusive digital rights to your work to Amazon only.
This does NOT include paperback and audio book formats.
During this time you also get a few perks. You can run a promo where you can offer your book FREE for 5 days out of the entire 90. You can use this all at once or in increments. You can also do a Kindle Countdown Deal where your book is listed at a discount rate. See more here.
There's also some extra promotion through Amazon's various programs during this time, but it's sort of a gray area as to what the specifics are.
I do recommend KDP Select at least for the first 90 days just for the promotional value it provides. I usually un-enroll after that so I can distribute my book through other channels at that point. My book stays active on Amazon of course, I just lose the ability to run promos through the KDP Select program.
Select your territories. I always go Worldwide here.
Step 2. Click the radio button next to your desired royalty amount. Select your primary marketplace from the drop-down menu and input the price for our book. (More info after image.)
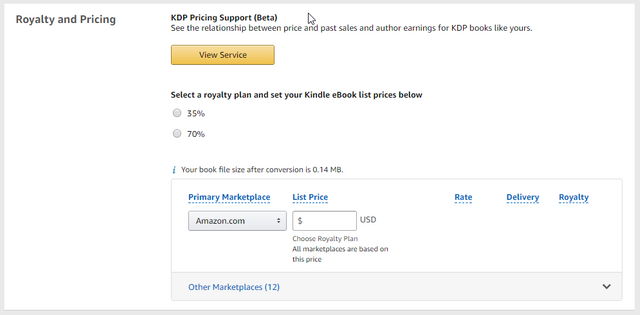
The KDP Pricing Support is new to me. Notice that it's in the beta testing phase. I clicked it, and it spun for 5 minutes and never produced any results. You can try your luck. I'm skipping it for now.
Choose your royalty amount by clicking the desired radio button.
This is pretty self-explanatory. 70% means you earn 70% of the purchase price of your book. 35% means you earn 35%. This is often more than traditional publishers make in royalties.
If your book is $1.99 or more, you can select the 70% royalty option. Anything under $1.99 forces you to choose 35%.
If you're not sure what to charge, you can conduct the same research we did in Part 2 to create our cover to see what others in your genre are charging.
As a general rule, self-publishers are not able to charge as much as traditional publishers, but they author often makes more in royalties per sale. A standard price for book that are less than 100 pages is $2.99. For longer works, $4.99. Most self-publishers do not venture outside of the $9.99 range.
I usually price my book in the $2.99 range. If you don't like these numbers, do your own research here.
Amazon will automatically convert your price for all 12 of its marketplaces.
The Final Step - Can You Believe It!?! Click the check box to participate in Kindle Matchbook if you choose. Click the check box to allow lending if you choose to participate in Kindle Book Lending.
Kindle Matchbook is a program where people who buy the paperback version of your book can get a Kindle eBook copy at a discount or free. I always participate.
Kindle Book Lending is a program where you book is available for lending for up to 14 days at a time. I also participate here.
While these two options don't necessarily make me money, they do get my book further than if I didn't participate. They are also just nice gestures for your readers, and as an author now (Yay!!!), you should serve your readers whenever possible.
These are small, small ways to do that. They don't really cost you anything.
Click the Publish Your Kindle eBook button.
Wrapping Up Part 3
Ohmygoodness....you're done!
Now the wait begins. KDP says it can take up to 72 hours, but I've never had it take more than 24 for my book to be available. Most of the time, it's more like 12 barring weekends and holidays.
Coming Up
Coming in Part 4, we will learn how to publish our book to Createspace in paperback. Wow! Crazy, huh? We will also discuss by Createspace (also owned by Amazon) is currently a better option than going through KDP.
These posts take a ton of time to write, and your follow, comment, resteem or whatever would mean so much to me.
If you missed the first two parts of this series, here you go:
If you have any questions about Part 3, please comment and I will do my best to answer. You may very well help another Steemian!
Thanks for reading. I can't believe you're an author now! Link your books in the comments too. I want to see your work!
Fantastic guide for writers!
Thanks for checking it out, @karencarrens!
I'm definitely going to be using the tips here soon! Didn't know how easy and straightforward it was to be a published writer on Amazon. Thanks!
That is EXACTLY why I'm writing this series. It is incredibly easy to do and I don't want people to be intimidated by it. The world needs your art! Good luck, @thetimreynolds on your journey. Thanks for taking the time to comment!
I find the hard part here is the filling in of all the financial information.
And they withhold taxes and other painful stuff.
Ah, yes, I'm sure this is more difficult outside the US. It's funny how Amazon can have a dedicated website in other countries so they can sell, but can't make separate provisions for the creators there.
Can you offer an insight here, as I don't have experience with these difficulties? Thanks for your comment!
Unless you supply a national tax certificate, (own country) Amazon retains 30% of your earnings. That's fair enough and is explained clearly by them. Once the document from the treaty country is submitted, they stop deducting the 30%.
Thanks for the info, Andre!
The reply to this is a post in and of itself. I would need to re-research everything so I would have all the correct names.
I was hoping you would do a further article on this topic.
If you don't, I will surely write one sometime, but not in any timely manner.
I will look into it and see what I can find out, @builderofcastles. I have a lot of self-pub friends, some of which are not US-based.
Self publishing is complicated process but it's worth to do it. There are many companies which can help with these things, but it costs a lot. And satisfaction is bigger when we do it ourselves.
I feel so accomplished when I hit that Publish button. I did it! Not them!
There are many companies who help for free too. I will cover them in a later post in this series. Paid service doesn't always mean the best service.
Thanks for taking the time to comment.
Thank you, very informative post
You're very welcome! Thanks for taking the time to leave a comment!
i actually read the entire post because i do want to know how. thanks for sharing step by step guide
You're welcome! Thanks for reading and taking the time to comment!
A special explanation for each reader
Indeed. I tried to make it step-by-step, actionable content. Thanks for your comment!
Thank you for this it will be a great resource in the near future.
Good, good. You're welcome! Good luck in your publishing journey! Thanks for taking the time to comment.
Thanks for this informative post. I have a question though. I downloaded my Google doc as a Word file, but it all became messed up in terms of formatting. Do you format the Word file, or do you upload as it is?
Hmm, I've never had this problem. If things are moving around and not staying where you put them, try downloading as a PDF instead.
You should only have to format once.
Also worthy of note, don't use the Tab key. It just doesn't work with Kindle.
The only formatting you really need is a Page Break between your chapters and other pages:
Title Page [Page Break] Dedication [Page Break] Foreword [Page Break]Chapter 1 [Page Break] Chapter 2....and so on.
Thanks for the reply.
I did the page break thing and it helped a lot. However, some of the lines (on pages without page breaks) get pushed to the next page although it shows up okay on the Word document. I only inserted page breaks in between chapters.
In any case, it's much better now. Thanks!
Hello. You might try this free all in one app: https://prowritingaid.com/en/Analysis/WebEditor/Go#