How to build a cat detector with a Raspberry Pi and a Pi Noir camera using Deep Learning - Part IV
Part I is here:
https://steemit.com/raspberrypi/@mragic/how-to-build-a-cat-detector-with-a-raspberry-pi-and-a-pi-noir-camera-using-deep-learning-part-i
Part II:
https://steemit.com/raspberrypi/@mragic/how-to-build-a-cat-detector-with-a-raspberry-pi-and-a-pi-noir-camera-using-deep-learning-part-ii
Part III:
https://steemit.com/raspberrypi/@mragic/how-to-build-a-cat-detector-with-a-raspberry-pi-and-a-pi-noir-camera-using-deep-learning-part-iii
Introduction
In this part I will describe how we can deploy the model we trained in part III on the raspberry pi. You can then choose what you want to do when a cat is recognised. In my case, I already have a raspberry pi controlled garden watering system in place. Now I use one of the rpi controlled valves to shoot some water in the direction of the cat when the cat detector finds a cat.
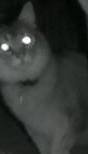
a cat waiting to be classified as a cat
Software Installation on the Raspberry Pi
As our model is a tensorflow model using the keras framework, we need to install these dependencies. Here we will use pure pip:
mkdir /home/pi/venv/
python3 -m venv ai
source /home/pi/venv/ai/bin/activate
Install required python modules. Tensorflow and keras for the deep learning, pillow for image handling, ipython for the interactive python environement.
pip install 'numpy'
pip install  'tensorflow'
pip install 'keras'
pip install pillow
pip install 'ipython'
Apply Keras Deep Learning Model to Recognize Cats
Let's try it to classify some real cat images! First you need to copy the hdf5 file with the trained weights to your raspberry pi. In my case, it is called inception_v3_1.h5, and has a size of 85MB. Let's open a file called apply_model.py and write this script:
from keras.models import load_model
from keras.preprocessing import image
from keras.applications.inception_v3 import  preprocess_input
import numpy as np
img_width, img_height = 299, 299
print('loading model... This will take a while...')
model = load_model('inceptionv3_1.h5')
print (model.summary())
def predict(image_file):
    img = image.load_img(image_file, target_size=(img_width,img_height))
    x = image.img_to_array(img)
    x = np.expand_dims(x,axis=0)
    x = preprocess_input(x)
    preds = model.predict(x)
    return preds
Run it in ipython shell:
ipython -i apply_model.py
You will realised that it takes around 3-4 minutes (!) to load the model into the memory on a raspberry pi 3. Let's try it out with a real file:
filename = '/opt/motion/cropped/23-20180423001209-06_cropped.jpg'
predict(filename)
You will see an output like:
predict(filename)
Out[4]: array([[  9.99523044e-01,   4.76956222e-04]], dtype=float32)
The array gives the probabilities for the two hypotheses: cat and noCat. It is nearly 1. for cat, so we can assume that this image is a cat:

You will also realize that it takes around 10seconds after the model is loaded to identify if a cat has crossed your garden or not.
We now want to use motion to call our function above everytime it recognizes a motion a stores an image in the cropped folder, as described in https://steemit.com/raspberrypi/@mragic/how-to-build-a-cat-detector-with-a-raspberry-pi-and-a-pi-noir-camera-using-deep-learning-part-ii
Obviously, we cannot call directly above module apply_model.py, because then it would take for every image a couple of minutes only to load the model into the python memory. We thus need to run some server, which preloads the model, and only runs the function predict(filename) in case a new motion is triggered by motion. Fortunately, there is already a very simple library which lets us execute remote procedures calls very naturally in python, called zerorpc. It uses zeromq as underlying socket protocoll and is very robust. You can find more information here: http://www.zerorpc.io/
We can install zerorpc with pip:
pip install zerorpc
We will now write a small zerorpc server, which loads our module apply_module.py and waits for a remote procedure call from the local client, which will be called from motion every time it triggers a motion. We call the server cat_rpc_server.py:
import apply_model
import zerorpc
import numpy as np
class CatRecognition(object):
    def cat_recognition(self,jsonobject):
        filename = jsonobject['filename']
        pred = apply_model.predict(filename)
        probabilities = {'cats': float(pred[0][0]),'noCat': float(pred[0][1])}
        return probabilities

s = zerorpc.Server(CatRecognition())
s.bind('tcp://0.0.0.0:4242')
s.run()
Let's run the server with python cat_rpc_server.py in one terminal. It will load first the model and then be ready to reply rpc requests from an rpc client. The client is then: recognize_cat.py, and you can find it in the repository in the raspberry_pi directory:
git clone https://github.com/magictimelapse/CatRecognition.git
Now finally we need to hook it into motion. We do it the same way as we already were collecting and cropping the images in part II. For that we add to motion.conf the following configuration:
on_event_start /home/pi/cat_recognition/recognize_cat.sh %v
This will run our script with argument run number. Our script recognize_cat.py will take the run number and analyze 10 images if a cat is present. If a cat is present, the script currently just writes that fact to the log file, but it is up to you to react to the presence of a cat in your garden!
Have fun!
@mragic, thank you for supporting @steemitboard as a witness.
Click on the badge to view your Board of Honor.
Once again, thanks for your support!