📺 Saturday Dadderday - Triple Bunk Bed Adventure [Video]
Our wild family enjoyed an incredible bonding experience last "Saturday Dadderday" when we built a triple bunk bed. Huge home improvement! Here's our original design, along with a complete list of supplies, and a time-lapse video that demonstrates the construction process, in case you'd like to build one.
The Triple Bunk Bed Adventure
The Video
The Story
Our three kids needed a proper sleeping arrangement. Their bedroom was just big enough for one bunk bed, but their old bunk bed was too bulky for their space, and it only held two mattresses. We needed a triple bunk bed, real bad!
For many months, these kids alternated sleeping spaces. Each night, they took turns sleeping on the one bed we kept, while the other two slept on the floor, in sleeping bags and blankets with mats underneath. This wasn't the world's worst sleeping arrangement, but we knew we could do better. So we did.
The Plan
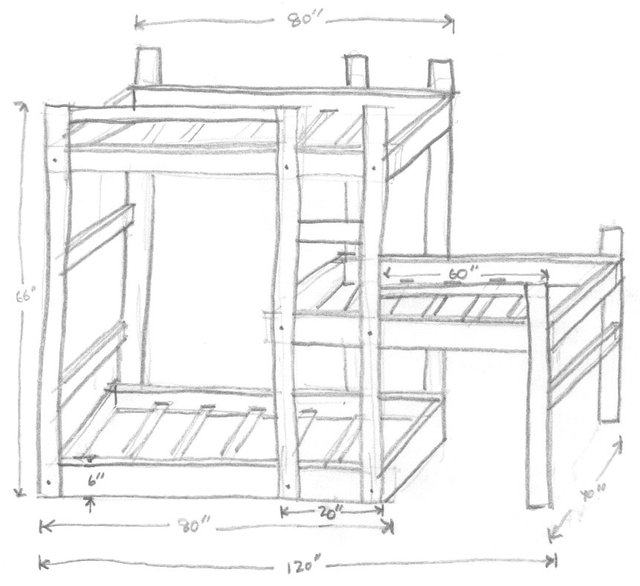
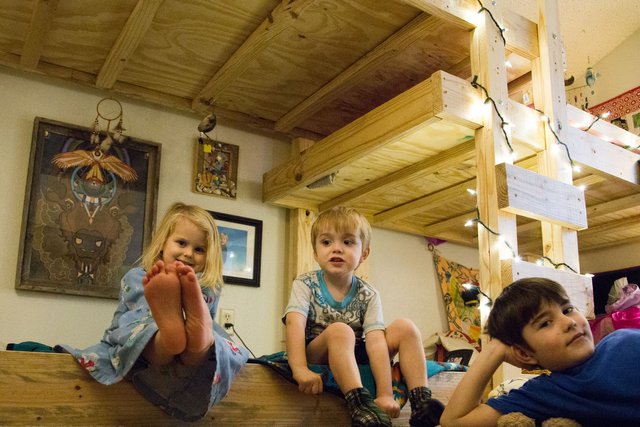
This three-level bunk bed holds three twin-size mattresses. We discovered we could give each kid some extra vertical space if we staggered the beds, as you see here.
We drew up some ideas for a triple bunk bed, exploring various configurations. At first, I thought they would all stack up in a single vertical line, but we saw some complications with a stack of three beds. Worst of all, there wouldn't be enough space for the kids to sit up in bed. Can you imagine? They'd bonk their heads first thing in the morning.
When we discovered the possibility of staggered beds, like the bunk you see here, a green light flashed. Our five-year-old, Rosalie saw the image and immediately lit up: "Ooh, I want the middle one!" she said. My daughter's enthusiasm gave me just the encouragement I was hoping for.
The Preparation
My background in woodworking includes: (1) one high school course; (2) two summers remodeling a house; and (3) a handful of experiences working with my dad on some decks and fences. Dad was a an elementary art teacher, who did some carpentry work in the summers. Long story short: We're new at this!
So of course, I did some logical prep work for this project. Online, I found some help with the engineering aspects, learning that the carriage bolt would be ideal for holding the heavy weight of this structure, for example. And when it came time to buy the supplies, I found a knowledgable person at Home Depot, to gain his helpful understanding, as we double-checked my plans and my materials.
I also managed some emotional preparation. Realizing this was a big learning experience, I firmed myself in the belief that I am strong enough, capable enough, and ready enough to handle a big project like this. I allowed myself the flexibility of changing the plans, if necessary, and accepted the possibility that some areas of my plan may not even work! I committed myself to seeing it through to the best of my ability.
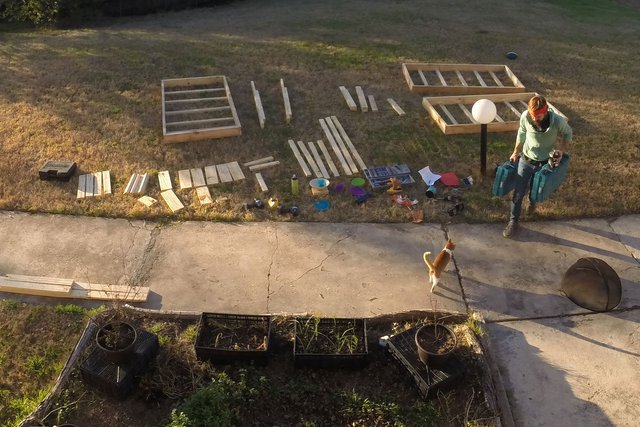
The Supplies
I remember walking into the lumber yard early that morning, and feeling very small as I looked at the tremendous task in front of me, with the walls of gigantic wood blocks. I felt dizzy, when a saleswoman asked me two different times if I'd like a free inspection on my attic. The second time, I asked her if she could refer me to someone who knew about wood screws. She led me to a knowledgable clerk who glanced at my plans, confirmed I was good to go, and showed me where to find the bolts and screws I was looking for.
Then, in the woodcutting department, I found another craftsman who was willing to cut my lumber for me. He made about 40-50 cuts, I think, and kept all of his fingers intact–although I honestly did notice he had one fingertip that looked a bit mangled. I shared a solid hour with this guy, and I was really impressed by his focus and his genuine care about my project. During the cutting process, he stopped and said, "You got boys? They're not gonna be able to move this. S'gonna be sturdy." Nice positive feedback from a woodworking expert!
Here's a complete list of our supplies:
- 2x6 Boards: 9ct, cut to various sizes (see below)
- 2X4 Boards: 11ct, cut to various sizes
- 2x3 Boards: 8ct, cut to various sizes
- Plywood Sheets: 3ct, cut to 75.5"x39.5"
- Wood Screws: 200ct, 3" long
- Carriage Bolts + Nuts: 18ct, 4" long
- Wood Stain: "Polycrylic" protective finish for indoor furniture
More specifically, the boards are cut as follows. First, 2x6 boards are ideal for the bed frames: (1) 6 cuts at the 80" length; and (2) 6 cuts at 40". Next, 2x4 boards work well for the vertical structure: (1) 6 cuts at the 66" length; (2) 2 cuts at 52"; (3) 2 cuts at 44"; (4) 2 cuts at 36"; (5) 4 cuts at 30"; and (6) 4 cuts at 9". Finally, 2x3 boards work for the mattress slats and guard rails: (1) 2 cuts at the 60" length; and (2) 15 cuts at 40".
Here's the lumber that went into our bunk bed, with some extra scraps we'll use later for shelving. We were able to cut these pieces to size with Home Depot's help, in order to fit them into our minivan.
Creating the bed frames was a piece of cake, once we got the right equipment. My 8-year-old son drilled some of the pilot holes, and drove a few screws in–he had a blast!
We own two hobby electric screwdrivers already, but neither one was powerful enough to pierce the pine with a 3" wood screw. Thankfully, we were able to rent two heavy-duty power screwdrivers to speed up the process.
The Construction
It's a good thing I have a sense of humor, because this project was full of bloopers. For one example, I broke a drill bit on the very first pilot hole, and broke three more by the end of the day! Another example is the fact that my two electric screwdrivers were way too weak to penetrate the wood–they both died trying! I had to return to Home Depot three times, and plus I recruited my wife to go there for me twice that same day. Most humbling of all was the initial "power hour," when just one lonely screw made its way into the wood.
Around noon, we equipped ourselves with two kickass power screwdrivers–we rented these for $15 each. Suddenly, we found our groove. Our eight-year-old son, Daniel, helped me to cruise through dozens of screws, and a few glue jobs. The littler kids kept us company, excited to see their bunk bed come to life. Our neighbors came by to visit, offering their encouraging words. And around sundown, we picked up the completed pieces and moved them indoors.
This is when the real banging and clanging began. We put up the beams and situated the bed frames, hammering in 18 carriage bolts, with a sound that thundered for miles around, I'm sure! Then we placed the plywood sheets, added the guard rails, and completed the ladder, with our 3-year-old, Gabriel, fast asleep. Kat, my wife, made some beds (three new twin mattresses will arrive next week), and the kids slept on their new bunk beds that same night.
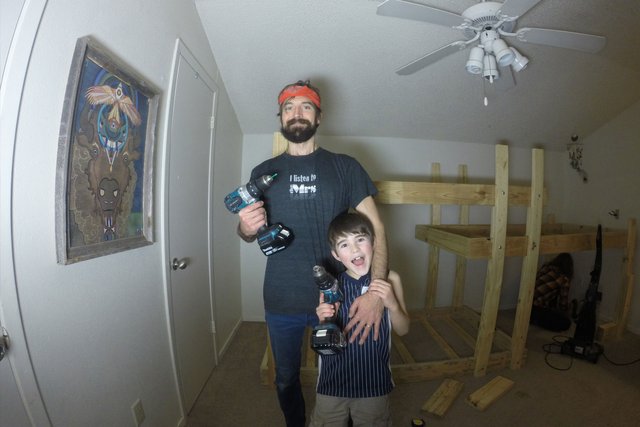
Around sundown, my son and I snapped a father-son photo together. Felt really good to share this moment with him, when we could start to see the results of our good work.
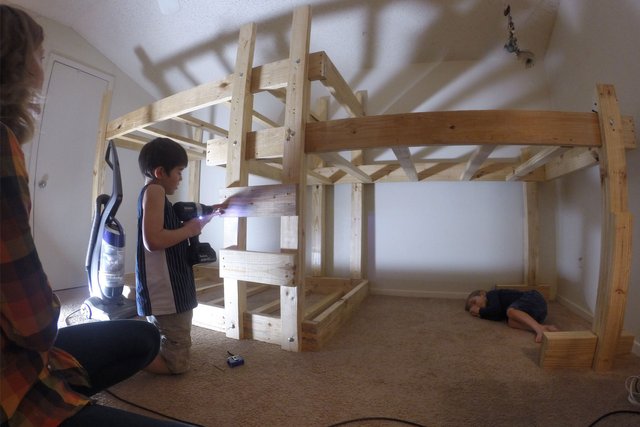
By bedtime, the kids' bedroom was louder than ever, with hammer striking, drilling, and clunking of boards, but somehow my youngest son managed to fall fast asleep. Do you see him sleeping there under the bed?
The Conclusion
This bunk bed structure cost us around $250, with another $200 or so invested in a new set of mattresses and bed sheets. We feel like this $500ish is a smart investment. And a meaningful one. And a fun one! It invited our family to join forces and build something special together with our hands, relying on our own energy. And it invited us to realize the divine guidance of our family's guardian angels, I believe.
Thank you, dear friend, for making your way to the end of this long post. Be sure to let me know if you have questions or comments. I would love to hear from you. Hopefully, you can see what a blast this project was. It was a bonding experience for our entire family. Our new triple bunk bed is decorated now, with Christmas lights, artwork, and the kids' precious dreams.
This post contains 100% original content by @cabelindsay.

Yeaaah, fantastic! It seems more people are using their own hands again instead of paying ridiculous prices in shops... And what satisfaction you get! My dad made a bunkbed for me and my sister, it was so sturdy and didn't squeak like my friend's beds did! Awesome project, well done, I love it :-)
Oh fo sho! Yeah, I meant to mention the whole cost-savings thing in the article here. Thinking I'll go back and add that in. Looks like we cut the cost in half, by my estimate. And just as you say, the real pleasure comes from the achievement of working with our hands and building something big that suits us just right–the #diy / #homesteading way. Feels like we're setting a strong example for the kids with this too. Yay, thank you for your encouraging words.
I just love this so much. The video is especially adorable. I'm really proud of you, you know. So happy to see your creative vision come to life!
Thank you, Kat. And I say "Thank You!" to the Spirit who moved us, to the buffalo who made us resilient, and to the Tree People who provided life. Aho Mitakuye Oyasin - I honor all of my relations.
Awesome project! You did a fantastic job with design giving each boy headroom. A perfect family project too. Congrats.
Awesome project! You did a super job in designing the bunk beds, giving each boy lots of headroom! Nice family project too. Congrats.
Thank you, this one feels like a dream come true. It's amazing the way this one addition has brought so much life to the kids' bedroom. They all love it in there! So grateful for the existence of Steemit, which rewards us when we try new adventures and document the journey.
Nice video. A lot of work, but good result! Thank you for sharing and keep it up :) Great project!
Thanks for your encouragement! This project has been so fun for me. Feels like I can build just about anything now, but I'll have to be patient for another opportunity. I see you're making fast progress on Steemit–so cool to see you taking off!
Yes!! Super dad!!
:) Feeling super in this moment, at least.
Congratulations! This post has been upvoted by SteemMakers. We are a community based project that aims to support makers and DIYers on the blockchain in every way possible. Find out more about us on our website: www.steemmakers.com.
If you like our work, please consider upvoting this comment to support the growth of our community. Thank you.
Hi Cabe! I have not yet had time to read your post through fully or check out the videos, but i wanted to say this looks really cool. Rock on Raddaddy! What a great project, awesome!! Also i wanted to thankyou for resteeming my song, it still makes me so happy to have found kindred spirits on steemit to share our creative endeavours with. Respect, brother!
Aho. Really lifts me and lights me up whenever I hear from you, and see you shining in all the ways you shine. Thank you.
Very nice custom bunk bed! I bet there was a fair bit of figuring that went into it's design with the low ceiling?
We only have two 6 month olds right now but they will probably get a bunk bed of some type when they are old enough. For the foreseeable future they will be sharing a room.
dude. that's fire. sorry i only just saw this now.