Java programming for beginners - Lesson 8 - Arrays -Part 1/2
Introduction
Hello everyone, welcome to the ninth lesson in my Java programming for beginners tutorials series. The eighth lesson(lesson - 7) - Methods can be found at - https://steemit.com/technology/@robertlyon/java-programming-for-beginners-lesson-7-methods
This lesson will be split into two parts with the second part being rolled out within two days after this part. The reason for this is the number of examples/challenges and information that I want to cover on this topic.
In this lesson, I am going to be covering the topic of Arrays. Arrays can be thought of as a collection of values. For example, if you wanted to hold a list of all the numbers from 1 to 100 and store that list in a single variable you could use an Array. Please note that in this example I am using the words list and collection, these can mean different things in Java and I am purely using them as part of the analogy and nothing else.
By the end of this lesson, you will know how to create arrays that work with primitive value and you will be able to create your own Arrays to use in your programs.
Arrays
What are they?
So as I alluded to above, arrays can hold collections of values. I will be focusing on primitive values in this tutorial and will provide two different examples(one with integers and one with Strings). The way that an array works is it is declared to be of a specefic type, "int" for example. This means that because the array is declared to be of type "int" it can only hold int values. This is the same for any other type that an array might be declared as. When the array is declared it must also be declared with the size, for example, if you wanted an array that holds 9 different values you would have to specify that when you create the array.
We will now look at some examples of how to set up arrays and some commands we can use to change and edit our arrays.
Code Examples
Example 1
public class Arrays {
    public static void main(String[] args)
    {
        int[] newArray = new int[3];

        newArray[0] = 1;
        newArray[1] = 2;
        newArray[2] = 3;

        for(int i = 0; i < newArray.length; i++)
        {
            System.out.println(newArray[i]);
        }
    }
}
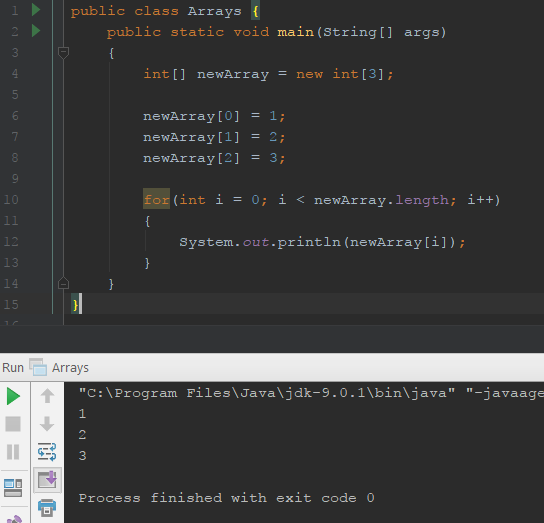
If we look at the example above there is quite a lot going on. One thing you should recognize about this program is the for loop. I will now break the code down line by line and explain what each part of the program is doing. Please use the line numbers on the image for reference.
On line 4 we have the array declaration int[] newArray = new int[3];. The first part of this statement "int[]", this is the declaration of the type of array we want to create, the square brackets are what indicate that we wish to create an array. So this part of the statement is saying we want to create an array that holds values of type int.
The next part "newArray", this is the name of the array. You should be familiar with naming conventions by now.
After that we have the part "= new int[3];". This part is saying we want to create a new array of type int that holds 3 values. I dont want to go too deep into the new keyword until we start working on objects. The main thing to take away from this is the part inside of the square brackets, this number determines how many values can be stored in an array.
We have now created an array that holds 3 value but we have not actually stored any values in the array, because of this each index of our array actually holds the value 0(the value is 0 because it is an int, if it was a double it would be 0.0 and other different types have their own default values).
On lines 6,7 and 8 we start to populate our array with values, we do this by using the assignment operator "=". Arrays are indexed from 0 so each compartment holds a value for example if we want to access the value in the first compartment of the array we would look for the value at index 0. This can be seen on line 6,7 and 8 in the code newArray[0] = 1;. To access the first compartment of the array we use the array name "newArray" followed by the index in square brackets "[0]". We then use the assignment operator to assign the value of 1 to the compartment that index 1 references.
Moving on to the for loop, the set up for this for loop is the same as the ones that were shown in the lesson dedicated to these loops, the only main point to note is that I am using newArray.length to get the length of the array. This means that when the comparison is being checked in the loop the loop condition is checking to see whether the increment variable is greater or equal to the length of the array.
It is important to remember that arrays start at index 0. This means that if your loop keeps looping when the condition is = to newArray.length then you have looped one step too far and will be presented with an error. Take a moment to think about the logic behind this and why this would happen.
The last part of this program is the print statement. In this example, you can see that I am accessing the index of the array using the increment operator. This is a good way to print out all of the elements of an array in index order. Because the increment variable starts at 0 and the array index starts at 0, as you loop around and the increment variable is increased by one, then the next item in the array is printed out. This keeps happening until the condition of the loop is met.
Example 2
public class Arrays {
    public static void main(String[] args)
    {
        String[] newArray = {"One", "Two", "Three"};

        for(int i = 0; i < newArray.length; i++)
        {
            System.out.println(newArray[i]);
        }
    }
}
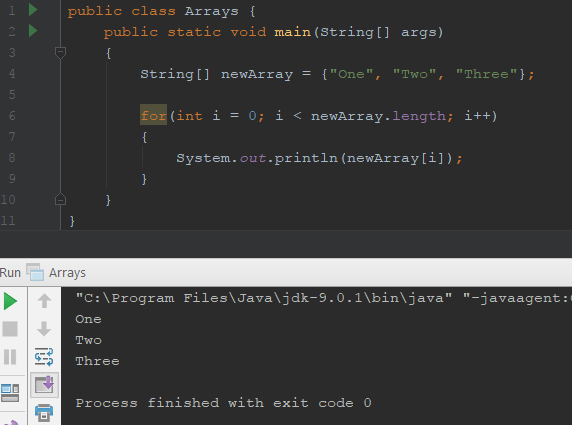
This example is very similar to the last example except the elements of the array hold strings instead of integers. The main point of this program though is to show a different and potentially more efficient way of creating an array.
On line 4 you can see the code String[] newArray = {"One", "Two", "Three"};. This code creates an array with 3 elements. the element at index 0 is "One", index 1 holds "Two" and index 2 holds "Three". This is just a faster way of creating an array, the Java compiler does all the extra work from example 1 behind the scenes for you and you get the same array.
The for loop in this example does the exact same thing as the last example except it obviously prints out Strings instead of integers.
Conclusion
This lesson contains a lot of information and I will be covering a lot more about arrays in the second part of this lesson. You should create your own arrays with different types and see what happens. Hopefully, you now understand the basics of creating arrays and how to add values to arrays.
If there is anything in this lesson that confuses you or there is anything programming related that you need help with then please comment below and I will try my best to help you.
As always if there are any improvements you think I can make to this post then please leave a comment and I will consider adding it.
Thank you for reading and I hope that someone will get some use out of these tutorials.
Message to readers
Thanks for taking the time to read my post, if you are interested in Science, Technology or Computer Science then check out my blog, content is a little sparse at the moment but I am making an effort to provide good quality original content to the Steemit community.


Very useful language! Thankyou ^.^
You are welcome :)
Thank you for sharing knowledge on the platform, I'm working on DLearn specifically for people like you and I, who want to share and for people who wish to learn -> https://steemit.com/utopian-io/@debraycodes/dlearn-education-decentralized-making-quality-education-accessible-to-all ... Salúd...
You are welcome, i will definitely check that out :)
As always, this is an extremely good quality post. You do a good job of explaining the concepts in a way that should be easy to understand for newer developers.
Thanks for the feedback, appreciate it :)
This post received a 100% upvote from @morwhale team thanks to @robertlyon! For more information, click here! , TeamMorocco! .
The faster you go, the shorter you are.
- Albert Einstein
:)
This post has received a 4.40 % upvote from @buildawhale thanks to: @robertlyon. Send at least 1 SBD to @buildawhale with a post link in the memo field for a portion of the next vote.
To support our daily curation initiative, please vote on my owner, @themarkymark, as a Steem Witness
Great! but you can't teach about programming here on steemit, it's not easy!
Just because it's not easy, doesn't mean it can't be done :)
You got a 4.04% upvote from @upme requested by: @robertlyon.
Send at least 1 SBD to @upme with a post link in the memo field to receive upvote next round.
To support our activity, please vote for my master @suggeelson, as a STEEM Witness