Java programming for beginners - Lesson 10 - User Input
Introduction
Hello everyone, welcome to the eleventh lesson in my Java programming for beginners tutorials series. The tenth lesson(lesson - 9) - Arrays -Part 2/2 can be found at - https://steemit.com/programming/@robertlyon/java-programming-for-beginners-lesson-9-arrays-part-2-2
This lesson is a short lesson about user input in Java, it is something that I missed out on during the lessons I have been giving. After this lesson, you will be able to input some information to the console, store that information in a variable and print the information back out to the console. As I mentioned before this will be a short lesson as it is something
that should have been included in an earlier lesson.
User Input
So we need user input when we want to interact with our program. User input can come in many forms, for example, it could be typing a word into a cell in excel, it could be pulling the trigger on your Xbox controller so you can make a gun fire or it could simply be clicking OK on a pop-up. In this lesson, we will be looking at simple typing a string into the console and storing it in a variable.
Code example
import java.util.Scanner;

public class Input {
    public static void main(String[] args)
    {
        Scanner aScanner = new Scanner(System.in);
        System.out.println("Please enter your name: ");
        String userName = aScanner.next();

        System.out.println(userName);
    }
}

Code explanation
As you can see in the code above there are a few new things that we have not covered and the code may seem a little confusing to you. I am going to try and explain the concept of using the Scanner class to get input from the user without delving into the inner workings of the Scanner class. The next few lines below will explain the code above.
The first thing we notice about the code above is there is a new line at the top of the program import java.util.Scanner;. This is what is known as an import statement. Because the Scanner class is contained in the Java.util library which is not added to our program automatically when we create it, (unlike the Java standard library we have been using to create our programs so far.) we have to add it to the program.
The next important line is line 6 Scanner aScanner = new Scanner(System.in);. In this line of code, we create an instance of a Scanner object named aScanner(don't worry if you don't understand this, we have not covered objects or classes yet so it may be difficult.) This is similar to what we did when we created an array.
All you need to remember at the moment is that this is the syntax get input from the user.
The next line is a simple print statement, all this does is print the prompt for the user, telling them what you want them to enter.
The code on line where the magic happens. String userName = aScanner.next();. The first half of this piece of code you should be happy with, it simply creates a String variable named userName. The next part is the interesting part. What is actually happening here is we are using the Scanner object that we created "aScanner" to access the method "next()" by using what is known as dot notation. This may seem foreign to you now but once we start work on Object Orientated Programming(OOP) principles it will become a lot clearer. The method "next()" reads the next line and stores that line in the variable referenced by userName.
The last line simply prints out the value held in the variable userName.
Have a look below for a guide on how to interact with the program and where you type the information you need.
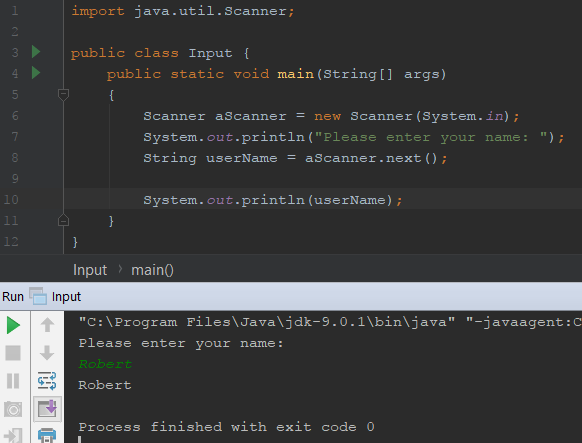
Before runtime

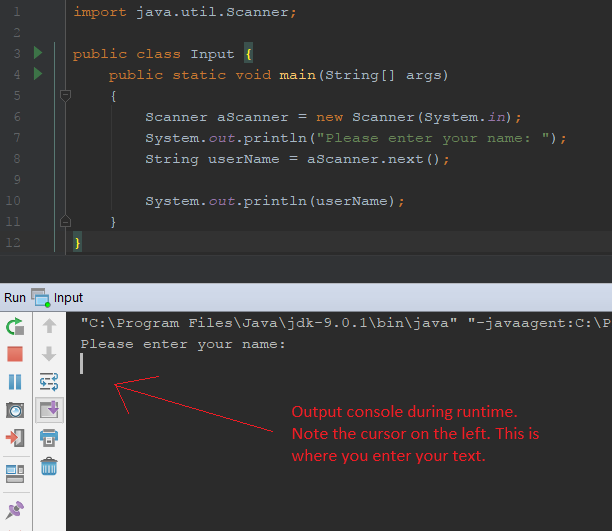
During runtime, before entering any text

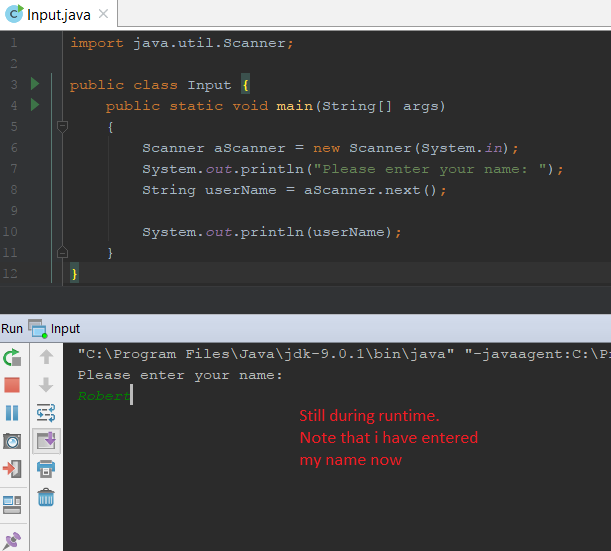
During runtime after entering name

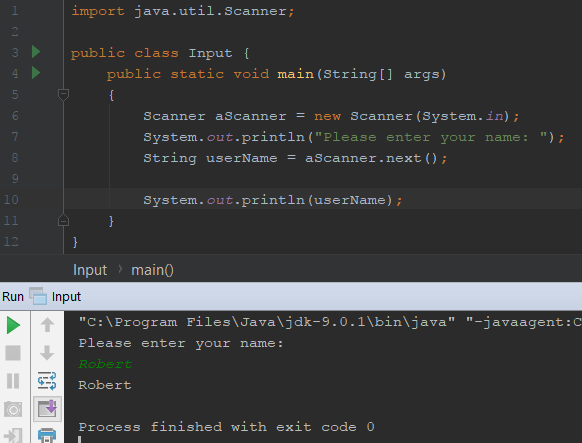
End of program, after pressing enter on input.

From the image above you should be able to see how we can get input from the user in a simple manner using the console. One thing to note that the method "next()" only works on strings. If you wish to read in integers, or doubles then you would have to use the methods nextInt() or nextDouble(). You should have a play around with these methods and in my next lesson, I hope to be showing you a simple game that will make use of the nextInt method.
Conclusion
As I said at the start this was just a short lesson on userInput that I missed on one of my earlier lessons. This should now give you much more freedom to create interesting programs that make decisions based on the user's input instead of the hard coded values. Hopefully, you are now able to create your own Scanner object and use it to get some input from the user.
If there is anything in this lesson that confuses you or there is anything programming related that you need help with then please comment below and I will try my best to help you.
As always if there are any improvements you think I can make to this post then please leave a comment and I will consider adding it.
Thank you for reading and I hope that someone will get some use out of these tutorials.
Message to readers
Thanks for taking the time to read my post, if you are interested in Science, Technology or Computer Science then check out my blog, content is a little sparse at the moment but I am making an effort to provide good quality original content to the Steemit community.
This post received a 100% upvote from @morwhale team thanks to @robertlyon! For more information, click here! , TeamMorocco! .
You got a 9.16% upvote from @upme requested by: @robertlyon.
Send at least 1 SBD to @upme with a post link in the memo field to receive upvote next round.
To support our activity, please vote for my master @suggeelson, as a STEEM Witness
This post has received gratitude of 1.06 % from @appreciator thanks to: @robertlyon.
This post has received a 0.88 % upvote from @sneaky-ninja thanks to: @robertlyon.