Improve your Software Development – Continuous Deployment with Docker – Part 5.1: What is Docker?
Improve your Software Development – Continuous Deployment with Docker – Part 5.1: What is Docker?
Hay Steemers,
yesterday, I’ve started to wrote the next chapter (4.2) about Continuous Integration and came to a point, where I thought that it would be nice to use Docker to setup the environment we will need for further steps.
So before we will learn more about how to develop software in a professional and modern way, we will step through some Docker basics.
Docker
We start this article with the question: What is Docker? And will step through the different kinds of Virtualization in this article, to find an answer for this question. The next part (5.2) will show you, how to install and work with Docker.

Virtualization
To make people, who never heared about Docker before able to follow and understand everything that we will do, we have to start with talking about virtualization in general.
Virtualization basically describes the portioning of physical things into several logical units. If you have, for example, multiple partitions on your PC, but only one physical hard drive, you already got in touch with virtualization.
Virtual machines
Virtualization got improved and developed and some decades ago we reached a point, where it was possible to simulate a complete computer with your PC’s hardware. One of those simulated PCs is called a virtual machine (VM) and you can create multiple of those VMs on one computer.
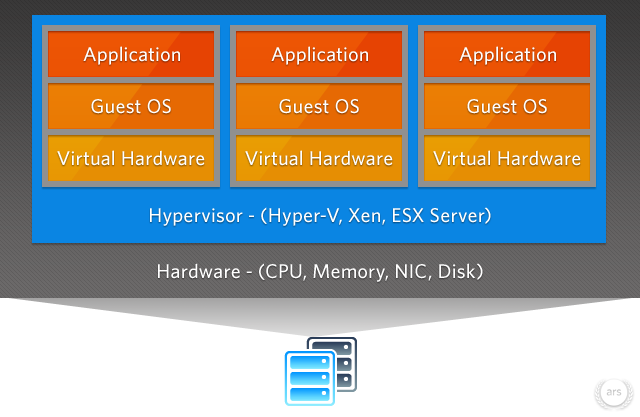
This picture shows a basic setup for virtual machines: You have the real, physical hardware (gray) where you run a special kind of software on, called Hypervisor. This software delegates the requests of the virtual machines to the real hardware (blue). One example for this kind of software is Hyper-V, which is provided out of the box by newer Windows versions (> Windows 7). With this software, you can create multiple, virtual machines and define how much resources they are allowed to use. Each of this virtual machines runs it own operating system (OS), called guest os, which runs one or more applications (orange).
Benefits
There are multiple benefits of this technique which I do not want to discuss in detail. The biggest advantage of this technique in my opinion is, that you can run multiple applications with completely autonomous resources.
Example
This example is a bit artificially, but should made the point above clear. We imagine an application that consists of multiple, small parts: You may have some kind of Backend, like a REST-Service, a Website as a Frontend and a database. There are some human users that use the Frontend, but you also have some other companies/computers/systems, that only need the Backend service.
Now, you have to make a decision on how to run those applications. In most cases, the people do not spend much time on this decision and just run all applications on one physical server like you can see on the left side of the picture below.

This seems to be okay, but think about some common problems like a memory leak on the front end. The front end will start to allocate more and more memory, until the hole machine becomes unusable. As we run all services on the same machine, this effects also the Backend service and the database. Our users, that only work with the Backend and do not need the Frontend can no longer work due to a problem of another component. Long story short: Because of a problem in one component, your complete application is unusable.
To avoid those problems, we divide the host computer in three logical units: We create three VMs! If we are now facing the memory leak in the Frontend again, only the virtual machine hosting the Frontend will become unusable, but the Backend and the database will still work. That's pretty cool, isn't it?
But we can still improve this using Containerisation.
Containerisation
If our main target is the separation of process, to make our hole system more reliable, we should make use of another virtualization technique called Containerisation.
To understand Containerisation and point the differences out, we have another look at the VM picture we have seen before:
You can see, that we need a Hypervisor, the special software that delegates the requests to the physical hardware, and a guest operating system for each VM. But hay, we already have a OS running on our host machine – Why can’t we use this and save the resources for simulating multiple other operating systems?
Good point! This is basically what Containerisation is about: Providing separated resources for each single process under the use of the host operating system.

As you can see in the picture above: Under the use of Containerisation, we still need some kind of software, that delegates the resources and requests of the separated processes to the hsot OS, but we no longer need to simulate several guest operating systems.
And yes, this attempt also has some disadvantages. One of them is that all of your processes, which we call Container from now on, have to use the host OS, so it is not possible to run one process in a windows in enviroment and one in a linux environment, but in the most cases we can live with that.
So what the hack is Docker
We now reached the point where I can tell you what Docker is: Docker is a company that provides a huge landscape of products for Containerisation and is (so far) the most common one. The best of it: The most parts are open source and absolutely free.
The technique of Containerisation itself is pretty old, and is already used by muliple, huge companies like Amazon or Netflix for their software products. But Docker made it so easy for everybody, that Containerisation became a huge hype topic in the last three years.
How does Docker work
Okay, I hope I didn't lost you as this topic may be pretty complex if you haven't heard about it before, but we are already done for this article, so please keep on! The last part of this chapter are some basics about how Docker actually works and how things are called in the Docker cosmos.
I will not show you everything in detail and also I don't want to show how to install and use the tools here, because I am afraid this article gets to long – Lets do this in the next chapter. With the following basics you should be able to understand the things, that we have done in Part 4.2 of this tutorial series.
Basics
As we have already seen, we still need a special software that delegates the requests from a Container to the real, physical hardware. The Docker product that can do this for us is called Docker-Engine. The Docker-Engine can be installed on multiple host operating systems and can do much more than simply delegating the requests. It makes sure, that the different Containers can only access their dedicated resources and it is also used to start and stop the Container.
If you want to start a Container with the Docker Engine, you have to (at least) define, what you want to run in this Container. In the Docker cosmos, this definition is called an Image.
Images
An Image basically contains the information about:
- What programs are needed in your Container?
- What ports does your Container need?
- Which command has to be executed, when the container starts?
- ...
So as an abstract example, an Image could look like this:
“Hey Docker, this Container should be based on an Ubuntu-OS and I need Java to run my Backend REST-Service which communicates over port 8080 and when I start the Container, I want you to start my Backend REST-Service”
Yes, for those who know Docker this example is a way to abstract, but don’t worry, we will create our own Images in the upcoming chapters and I only want to give a basic understanding at this point.
File-Systems
One special thing about a Container is, that they will not persist any changes until you tell the Docker Engine to do so. That means, if you start a Container, change something and restart the Container, your changes are gone by default.
The only way to persist changes is to define a so called volume. With a Volume you tell the Docker Engine something like this:
“Hey Docker, if there are changes on the filesystem under “/home/myContainerUser/myApplicationData” please store persist them under “C:/Users/myWindwosUser/myApplicationData”, and if I restart this Container, please use the persisted data”
Okay - That should be enough basics to understand what we have done in Chapter 4.2 of this tutorial series. We will use the techniques and tools in other parts of this tutorial series, so don't worry if you want to know more about it!
Summary
In this chapter we learned about the differences between Virtualization and Containerisation, what Docker is, and also learned the very basic vocabularies that are used in the Docker cosmos. In the next chapter I will show you how to install Docker and how to basically work with it.
I hope I was successful at compressing a pretty complex topic into one, small article. If not, feel free to ask questions in the comments and I will try my best to answer them. Also, if you like my work, like the post and follow me.
Thank you and best regards!
Awesome! Do you use only Linux containers?
Thank you for your feedback @gutzofter :) Yeah - I will only create Images based on Linux as it is the easiest in my opinion.
Cool! Will be waiting...