DIY a LOW COST Light Painting Pencil!!!
-English Version-
It took a long time in my head. I wanted to build a light painting pencil to draw strokes, calligraphy, macro light painting, and for all it could be useful to my work.
It was sure that I would make it with a mini RF LED strip controller, as I had a spare one of another tool that I made long ago. 
It seems to me a easy to use device that with low power, reduced dimensions and little knowledge of electronics you could modify several parameters as color, intensity or strobe mode in the LED strip. I could draw with a hand while the other makes the necessary adjustments through its remote selector.
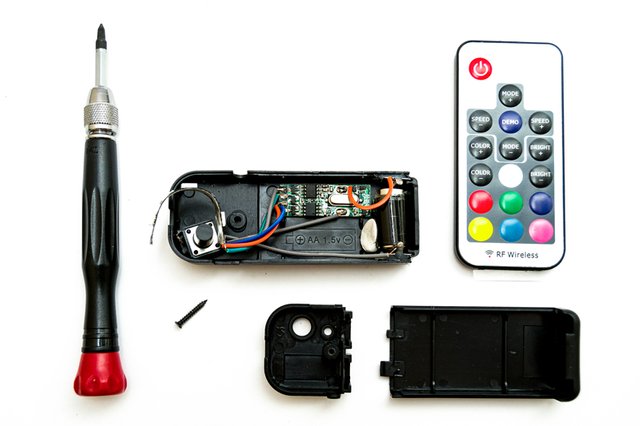
Finally a decided to start with it and I began looking in the drawer of spare parts and broken junk that I keep and BINGO!!!
There appeared before me a casing and the push button of an old and damaged inverter that I used with el wire.
It seems an interesting idea as I could host in it the RF controller, a LED module of a piece of LED strip that I found, a button, wiring and battery.
At first I was looking for introduce a battery that would give me the 5V I needed, and that would be small enough for everything to fit into the housing.
The first came into my head was to use a 9V battery :(
I´d have to lower the inside of the casing a bit and do some juggling to be able to fit all the pieces together, but at first it seemed viable. Then I realized that I also had an old diode lamp that used 4 batteries of button LR44.
Here you have a small installation scheme that I hope can help you.
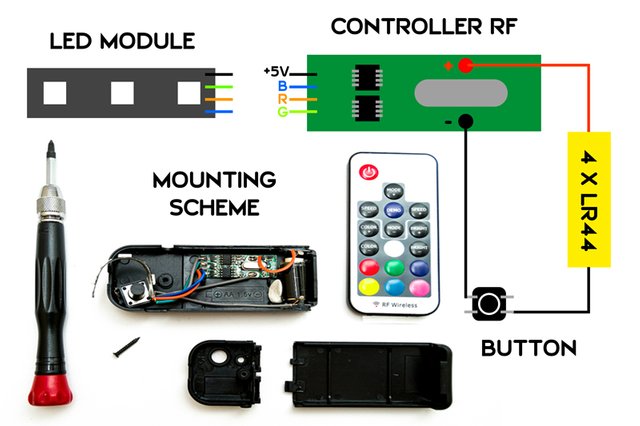
It´s a really simple scheme. It will only be necessary to remove the protective plastic from the mini RF controller, desolder the positive and negative poles of the power cable, and the four pins of the LED strip connector to re-weld as indicated in the diagram. And that is all. I´m sure people with more experience in electronics could get better it.
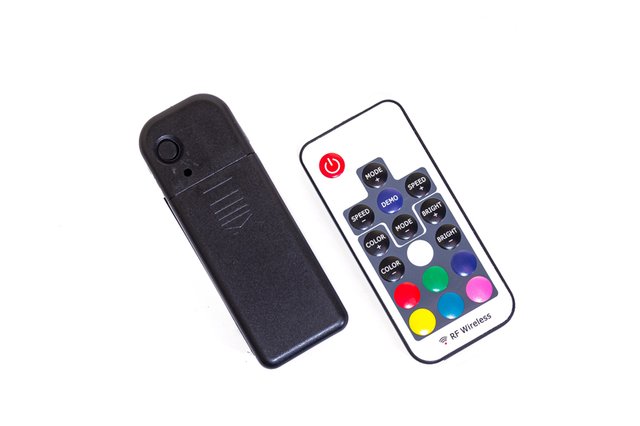
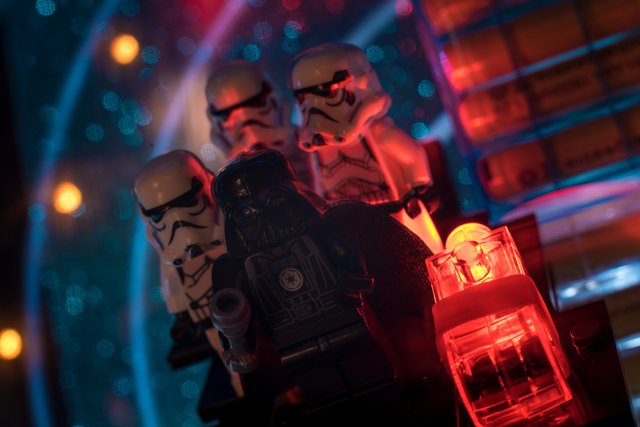
You can see now some images in which I have worked with it and hoping it will be useful to you.
If you have any doubts you know where to find me :-)
If you would like to see and learn more about Light Painting your can follow our community work in "Lightpainters United" and follow @lightpaintershub
-Spanish Version-
Llevaba algún tiempo con la idea en la cabeza de construir un pincel de luz para dibujar trazos, caligrafía, iluminaciones muy precisas, y todo aquello para lo que me pudiera ser útil. Tenía claro que lo montaría con un mini-controlador RF de tira LED, ya que disponía de uno sobrante de otra herramienta que fabriqué hace tiempo. Además me parece un dispositivo muy útil y manejable que con poca potencia, reducidas dimensiones y escaso conocimiento de electrónica, permite modificar con facilidad varios parámetros como el color, la intensidad o el modo strobe en la tira LED, permitiendo dibujar con una mano mientras la otra realiza los ajustes necesarios a través de su selector remoto. Tenía que ser algo ligero a la vez que cómodo en su manejo pero no se me ocurría en que tipo de carcasa alojarlo, por lo que tuve un poco aparcada esta idea.
Finalmente me puse manos a la obra y comencé a buscar en el cajón de repuestos y trastos rotos que guardo (por si les puedo encontrar otra utilidad) y BINGO!!! Apareció ante mi una carcasa y el pulsador de un viejo inversor estropeado que utilizaba con hilo luminoso. Me interesaba la idea, ya que podría alojar en ella el controlador RF, un modulo de 3 LED de un trozo de tira LED que encontré (dos de los cuales quedarán dentro de la carcasa sin utilidad alguna, mientras que el tercero lo encajaría en el hueco del cable del inversor), el pulsador, y su correspondiente cableado y batería. La cuestión radicaba en introducir una batería que me proporcionara los 5V que necesitaba, y que fuese lo suficientemente pequeña para que todo entrara en la carcasa.
La verdad que lo primero que se me vino a la cabeza fue utilizar una batería de 9V. Tendría que rebajar un poco el interior de la carcasa, y hacer algunos malabares para poder acoplar todas las piezas, pero en un primer momento me pareció viable. Luego me di cuenta que también tenía una vieja lámpara de diodo (de vete a saber que otro trasto roto) que utilizaba 4 pilas de botón LR44, con lo que le quite el muelle porta-pilas y ya tenía todo lo necesario para disponerme a montarlo.
Para los que como yo no controle gran cosa de electrónica tenéis aquí un pequeño esquema que espero os pueda servir de ayuda. La instalación es realmente sencilla, ya que solo será necesario quitar el plástico protector del mini-controlador RF, desoldar los polos positivo y negativo del cable de alimentación, y las cuatro patillas del conector de tira LED para volver a soldar como se indica en el esquema.
Y con esto termino, no sin mostraros alguna imagen en la que he trabajado con él y esperando que os sea de utilidad.
Si tenéis alguna duda ya sabéis donde encontrarme :-)
Si desea ver más lightpainting sírvase de seguir a "Lightpainters United" en @lightpaintershub
Congratulations @thelightcat! You have completed the following achievement on the Steem blockchain and have been rewarded with new badge(s) :
You can view your badges on your Steem Board and compare to others on the Steem Ranking
If you no longer want to receive notifications, reply to this comment with the word
STOPVote for @Steemitboard as a witness to get one more award and increased upvotes!
Fantastic instruction! We have picked your post for our daily manually voting initiative! 100% Upvote and resteemed to shine bright!
Posted using Partiko iOS
Hello thelightcat, welcome to Partiko, an amazing community for crypto lovers! Here, you will find cool people to connect with, and interesting articles to read!
You can also earn Partiko Points by engaging with people and bringing new people in. And you can convert them into crypto! How cool is that!
Hopefully you will have a lot of fun using Partiko! And never hesitate to reach out to me when you have questions!
Cheers,
crypto.talk
Creator of Partiko
This post was shared in the Curation Collective Discord community for curators, and upvoted and resteemed by the @c-squared community account after manual review.
@c-squared runs a community witness. Please consider using one of your witness votes on us here
Congratulations @thelightcat !
Your post was featured on our daily build newsletter! We've sent 100 liquid BUILD tokens to your wallet upon which you can sell, trade or buy on steem engine or SteemLeo. We've also shared your work on our Instagram, Facebook, and Twitter pages for more exposure.
Keep sharing your awesome DIY and How-to tutorials together with the recommended tags #diy, #build-it, #how-to, #doityourself, #build as well as posting from our website