Easy Black And White Portrait Conversion (Using the Now FREE Nik Silver Efex Pro 2 Plugin - Photography)
Introduction
Further to my previous photography tutorials I thought it would be useful to cover how I would do a basic black and white conversion using Nik Software's excellent Silver Efex Pro 2. (Note it is not a typo they really spell efex with one "f", I'll apologise in advance for any instances where I use two "f"s)
Nik Silver Efex Pro 2
A couple of years ago Google acquired Nik Software amongst much controversy due to many photographers believing that the acquisition would lead to the end of development of their much loved tools. The current status of Nik and their plugins is not clear as they have not been updated for a while. That said they still work fine with the current versions of Lightroom and Photoshop and best of all they are now free (I previously paid about £500 for them). You can get them here:
https://www.google.com/nikcollection/
Nik software also have some great tutorials on their Youtube Channels which I would strongly recommend.
https://www.youtube.com/user/NikSoftwareLessons
For me the real "jewel in the crown" of the Nik Collection is Silver Efex Pro 2 (SEP2). This was the first Nik product I bought and I believe it cost about £150 then. It is in my opinion much better than most similar products. The fact that it is now free makes it even more of a must have.
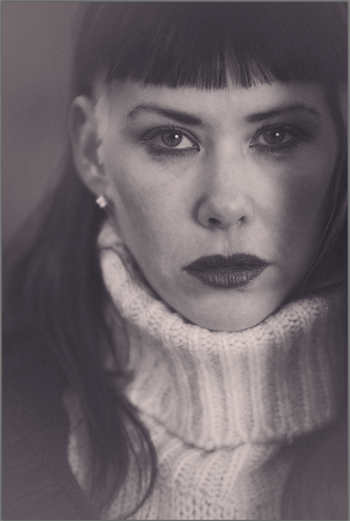
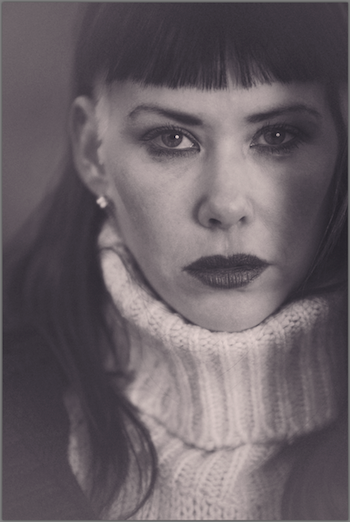
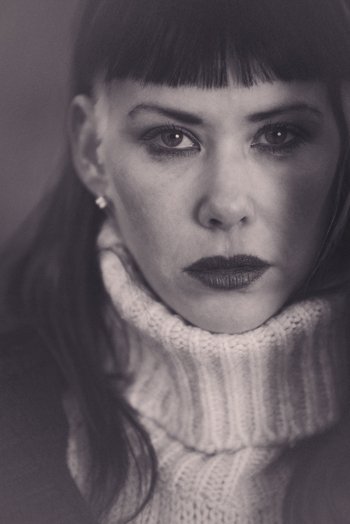
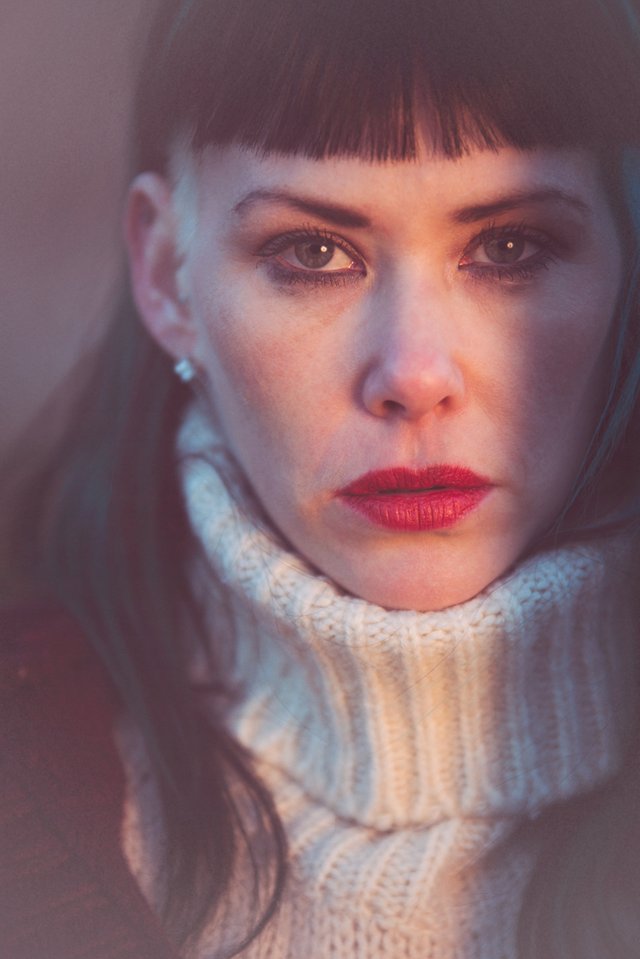
The Colour Photo I Am Using

(Scroll down to the bottom of the post to see the large version. Model is Karen Thompson Pringle)
This is quite a controversial photo for me. It was taken close to sunset with very unusual lighting conditions. There were multiple colours of light due to the warm ambient light becoming very blue as it passed behind icy winter clouds.
I was using a warm gel on my beauty dish and flash (towards the front of the model) to match the sunset light, however as the light changed I liked the combination of both tones and decided not to remove or switch gels. There was also a long shadow being cast by a nearby pole on the model, Karen's face.
I loved the photo at the time but at various points I have changed my opinions on it. Right now I like it again. I like the different shadows that are cast on the face and the combination of warm and cool tones.
The shot was taken using my Sigma 70-200mm/2.8 at wide open 2.8 aperture and full 200mm focal length which gives the very particular look that it is.
It should also be noted that this was dead of winter and this shot was taken on a beach in Northumberland. It was literally freezing and Karen was a real trooper during this shoot as we were both very cold. Her nose was running and her make up was peeling off - which I actually felt enhanced the feel of the shot.
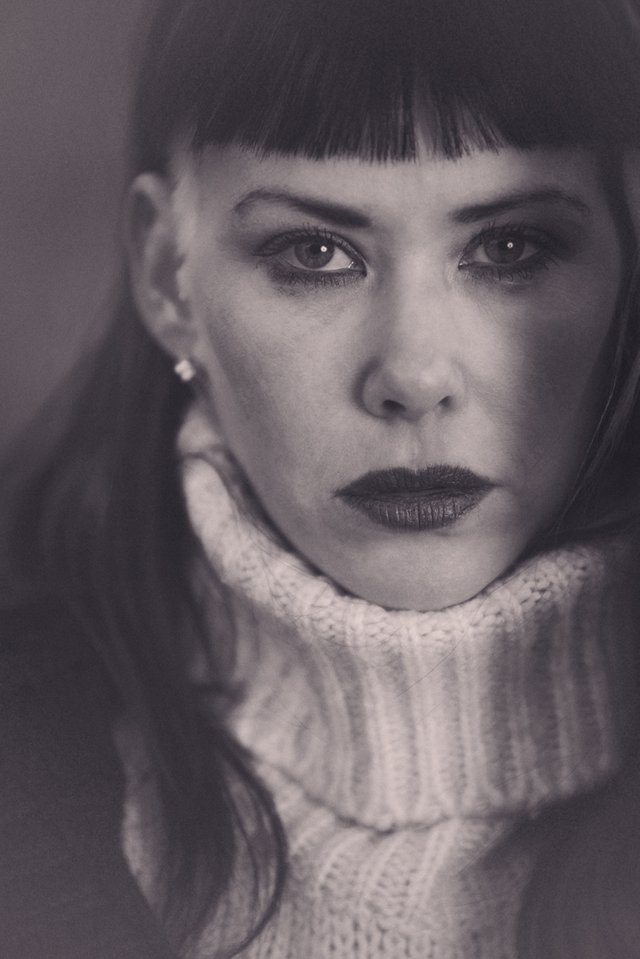
Given the strong shadows in this shot I felt it deserved a black and white conversion to see how it would look once the colour was removed. This also gave me the opportunity to create a new tutorial.
Silver Efex Pro 2
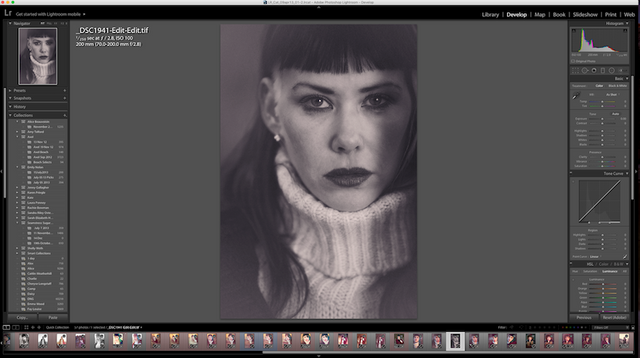
You can open SEP2 in Lightroom by right clicking on your photo and going to >Edit In>Silver Efex Pro 2 - assuming you have installed it correctly. In Photoshop you need to go into the Plugins menu.
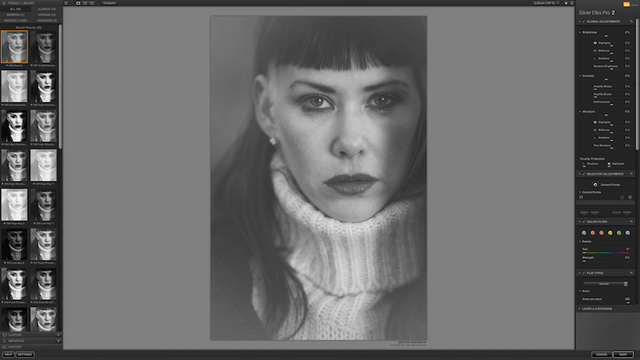
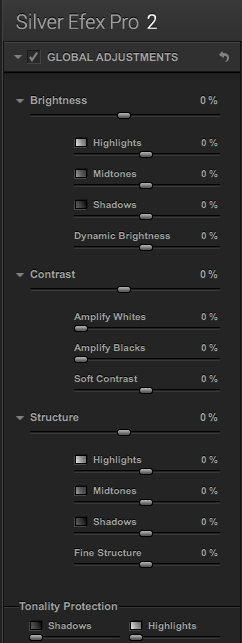
This is the main window. Here you have presets on the left side (these include any custom presets you have created). Adjustments are on the right side of the window.
Presets
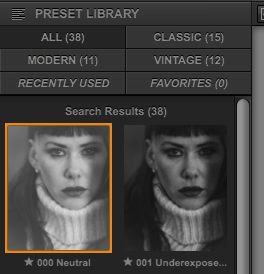
The top preset is "neutral" which means that none of the settings have been adjusted. I will select this for demonstration purposes.
Colour Sensitivity Sliders
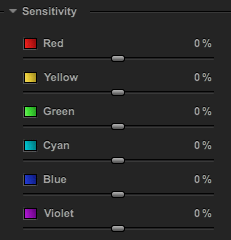
If you are doing a black and white conversion from neutral this is a good place to start. Adjusting the sliders allows you to adjust the brightness value of each of the colours red to violet in the photo. This allows you finer control over different parts of the image. Generally Reds and Yellows tend to affect skin tones in portraits. Blues and Greens tend to affect other elements like clothing and background (unless the subject has eyes of this colour). The best way to figure these out is just to experiment with the sliders - every photo will be different in it's exact colour composition.
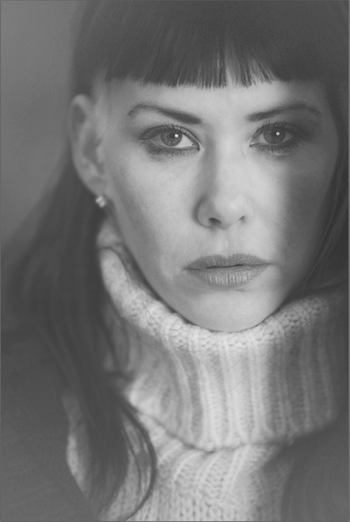
Decreasing Red Sensitivity
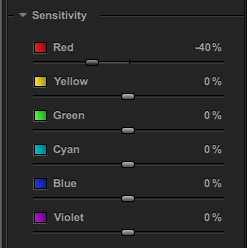
Here we can see the effect of decreasing the red sensitivity slider. The image is generally darker. This is most noticeable on the skin and lips.
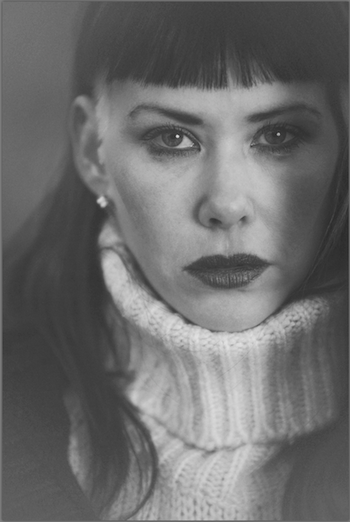
Increasing Red Sensitivity
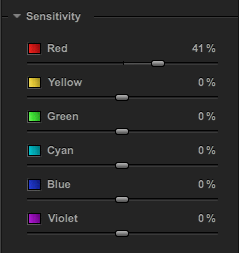
Here we see the effect of pushing the red sensitivity up. The picture generally gets brighter and we can see this most in the skin and lips.
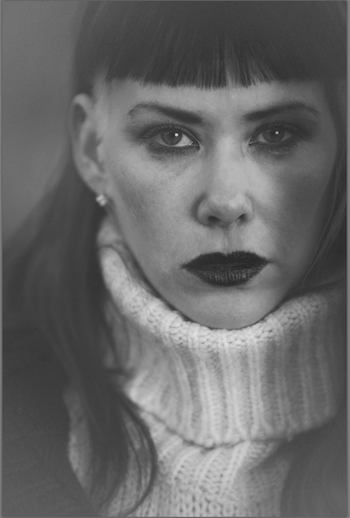
My Final Sensitivity Adjustments
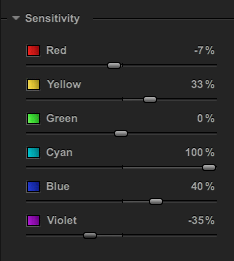
These are my final adjustments to sensitivity. This is down to personal taste and preference. Since Karen had partially blue dyed hair, increasing the cyan and blue settings made this part of the hair brighter and more white in appearance. This helped to differentiate it from the other parts of her hair more.
Grain Settings
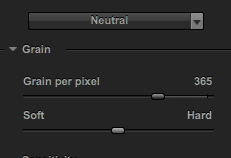
This is one of my favourite reasons for using Silver Effex Pro. The grain recreation engine it uses gives the most realistic and film like results. From what I understand their engine recreates the image using mathematical formulae that simulate individual grains - this is quite different to most plugins which simply add noise to the photograph.
Lowering the "grain per pixel" makes the film grain larger, raising it makes the grains smaller. The soft and hard slider adjusts how prominent the grains are.
It is almost impossible to see at this size though due to the lack of detail. I should have done some larger before and after screenshots to make it more obvious.
Silver Effex Pro also has a number of specific presets that combine with the grain setting to give a more accurate feel of certain classic film types. These are located in a separate drop down menu.
Silver Toning
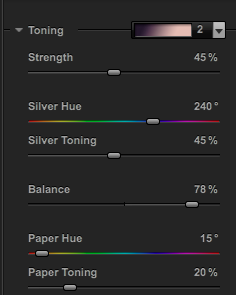
In traditional film photography people used to use various processes to add colour tones to their photos and most people are familiar with the common versions such as Sepia toning.
I have previously covered how this works in Lightroom. SEP2 has it's own version of this panel. In this case the Silver Hue and Toning slider controls the shadows and the Paper Hue/Toning controls the highlights.
There are also a number of common presets such as Sepia, Ambrotype, Selenium etc. Here I have chosen a split tone preset which I feel works well with this photo.
Vignette

Before After
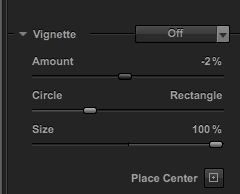
Old lenses and cameras used to impart a vignette on photographs and photographers would often exaggerate this effect to draw more attention to the subject.
SEP has a number of presets as well as custom options for this. The amount allows you to create a darkening (negative) or lightening (positive) effect as well as altering it's shape between being more circular or rectangular and changing it's size.
Unlike Lightroom you can also define the absolute centre of the vignette which is useful for certain types of shot. Here you can see the very subtle vignette I have applied in the before and after shot.
This shot already has a vignetting effect from the prominent shadows and so I didn't feel any more than this was required.
In fact one of the most common mistakes that I see people make on their shots when they start out is turning the degree of vignetting way up which just looks completely un-natural and strange to my eye - particularly on bright daylight shots.
Contrast

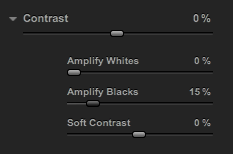
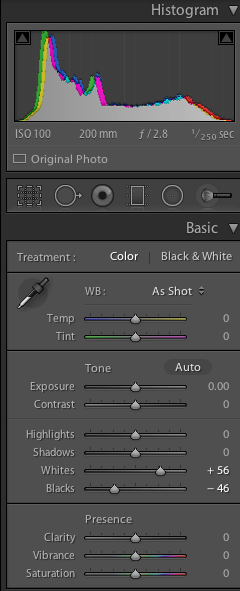
As a final touch I am going to tweak contrast a little bit. This is similar to Lightroom where Amplify White and Black corresponds to White and Black settings. Highlights and Shadows is in the separate Brightness panel which you can see below as an example. For this photo I have just increased the blacks slightly.
Lightroom
Finally after completing changes in SEP2 you click on Save in the bottom right corner and it will take you back to either Lightroom or Photoshop (depending on which application you are using the plugin with).
Using it with Photoshop allows you to put the black and white image on a separate layer and you can use different opacities to create some interesting colour effects which I might cover in a different tutorial.
Anyway for this photo I was using Lightroom and I tend to finalise finishing touches on my photo there because of how quick and easy it is.
I am fine with the way the photo is here but some people prefer a more extreme contrast effect. As you can see in the histogram in the top right corner there are still large gaps at the top and bottom.
Some people would normally stretch out the histogram by increasing the contrast slider (or adjusting the whites and blacks for finer control).
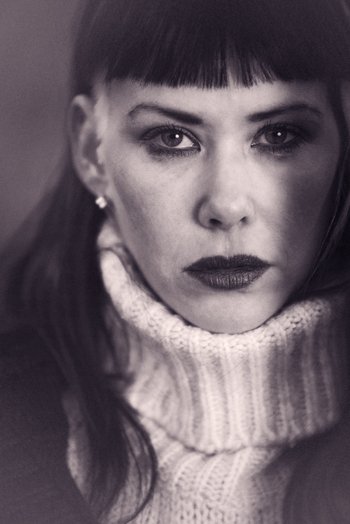
I don't like such high contrast images as I have said but just to demonstrate this I have done a comparison below in case you do.

Here are the changes which fill the histogram.
Before After (with high contrast)
The high contrast version is definitely more striking but I feel it looks less realistic and the difference is emphasised at larger sizes.
Comparison of Colour vs. Black and White
Colour Normal contrast
Colour High contrast
Personally I feel that I actually prefer the colour photograph in this case but it is close for me between that and the lower contrast black and white which I feel retains more of the feel of the original colour photo. The high contrast version has a very different feel which doesn't appeal to me as much.
Large Versions
Colour
Regular Black and White
High Contrast B&W

Conclusion
I have just scratched the surface here with what can be achieved with SEP2. There are many more advanced features that are best demonstrated in video tutorials - as you can find in the link to the Youtube channel I posted earlier.
One of these is the selective adjustment tool which allows localised adjustments to your images using a smart AI selection method which is only available in Nik tools.
This allows the kind of fine tuning that would normally only be available through the use of multiple layers in Photoshop. This tool was so good in fact that Nikon themselves used it in their own processing software.
If you like my work please follow me and check out my previous photography work and tutorials @thecryptofiend - hope you enjoy.
Technical Information:
- Nikon D800 Camera
- Sigma 70-200mm/2.8 lens
- Adobe Lightroom CC and Nik Silver Effex Pro 2 for processing.
(Verification for me here: http://www.aapicture.com/about-me)
Just found this! Great job. Well explained. It's my favorite plugin for Photosop CC! I too think it's the best Black And White plug in there is. I also use Topaz plugins, but had to buy them. I too used to buy the NiK software.
Wow, great work!! My wife handles the image editing but I know it is not easy.
Thank you:)
I love the nik software. I use silver efex pro too and it cost a hundred odd back in the day. I totally hadn't heard about the google thing. Will have to check it out as they made loads of cool plugins!
You should definitely download them now that they are free.
I'm on it now!
Great:)
Very interesting I bet it took you awhile to put this together
Yes I've been doing it slowly over the last week and a bit - it took longer than expected because of the issues with my eye which is still not great. It takes ages to get all the screenshots and arrange them in order so I just do it gradually that way I don't forget what I have done and you can do a little at a time.
Thank you! very useful post!
You're welcome. I'm glad you like it.
Excellent tutorial my fiend!! I love B&W photography and the ability to re-purpose a color photograph is very cool. Great work!
Thank you:)
Great and detailed post!
eyes of model so enigmatical
Thank you. Yes I love the eyes on this photo.
Great post! Beautiful photography
Thank you:)
Now THAT'S what I call a tutorial.
Thanks. It did take a while to put together. Once again I'm feeling unsure if I like the photo and if maybe I should have used a different one.
This is pretty amazing. I only did basic photo editing for newspaper pics.
Did you say the editing software is FREE?
Yes the plugins are now free but you need either Photoshop or Lightroom to use them. You can get them both (LR+PS) for £8.57 per month on the Creative Cloud Photographers subscription which is pretty cheap. The Nik plugins would have been an extra £500 on top if you got the whole package or £150 each as single plugins but they made them completely free in March:)
I have an older version of Photoshop and Illustrator. I'll have to check out the plugins because my family just shipped a bunch of old photos that I need to scan. I was hoping to surprise them with touched up digital copies - especially the old black and white ones of my great grandparents...and some photos from the 70s that has that strange orangey tint to them. Thank you for the information!
No problem. I think for retouching of dust and scratches you might be better off just using Photoshop on it's own as I described in my tutorial for my own scanned images to get the best results. Some of the Nik plugins might save you time after you've done this though.
Viveza is their plugin that allows for quick selective enhancement of things like colour and contrast. If you don't have Lightroom it is a good alternative that lets you make adjustments quickly without having to dive into the full Photoshop controls which can take a lot longer to use.
The control points system makes it easy to do localised adjustments without needing to be an expert Photoshopper or indeed needing a Wacom Tablet (which is a necessity for doing the same things in Photoshop the conventional way using layers).
They also have very effective plugins for reducing noise, sharpening etc. I would strongly recommend their Youtube channel to quickly get you up to speed on how to use the different tools - the video tutorials don't take long to watch and once you have seen how to use the tools it will save you a lot of time.