PHOTOSHOP PORTRAiT - TOOLS AND TRiCKS (MY WAY) /// 2 MAKE IT PERFECT ( AGAiN ) ! (>.<) + GREEN SCREEN ///++PHOTOS
Hello dear Steemers! Do you know how to fix blury photo you love most and make the best of your portrait? Last days I was creating a campaign stills and video images for a good client so I wanted to share process and experience in details with you along with some cool tricks.
I called my best friend to be my model as I knew we would have great fun making it, plus it was handy as friday night we usually go clubbing together. I just love how specific face and character she is so she was perfect for this shooting as they wanted unlimited time usage material licence (so no celebs or actors as they always having demands on time and budget). Eventho my friend isn't unknown, she was acting in TV show and she is musician and performer. I love her voice, reminds me of Grace Jones, and not only me. I am doing video for one of her songs as well.
So as this shooting demand for commercial billboard was all of the sudden and urgent and low budget, guess what - I was the one man band! (I love it and hate it same time, makes me feel like a superwoman but I get dizzy of speed when some extra hands are needed).
Therefore I decided to go to studio and just use CROMAKEY or GREEN SCREEN. So they can do with it whatever they want, once i punch it. Eventho in my mind was some cool color painted background with some drawings. I love it the simplest as possible.
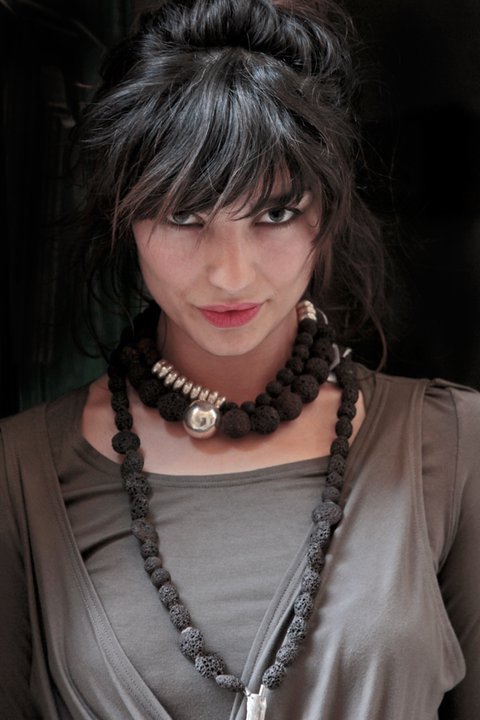
So at first I did this (note this was just a sketch):

BUUUUUT! They didn't like it :) She was too sexy and with attitude, plus they didn't want drawings. I always try to sell a little bit of art, but common clients wants perfect happy looking woman, without any flaws (which I adore), and often blue sky color in background. AAAAaaaaaaahhhhhh......
Me and model made really great shoots with various palletes of emotions and attitudes so they could really choose whatever they want from 209 successful shoots. I can't pick my favorite out of 112 tbh.
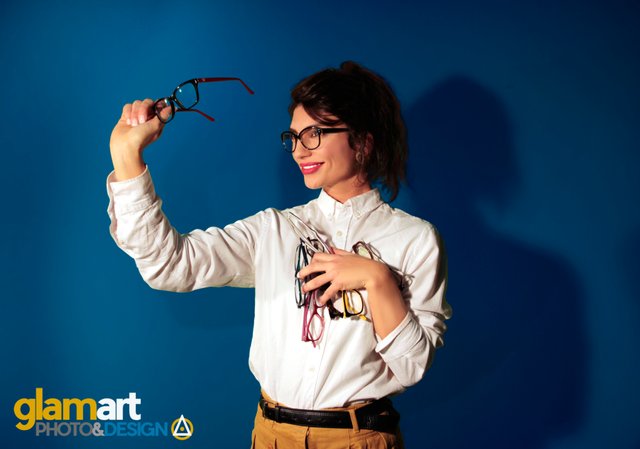
So we came onto this proposal.

This was the first picture selected. To be honest I was working as photographer from 2002-2008. Was even official photographer at some big budget movies. But, I wanted to do designs and movies more than this after that. So I gifted my camera and bought just Canon D60 because it was handy for videos (it has this monitor that you can twist and turn and I love it for playing). Since this was low budget I didn't bother to buy MARK 2 or borrow D1. I didn't even turn on RAW option ;)
Scrolling photos on shooting was cool and inspiring, they all looked amazing. I admit we got buzzed a little bit. It was friday night fever ;) BUT when I came home day after and seen on my large HD Screen I wanted to cry out loud (just kidding). They were all bit blurry, hehehe. Opening in Photoshop didn't make it better eighter. So I JUST HAD TO BE CREATIVE and TURN ON ALL MY PAINTING; VISAGE; IMAGE SKILLS I EVER HAVE!
1. HER BLURY MAJESTY! FCKD SHOOTS
How to fix problem when you are the only fuckup of a perfect shoot (ooops, like I am in this one)? Your focus is just happen to be OUT of key spots!. In real life there is no undo button, hehhe, but just anything can be solved if you are enough creative or if you know someone creative enough.
Notice on PIC 1, in raw material, how her eyes are blurred. The way to do it is use SHARPEN FILTERS. But it will only damage your shot even more. This pic is suppose to be enlarged on billboard.So sharpen plus enlargment, just wasn't my option. So i interpolated image, enlarged it first as I have pro machine that can handle it easily. Otherwise I would draw, retouch and all that stuff and then enlarge with interpolation. That can be set up under "IMAGE PREFERENCES" before you do resize.
After that I focused primary onto the eyes, as eyes are key spot of any portraiture picture. Or hands and mouth, as well. Everything else can be blurry :D Wohoo. I love the blurs, honestly. I dislike HD 4K picture, SAMSUNG TVs especially. Its picture is so unreal that it's killing my eyes literary.
So eyes, yes. I opened new layer above the pic. And simply painted with clear brushes beyond the white part and edge of the iris. Sometimes, I add a little reflection with white controlling the fill and opacity onto the brush. Whatever you draw on your portrait make it in another level, so you can erase, add, change, delete, see/unsee and so on. Every fragment that you paint, or color do it in another layer. And before that I even sharpened the particular fragments of an eye with sharpen brush. You can control it and make it natural or as lense would see it while preset sharpen filters are not that easy to control in such fragments or details.
2. GREEN SCREEN
A very handy gadget. Can be blue as well. I never tried, but I believe for Nikon users would be better green screen and for Canon's blue. Because Canon pictures are by default always little bit yellowish, and Nikon bluish. So be easier to cleen up after.
There is only one way to clean Green screen properly in PSD.
>>>> SELECT >> COLOR RANGE >>> as you select multiple droppers.
Green screen is rarely blank and clean of shadows. That's why you will need to manually select all shades. Choose mask to be seen as you do it in same option window.
Next you want to do is REFINE EDGE>>>>> I just put 10% smoother and that's it, explore other options but dont play with fuzziness in stills it looks lame in the end.
Then SELECT >>>>>> Modify >>>> Contract - to contract 2 px which is after best to redefine with eraser tool manually.
TAaaaaa-daaaaa! We can finally DELETE THAT GREEN SCREEN!
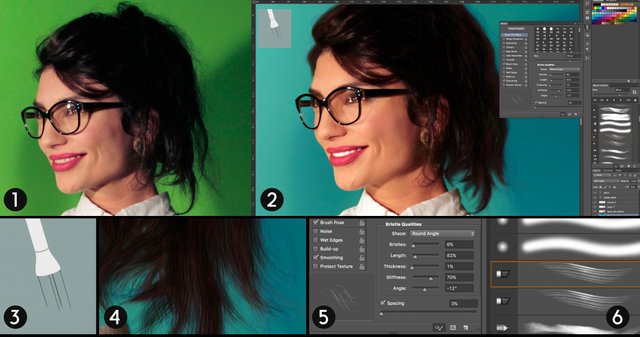
4. How to achieve interesting rich COLOR BCKG rather than cheap fill (IMAGE 1 and 2 )
So previous image 1 as you noticed is raw picture, and on the right image 2 is polished photo with custom background. I left the shadows, plus added some more to add realistic moment and painted the rest. To achieve such interesting COLOR you need to work in LAYERS with all possible options. So I chosed primary color to be grey blue with 3 tones from same scale. And I literary painted one layer where I want it more highlighted or darker. I added some more tones of blue to make it more interesting. And I make few more layers like this just bit different with green and violet tone. And on top of it all one more layer filled with high hue blue color plain. Then I play with layer transparency, fill and opacity as well as styles of transparency (darker, screen, soft light, hue, etc..). This first layer with painted darker and highlited spots I pass photo filter with particular color I want to dominate the image (my favorite is COOLING FILTER 82 and DEEP BLUE). In this image 2 one layer of background was filltered with "cooling filter 82" and other layer was filtered with deep blue to add richness in color. DEEP blue will add sense of mystic in it and depth. It is really interesting what all can happen in those mixing, you can play for hours, all colors and details are perfect with this method.
Some actions in PSD destroy the image, make barely seen circle trays, so when that happen, like it will after photo filter applying over painted surface, add some gaussian blur to restore the smoothness.

All of this resulting this final end Image 2. I could of make just one layer and choose a brush with that tone I wanted. But then the backgorund wouldn't be interesting to me or so vibrant.
5. ADDING MORE SHADOWS & HOW
This is easy and anyone can figure it out. As you already having layer of your model cut from green screen just select somewhere outside on empty space of that layer with selection tool. Then right click, SELECT INVERSE. Now click on layers to add new layer. Choose a color (I use dark grey or black) click FILL and fill inside of selection in that new layer.
Now you need to change perspective of that shadow. Best to use transform >> DISTORT TOOL to change it properly as you want.
After you distored shadow in proper direction I use transparency option OVERLAY of the layer to change it in background's tone scale :)
Then final touch, Use that smooth eraser brush large as you need, adjust low fill and opacity transparency of it so you can gradually erase end part of the shadow (in my example third of the figure, head and sholders). You erase it under one click, then again and again adjusting transparency to less and less as you go deeper.
5. IMAGE IS IN BLOODY DETAILS ;)
Same way I do everything in layers, so as I do details, especially them. Commercials need to have PERFECT MODELS, including various beauty treatments. My model was beautiful and character but she hates that kind of "beauty" so I needed to do it all in PSD.
- So I made her french manicure. Again I opened new layer, chosed smooth circle brush proper size, adjusted fill to lower so I can make it realistic. Thing is you need a really good mouse to paint a nail, and make even tips with all corners in one stroke. After that one more layer was added to paint more shines and reflections onto nails. I used often eraser too for final shaping of the edges. And one more layer for the extended tips of nail to give it proper french manicure look.
ex. image 3 and 5 are raw details, and 4 and 6 retouched
- the eyes - first I sharpened with sharpen brush as mentioned before the part of iris. In new layer I painted with white her white parts of the eyes with more filling to iris and less in the corner of the eyes.
- shadows were removed from glasses, same way in new layer just with carefully picking color with eyedropper from the source so I can paint above the same and exact color, always letting some transparancy flow to get realistic sense.
- Same way reconstruction of the eye under glass reflection was made. ALl you need to do is pick proper shades from source around that spot and brush it with smooth transparent adjusted size brush over that layer. Be a proper SMOOTH OPERATOR as you do this ;)
- all pimples, wounds and similars are removed with healing brush tool. But not spot! Use one that you must choose sample patch by going around area you want to "clone", pressing alt and click, then click over pimple and that will do the work. If you made a spot, instead of smooth skin, find better part to clone. Or adjust brush size. If that doesn't work go to my favorite method, new layer and paint brush :)
- TEETH CORRECTION . they are often yellowish so first thing I do is select them with lasso and copy to another layer. Then I use SPOONGE TOOL to desaturate them (but very little percentage of desaturation). After that DODGE TOOL, least possible percentage over highlights to whiten them out. It has to be done in one stroke otherwise you will get white spots. If it looks too american or over reacted then you make that layer bit of transparent over source. I think I overreacted in here but I liked it for this image.
- Reflections in the glass. I smothered reflection with eraser around the sharp spot to give it more soft feel. I don't like sharp reflections. I could of achieve it with smoothers over reflector, but I couldn't find them in studio, someone must have took it. I used video lightening kit. I love continuous lightning. Flashes disturbing my mind, perception and soul tbh.
- Painted the skin above her upper lip to get cleaner make up, she eats make up making funny lips movements all the time and I didn't have time to fix her make up all time. That would bother me, otherwise make up artist annoys you on the set with that. I don't like that eighter. It kills inspiration and interupts flow and mood.

In this another shoot I had to make more of her face retouching. And I solved it all with brushes. I highlighted with white low fill brush; middle of her nose, corner of eye, under eyebrow, middle of eye lid and top of her chin. I smoothed the shadows, with skin color brush and draw her hair and eyebrows with special adjusted brush. Again french manicure and on both of images I had to retouch her arms, cover her hair as client requested, and remove the marks or tattoos.
RESOLVING HAIRY ARMS OR EXCESS OF EYEBROWS
I just selected part of the arm and pasted it in new layer. Blurred it, used healing brush to recover anomalities and then in new layer i painted three tones of her skin, literary painted the hand in transparent filling. In the end of that reconstruction I fixed the edges with eraser, again as smooth operator :)
6. HAIR AND EYEBROWS CORRECTION
GREEN SCREEN messes up the hair, especially if the hair is messy like in my case. It will cut it out and model will end up looking like an idiot rather than a model. Notice that hair in tiniest detail has a lot of shades and colors, reflectines (shines) and is blury in endings and bit transparent. In this hair I found redish brown, dark brown, black and even dark teget violet shades.
So what you want to do is find the most perfect brush, because you don't want to draw one line after other. Even with this brush it has a lot of stroke to be done. So I found the best brush for doing hair (img 3). You will not find it in presets because I made it that way. This brush when pressing and twisting or turning to make a wave has a very smooth head and adjusts onto your movement (with mouse movement). You can literary paint with the mouse with this brush. What that means? I noticed when I make a movement with mouse as if I am holding a brush it makes exact stroke with faded endings - just perfect what you need for hair endings. It has pressure, angle, and you can adjust just anything with this brush, how many bristles it has, and so on.
IF THERE IS NO PERFECT BRUSH - MAKE ONE!
Image 6 presents brush in presets which I have chosed and changed. Image 5 is settings I made to get it. It took me two nights to experiment with brushes and settings to get this perfect one. And I'm happy to share it. Image 4 is one of the zoomed detail of reconstructed hair. In real print size (150cm h ) that looks quite natural, nice and tidy. As you brush change colors and fillings and opacity. Change angle and sometimes even size of brush. Hairs in endings are thinner, more transparent and often lighter. I could of done more detailed hair in here but sometimes it's just not worth it. Know your media, because it depends of size, is it print, is it screen, how would your details look like. Observe differences.
One more detail I forgot to mention, green screen sometimes reflects almost unseen green translucent glazure onto the model's edges. Make sure to little desaturate that if source color allows you to. (Never over face or skin), but it is less likely that the skin will reflect it anyway.
RECAP
So once again, here is larger format of the photo to recapture all details.
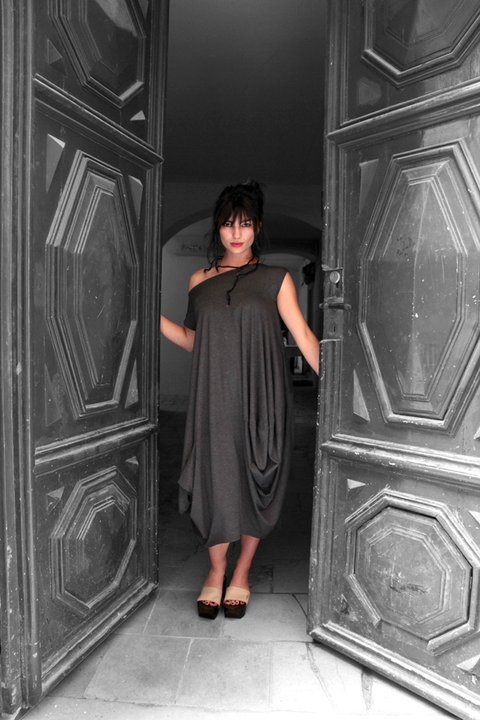
And some more of mine photos, in different story, made with the same model few years ago.
Hope this was of use and someone might learn something, even if it's another point of view in their observations.
_____________________________________________________________________________
/////////Image source: (my page for design) www.o7design.com , where I upload images for steemit as well. //////// 1 / 2 / 3 / 4 / 5 / 6 / 7 / 8 / 9 / 10
_____________________________________________________________________________
*Anyone who wants or needs this images can use them from this source as long as they credit me properly as author and notice me prior. If you need high resolution for print or other, please contact me at [email protected]
_____________________________________________________________________________
And, in case you wondered, Glamart is a page I run in free time on Facebook where me and my friend publish just paintings we make. So whatever I make in creative manner i put Glamart sign on it.
_____________________________________________________________________________
author (text and images):
Omarrium (Olga Andonovic)
Thank you for reading and being here!
>>>>>>>>>>>>>>>>>>>>>>>>>>>>>>>>>>>>>>>>>>>>>>>>>>>>>>>>>>>>>>>>>>> Omarrium :)(:
Amazing post! There is so much knowledge you share. Also your writing is really fun to read. Resteemed.
Awwww thank you dear shortcut! You are always first to check it :) Sharing knowledge is one of my favorites. Feels good. Especially when someone is eager to accept it. :)
You've come to the right place for sharing knowledge :-) There are so many creative people here and I'm happy if I can help you to find your audience.
Perfect! :) <3 I was a little bit confused of all those posts,but I noticed every now and there are really valuable gems of people. can't wait to meet them creatives !
I can totally understand your confusion. There have been lots of posts about the first real-life meetup recently. That's just cause 200 of the most active bloggers really had a good time :-) In my opinion collaboration is one of the strengths of this community.
This is really beautiful.
Awww thank you from my heart Skapaneas :) Beauty has a really big role in my life.
This post has been ranked within the top 50 most undervalued posts in the second half of Nov 16. We estimate that this post is undervalued by $7.10 as compared to a scenario in which every voter had an equal say.
See the full rankings and details in The Daily Tribune: Nov 16 - Part II. You can also read about some of our methodology, data analysis and technical details in our initial post.
If you are the author and would prefer not to receive these comments, simply reply "Stop" to this comment.
Thanks for sharing @omarrium , Good Job there.
as you been follow back from my post. @bullionstackers
thank you! Appreciated very! :)
Upvoted and followed. Thank you for your kind words on my post https://steemit.com/art/@iamwne/how-steemit-boosted-my-career-design-competition-my-most-ambitious-project-ever
Thank you! :) I was happy to follow