Tips for Improving your Long Exposure Photography
Long exposure photography is a fun and creative way to take a shot. It can dramatically change a scene and opens up new possibilities for what you can do with an image. It is however very easy to screw up a long exposure, and I have screwed up plenty in the past so I will share with you my tips for improving your long exposures so you can skip the screw ups I made!
Essential Equipment
There is certain equipment for this that is essential. If you don’t have this in your kit bag the I wouldn’t recommend a long exposure attempt:
Tripod
You need to keep your camera as still as possible and a sturdy tripod will do that best. If you have a more lightweight tripod try and weigh it down, especially when it gets windy. Many tripods have hook on the underside that you can hang things on. Both my tripods have this and when it gets windy I will hang my camera bag from it to add a couple kilos to the tripod.Camera with ‘bulb’ mode
You will need to set the camera to bulb mode in order to control the exposure time from a shutter remote. It also sets your camera to full manual so you need to dial in all your other settings manually. This is best as it affords you the most control over your shot.Shutter Remote
Even pressing the shuttler on your camera can cause it to shake and will blur your image. The shutter remote avoids this. However, if you don’t have a shutter remote you can always set your camera to the 2 or 10 second timer thats built into most cameras. This delay helps avoid the shake of pressing the shutter as it gives the camera time to stop shaking before it takes the shot.Something to cover the viewfinder (electrical tape works well)
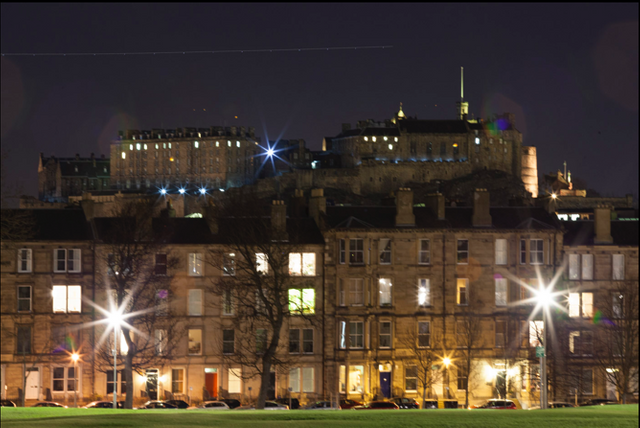
This is something that took me a while to figure out and is critical if you are doing long exposures at night in an urban area. Light from behind you will leak into the exposure from your viewfinder (say a passing car’s headlights or a street light).
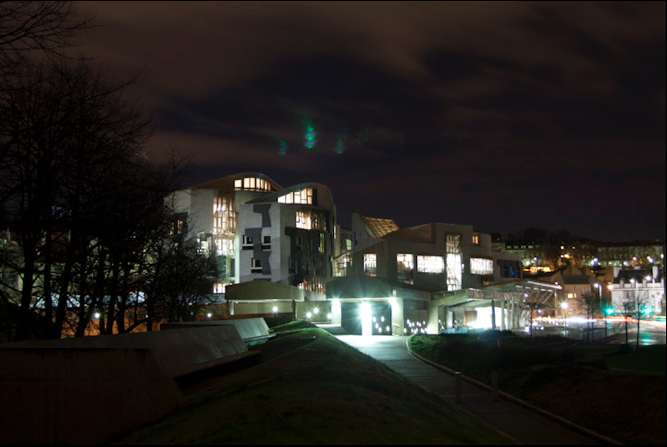
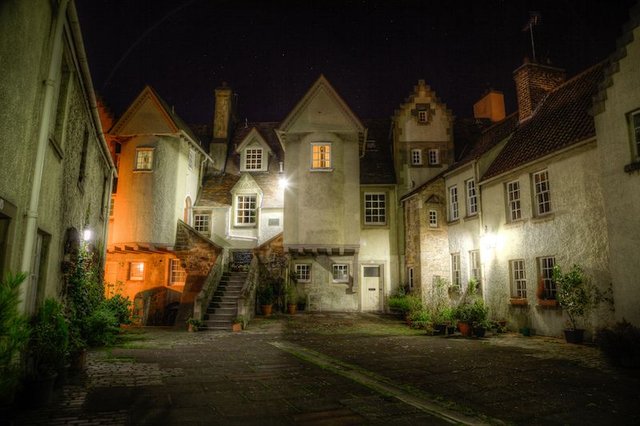
This is one of my first long exposures, and there is a lot wrong with it, but you can see the most glaringly obvious problem, those phantom lights above the building. They came from a light source behind me that leaked into the viewfinder:
Nice-to-have Equipment
Some equipment is just nice to have as it extends the range of your capabilities:
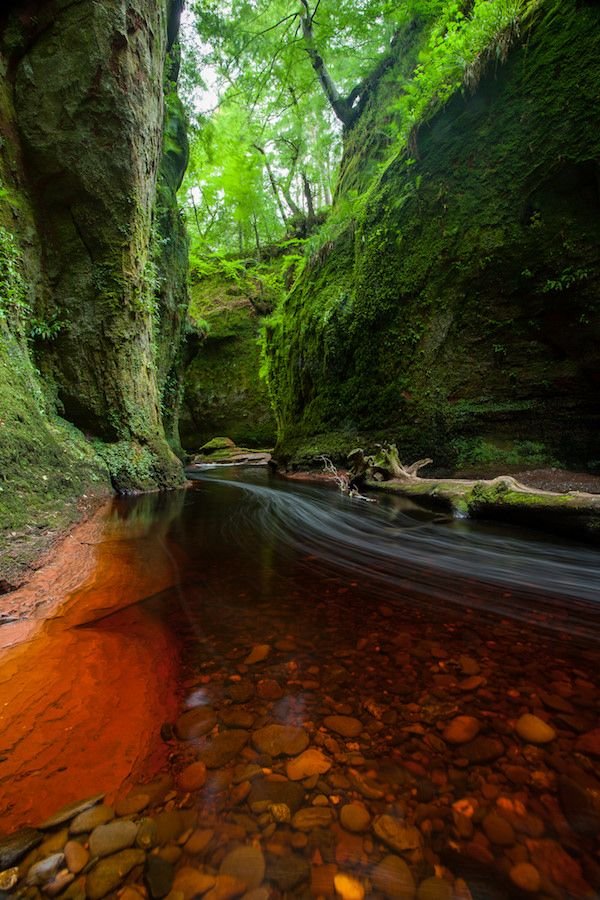
- ND filter - 10 Stop
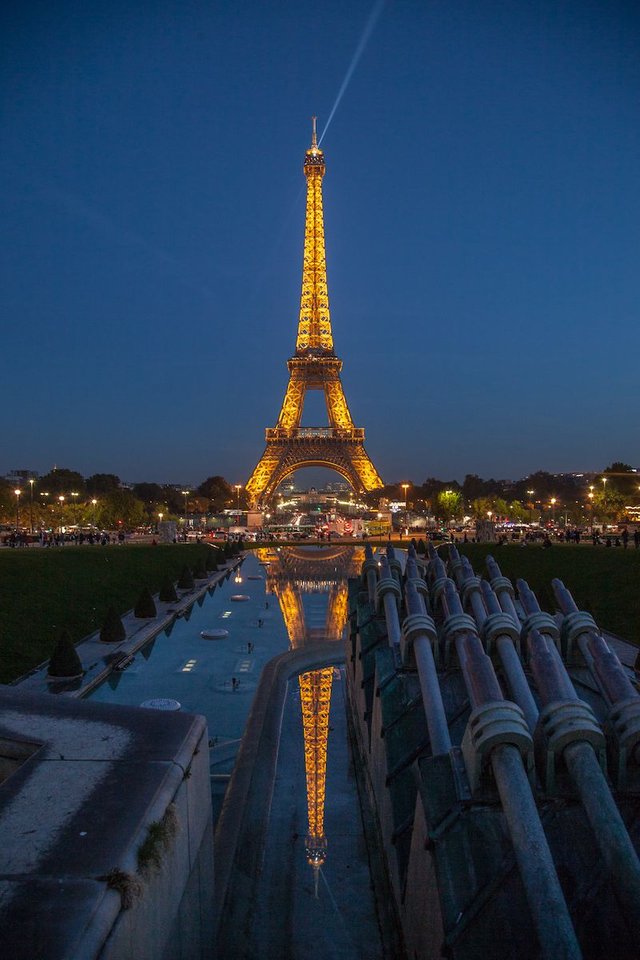
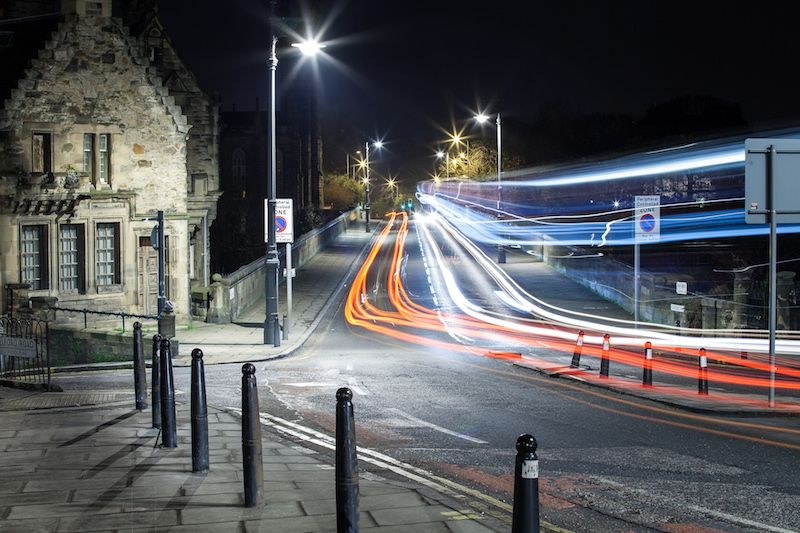
This is a great piece of kit for doing day time long exposures. It’s excellent for those times you have water in a shot you want to smooth out or you want to create a sense of motion in a day time image. It doesn’t need to be a 10 stop filter, it can be anywhere from 2 to 10 depending on how long an exposure you want to make or what effect you are going for. Here are some examples:
Lens Hood
Lens flares are not just a daytime problem when shooting at certain angles from the sun. When the sun is down its replaced with street lights and lights from buildings. These can create horrible lens flares that can really screw up your shot. A lens hood can go a long way to alleviating this issue. If you are still getting lens flares then you need to re-think your composition and place your camera at a different angle from the light sources near you.
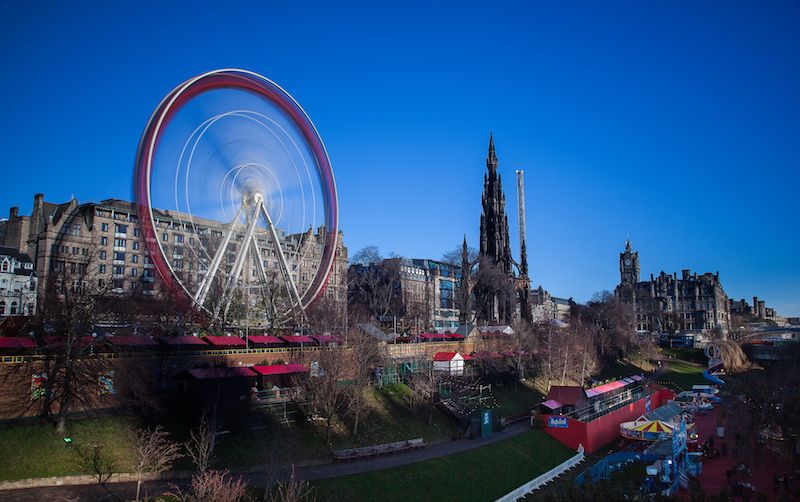
look at how badly i screwed this one up:

and this one
Forget the fact that its out of focus for the moment. We’ll cover that later.Extra Batteries
Long exposures take a toll on your battery life so if you are doing quite a few in one evening it is worth taking a second battery along so your session isn’t cut short.
Your camera settings
ISO - keep you iso as low as possible to avoid noise. Noise is much more obvious in long exposure night shots than any other. I tend to keep mine around 100.
Aperture - I keep this as low as possible too, but it depends on what your want to achieve. If you want a low depth of field that keeps everything in the image in focus then f/18 - f/22 or more is good. It also creates that starburst effect on lights you often see. A higher/wider aperture i.e. f/2.0 - f/8 will give you a stronger depth of field and between f/2.0 - f/4 you run a good chance of getting some nice bokeh effects.
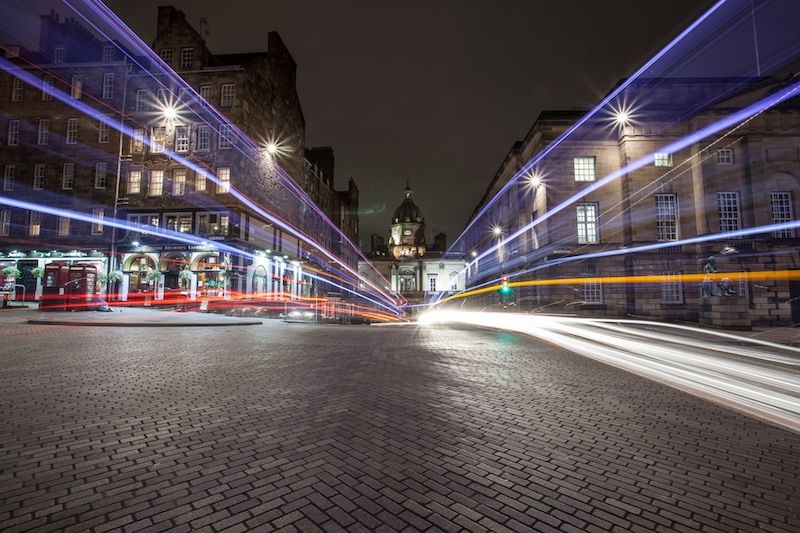
Shutter Speed - this one will entirely depend on the conditions at your location and you will need to wing it. I often start with a 30 sec exposure time and then adjust after I have reviewed the image.
Bring it into Focus
Focus is important, it can make or break you image. Nothing looks quite as shit as a long exposure thats not quite in focus. I may be exaggerating but it looks pretty bad, but there’s a simple technique to avoid this. Set your camera to Manual Focus!
Once in manual, use the live view mode on your camera. once in live view mode you can zoom into the area of the shot on your screen that you want to have as the sharpest. Then, while zoomed in you can manually adjust the focus of your lens until its as sharp as you can make it. Then you can zoom out and since you are in manual focus mode, you don’t have to worry about the camera trying to refocus when you hit the shutter.
Mind your highlights and your shadows
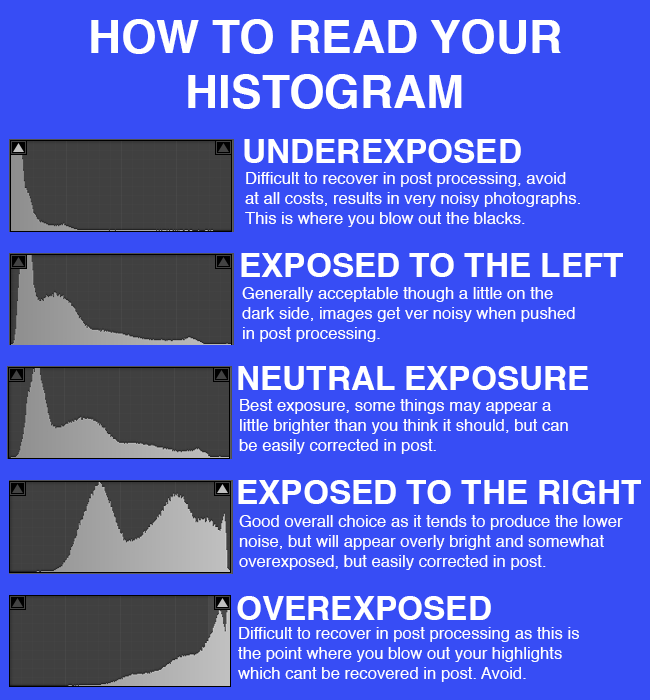
The histogram is your friend.. learn to read it. One of the main things people often get wrong in their long exposures is to either to blow out the highlights and overexpose, or to underexpose and loose the shadows to total black. Sometimes you will do this for intentional effect, but generally you want to avoid it. Remember the shot above with the light leaking from the viewfinder? The windows in that shot have no detail because I overexposed and blew out the highlights!
If you have live view on your camera you can usually also super impose the histogram over the live view and you can see what your settings will produce. you can use this as a guide for your camera settings. Here is a nifty cheat sheet I made:
Color Temp/White Balance
Its often over looked but pay attention to your color temperature/white balance. You want this to be on the colder side 4500 - 5000k if you are in an urban area as many street lights give that horrible orange glow. This is also something you can adjust later in lightroom or your prefered photo editor (provided you are shooting RAW which you should always be doing!).
Here’s a rather extreme example:
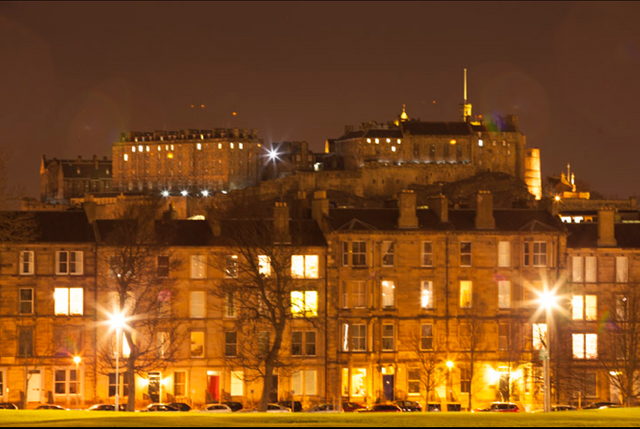
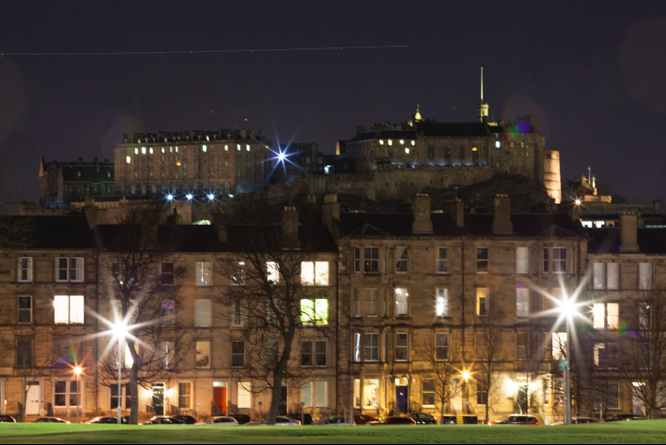
See the difference between the two?
Post Processing
Post Processing is a rather personal process that greatly relies on the individuals tastes and vision for their image, but there are some general tips I would give that I start with in all my long exposures:
Adjust the white balance/color temp to a more realistic setting - especially if your image is mostly orange from the street lights
Tune the highlights up or down to bring back detail
Tune the shadows to bring back detail
Adjust the blacks if adjusting the shadows has taken away from of the contrast in the image.
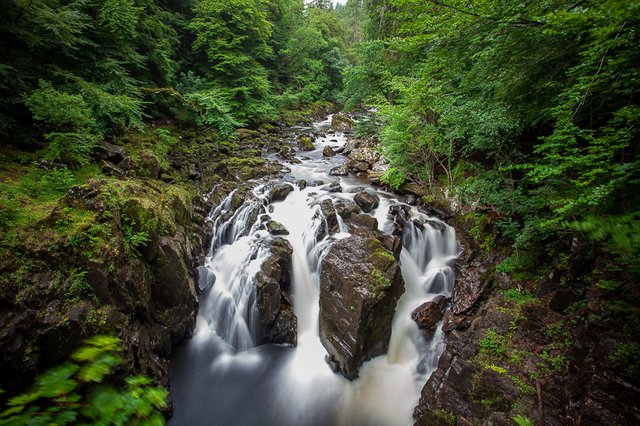
That’s it, beyond that is your own preference I feel. These are the key aspects that I work on and have helped me produce shots like these:
Thanks for Looking.
Follow me and read more of my posts here: @fiftysixnorth
Don't forget to Upvote and Resteem
Thanks for sharing this, hoping to have a better photography experience with tips. And those are some fascinating pictures.
Thanks! I hope it helps you in some way :)
It surely will....
Ok this is really amazing my friend. Thank you for sharing this, much new information for me and sweet how a picture can change like that.
Your pictures are truly spectacular, love it.
I have to try some of this but I guess it will take time to get it right... Lol
Stay awesome and have a wonderful evening.
Thank you! I am glad its helpful to you :) It still takes lots of practice to get things right, but these tips should help improve things quicker :)
No thank You 😉 this was fun and interesting info, just love to learn new ways to make effects and things with pictures and se the changes. I'm still learning so thank you for sharing this and I belive its harder than it looks and will take time to get it right.. Lol
But hey practice gives results right!
Have a wonderful evening my friend 🤗
Thanks, yes, it just takes time and practice :) have a great day!
So true 😉👍
Stay awesome and have a great week!
Great article, extremely helpful , I enjoyed the histogram examples !!
Thanks! It took me quite a while to work out histograms, how they work and what they mean etc, I wish I had something like this when I was learning so i thought it would be useful to make for my fellow steemians :)
Great advice. I have a better understanding of the histogram now.
Thanks! I am happy that its helpful to you :) histograms are pretty easy to understand.. if someone explains it :) took me ages to work out!
I take it as a sign that I really should get more into Long Expo. Excellent article and clear and to the point explanations. I need to save this!
Thanks! Glad you enjoyed it, I hope its useful to you and helps you with your long exposures :)
Fantastic post a lot of great tips here, thanks for sharing all this great info
My pleasure, I hope its of some use :)
It is for sure some new and some I need to act in
Thanks for sharing, my friend, your post is really useful and enlightening. Covering the viewfinder is something I've learned from my mistakes, also. Still have to try bulb in an effective way, though. I'm a bit lost in using it. I would add also in your awesome post the blocking of the mirror, at least I do this on my camera when I use my tripod, although I don't know if all DLSR cameras have this feature. Thanks again!
Thanks! Yes, you are right, the mirror lock up is really useful too. Thanks for mentioning that, I forgot about that one, I often forget to use it when I'm taking photos! :)
Mirror lock up... I was wondering what was the name in English... Now I know! Thanks! It's wonderful how we all learn from each other. Love this!
PS: I never forget to set the mirror lock up but almost always forget to cover the viewfinder ;)
haha! I sometimes forget the viewfinder as well! I really need write down a checklist i think ;)
Lol, I was thinking exactly the same some while ago ;)!
Really great tips and simply easy-to-follow instructions ! Bravo, great post! Now all I need to do is buy a camera and these few pieces...and I have this post for reference! O! and simply stunning pics! :D