Bobby Boe: Fotografenwissen #3 • photography & image editing

Dear Steemers,
This post is the first english post in this series of image editing and photography. I hope you enjoy my topics about
- how to improve image quality made with mobile phones,
- how to create albums and collections in picasa and
- how to change colors selective with photoshop.

Recently I held a seminar about taking photos with smartphones, so I thought some of this information might also be interesting for people on Steemit.
The big advantage about your phone and photography is obvious...sit is at hand when photomotivs like situations you want to hold photographically for later...suddenly pop up in front of you. A smartphone has less weight than a camera and it is also very comfortable for looking through the picts on a bigger display than cameras usually have.
But of course there are not only advantages, but also disadvantages.
The most significant disadvantage regarding photo-quality might be the very small sensor. While on one hand, this small size enables the phone to incorporate a camera and being very thin at the same time, on the other hand a small sensor means image quality is prone to noise. To avoid noisy photos one should not increase ISO to much (which normally is done automatically in your phone, as you are normally using A (Auto) - mode. As soon as there is not enough light, ISO will go up to compensate the lack of light ... in result automatically the picture will be much noisier than pictures taken in good light conditions.
However there is another way to get more light than increasing ISO... you can increase exposure time. The disadvantage here is that it is much more difficult to avoid shaky images.
One of the most important factors to improve image quality in smartphone-photography is holding your camera still.
The way you release your shutter can make huge difference.
Try to find something to lean against while shooting, even better lean the smartphone itself against something like a wall, a door frame or a table.
One more valuable thing to think about is how you press the shutter. This depends on your camera app as well. On some older Samsung phones and others the shutter only released when the finger left the button on the touch display. This enabled the photographer to hold the camera still and concentrating on the right moment to release the button instead of concentrating to hit the button without missing it and giving the phone a little shake.
This information can make the difference between a good and a bad photo my friends ... and it is not difficult! However if your phone starts to shoot fast series of photos when holding the shutter, you can not do it this way but there are other ideas to help you out. One good alternative for your camera app might be the app “open camera” (open source, without any advertising, without any cost). This works only for android phones and can be downloaded as usual in google Play Store. This app offers a lot of cool features including real HDR, manual camera setting and much more … and the shutter works as described above.
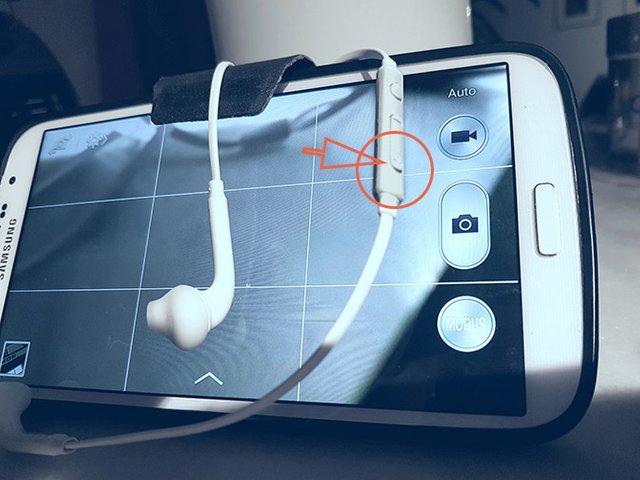
One more way to press the shutter of your phone very often is the volume-up button and the coolest thing this also works using the volume button of the little headphones that came with your smartphone … probably you have them with you anyway as you don't want to heat up your brain while speaking on the phone.
Using this headset and pressing the little volume key, you can release the shutter while pressing the phone against the wall to avoid any movement. Best conditions for best photos!

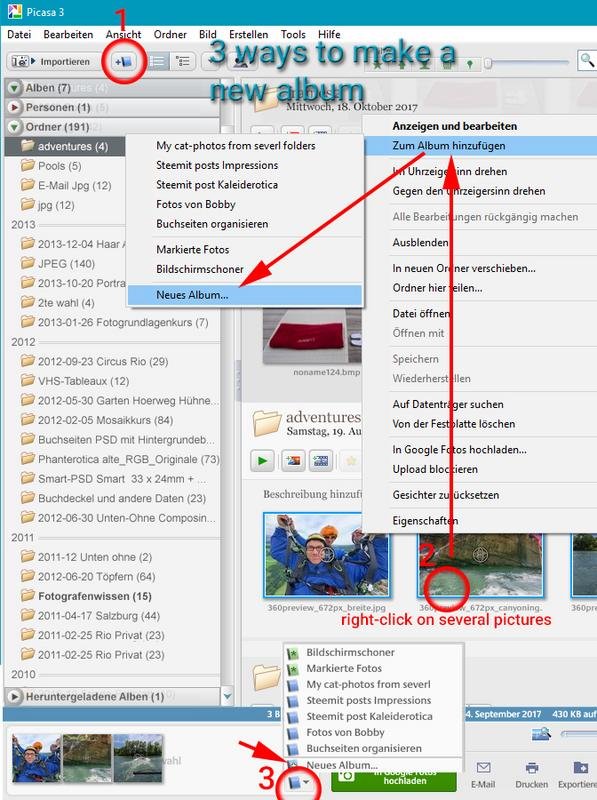
Picasa... folder, albums and collections
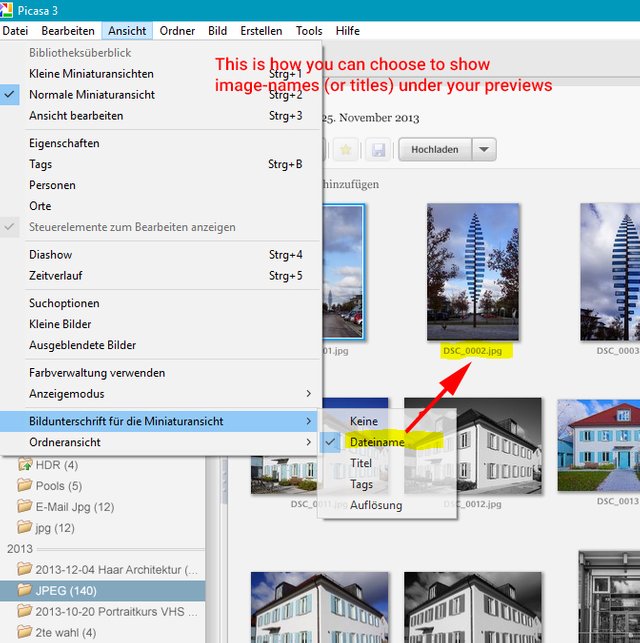
I introduced picasa in my last posts. This time I want to show you something you might have been missing as it is not the default setting … however, I like to see the image-file names under the previews. So this is how you can change it the way you like. I am sure, you can find it, even if I use the german language version in the screenshot.
Although Picasa shows pictures in real folders corresponding to your harddrive, it does not show the hierarchical structure of folders from your drive in default view. You can switch to folder tree view ... but I would rather recommend to understand how picasa was designed to be used. To put things in order, … instead of nesting folders in folders on your harddrive, you can use “collections” (as folders for image folders) and albums for groups of images that you want to show together, without the need to have these pictures in only one single folder on the hard drive. One photo can show up in as many albums as you like...without moving a single copy of that photo from its folder on your hard drive.
By doing this you save hard drive-space, but nevertheless can have any of your photos in several different albums.
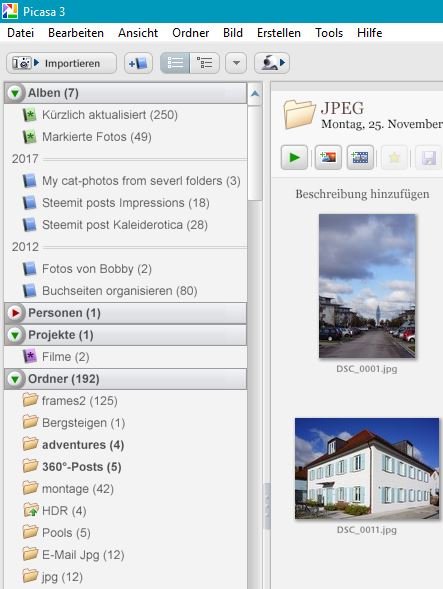
The green book-icons are automatic albums, the blue ones are created by myself. For example I could collect all cat-photos from diffeerent folders in one album.
I created the album with the name "My cat-photos from..." as you can see in the screenshot.
You can not group albums any further.
Albums cannot be ordered in folders ... many picasa-users wanted that feature ... Gut Google did not fufill their desires but but gave up picasa instead.
This how you create albums in picasa.
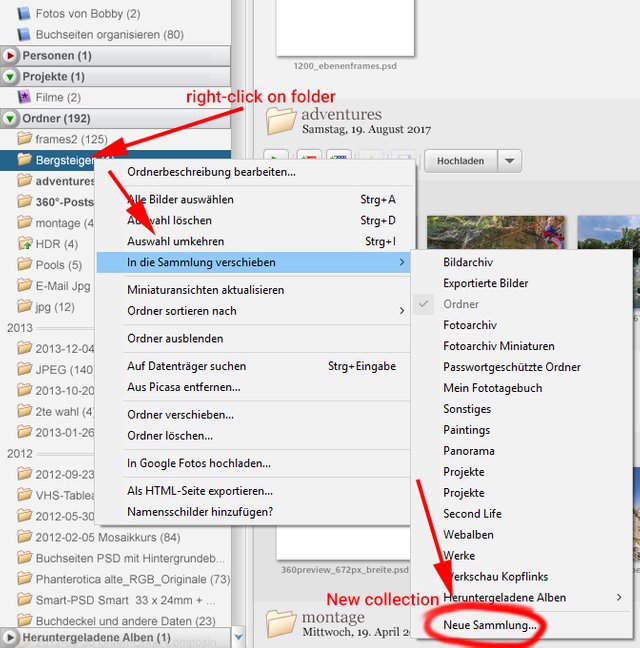
Collections are "picasa-folders" holding real folders as subfolders
You can order folders into “collections” only one level (no collections in collections). This means you are virtually putting real folders in some "picasa-folders" called collections. The folders are not moved anywhere, it is only a tool to organize your data within picasa.
For example in the screenshot above, I have one collection called "ordner".
This is how you organize your folders in collections.
If you request it in comments, I will explain real cool things you can do with albums and collections in picasa in future posts.
I am here for you! Tell me what you want to learn!

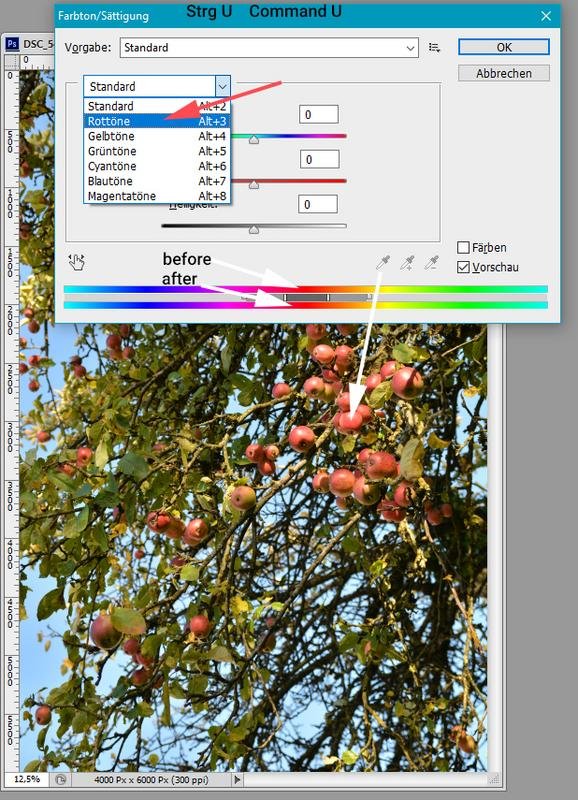
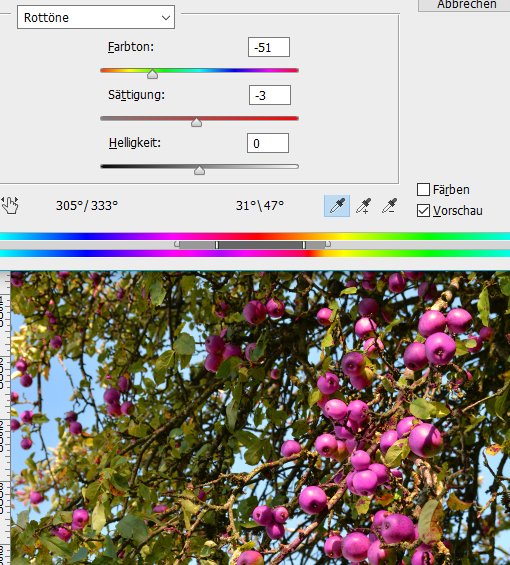
Using Photoshop to change selective colors
(suitable for any CS or CC version and even older versions)
This is called selective color correction, and this is not done by selecting all apples trying to create a lasso-selection.
Press
Command U Strg U
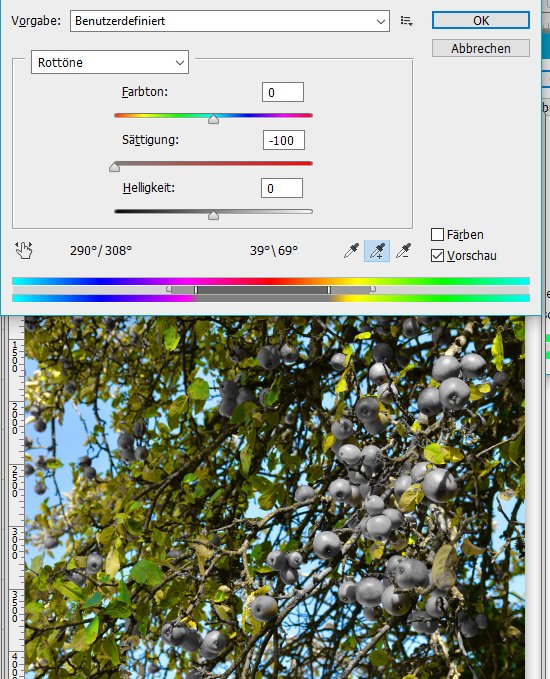
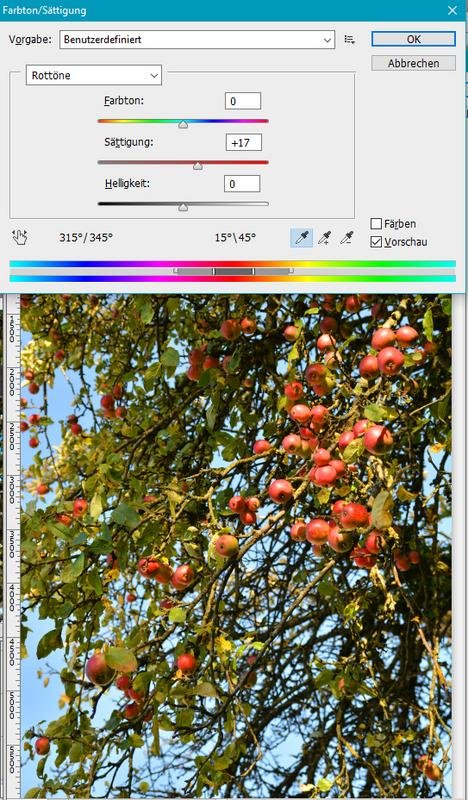
I am expecting your questions in the comments.

Beitrag zur Installation von Picasa
Installation of open camera in Google Play Store (Open Source Freeware)

This reminder reminds you about posts only from this series about photography- and image editing issues. You can deactivate at any time using the red button. Press the green button to activate and don't miss the next post about Fotografenwissen (photographers know how).
You can speak to me in german, italian or english language!
 |
  |
Coaching zu Fotografie oder Bildbearbeitung via Videochat?
Ihr findet mich unter dem Namen "herrbobbyboe" auf Skype.


|
I will upvote your friendly comment! |
||
|
If you resteem my post I will:
|
Suggesting the app "OpenCamera" is basically the right idea. Hower, I would not use the HDR-feature of the app, but turn on exposure bracketing instead. The built-in HDR feature doesn't do a very good job dealing with ghosting which will invariably occur since a smartphone takes up to several seconds for 3 exposures.
With exposure bracketing the photos can be processed (tone-mapped) at one's convenience with a more suitable program. Personally, I'm partial to "Fusion HDR". The summation operator in the free version is easy to use, easy to understand and ghosting is virtually eliminated. For a few dollars, one can buy the prog and gets many more options. For Windows.
http://fusion-hdr.com/
If it must be done on the phone, there is an app by Mark Harman (who created "OpenCamera"). It's called "Vibrance HDR" and offers a number of processing options vis-à-vis the HDR-feature of OpenCamera. However, ghosting is still an issue with "Vibrance HDR". The app can also do DRO, a HDR-like contrast enhancement requiring only a single image. For Android.
https://play.google.com/store/apps/details?id=uk.org.opencamera.vibrancehdr
Worst case scenario, you don't want to bother with HDR. Exposure bracketing still lets you pick the best picture of 3 and avoid blown-out areas you hadn't considered when shooting. To polish that right on the phone, I recommend "Snapseed". For Android.
https://play.google.com/store/apps/details?id=com.niksoftware.snapseed
Here is a HDR drone shot (3 exp) I took while I was out scouting for my upcoming sightseeing video (follow me) on the UNESCO World Cultural Heritage Site "Voelklingen Ironworks". I processed this quick and dirty on my phone with "Vibrance HDR". If you look closely at the vehicles in the roundabout, you will notice the ghosting. In this case, it was acceptable, because the drone - unlike a phone - takes the 3 exposures very quickly and the cars are just tiny viewed from above. (Plus, the shot was just for reference.)
Thank you @folker-wulff, that was really detailed feedback! Really valuable!
Nice post! What will happening, if someone resteem your post?
I will have a look on your stuff.
Who is Benjamin? ;-)
Why don't you make your posts bilingual? As a german learner, i'd benefit greatly from that :)
Hallo, ich bin immer noch dabei auszutesten was am günstigsten ist. Aber du sprichst, bzw. schreibst ja gut englisch und zudem sind die screenshots ja in deutsch. Ich hoffe du konntest alles verstehen!
Ja ich hab's verstanden, danke sehr :)
I like your post brother and always give u upvote and follow u.
if u like my post Please brother follow me and give me upvote.
Thanks
These days I don't bring my camera to often since iPhone pictures became much better than before.
Howeve holding it still is still a challenge, and leaning it somewhere too. I usually don't have a tripod with me
However good post, you got my upvote.
Beste Grüße aus Japan
Will you try the trick with the headset button?
If I can leave the phone somewhere and am close enough for sure
There is a trick you can use: A loop of string, measured from your toes to approx. chest height. Put one foot through the loop, the other end around the phone held with both hands. Both elbows in against the body, pull the phone up, placing the string under moderate tension. If done correctly, you have a very stable system. Can be done for a few seconds with a little practice, i.e. good for long exposure night shots etc. The string, of course, bunches together and fits in every pocket. No excuses. ;-)
What about using 2 of these strings to build a triangle system... following theoretical thoughts this should ad one more component to stability :-)
It is roughly based on triangles: The arms are taken in and form a triangle with the chest to give lateral stability. The body, the outstretched arms, and the string form a vertical triangle. The only disturbance comes from rotating in the hip and (negligible) sways back and forth. Both can be excluded by leaning against a wall.
And yes, I have seen photographers put a (larger) loop under both feet to get a triangular string. In my opinion, though, the required stance with legs spread apart is less stable than "my" technique with one foot in front of the other.
As so often in life: whatever melts your butter, just as long as it works for you. So try both.
BTW, for those taking panoramas, the string also comes in handy: put a weight on it, place a marker on the floor, and rotate the camera around the plumb line.
Dieser Artikel hat mir jetzt nicht wirklich neue Erkenntnisse gebracht, aber ich hoffe auf künftige spannende Artikel von dir. Upvote, resteem und Follow hast du. Schau dir auch meine Artikel an.
Danke dafür!
Hab picasa noch nicht verwendet, denke mir mal nach deinem post das ich es doch mal ausprobieren sollte, danke lg
Es gibr leider auch einige Merkmale die nicht mehr so gut funktionieren wie zu Zeiten als denen das Program noch von Google gepflegt wurde... zum Beispiel die Suche nach Tags die bei mir regelmäßig abstürzt, aber es ist der Hammer welche Funktionsvielfalt man kostenfrei bekommt. Obwohl es die Picasa Webalben nicht mehr gibt, kann man mit Picasa dennoch Bilder zu Google Photos hochladen. Am Rande bemerkt, sind diese dann mit einer beständigereren Url erreichbar als dies bei normalen Google Photos Alben der Fall sein soll (hierbei wecheln die URL schon mal, hört man von Bloggern im Internet, die darum in Beiträgen lieber auf Bilder verlinken die "archive" in der Url beeinhalten. Diese behalten angeblich die Url längerfristig bei.
Thank for the photoshop tip with the selective color correction. This should be faster than using masks. 🙂