Photoshop. Curves

Continuation ...
So, let's continue with the Curves tool. By the way, about the interface language. When I started working in Photoshop, it was only in English. I have to say I didn't know English at all. Now I know several worlds but It's still not enough.
Then there were localizations of third-party authors. Most often they were crooked, with strange terms and no desire to move on to them did not arise. Then Adobe made official localization, but here I am already so used to the menu in English, that I could not understand what it means to an item of the interface in translation. So, I use the English interface.
Curves...

Before us is an image. Our task is to correct the image. First you need to think about what we want to do. It is most important. The statement of the problem. A global task and smaller tasks that will lead us to global. The task is set - to make the image contrast, brighter, tastier. This is in household terminology. Well, so be it. The first thing to do is bring the image to full-contrast. This means that we have to place all the brightnesses we need to the full possible brightness range.
To do this, we create a correction layer for the curves.


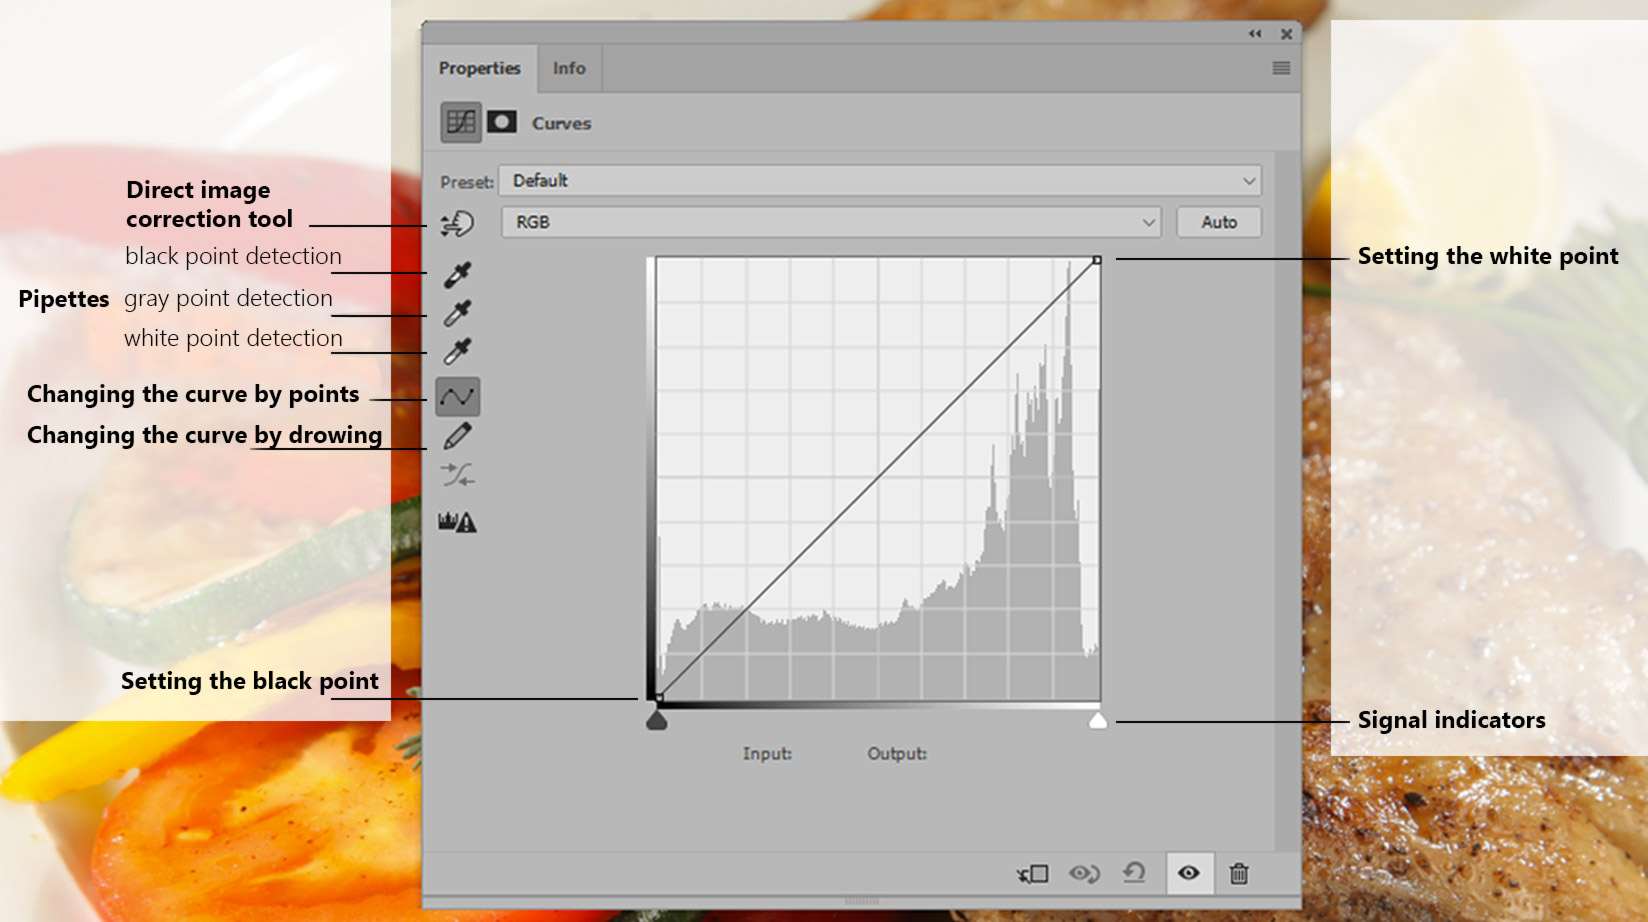
We see a histogram of the distribution of brightness. We need to set the value of the black and white points of the image, so that the whole image will be recalculated relative to the new values. For this we will use pipettes. On the panel we see three pipettes. One for a white point, one for a gray and one for a black one.

If we double-click on any of the buttons, a dialog will open to select the color value at this point. If we leave all three zeros for the black point, (since we open the image in the RGB color model, then we have our own brightness for each channel (red, green, blue), and we get 0 for each channel), then when we set such a black point on the image, all that will be darker at the starting point, everything disappears. It will be cut off. The same story with a white dot. If you assign 255, 255, 255 for the white point pipette. the maximum possible and poke into the image, indicating a new value of white, then everything that was lighter in the original image will also be cut off. Let's have it in view of.
Now look at the sliders under the histogram. One black and one white. These are the cutoff indicators. If we move them to the center of the histogram, the image will change, the details will disappear, and the cutoff will be performed. If we move the white slider - all the brightnesses from 255 will be cut off. If the black is from 0. If you move the sliders with the ALT key pressed, then we will see what will be cut off. This is a very convenient way to determine the place on the image that has the highest and lowest brightness. Those. just what we need is a point of white and a point of black. We understand that if we indicate new points of black and white, all that stands out brighter and darker than them - will go into the cutoff. In order to make this care not so sharp, let's set the value for the white point not 255,255,255 and 245,245,245. Those. the smallest is darker, and the value of the black point is 10, 10, 10, i.e. slightly lighter ...


I want to emphasize, we are interested not only in the darkest and brightest points of the image, but such, but with the condition that they are important for the plot. Those. we return to the idea that before you start to change something in the image, you need to know for sure what :)
So, we expose the white point and the black point. When setting the white point, I use the cut-off view, shifting the sliders with the clipped ALT and studying where I will have the first white space.


Glare I miss, because they are breakdown. Those. they can not be oriented.
I choose where after there poke a pipette, setting a new white point.
The same with the black dot.


The image became more contrast. The parasitic yellowness of the dish went away, the colors became more juicy ...

Pay attention, our curve, which in the beginning was just a line, turned into a line and three more color lines. These are the modified curves for each of the RGB channels. About them, we'll talk separately, but for now look at our common curve (which we have so far direct). By the way, it's called a master curve. Since it controls all three curves of each channel.
Paradox. We call the curve, and we have a straight line on the monitor. Let's make it a curve. We will take into account that if the slope of the curve increases, i.e. the line becomes steeper - in this zone the contrast increases. If the curve becomes more flat - the contrast drops. And, if somewhere the contrast will increase, necessarily somewhere it will fall.
Let's look at our picture. I want to increase the contrast of the chicken. To do this, you need to make the curve steeper in the area where the chick's brightness is located.
Here, experience will come to our aid. And if not, then a button with a thumb, a button for direct image correction. If you press it, then moving the cursor over the image, we will see on the curve of the cups, showing how bright the point on the image is ... We lead the chicken and see - it's medium tones and a little lighter ...

So we will support the curve slightly upwards, so that it would become steeper in the chicken zone and see the result. By the way, if you hold down the mouse button in the mode of direct correction, you can control the curve based on the picture itself, but for this, again, you need an experience that would fit in your head, as the tool responds to the impact.
In the end, we got a picture:

We did not touch the gray point. It would be required if we had a parasitic shade after the reduction to full-contrast. Well, and of course, a very simple image, for which there is a white dot and a black one. And often, in the image there are no such points in an explicit form. There are light areas and there are dark areas. How to be in that case - next time ...
wonderful :)
Hello!!
I gave you an up-vote.
Please follow me if you like and we can share posts and up-votes and help build our profiles.
great to see someone teaching photoshop here on steemit! looking to learn more from you.
Thank you :) I hope it's useful :)
World of Photography
>Visit the website<
You have earned 6.40 XP for sharing your photo!
Daily photos: 1/2
Daily comments: 0/5
Multiplier: 1.28
Server time: 01:26:54
Total XP: 1939.81/3200.00
Total Photos: 128
Total comments: 12
Total contest wins: 22
Follow: @photocontests
Join the Discord channel: click!
Play and win SBD: @fairlotto
Daily Steem Statistics: @dailysteemreport
Learn how to program Steem-Python applications: @steempytutorials
Developed and sponsored by: @juliank