SEC 20w3 | Ladies Skirt Base Pattern Layout
Hello #patronaje-s20w3 Team |
|---|
Hello My Steemain Friends ,
How are you. I hope you people of steemian are good and enjoy your life . Well I am well. May God bless you all. Today I am writing about an interesting Steemit Engagement Challenge S20 - W3: which is all time my favourite topic “Ladies Skirt Base Pattern Layout" this amazing challenge organised by @lunasilver . So, in this post I am going to share my point of view about this topic.
 |
|---|
Skirt layout measurement

Skirt length 15.5 inche
Waist 28 inche
Hip height 15 inche
Hip circumference 24 inch

Step 1
Now first of all we took a chart paper. On which we could mark the measurement of our skirt. We drew a line by taking a margin of one inch on both sides of the length and width of the skirt.
We wrote A on the corner where both the lines meet. For example, if we have kept the length of our skirt 15.5 inches, then we will measure 15.5 inches in length and mark a point, which we will name B.

Then from point B, we will measure one-fourth of the hip circumference towards the width of the skirt and mark a point, which we will name C. Then we will draw a straight line from point B to point C. We will divide 28 by 4 and take out one-fourth of it. Which will be 7 inches, so the length between B and C will be 7 inches.

Now we will draw a straight line upwards from C and name it D point.

After that we will draw a line on the extra part left from d and name it E point. Then we will join E point with the line below, we will name it F point.
Step 2
Now we will draw a straight line from A point taking the length of hip 7.5 inches, which we will name G point.
Now we will measure one fourth of our waist and add 1.5 inches to it and put two points, which we will name h1 and h2.
In this way we will make 7.5 which is one fourth round waist by adding 1.5 to it and make it 8.5 and put a mark on it.
Now we will join A and E points by taking a distance of half an inch from h1 and h2.
Step 3
Now we will put dots in it i.e. front part and back part. The only difference between front part and back part is the waist. Front part has more waist and back part has less waist.

Now we will put its dot at a distance of 3 blocks and then at a distance of 3 blocks we will put a dot, so that when its pleats are made then it looks good. We will put this dot at a length of 4 inches.
Step 4

We put two dots in the front, now we will put two dots on the back also in the same way.

Step 5
After this we will dot the curve of the hip and the curve should be such that it curves down and meets the straight level.

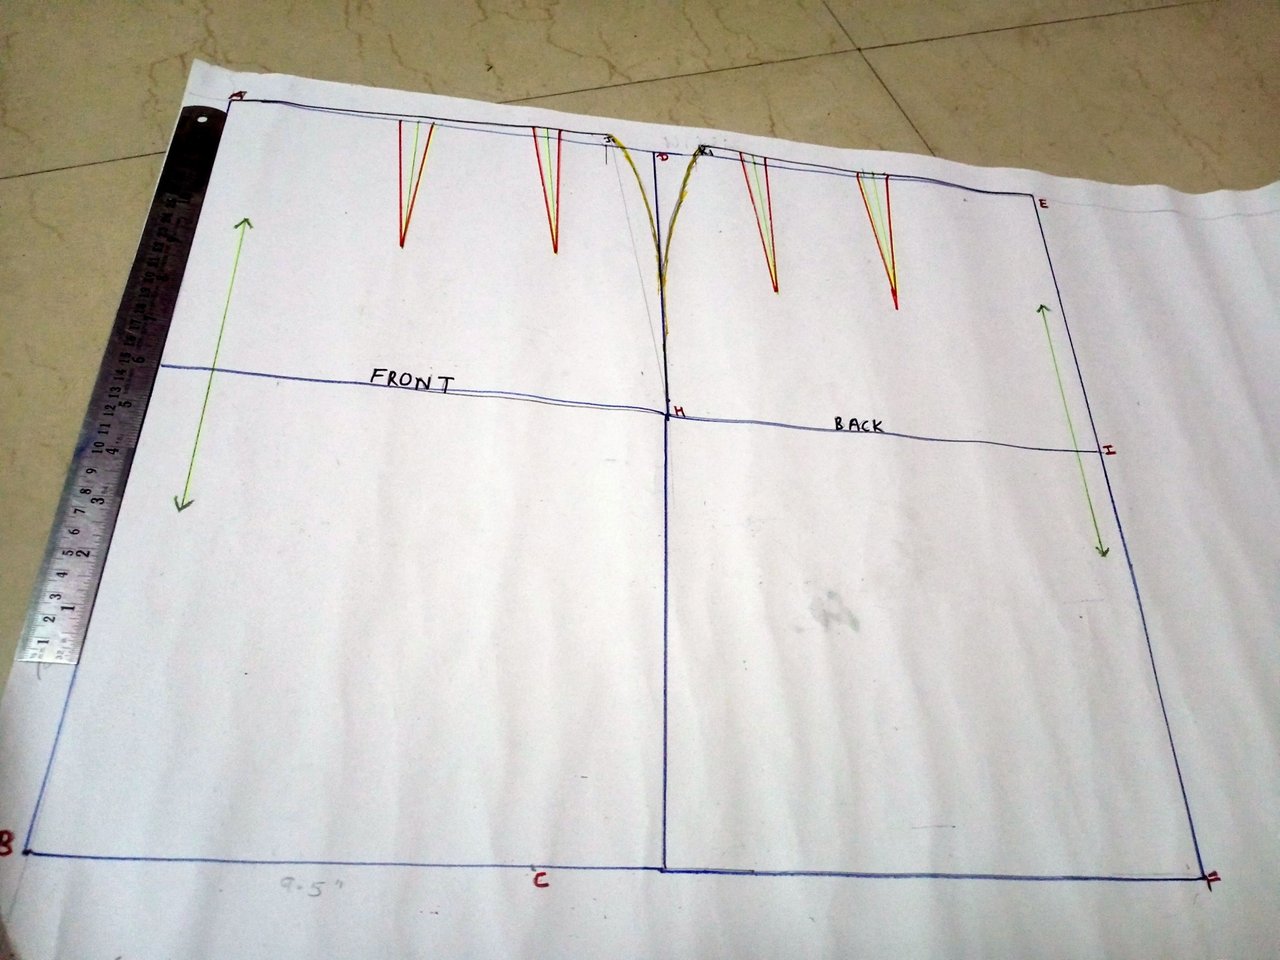
Similarly we will take a same curve on the back side, it is a little sharp, but it also meets below the straight level.

In this way our skirt layout is ready in 5 steps.

I want to invite my friends to take part in this contest: , @suboohi, @goodybest , @eliany , @anasuleidy"
Thankyou 🙏
Great post.
Upvoted. Thank You for sending some of your rewards to @null. It will make Steem stronger.
Hola amiga @aviral123 que bonito te quedo el patrón de la falda.
Has hecho una buena explicación fácil de entender.
Te deseo éxitos en tu participación.
Bendiciones!!
Your post has been rewarded by the Seven Team.
Support partner witnesses
We are the hope!
Very nice keep it up 💯