How to effectively use the Explorer II in NextColony
Good morning settlers,
today I want to help you a bit in how to effectively use the new Explorer 2. As you might know, it is 6x faster than the basic Explorer 1 and has a probability to find a planet which increases with the distance. But what does this mean in practice? Here is some help...
Where is the Explorer II most effective?
At low distance, the Explorer II is basically useless, as it has only a very low probability to find a planet. At longer distances, however, it is much more effective than the Explorer 1 as the probability approaches 5.5% at very long distance. The following chart shows you the probability to find a planet at different distances:
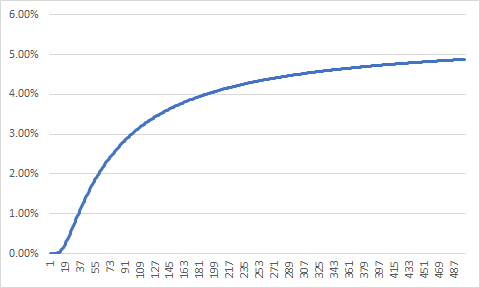
However, the longer the distance the fewer explorations per day you can do. So to really judge the effectiveness of the Explorer 2, we should look at the probability to find a planet per hour of use.
The following chart shows the development of the hourly probability. As you can see, the sweet spot to find a planet is at a distance of 60 tiles, with almost identical values in the area in the area +- 20 tiles.
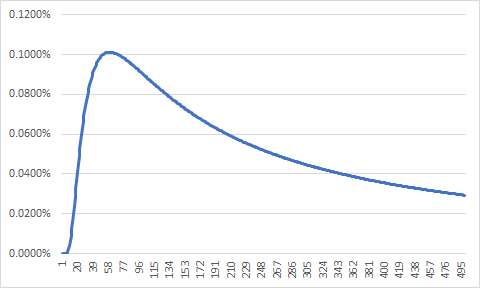
At 72 tiles the ship is only 2% less effective than at 60 tiles - so you will have a wide range of explorations you can do at almost ideal conditions.
Why do I mention 72 tiles specifically? Here comes my pro-tip: At 72 tiles the ship will be busy for 24 hours - so if you play once a day and always at about the same time, this will be the distance that will allow you to keep your ships busy 24/7 - without the need to have a bot helping you.
How does the Explorer II compare to the Explorer I in terms of effectiveness?
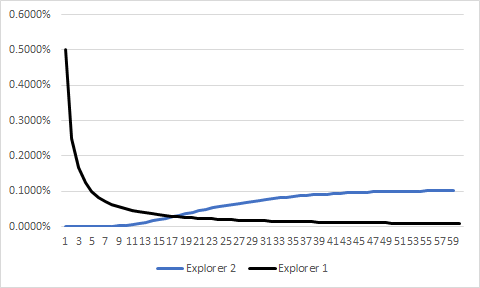
Explorer I is much more efficient at low distances. However, due to the fix probability of 1%, the effectiveness of the explorer I decreases quickly. The effectiveness of the Explore 2 beats the effectiveness of the Explorer 1 at distances greater than 17. However, I would not use the Explorer 2 at these distances as it is much more effective at higher distances. At its sweet spot, the Explorer II reaches the same effectiveness as the Explorer 1 at a distance of 5 tiles.
What does it take to build the Explorer II
The Explorer II is more expensive than the Explorer I - which is only fair given its superior performance. The ship costs 3,071 Coal, 1,537 Ore, 768 Copper and 461 Uranium to build and requires a shipyard skill of level 14. In Uranium equivalents, this is about 6.5x as expensive as the Explorer I. Is it really worth the high price? I think the answer is a clear yes:
Firstly, to find a planet with Explorer I you will need on average 100 explorations. If you start off fresh and no neighbor has explored anything in the area around you, 100 explorations will on average require a distance of 3.8 tiles.
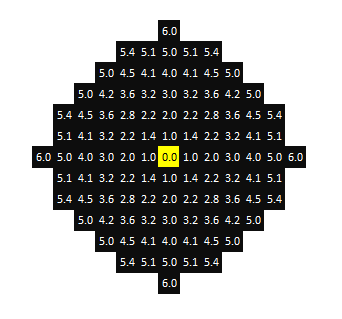
However, even without facing neighbors, the second planet will on average already require a longer average exploration distance. Assuming that you find a planet with your 100th exploration and then again with your 200th exploration mission with Explorer I, the second planet will on average require on average almost 5 tiles of distance. bringing in competing nieghbors etc, things are not getting any better.
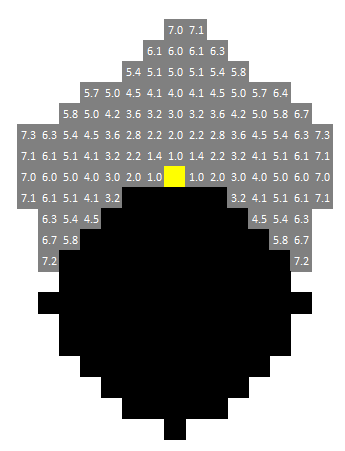
At a 5 tile difference, Explorer 2 is about as effective as an explorer 1, so if you are lucky and you have spawned at the edge of the ring with no neighbors in one direction, you might argue that it is cheaper and equally effective to spend your money on Explorer 1 ships instead of Explorer 2. However, there is one more argument you should take into consideration - the loss ratio.
While the loss ratio is 5% for each exploration for both ships, you will need fewer explorations at the sweet spot of Explorer II than for Explorer I. At 60 tiles distance Explorer II has a likelihood to find a planet of 2.0% versus 1.0% for the Explorer I - so you will need on average double as many ships to find a planet when using Explorer I.
More important than the actual costs are however inmost cases the opportunity costs. At distances above 5 tiles you will on average find a new planet much quicker with the Explorer II - the extra time of production from the new planet will in most cases make up the higher resources very quickly.
What Depot levels does it need to be able to store enough resources to build explorer 2?
In order to be able to produce and store enough resources to produce Explorer II, you need all depots at level 13, except for the Uranium depot which requires level 16. I would argue that a player who has successfully managed to increase the Explorer skill to level 20 and Shipyard skill to level 14 should not have any problems to reach level 13 for their depots. Level 16 for uranium is a little bit more difficult, but should be also withing range.
Conclusion
If you start exploring, Explorer I will be just fine for the players. It is cheaper and more effective at low distances. However, once exploration distances go beyond 5 tiles, Explorer II is more effective to use assuming that mission control limits your number of explorations you can do. You should ideally go for an exploration distance of 45 to 75 tiles in distance, as this is the distance with the highest effectiveness of the ship. Shoot for an area which is free of any neighbors and use the new planet once found to start again the short range with Explorer 1 ships.
Hope that helps, good luck with your missions ( I know, luck plays an important role) and I am more than happy for any feedback!
All the best,
Tim
How do you make an entire post about the explorer 2 (and a very good, detailed one at that) but fail to mention that it is only available for purchase with steem? That is one of the largest notable things about it and that fact puts it out of reach for a decent sized chunk of the player base.
I have made an analysis of how to use the ship efficiently and not a factsheet about the ship. The fact that you need to buy the blueprint is not new and would not have added any value to this post. But this is just my view, you are of course welcome to see this differently.
I think you did a very good job with the post. You did list all the other facts of the ship (cost, speed, etc.) just felt like you left out that one important fact :)
thanks for clarify the effectiveness of the exp II :)
Welcome rivalzzz
Really excellent insights and good explanations. I read the post about the Explorer II but struggled a bit to understand its advantages. Your putting it side-by-side with the Explorer I, along with the graphs helped me see the bigger picture. If I hopefully have a chance to grab one of these blueprints, I'll definitely be coming back to read this article again! Thanks for the information Tim, and for the great job the @nexcolony team is doing to nicely pace this unique gaming experience!
Thank you for the feedback and good luck with your explorations.
thanks you @rondras for this effective analysis of this long shot ship !!
You’re welcome!
What does it take to build the Explorer II? - hell-of-a-lot. One need to large enough depot, or loot from other planets. :)
Hi Joe,
there is actually a paragraph on this in the article as well. You will find it towards the end of the article.
Tim
Yes and you did. Thanks.
Thanks for the explanations ;-)
you're welcome
Hey, do You fly too?
Only Explorers I, I don't want to spend money for the game.
Great article and approach to the hourly efficiency compared to the explorer 1. The problem I see is that the chance of getting lost still far outweighs the chance of finding a planet with the Explorer II in the 60-70 tile range., but that can be limited by going on much longer runs (say 200-400). At what range does the overall resource cost of losing ships outweigh the time burden of making new ships to explore?
Thank you so much for participating in the Partiko Delegation Plan Round 1! We really appreciate your support! As part of the delegation benefits, we just gave you a 3.00% upvote! Together, let’s change the world!
Congratulations @rondras! You have completed the following achievement on the Steem blockchain and have been rewarded with new badge(s) :
You can view your badges on your Steem Board and compare to others on the Steem Ranking
If you no longer want to receive notifications, reply to this comment with the word
STOPTo support your work, I also upvoted your post!
Vote for @Steemitboard as a witness to get one more award and increased upvotes!