Sewing a Chubby Pleated Shoulder Bag [ENG-IND]
Hi my dearest friends,
Yippiiii...It’s Monday. Is everyone as excited as I am when it is Monday because it is time for #needleworkmonday? This Monday is special because I cannot wait to know who wins the giveaway organized by @crosheille and @crystalize last week.
Halo semua...Yeay, sudah hari Senin lagi. Ada yang merasa senang sekali kalau hari Senin karena #needleworkmonday? Senin ini spesial karena akan ada pengumuman siapa pemenang giveaway yang diadakan @crosheille dan @crystalize minggu lalu.
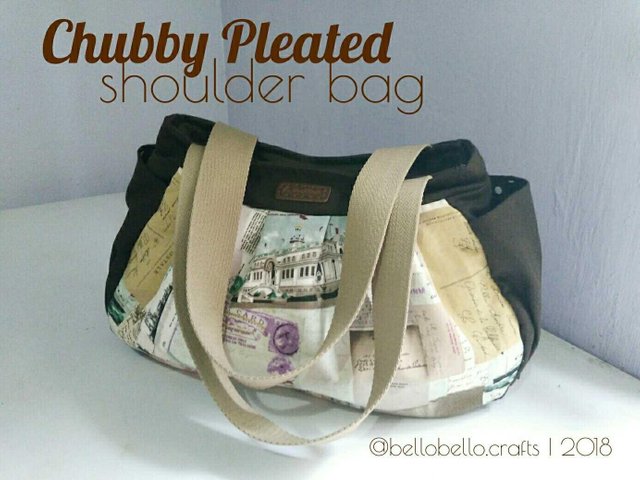
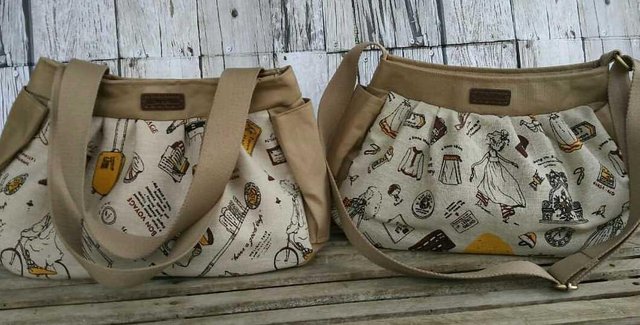
While waiting for the announcement, I’d like to write about my very recent sewing project, a chubby pleated shoulder bag. This is a recent order from one of my loyal customers. The model of the bag is not originally mine. Last year, I bought a Taiwanese book titled My Multiuse Bag because I fell in love with this bag model.
Sembari menunggu pengumuman, saya ingin cerita tentang jejahitan saya yang paling baru yaitu tas pundak yang berlipit dan gendut. Ini adalah pesanan dari salah satu pelanggan setia saya. Model aslinya bukan punya saya karena saya mengambil dari buku Taiwan berjudul My Multiuse Bag yang saya beli karena jatuh cinta dengan model tas lipit ini.
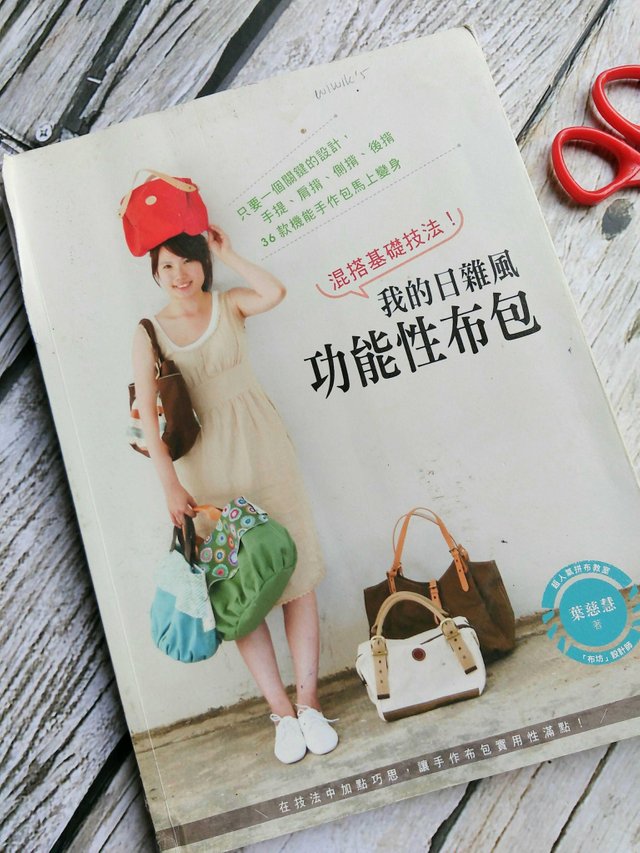
I once wrote a short review about this book which you can read HERE.
Saya pernah menulis review singkat tentang buku ini dan bisa dibaca DI SINI.
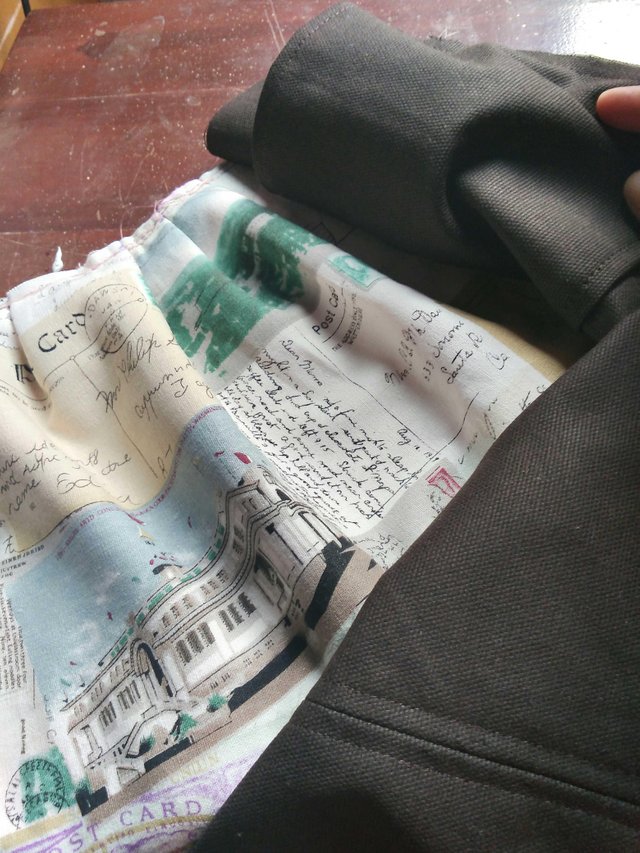
First of all, I worked on the pleated part. If we look at the tutorial, it looks easy to make it. But when I gave it a try, I started to learn the obstacles. Making the pleats is not easy because mine is thick as I give an interfacing (felt) to some part of the body of the bag to add a little volume to the bag.
Pertama- tama, saya mengerjakan bagian yang ada lipitnya. Jika kita lihat tutorialnya, keliatan mudah membuatnya. Tapi ketika saya coba sendiri, saya baru tahu ternyata ada tantangannya. Membuat lipit itu tidak mudah karena kain saya tebal sebab saya menambahkan pelapis kain flanel untuk memberi volume pada tas.
Once I was done with these parts, I combined them with gusset. If you wonder what gusset is, it is basically the part that makes the sides and bottom of the bag. Sewing a gusset to a round base bag like this is not easy as sometimes the length of the gusset does not precisely match with the body of the bag.
Setelah selesai mengerjakan bagian lipitnya, saya lalu menggabungkan dengan bagian guset. Kalau teman-teman tidak tahu apa itu guset, pada dasarnya adalah bagian yang merupakan sisi samping dan bawah tas. Menjahit guset pada badan tas yang agak bulat ini juga tak mudah karena karang-kadang panjang guset dan badan tas tidak pas.
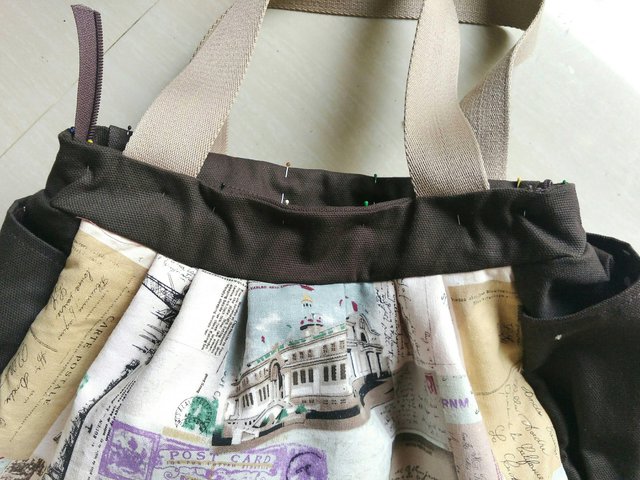
Next is to add the upper part of the bag like this.
Selanjutnya adalah menambahkan bagian atas tas seperti ini.
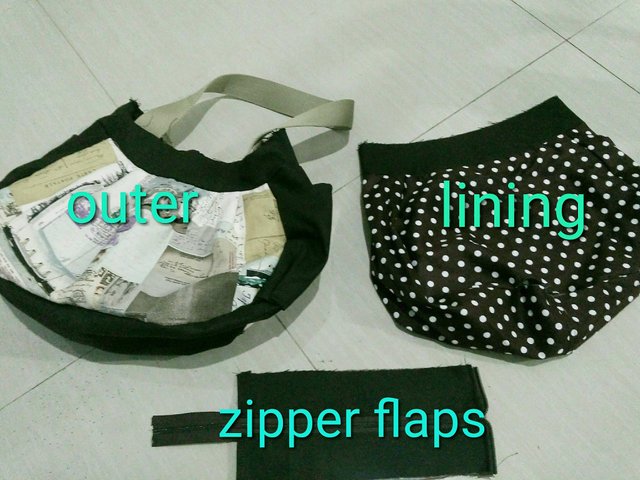
The bag consists of 3 parts: the outer , the lining, and the zipper flaps. Once I finished them all, I combined them by stitching at the mouth of the bag.
Tas ini terdiri dari 3 bagian: bagian luar, puring, dan lidah rits. Setelah saya menyelesaikan semua bagian itu, saya menyatukan dengan cara menjahit di bagian mulut tas.
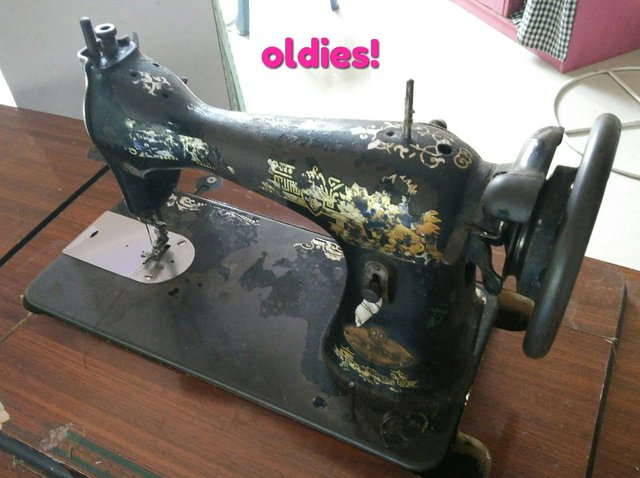
The following step is to turn the bag inside out aaaand....finally the most dreadful part: topstitching! Topstiching is always a challenge to me because I have to deal with so many layers of fabrics which makes the materials very thick. My humble portable sewing machine never manages to do it. The needle will not move when it touches the surface of the fabrics. So I have to use my other sewing machine! Take a look at this. OMG, can you believe I still use the machine from ancient times? Hahahah....well, yes, it is very old, but a badass machine :D :D. I think I need a high speed sewing machine to deal with thick materials. Hmm, I think I have to wait for the steem/SBD price to soar again to afford such machine. Fingers crossed!
Langkah berikutnya adalah membalik tas daaaan.....tibalah saat yang paling mendebarkan yaitu menjahit tindas mulut tas! Menjahit tindas itu adalah tantangan tersendiri buat saya karena umumnya material yang dijahit tebal karena ada berlapis-lapis kain. Mesin jahit portabel saya yang sederhana tidak sanggup mengatasinya. Jarumnya langsung tidak bisa bergerak begitu menyentuh permukaan kain. Jadi saya harus beralih ke mesin saya yang lain. Lihatlah ini. Ya ampun! Percaya tidak saya masih pakai mesin dari jaman kuno ini? Hahahah, iya, mesinnya sangat tua, tapi bandel :D :D. Saya berpikir saya sudah harus membeli mesin high speed karena selalu menjahit bahan yang tebal. Hmm...tapi saya harus menunggu harga steem/SBD membubung tinggi. Semoga!

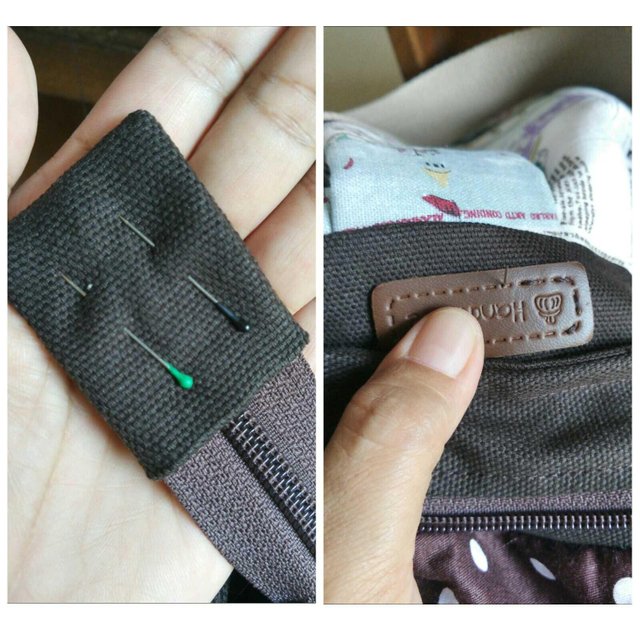
Being able to finish topstitching is very relieving. Seriously. After that, I just needed to sew the handmade label and the zipper end. I always like this part because it means, the bag is finished!
Bisa menyelesaikan jahit tindas itu sangat melegakan. Betul deh. Setelah itu, saya hanya perlu menjahit label handmade dan ujung rits. Saya selalu suka bagian ini karena artinya, tasnya sudah jadi!
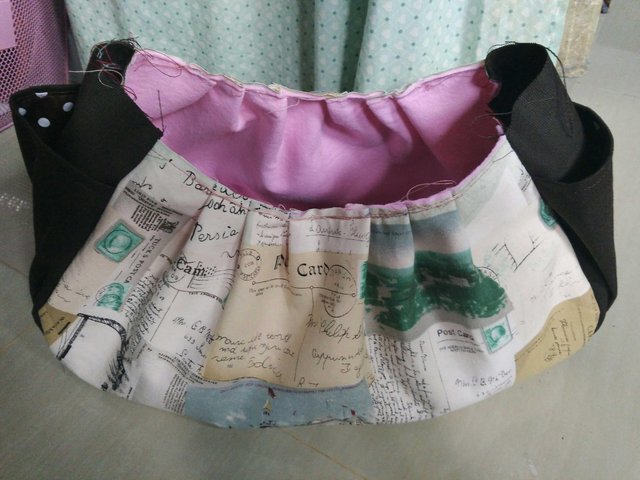
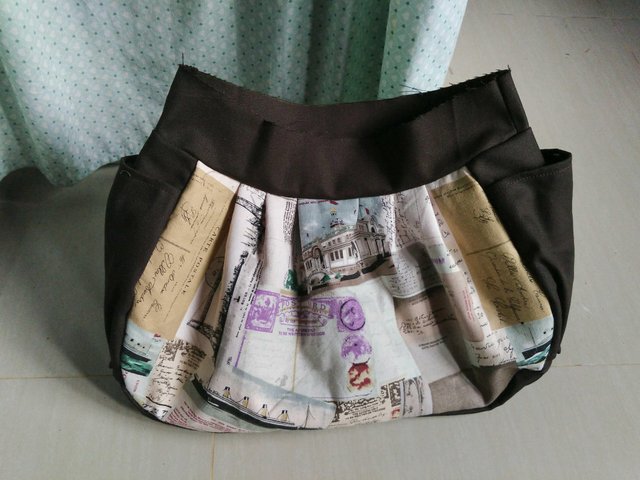
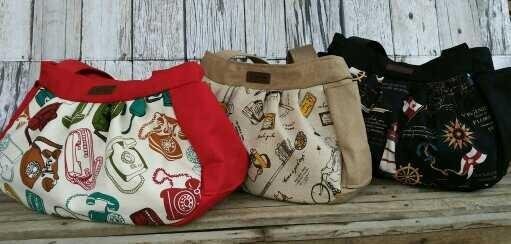
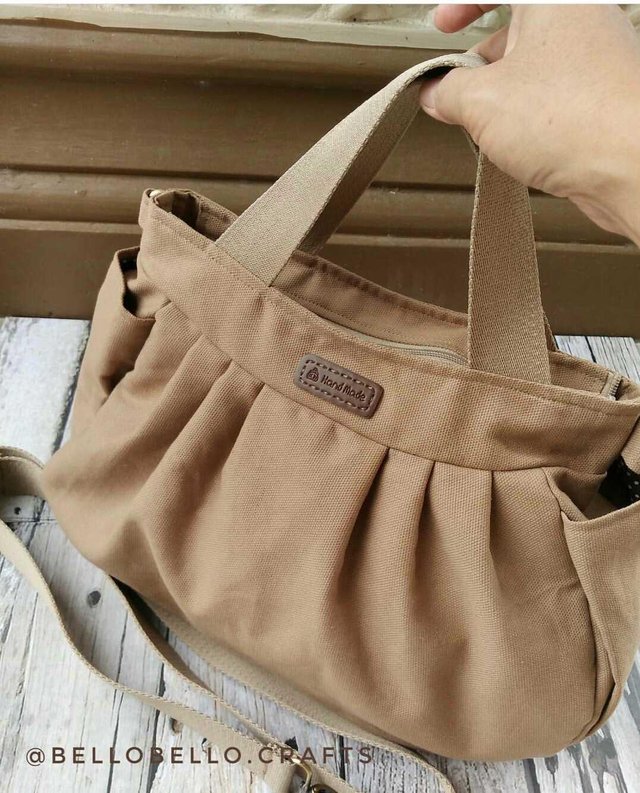
I particularly like the shape of the bag because when the bag is filled with lots of stuff, it looks chubby. The pleats and gusset apparently gives so much room inside even though the bag does not look big. In addition, the bag has two pockets at the side of the bag.
Saya sangat suka bentuk tas ini karena saat diisi penuh, terlihat gendut. Ternyata lipit dan guset membuat tasnya mampu menampung banyak barang meski bentuk tas kelihatannya kecil. Selain itu, tasnya punya dua kantong di sisinya.

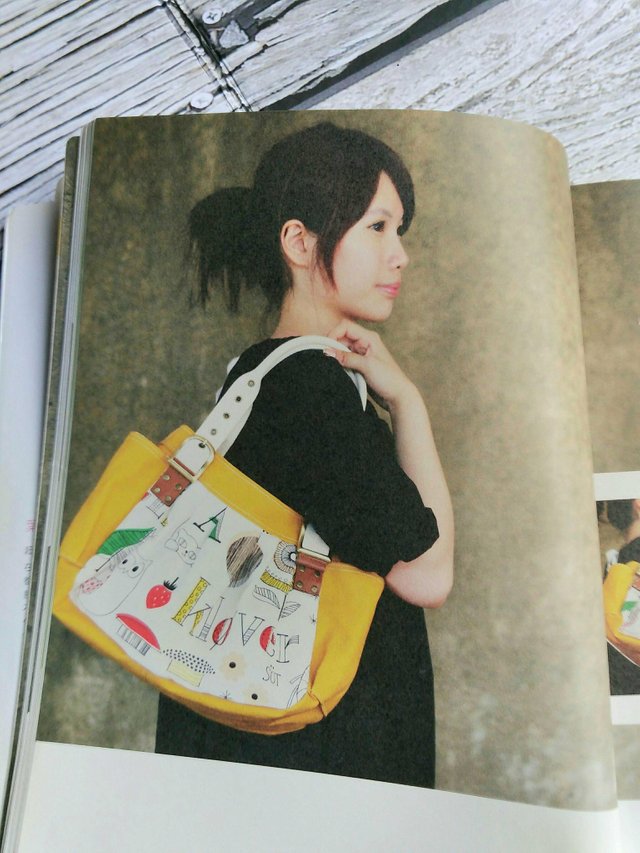
Using the pattern from the book, I have made a lot of bags of this model with a variety of handles. Some are shoulder bags, some are handbags, and some people prefer to have cross body bag.
Menggunakan pola dari buku, saya sudah membuat banyak tas dengan model ini dengan variasi tali. Ada yang tali pundak, tali jinjing, ada juga yang slempang.
Okay, that would be all for now. Thanks for stopping by and reading this post. Happy #needleworkmonday, folks!
Oke, itu saja cerita saya untuk saat ini. Terima kasih sudah singgah dan membaca tulisan ini.
Keren banget.... semoga sukses selalu Mbak @horazwiwik.
makasih ya mbak @tatimaryati.. doa yang sama ya, semoga sukses utk mbak :)
Wow! Your bag looks so professional, I would never have guessed you made it yourself. You did such a great job.
Thanks a lot @thriftymum, I still need a lot of practices as I am an amateur bagmaker :D
I am so liking all your bags , they all look pretty nice and lovely, the book you learnt from , I can't read the language but hopefully I could also see something about it on YouTube.
Also that machine lol! Its the exact kind I have, I newly bought it, its not up to a year. Yeah, its a pretty bad ass machine. Nice work @horazwiwik
Thank you very much @wondermaey! You know, I can't read the languange of the book either, but the good thing about craft book from Taiwan is, the tutorial uses real photos and the steps are pretty clear to me. It is different from most of Japanese craft books which do not use real photos.
You do have the exact kind of machine? Hahaha, I thought I am the only one who still has such machine :D
Wow @horazwiwik Your bags and choice of fabrics are truly great !
Is that a manual sewing machine in your photo ? What you're probably looking for is an industrial machine to go through all those thick fabrics.
My personal dream is to have a 'coverstitch' machine to make nice hemming on knit fabrics (swoon... one day...) 🌺
Thanks a lot @cryptocariad. You are right, I need an industrial machine to beat those layers of fabrics. When I bought my current portable sewing machine, I never imagined I would sew bags, so I did not think of buying an industrial machine at that time.
Let's keep praying our dreams will come true!
I love your choice of 'postcard' material, it looks really elegant and I'd imagine, would match all sorts of clothes.
I've never had a handbag of this shape, but it looks like a very elegant and practical one, a hard match to find :D
Well done!
Thanks for your lovely comment, @vliet! I agree, the neutral tone of the bag makes it easier to match with all kinds of clothes.
Happy NeedleWorkMonday! I 😍😍😍 your bags @horazwiwik! The pockets, the shape, the fabric, the handles, the size, the color combination, everything! How long does it take for you to finish one bag?
Thanks a lot, @marblely! It took me like 4 or 5 days to finish it. It is quite a long time because I can only work on this project when my baby naps :)
Having just fought with flannel quilt binding this week, I can absolutely appreciate the difficulty of sewing through thick/multiple layers of fabric. I need a machine like your old one! Love it!!
Those bags are so pretty! I actually especially like the solid tan one!
Many thanks, @mtnmeadowmomma! Sometimes it is frustating to deal with thick fabrics. I think it is time for me to have an industrial sewing machine :)
Aha, me too, I like the solid tan one better :)
Great work, the bags look really professional!
This post was shared in the Curation Collective Discord community for curators, and upvoted and resteemed by the @c-squared community account after manual review.
Thank you very much, @c-squared!
Hi @horazwiwik. I loved the bags. Very nice fabrics, and your explanation quite clear. I have always wanted a bag made by me, I will try in the future to make one with the idea you bring me today. Greetings.
Hi @jicrochet, thanks for your lovely comment. Yes, you should try to make a bag for yourself. You will be proud to wear something that you make with your own hands :)
Tas lebaran ya kak.. hehe
hahah, bukan, ini tas pesanan orang :)