Source: Photo taken by the author @fabianaporteles on a cell phone and edited in the FotoCollage application
This article will consist of 2 parts, the first in English, which will be done with the support of a translator and the second part in Spanish, which corresponds to the original text.
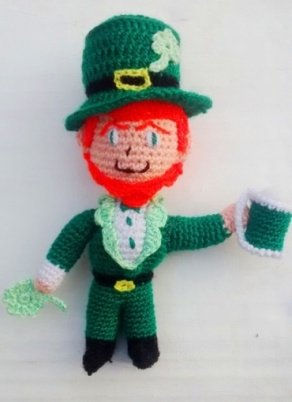
I made this amigurumi of leprechaun to participate in the contest of the
St-Patrick's Day
of @foxyspirit. The leprechaun seemed ideal to me as it has a hat, a clover, a beer, a green jacket, a belt with its yellow buckle and is a great representation of St-Patrick's Day. I'm from Venezuela and St-Patrick's Day is not celebrated here, so the first thing I did was to search in Google images related to this day, and I got many images, but the one I liked was the next image of leprechaun:
I started weaving approximately at the age of 7, so for me weaving is an art and a fascination, I simply take the thread and needle to weave and mold everything I want to do, I can turn any object into a woven piece. I rarely use patterns, for me it is easier to weave spontaneously, giving it the shape and size as I weave, so I do not usually count the number of stitches or turns woven. In my previous publication of the woven clock I had to make the piece twice, the first spontaneously without counting points, and the second taking the woven piece to a pattern, in order to count the number of points and the number of woven rounds. For this publication, due to the short time I have due to the closing date of the contest, I only knitted the piece once and the way I know how to do it spontaneously, giving shape and size to the piece as I weave, I did not have time to make a second piece to count the number of points and rounds, so in each part of the pieces I will describe what I did.
For the design of the leprechaun, I took as a guide the image of Google, however this pattern is designed by me, using my creativity and my ability to weave.
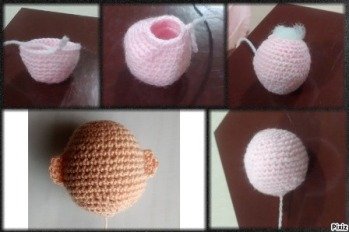
, for this we weave a sphere and then we incorporate the ears. To start the sphere we weave single crochet inside a magic ring, then we increase the points in each turn until we reach the half of the sphere, then we decrease the points until we close the sphere and fill it with wadding as seen in the following image. In the image there is a difference in color because I didn't have skin color crochet thread and I started to weave the head with pink wool, and I took the photos step by step, then my sister @xeliram gave me a little bit of skin color crochet thread and I made the head again, but I made it so fast that I forgot to take a picture of the procedure again.
Source: Photo taken by the author @fabianaporteles on a cell phone and edited in the FotoCollage application
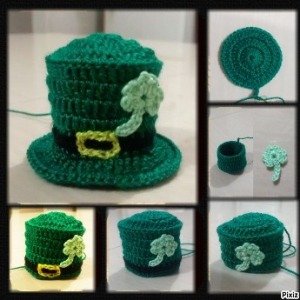
Then we weave
the hat
of green color Christmas, we begin weaving double crochet inside a magic ring and we give 3 flights to realize the base of the hat, then we give height to the sobrero weaving 4 turns of double crochet in green color Christmas, later we sew the clover of 3 leaves previously woven in green light color, later we continue giving 1 turn of double crochet in black color and another turn of single crochet in green color Christmas, once in this part we proceed to make the belt with yellow crochet thread, which we weave with sliding point. And to finish the hat we weave 2 turns of double crochet in color green Christmas.
Source: Photo taken by the author @fabianaporteles on a cell phone and edited in the FotoCollage application
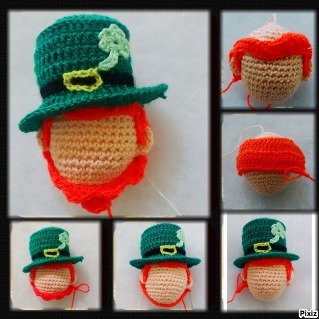
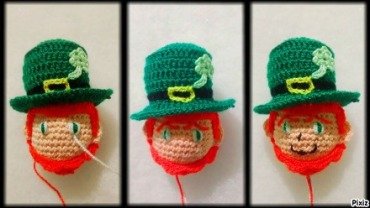
Hair and beard
processing: We first weave the front of the hair as seen in the image combining: double crochet and single crochet, then we weave the back giving 4 turns of double crochet, just in this part we proceed to sew the hat already woven previously, and finally we weave the beard, making a chain that crosses the face from one end to the other, then on the chain we weave a combined and repetitive: 1 single crochet, 2 double crochet, 1 single crochet and 1 sliding point to give the waved form to the beard as seen in the image below.
Source: Photo taken by the author @fabianaporteles on a cell phone and edited in the FotoCollage application
The elaboration of
the face
: we sew the eyes with crochet thread white and green, then we sew the eyebrows with crochet thread orange, and finally we make the nose and mouth with crochet thread black.
Source: Photo taken by the author @fabianaporteles on a cell phone and edited in the FotoCollage application
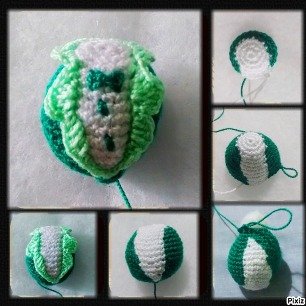
Second part: elaboration of the body (belly)
For the elaboration of
the belly
a sphere with single crochet is woven, combining the white color with the Christmas green as it is seen in the image of below, then it is woven between the white color and the green Christmas, double crochet and single crochet in light green color to make the neck of the jacket; and finally it is sewn in thread crochet green Christmas the two buttons and the tie.
Source: Photo taken by the author @fabianaporteles on a cell phone and edited in the FotoCollage application
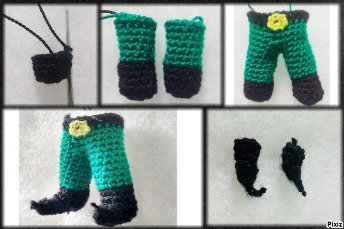
Third part: elaboration of pants and shoes
To knit the
shoes and pants
, one begins to single crochet inside a magic ring in black crochet thread, after having the height of the shoes one continues to knit with Christmas green crochet thread until having the height of the legs, then one joins the two legs knitting several turns of single crochet in green color and finally one makes the last turn in high knit stitch with black crochet thread to make the belt, where one makes the detail of the buckle with yellow crochet thread in sliding stitch. Then the detail of the shoes is made weaving a pointed cone and proceeds to sew in the black turn woven in the elaboration of the legs.
Source: Photo taken by the author @fabianaporteles on a cell phone and edited in the FotoCollage application
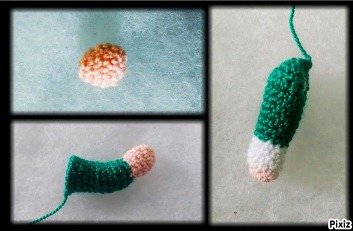
Fourth part: elaboration of hands and arms
To make
the hands and arms
, it is woven with crochet thread skin color, single crochet inside a magic ring until you get the height of the hand, then woven the following turns in green crochet thread until you get the height of the arm. In the image has a detail in white because I finished the thread crochet skin color.
Source: Photo taken by the author @fabianaporteles on a cell phone and edited in the FotoCollage application
Part five: Manufacture of accessories
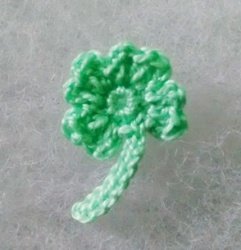
The clover of 4 leaves
is woven in crochet thread light green color. The four-leaf clover was chosen because it is recognized as the lucky clover. It begins weaving 8 single crochet inside a magic ring, then in the following round two chains are woven to make a double crochet followed by a knit stitch in the same hole, and in the next hole is woven a double crochet followed by two chains, then makes a point slipped in the same point and this is repeated 4 times to make the 4 leaves of the clover. The author @fabianaporteles chose the four-leaf clover for luck and to win the St-Patrick's Day contest.
Source: Photo taken by the author @fabianaporteles on a cell phone
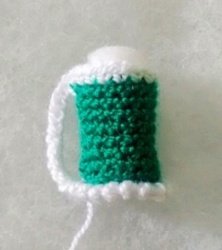
The beer
was brewed, first weaving a circular base in crochet thread green Christmas, then the height of the glass is made in crochet thread green Christmas, where it is given a cylindrical shape and finally is woven the ear of the glass and the edge both above and below in crochet thread white. All the weaving is done with single crochet.
Source: Photo taken by the author @fabianaporteles on a cell phone
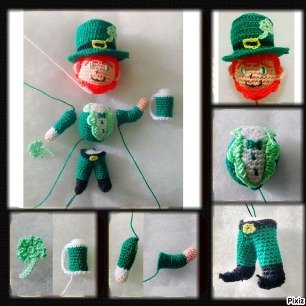
Sixth part: assembly of the pieces to build the leprechaun of St-Patrick's Day.
Each piece is left with a strip of crochet thread to be used when sewing and joining the piece. All the pieces (head, body, legs, arms and accessories) are joined together to form
the leprechaun of St-Patrick's Day
as seen in the image below.
Source: Photo taken by the author @fabianaporteles on a cell phone and edited in the FotoCollage application
If you like it give UPVOTE, COMENTA and RESTEEM... Thank you.
I am Marilyn Porteles, mother, wife, industrial engineer, teacher in Mathematics and I like weaving and swimming.
Este artículo constará de dos partes, la primera en inglés, que se realizará con el apoyo de un traductor y la segunda en español, que corresponde al texto original.
Realice este amigurumi de duende para participar en el concurso del
Día de San Patricio
de @foxyspirit. Me pareció ideal ya que tiene un sombrero, un trébol, una cerveza, una chaqueta verde, un cinturón con su hebilla amarilla y es una gran representación del día de San Patricio. Yo soy de Venezuela y aquí no se celebra el día de San Patricio, así que lo primero que hice fue buscar en Google imágenes referentes a este día, y conseguí muchas imágenes, pero la que me gusto fue la siguiente imagen de duende:
Yo empecé a tejer aproximadamente a los 7 años, por lo que para mi tejer es un arte y una fascinación, simplemente tomo el hilo y la aguja de tejer y moldeo todo lo que quiero hacer, puedo convertir cualquier objeto en una pieza tejida. Rara vez uso patrones, para mi es más sencillo tejer de manera espontanea, dándole la forma y tamaño a medida que voy tejiendo, por lo que no acostumbro a contar número de puntos o de vueltas tejidas. En mi publicación anterior del reloj tejido tuve que elaborar la pieza 2 veces, la primera de manera espontanea sin contar puntos, y la segunda llevando la pieza tejida a un patrón, para poder contabilizar número de puntos y de vueltas tejidas. Para esta publicación por el corto tiempo que tengo debido a la fecha de cierre del concurso solo tejí la pieza una vez y de la forma que lo sé hacer de manera espontanea, dándole forma y tamaño a la pieza a medida que voy tejiendo, no tuve tiempo de hacer una segunda pieza para contar número de puntos y vueltas, por lo que en cada parte de la piezas describiré lo que hice.
Para el diseño del duende, tome como guía la imagen de Google, sin embargo dicho patrón es diseñado por mí, utilizando mi creatividad y mi habilidad para el tejido.
Materiales
Hilo crochet (color verde navidad, verde claro, blanco, negro, amarillo, naranja y color piel)
Aguja de tejer (1.45mm o 3)
Tijera
Aguja para coser crochet
Guata
Primera parte: la cabeza
Elaboramos primero
la cabeza
, para ello tejemos una esfera y luego le incorporamos las orejas. Para empezar la esfera tejemos medio punto dentro de un anillo mágico, luego vamos aumentando los puntos en cada vuelta hasta llegar a la mitad de la esfera, luego vamos disminuyendo puntos hasta cerrar la esfera y la rellenamos con guata como se ve en la imagen siguiente. En la imagen hay una diferencia de color debido a que no tenía hilo crochet color piel y empecé a tejer la cabeza con lana color rosado, y tome las fotos paso a paso, luego mi hermana @xeliram me regalo un poquito de hilo crochet color piel e hice la cabeza nuevamente; pero la hice tan rápido que olvide tomar foto del procedimiento de nuevo.
Fuente: foto tomada por la autora @fabianaporteles en un celular y editada en la aplicación FotoCollage
Luego tejemos
el sombrero
de color verde navidad, comenzamos tejiendo vareta dentro de un anillo mágico y damos 3 vuelas para realizar la base del sombrero, luego le damos altura al sobrero tejiendo 4 vueltas de vareta en color verde navidad, para luego coserle el trébol de 3 hojas tejido previamente en color verde claro, después continuamos dando 1 vuelta de vareta en color negro y otra vuelta de medio punto, una vez en esta parte procedemos hacer el cinturón con hilo crochet amarillo, el cual tejemos con punto deslizado. Y para finalizar el sombrero tejemos 2 vueltas de vareta color verde navidad.
Fuente: foto tomada por la autora @fabianaporteles en un celular y editada en la aplicación FotoCollage
La elaboración del
cabello y la barba
: tejemos primero el frente del cabello como se ve en la imagen combinando varetas y medio punto, luego tejemos la parte de atrás dando 4 vueltas de varetas; justo en esta parte procedemos a coser el sombrero ya tejido previamente; y por ultimo tejemos la barba, haciendo una cadeneta que atraviesa la cara de un extremo al otro, después sobre la cadeneta tejemos de forma combinada y repetitiva, 1 medio punto, 2 pilares, 1 medio punto y 1 punto deslizado para darle la forma ondulada a la barba como se ve en la imagen de abajo.
Fuente: foto tomada por la autora @fabianaporteles en un celular y editada en la aplicación FotoCollage
La elaboración de
la cara
: cosemos los ojos con hilo crochet color blanco y verde, luego cosemos las cejas con hilo crochet color naranja, y por ultimo hacemos la nariz y la boca con hilo crochet color negro.
Fuente: foto tomada por la autora @fabianaporteles en un celular y editada en la aplicación FotoCollage
Segunda parte: elaboración de la barriga
Para la elaboración de
la barriga
se teje una esfera con medio punto, combinando el color blanco con el verde navidad como se ve en la imagen de abajo, luego se tejer entre el color blanco y el verde navidad, varetas y medio punto en color verde claro para hacer el cuello de la chaqueta; y por último se cose en hilo crochet verde navidad los dos botones y el lazo.
Fuente: foto tomada por la autora @fabianaporteles en un celular y editada en la aplicación FotoCollage
Tercera parte: elaboración de los pantalones y zapatos
Para tejer
los zapatos y el pantalón
, se comienza a tejer medio punto dentro de un anillo mágico en hilo crochet color negro, luego de tener la altura de los zapatos se continúa tejiendo con hilo crochet color verde navidad hasta tener la altura de las piernas, luego se une las dos piernas tejiendo varias vueltas de medio punto en color verde y por último se hace la última vuelta en medio punto alto con hilo crochet negro para hacer el cinturón, donde se hace el detalle de la hebilla con hilo crochet color amarillo en punto deslizante. Luego se hace el detalle de los zapatos tejiendo un cono puntiagudo y cosiéndolo al tramo negro tejido al inicio de los pantalones.
Fuente: foto tomada por la autora @fabianaporteles en un celular y editada en la aplicación FotoCollage
Cuarta parte: elaboración de brazos y manos
Para elaborar
las manos y brazos
, se teje con hilo crochet color piel, medio punto dentro de un anillo mágico hasta conseguir la altura de la mano, luego se teje las siguientes vueltas en hilo crochet verde hasta conseguir la altura del brazo. En la imagen tiene un detalle en blanco debido a que se me termino el hilo crochet color piel.
Fuente: foto tomada por la autora @fabianaporteles en un celular y editada en la aplicación FotoCollage
Quinta parte: elaboración de accesorios
Se teje
el trebol de 4 hojas
en hilo crochet color verde claro. Se escogió el trébol de 4 hojas ya que es reconocido como el trébol de la suerte. Se comienza tejiendo 8 medio punto dentro de un anillo mágico, luego en la siguiente vuelta se teje dos cadeneras para realizar una vareta seguido de un medio punto alto en el mismo hueco, y en el siguiente hueco se teje una vareta seguido de dos cadenetas, para luego hace un punto deslizado en el mismo punto y esto se repite 4 veces para realizar las 4 hojas del trébol. La autora @fabianaporteles escogió el trébol de 4 hojas para que le de suerte y poder ganar el concurso del Día de San Patricio.
Fuente: foto tomada por la autora @fabianaporteles en un celular
La cerveza
se realizo, tejiendo primero una base circular en hilo crochet color verde navidad, luego se realiza la altura del vaso en hilo crochet color verde navidad, donde se le da una forma cilíndrica y para finalizar se teje la oreja del vaso y el borde tanto de arriba como de abajo en hilo crochet color blanco.
Fuente: foto tomada por la autora @fabianaporteles en un celular
Sexta parte: ensamblaje de las piezas para construir el duende del Día de San Patricio
A cada pieza se le deja un tira de hilo crochet para luego utilizarla al momento de coser y unir la pieza. Se unen todas la piezas (cabeza, cuerpo, pantalón y zapatos, brazos y accesorios) para forma
el duende del Día de San Patricio
como se ve en la imagen de abajo
Fuente: foto tomada por la autora @fabianaporteles en un celular y editada en la aplicación FotoCollage
Las fotos fueron tomadas por la autora @fabianaporteles en un celular y editadas en: la aplicación de Fotocollage (https://es.pixiz.com/?q=collage), Microsoft Office Picture Manager y Paint.
I'm loving this guy. I agree with the other comment from Muscara, adding the beer mug. He is just adorable. The red hair and everything. It's perfect ^_^
What is pretty awesome is that you made it yourself without following a pattern. I know I wouldn't be able to. I mean I know how to make the spheres etc, it is certain details like the lapel of the coat would have me in questions.
Good job! Thank you for taking part in the contest :)


Love the little guy - especially the beer mug! Glad you showed us the different steps :)
Congratulations @fabianaporteles! You have completed the following achievement on the Steem blockchain and have been rewarded with new badge(s) :
Click here to view your Board
If you no longer want to receive notifications, reply to this comment with the word
STOPDo not miss the last post from @steemitboard:
Vote for @Steemitboard as a witness and get one more award and increased upvotes!
I'm loving this guy. I agree with the other comment from Muscara, adding the beer mug. He is just adorable. The red hair and everything. It's perfect ^_^
What is pretty awesome is that you made it yourself without following a pattern. I know I wouldn't be able to. I mean I know how to make the spheres etc, it is certain details like the lapel of the coat would have me in questions.
Good job! Thank you for taking part in the contest :)